As you can see, each tank has its own pros and cons during operation, which can affect the consumer’s choice. But, regardless of the type, in order to install drainage pits in a private house with your own hands, you first need to familiarize yourself with the requirements of SNiP. It is best to cut slate with a grinder. When performing such work, experienced craftsmen point the grinder in the direction opposite to the wind. In this case, the dust will be blown away from the cutting person. Since asbestos dust is dangerous to humans, it is necessary to protect yourself from it while working by wearing safety glasses over your eyes and covering your nose with a gauze bandage. Do not use a wood saw to cut slate. This is a traumatic job; one wrong move can cause you to lose your arm.
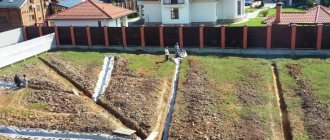
Choosing a place to install a drain pit. If we talk about such a design as a drainage pit for a bathhouse, then the need for it will arise only if on the site where the private house is located there is no central sewerage system, as well as a cesspool or septic tank where the drain could be connected. As for the functions of the drain pit, they are very simple - collecting water after washing in the bathhouse, effectively discharging it into the ground. This is what the place for the drain pit looks like. The design of the pit is very simple - it is one container with no bottom. Instead, a drainage layer is installed here, through which water will seep into the soil, purifying itself at the same time. A drain pipe must be connected to the pit, which is installed during the construction of the foundation. As for the volume of the pit, it will depend on the number of people for which the bathhouse is designed.
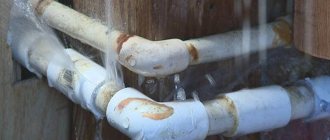
This is what the pipe supply to the drain pit looks like. Based on the information provided, you can understand that you can install a drain pit for a bathhouse with your own hands, without requiring a lot of time and effort.
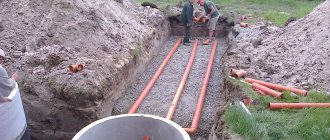
Even materials do not always need to be purchased. You can use available raw materials, even slate. The drain pipe ensures the drainage of wastewater from the bathhouse into the drainage pit. Moreover, its presence should be provided for at the stage of construction and design of the bathhouse. The pipe should exit at the bottom of the foundation. As for the connection of the pipe with the drainage pit, it must be straight - no fractures or bends, because in this case the drainage will be very poorly drained. You should also observe the slope of the pipe to ensure natural movement of water. The drain pipe installation work will look like this: Drain pipe installation and angle of inclination
- dig a trench of the required depth;
- arrange a cushion of crushed stone;
- lay the drain pipe, observing the slope;
- connect;
- check the tightness of the system;
- cover the pipe with soil.
In order to cope with this job, you do not need to have any special skills. Construction is quite simple and quick.
To give rigidity to the panels, a strut must be inserted between the frame boards. The pictures below show the front, rear and side shields. The parts of the frame boards protruding from the bottom of the boards are spikes, which, when installing the booth, are inserted into the grooves of the lower frame. Installation of the walls consists of sequential installation of the boards into the grooves of the bottom frame and fastening the frame boards of adjacent boards using cap screws (3-4 pieces per corner ). In essence, these cap screws perform the function of the upper frame, as they impart the necessary rigidity to the entire building. Before making a drainage hole, it is first more advisable to calculate its depth and diameter. The data obtained will help you correctly determine the design of the cleaning tank and extend the service life of the entire sewer system.
The roofing material is attached to the sheathing with roofing felt buttons at intervals of 15-20 cm. Dig a hole. As you probably already guessed, the pit should be rectangular, preferably square. To develop the soil you will need a shovel and a cart, as well as buckets. As for the depth of the pit, it’s up to you to decide. When the pit is ready, start organizing the metal frame. You need to weld a frame made of steel corners under the bottom of the pit. You will need two such frames. Afterwards, one of them must be laid at the bottom of the pit. The pipes must be welded at the corners of the lower frame, and then at the corners of the upper one. As a result, you will get a rectangular frame. At the next stage, you need to start arranging the walls of the well. Everything is simple here. The task is to cut the required number of pieces of flat slate, and then lower it into the hole, sewing up all sides of the rectangular frame. To fix the slate, you can use self-tapping screws. When ready, the space between the slate and the walls of the pit must be filled with soil and then compacted. Well, only then you need to make a lid. If the hole was made for installing a toilet, you need to start installing it.
Shelves in the cellar
Another way to use old slate was suggested by experienced summer residents and gardeners. To store supplies, they propose to build comfortable and durable shelves using slate, allowing you to organize a convenient storage system for existing supplies. The shelves are constructed as follows:
- In the corners of the pantry, brick racks are laid, the length of which should match the width of the slate sheet. The height of the racks is 90 cm.
- A sheet of slate is laid on the racks.
- Formwork is constructed around it.
- Reinforcement pipes are laid into the slate ribs.
- The solution is mixed as for a cement screed.
- A sheet of slate is poured with it; the layer of mortar should be 10 cm.
- The result should be monolithic concrete - a fairly strong, spacious shelf that can easily accommodate any container for storing vegetables and fruits.
If the cellar is large, such shelves can be placed around the perimeter, made short or long. Many will think that using boards in this case is easier than slate, but the use of the described material, as practice shows, helps to save significantly. In addition, the slate does not need to be removed from the formwork. It can be painted or whitewashed with lime. Then the shelves will look quite neat.
When calculating the size of a cesspool for a bathhouse, as well as a sewer system for a home, many factors must be taken into account in order to ensure maximum productivity of the structure. First you need to draw up a design for a sewage pit, choose what type it will be, and calculate the volume. In particular, you should pay attention to the following parameters: Wood, of course, is the most affordable and technologically advanced material, but if for other buildings (garage, outbuilding) it is planned to use an asbestos-cement slab (flat slate), then it is also suitable for a toilet booth.
The front pillars are made a few centimeters 10-15 cm longer to ensure the roof slope. A cesspool in a private house can have a different layout and design, and be made from various materials. There are several types of pits:
- designs without a bottom;
- septic tanks;
- sealed storage systems.
Schematic location of the cesspool and its system
Advantages of different types of structures
If we are talking about the simplicity and price of the design, then the optimal solution may be a storage system. But it has disadvantages, since waste will remain in it, it will fill up quickly, after which you will need to hire an expensive sewer truck for cleaning. Such a system is not suitable for houses with permanent residence, because due to significant costs, the water container will have to be cleaned every week. The design without a bottom is small in size. Its main advantages include:
- no need for constant cleaning;
- has small parameters.
However, waste will enter the soil and pollute it. A pit without a bottom is suitable for arranging a summer cottage where sewerage is not often used. With a daily water consumption of up to 1m3, the soil will clean itself on its own.
The third and most popular type of pit for private houses is a septic tank. The device can mechanically clean incoming wastewater. A septic tank can consist of one or more chambers, and its bottom is made of gravel, blocks, or broken bricks. The walls of the septic tank can be lined with brick or concrete. With this design, the soil will be less polluted, because first the waste will be cleaned through the stones. Such a cesspool would be the best option for a private home.
Key points in organizing a sewer system
When designing a cesspool, the main details should be taken into account:
- the container can be without a bottom or sealed with regular cleaning with a vacuum cleaner;
- the sewer container should be located at a safe distance from groundwater and buildings (outbuildings - from 3 m, residential buildings - from 5 m);
- it is necessary to provide convenient access for cleaning the container;
- the parameters of the sewer tank depend on the number of people living in the house (on average, about 0.5 m3 of water is discharged per person).
To prevent feces from entering the aquifer, the distance between the lower level of the sewer hole in the soil and the water source should not be less than 1 m.
location of the sewer hole
Based on the type of soil, the distance from the well or well to the drainage pit can be 20-50 m.
Types of designs
The design of the cesspool can be different...
I've built pits out of everything you can imagine. But the most common options were:
- The pit has no lining at all. It is almost never used in construction, as it can contaminate groundwater and soil. In addition, the soil from the walls crumbles during operation, so the useful volume of the structure is constantly decreasing.
- Tire pit. Car tires (old) are used as wall material. I know from experience that this design lasts about 30 years. There are two disadvantages here: the small volume of the container (if you do not use tires from a mining dump truck) and its leakage.
- Slate pit. I once built something like this. The design is very simple, leaky and ineffective. Suitable as a temporary measure until you build something more decent.
- Brick pit. The structure is strong, but short-lived. If waterproofing is poor, water from drains will penetrate into the thickness of the brick walls, which will quickly lead to their destruction.
- A pit made from ready-made containers. This is not exactly a hole, but rather a sealed large barrel that is buried in the ground. Sold in construction supermarkets. An excellent option if you don't mind the high price.
- Pit made of concrete rings. Robust and durable design option. I often built such pits, but here I couldn’t do it without the help of a crane. You will not lower the ring into the prepared pit on your own.
- Pit made of monolithic concrete. This option appeals to me the most. You can make such a design yourself, and I will talk about it below.
... but the best option is concrete.
Construction of sewerage from a plastic or metal container
Often homeowners choose large tanks as a cesspool.
An iron barrel can become a homemade chamber for feces. But metal is not capable of ensuring reliable and uninterrupted operation of the sewage system due to the instability of corrosion and rapid failure. After some time, the cesspool may need to be overhauled. location of the cesspool on the site The best solution for a cesspool would be a plastic container, the walls of which are protected from the action of organic waste entering inside. When digging a pit, the parameters of the plastic tank are taken into account. The bottom of the pit is strengthened with a sand-gravel cushion or concrete mortar. 24 hours after the preparatory work, you can install a container, on the side of which, in the area of freezing of the soil, an opening is made for supplying a drain pipeline. All joints are treated with sealant.
Due to the lack of drainage in such a sewer structure, it must be periodically cleaned with a vacuum cleaner.
Pipe installation
The autonomous sewer system of a private house includes a treatment facility, as well as a sewer pipeline. Proper installation of pipes is essential to ensure proper operation of the system. Pipes should be laid according to the following rules:
- you need to start their installation from the storage tank towards the parts of the internal sewage system of the house;
- the pipeline must be insulated to protect against freezing in cold weather. To do this, you can use the “sandwich” technology, wrapping the pipe with insulation made of specialized foamed polyethylene, onto which an asbestos-cement pipeline is then placed;
- pipes can be connected using couplings or welding;
- the number of turns should be minimized and pipe bends should be removed to avoid blockages;
- for gravity movement of wastewater, an optimal slope must be created;
- if it is necessary to design a pipe turn, a rotary sewer well is installed in this area from concrete rings.
Creation of a drainage system
With a properly calculated and created drainage system, the house is protected from water and there is no flooding of roads and vegetation. For cesspools with a bottom, open or closed drainage can be created. The first option is created from drainage ditches, which are filled with small stones or gravel. They ensure the drainage of wastewater to a receiving water source (swamp, river or lake). The second option is more durable; its design consists of trenches filled with sand or small crushed stone with laid drainage pipelines. Pipes drain groundwater or rainwater at a created slope.
- drainage pit without pumping;
- sealed tank;
- termite storage septic tank.
— good ventilation must be provided under the bathhouse building;
There are several options for cesspools. City property owners do not face such a question as installing a sewer system. The supply of water and its disposal after operation is carried out at the expense of housing utilities. But it is extremely difficult or even impossible to provide central sewerage to country houses and dachas. Therefore, residents often have to organize their own drainage system. This installation is not as complicated as it might seem at first glance. In this case, the most important thing is to know how to properly make a drainage hole, and what you will need for this.
Adviсe
- When more than five people use such a toilet, it is recommended to install forced ventilation.
- You should not leave the dry closet lid open after use.
- A large number of users can lead to excess fluid, so it is worth pre-equipping the drainage of fluid from the dry closet into the drainage system of the dacha.
- It is better to make the ventilation pipe longer - up to 4 meters.
- If you don’t want to carry a heavy, filled tank, it’s better not to wait until it’s full. Or take a model not only with handles, but also with wheels.
- To increase efficiency, it is better to use granulated peat mixtures. They are more expensive, but absorption increases 4 times.
- Do not send the contents of the bottom tank directly to the beds. It should ripen in a compost pit or container for six months to a year.
Choosing a place to install a drain pit
Many consumers making a drainage pit for the first time make a big mistake by not coordinating the design of the sewer system with the SES. Such an oversight subsequently leads to litigation from complaints from residents of neighboring areas. Such claims are related to the fact that if the sewer pit is located incorrectly, destruction of the foundation of a residential building and environmental pollution often occur. Therefore, in order to avoid such problems, the location of the storage pit must comply with the following regulatory requirements:
- The drainage hole is dug only within the personal plot;
- To avoid troubles, the distance from the pit to the dividing fence to the neighbor should be about 1 m;
- In order not to pollute the water, it is better to place the sewer pit at a distance of 20 m from the drinking source, and 10 m from the passing water supply;
- To avoid an unpleasant sewer smell, the distance of the pit from the house must be at least 5 m;
- If a private house is located at the lowest point of the plot, in order to avoid erosion of the foundation, the pit location should be 10 m from the house.
In addition, the consumer must provide such a distance from the cesspool to other buildings so that there is free access to it for a sewer truck. Important!
According to sanitary standards, the depth of the drainage pit must exceed the level of the drinking source. Otherwise, the drainage pit can contaminate the water source. So, having familiarized yourself with the distance at which the storage pit should be located, according to SNiP, you can begin to calculate it.
There is no point in describing the operating technology here. You just need to mix the required amount of solution and fill the formwork with it. In this case, the concrete must be carefully compacted so that there are no voids left inside the walls. A cesspool for a country toilet is a fairly simple design, but it has both its advantages and disadvantages. I will voice both the first and second ones for you.
To do this, I took the dimensions in advance, after which I made something like a box from OSB boards, which I installed in the future cesspool and secured in place so that it was the same distance from the external enclosing structure. Always requires the organization of a device for draining water. It is necessary to take care of the drain even before its construction begins. The drainage pit is the basis of the entire drainage system. The option of draining water with a drainage pit is very popular among summer residents. If there is a sewer line or ditch not far from the summer cottage, then making a hole will become impractical. In such cases, it makes sense to run drainage pipes to the sewer system and or ditch. It is strongly not recommended to make a drainage hole in areas of land with a high groundwater level, as this will not lead to any benefit, and the efforts will be wasted. Therefore, before you start building the bathhouse itself, there is no need to rush into preparing the drainage pit. If a drainage hole is still needed, then we begin construction. So, where to start? Like any other building - from design. Specialists in the field of engineering are not required here, but you need to make a few calculations. Answer the questions:
- How many people will visit the bathhouse?
- What are the characteristics of the land on the site?
- How high is the groundwater level?
It has already been said that when the groundwater level is high, it is better not to make a drainage hole. But how do you measure the level itself? The most accurate method is drilling a well. But not everyone has a drilling rig lying around in their garage. Take a closer look at areas where vegetation is not watered. If moisture-loving plants grow there, then there is definitely water in the soil. The vegetation is dense, which means the hole needs to be dug deeper. The volume of the cesspool will depend on how intensively the owners use the bathhouse. The more people are expected to visit the steam room and shower, the larger the volume of the pit will be required. If there is a deficiency, waste water may end up overflowing. Is the soil loose? Then you will need to strengthen its edges. If the soil is hard, then it’s a plus for time. Having determined all the characteristics of the land and the “productivity” of the future bathhouse, you can choose a place for the pit. Bathhouse construction experts advise digging a hole two meters from the walls of the bathhouse itself. Too far - then the required slope will not be provided and the water will stagnate.
Types of outdoor toilets
- A toilet with a simple pit cesspool. When the pit is full, the house is moved to another place, or cleaning can be done using vacuum trucks.
- The backlash closet also has a cesspool, but here it is sealed and can only be cleaned using a special machine.
- applicable where aquifers are located nearby. Here, instead of a pit, there is a container for collecting feces under the toilet seat. Filling with dry peat or sawdust after each use helps prevent the smell.
- Country toilets that use biological additives or chemicals can be installed both outdoors and in the house.
Making a toilet in the country with your own hands is not difficult. The main thing, when choosing its device, is to take into account the groundwater level under the site. If the water layers here are deeper than two and a half meters, then you can safely build a toilet of any design. Otherwise, a toilet with any cesspool may turn out to be a dangerous structure.
Trench preparation and excavation work
Where to put the excavated soil? If the soil is of good quality, sprinkle it on an area with vegetation. Stones, sand and clay for removal. We decided to equip the pit with brickwork, ceramic bricks are the way to go. Durable material that does not have “hydrophobia”. You can save on bricks by laying bricks edge up. You need to leave holes between the ends - this is an outlet for water. A simple and useful tip is to use natural stone so as not to spend money on bricks, it’s profitable. Is the masonry complete? Then we begin to form the bottom, a waterproof bottom! The same crushed stone and sand will serve as backfill. Construction waste is also suitable. It is better not to underestimate the bedding layer, at least 20 cm. The upper part of the masonry should exceed the ground level by 30-40 cm. Cover the pit with a concrete slab or metal sheet. If vehicles will pass along the site above the pit, then the thickness of the slab should be at least 30 cm If the soil does not absorb drain water well, then holes can be left in the slab so that when the pit overflows, drainage can be pumped out. Only this hole needs to be covered with something, otherwise you can accidentally fall into it. The strengthening is completed, all that remains is to fill its outer part with already dug soil (fill the unusable part of the hole with sand). In the place of the former pit, you can grow plants or create a passage.
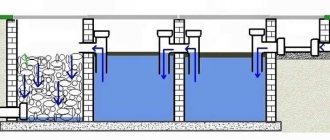
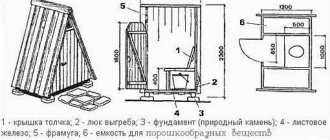
Bottom of the drain pit Septic tank structure (top view):
Construction of a cesspool.
In a place where there is life, as a rule, a certain amount of various waste appears. In view of this, problems arise: what to do with them, how to store them, where to put them? Where there is no sewage system, the simplest option is to collect them in a storage tank - a septic tank. At first I thought about building a cesspool, but after figuring it out, I immediately changed my mind. What attracted me to the cesspool was the simple structure of the pit, the speed of production, and the minimum of materials. But when I calculated the average filling of the cesspool, I was horrified. If we take on average: 3 people. * 200 lit. per day = 600 liters per day. (although 200 liters per person is not at all, think about it - using a sink, shower, toilet, washing dishes, washing machine,) 600 * 31 days is 18,600 liters. But I didn’t take into account the arrival of guests and relatives on weekends and holidays. Well, where to put this amount of sewage? It’s not difficult to try to make a deep hole and call a special vehicle for pumping once a month, or you can install a drainage pump and pump out the gray ones yourself water into the nearest ravine. But unfortunately, I don’t have a lot of money to call a sewer truck (and to be honest, I haven’t seen one in my neighborhood), and I also don’t have time to keep track of when the pit is filled. And cursing with my neighbors and environmentalists was also not part of my plans. So the conclusion is that a cesspool is not for me. Therefore, we decided to build a septic tank with our own hands. A septic tank is made for year-round use. On weekdays, the septic tank will be filled by 1-3 people, and on weekends by 3-10. It will drain from the kitchen, from the house, bathhouse, and summer kitchen. Beginning: from 70-80 cm - there is earth, then there is clay. GWL is more than 4 meters. However, I don’t know how deep. With this data, I began planning and calculating the septic tank. The calculation of a cesspool, like the calculation of a septic tank, is all very conditional, but for your peace of mind: 3 people are 200 liters, that is, 600 liters per day. Calculating a septic tank by volume essentially comes down to calculating the volume of sections 1 and 2 (3-chamber septic tank). The calculation is carried out knowing that the sewage drains are supposed to be in the first section of the septic tank for less than a day - so that the water has time to settle and light substances rise to the top, while heavy substances must go to the bottom. Logically, you can’t have enough septic tanks, but you shouldn’t overdo it either. The septic tank should be as budget-friendly as possible, and the sewage system should be autonomous; it was decided to make a septic tank with your own hands
.
I thoroughly probed Andrei Ratnikov’s articles and studied the experiences of summer residents from various forums. At first I planned to use well rings with overflows for construction, but I found out that concrete rings are a bit expensive, so I decided not to use them. If I could return time, I would probably use them. Why I decided this, read below. I recommend that for those who have areas with high groundwater levels, use used euro cubes as sections for a septic tank. Immerse in holes, connect with overflows and air vents, then fill everything with concrete. The advantage is that there is no need to erect formwork, plus the plastic will help the concrete chamber to hold water, which means it is reliable and environmentally friendly. In my case, the groundwater level on the site is very low, so I did not use a used eurocube. We built a septic tank from the materials that were already available, and purchased additional cement and fittings. It took to build a septic tank:
- 18 m-500 bags of cement; — used bricks 200 pieces; — for external laying of pipes (red) 1x3 meters, 2x2 meters; — for internal installation, pipe 1x0.5 m. 1x2m; - approximately 2 m3 of crushed stone; — 4 sheets of flat pressed slate 1x1.5m; — 1.5 m3 of sand; — metal corner 35 meters; — fittings of different diameters (about 130-150 meters); — expanded clay approximately 1 m3; Septic tank installation (top view):
So let's summarize. The result was a do-it-yourself septic tank with a useful volume of 3.75 m3. The volume of the first chamber is 2.25 m3, the volume of the second is 1.5 m3. The overflow pipe is slightly higher than the middle. According to my calculations, the ventilation pipe will draw air into the septic tank, and the outlet will be connected to the sewer pipe in the bathhouse and brought to the roof. In order to additionally clean before gray water is absorbed into the soil, I dug a trench 30 meters long and 2 meters deep, on 30 cm of crushed stone was poured into the bottom, a drainage pipe with holes was laid on top and buried. What can we say, do-it-yourself sewerage is something everyone can do. And it’s also good for your budget.
Video
DIY country toilet
DIY country toilet and shower
Do-it-yourself toilet in the country: powder-closet without a cesspool
A cesspool is the simplest and cheapest way to dispose of wastewater in a dacha. It is made to drain sewage from the house and as a feces reservoir for the country toilet. However, spring can get really busy; floods and meltwater can wash away anything, including the walls of a mini-septic tank. As a result, site owners have to think about how to strengthen the cesspool so that it can be used again.
Before you begin to strengthen the cesspool, you need to find out the cause of the collapse. If the ravine was formed as a result of karst phenomena, then it is better not to think about repairing the cesspool at all. There is no point in fighting nature. We need to look for a new place for a toilet and a full-fledged septic tank.
The only way to strengthen a tire rack is by completely replacing them.
In other cases, it is necessary to assess the degree of collapse and how costly it will be to strengthen the walls. It is often better to fill in the existing cesspool and dig a new one nearby. Renovating is often more difficult than building from scratch.
Calculation of cesspool volume
When calculating the size of a cesspool for a bathhouse, as well as a sewer system for a home, many factors must be taken into account in order to ensure maximum performance of the structure. First you need to draw up a design for a sewage pit, choose what type it will be, and calculate the volume. In particular, you should pay attention to the following parameters:
- who will use the bathhouse and how often;
- characteristics of the soil where the drainage pit will be located.
Calculation of the volume of a cesspool If there are many users, a larger cesspool is required. Sandy soils are better able to absorb liquids, so in this case you can build a small waste pit. But on loams and clay, water drains very slowly; additional absorption area is needed here. In areas where the soil is stable, you don’t have to do additional strengthening of the walls. But where the soil is crumbling, care should be taken to ensure that the hole does not fill up. Errors during the construction of a cesspool will affect the quality and durability of its functioning, so you should take into account all the nuances when carrying out work in order to avoid troubles during operation. Since mostly water will accumulate in the cesspool under the bathhouse, and they will not be steaming there constantly, there is no need install a complex structure; a regular cesspool in a bathhouse can handle the collection and recycling of waste.
- to begin with, use thread and stakes to mark the selected area - on average, the dimensions of the hole are 1 by 1.5 meters;
- to fill the hole at the end of the work, you will need about 1.5-2 cubic meters of soil, the rest of the soil extracted during the digging process should be evenly distributed over the surface;
- if you plan to drain wastewater through pipes, then you should dig a trench under the pipe in advance;
- at the bottom of the dug pit, apply a 15-centimeter layer of sand, on which apply a layer of concrete of the same thickness;
- With a sharp object, by “piercing” this layer, remove excess air bubbles;
- after the concrete pad has hardened, lay a sewer pipe (if provided);
- after this, proceed to laying the facing walls, placing the bricks in a checkerboard pattern using sand-cement mortar;
- to increase the service life of the cladding, also apply the solution directly to the outer part of the walls;
- upon completion of the cladding work, apply a layer of bitumen to the walls;
- make depressions in the ground 20 centimeters around the entire circumference;
- use corrugated sheeting to build a vertical partition around the perimeter of the pit;
- strengthen the ceiling by using rods and reinforcement fastened together with wire;
- evenly fill the formwork with concrete solution and let it dry for 25-30 days;
- Carefully remove the formwork with the frame, making sure that the structure is strong.
Tires are installed in different ways: in some cases, holes are cut out in their side walls, in others, a small gap is provided between the slopes, in others, the outer walls are almost completely cut off, but the principle of operation of the drainage pit remains the same.
evenly fill the formwork with concrete solution and let it dry for 25-30 days; Is fifty years a lot or a little? During this period, technology has made great strides forward. It would seem that quite recently people living in the private sector did not have the opportunity to take a hot shower and had to go outside to the toilet, and this, you will agree, is not entirely pleasant. For a modern person, accustomed to living in comfortable conditions, such discomfort cannot be expected and speeches. And therefore, when building or reconstructing a house or country house, the question arises: how to make living in it, even short-term, if it concerns a country house, more comfortable.
- cesspool
The convenience of a family living in a house depends on the availability of communications in it. These include gas, electricity, water, sewerage. Next, we will dwell in more detail on the installation of sewerage in a country house. The assumption that every owner wants to have all the amenities at home is absolutely correct. But not everyone can pay a tidy sum for this and, moreover, spend a lot of time on installing everything necessary for this. But if your house is small and your family does not live in it permanently, but only stays for a short period of time, then a drainage pit will help solve the problem. This is a structure that is a kind of well that works on the principle of drainage. The drainage pit can be made on your own from a barrel, used car tires, or from bricks, new or used.
How to make a toilet in the country with your own hands
You have already completed the first two steps: you have chosen the type of toilet and the place to install it. The next step is to choose the sizes. Deciding on them is not so difficult. They told us how to choose the volume of a cesspool - 1.5 cubic meters is enough for 2-3 people, now about what size the toilet house should be.
- height - 220 cm;
- width - 150 cm;
- depth - 100 cm.
We suggest you familiarize yourself with the difference between sakura and cherry.
These dimensions are convenient for people with an average build. They can be changed as you wish. There are no standards.
Toilet houses are most often made of wood. But this is not the rule. It can be made of sheet material such as fiberboard, gypsum fiber board, flat slate, brick and any other building materials, profiled sheet metal, even plastic.
The most favorite roofing material for a country house is slate. The installation of a soft roof made of fused materials is inexpensive. In general, you can use any available one. It is attached to a continuous sheathing, so there is not much difference.
Drain pit made from car tires
Used car tires are useful for creating a sewer system in a summer cottage. This will require free time and 4-5 used tires. The principle of constructing a drain pit from tires is almost the same as constructing a drain pit from a barrel. You also need to choose a suitable location for the sewage system. A hole is dug in this place, 20 cm wider than the diameter of the tires. The depth of the hole should be 60-80 cm greater than the total height of all future rings. The bottom of the pit is filled with coarse gravel, 30-40 cm thick. Then you can lay the tires one on top of the other, very tightly and evenly, so that the joints are minimal. The sides of tires should be sawed off or cut off. Either a large sharp knife or a jigsaw will help you cope with this. Only one side of the top tire ring should be cut off. The drain pipe must be inserted at level 4 or 5 of the ring, for which a special hole is cut in it. The drainage pit is closed with a durable lid, such as metal or wood, and covered with a thick layer of soil.
Shower-toilet
A toilet-shower for a summer house is a building that combines two rooms under one roof.
- A partition is erected between the toilet and shower; each section has its own door. The height and width of the building is 2 m, length is 3 m.
- The upper and lower trim can be made from 100×100 mm timber, and for vertical supports - 50×100 mm timber. Buy enough timber to make 24 supports.
- In addition, make 12 blanks 200 cm long. They will be used for roofing, use timber with a section of 50x100 mm.
Pros of using slate fencing
Experienced gardeners today not only make beds from slate sheets, they use it to assemble flower beds and lay slate in greenhouses. A garden path covered with flat sheets is durable and reliable. Practicality and decorativeness are not the only advantages of such a solution.
- Slate is a material that quickly heats up in the sun, heats up and easily transfers excess heat to the soil. This has a beneficial effect on the growth of any plant.
- A fencing for a garden bed assembled using asbestos-cement sheets is difficult to destroy.
- In the future, there is no need to carry out any other work with such a fence. Set it and forget it for a long time.
- By using old slate sheets, there is no need to spend money on purchasing wooden beams.
- If desired, the sheets can be easily painted in any color; painting increases the decorative properties of the fence.
If you want to repeat a similar experiment in your garden, it is useful to study in advance the disadvantages of asbestos-cement products. On hot summer days, such a fence will contribute to overheating of the soil, so the plants will need to be watered more often. In places where long rains are a common occurrence, the soil under the fence is often washed away, so they constantly tilt. This forces the garden owner to constantly straighten the fence. For many, this procedure will seem tedious.
Cleaning the cesspool before repair
If only the edge of the cesspool has crumbled, then it can be strengthened without removing sewage. In the event of a serious collapse, the cesspool will have to be cleaned without fail. Working in close proximity to fecal matter is not only unpleasant, but also dangerous to health.
You can clean the drains from the drainage pit of a country toilet or home:
- calling the vacuum cleaners;
- using a special pump;
- manually with a bucket and shovel.
Manual cleaning of the drainage pit is an unpleasant task
The first option is the fastest, but you will have to pay a lot for calling a suction pump. When using the other two methods, you need to prepare a container for the pumped-out sewage in advance, and also find out where it should be taken out.
It’s better not to skimp and invite specialists than to “immerse yourself” in sewer drains, especially if you have to strengthen the cesspool of a country toilet. This is by no means water from the washing machine and washbasin; you will have to pump out unattractive feces that do not smell like violets.
Advice! When calling vacuum cleaners, it is worth considering that they charge for the application, and not for the volume pumped out. The pit in the country toilet is small in size; ordering a car with a large barrel will not be economical.
Construction of a country toilet with a cesspool
When cleaning the cesspool yourself, you should take care of protective equipment: gloves, a gas mask and a rubber suit. Only after wearing all this can you safely begin the process of pumping out sewage.
Practical fencing
Until recently, slate was the most common roofing material, with a large number of operational advantages. Today its popularity has fallen slightly; more modern materials have appeared on the market: bitumen shingles and metal tiles. It’s a pity to throw away the old covering, which is why many people have warehouses of old slate sheets in their dachas. It’s a shame to throw it away, and there’s no need to do it.
You can easily assemble and make a temporary toilet, an outdoor shower from slate sheets, you can build fences from it, covering a fence made from a chain-link mesh, for example. This solution will protect the garden plot from the prying eyes of passers-by and the penetration of neighboring dogs.
A standard slate sheet has a length of 175 cm, the sheet is cut in half and simply, with an overlap on the chain-link, is dug into the ground with its lower edge to a depth of 40 cm. If the soil is thoroughly compacted after this, no additional fastenings are needed to stabilize the fence. If desired, slate can be easily painted by choosing the right color; it is not difficult to easily integrate it into the style of your site.
Note! Such a partition can protect a personal plot from the spread of weeds, which with their roots try to gain a foothold on the edge of the neighbor’s plot.