How to concrete a cesspool?
In order to correctly and reliably fill a hole with concrete, there are several technologies for constructing cesspools. These include: construction of pit walls from red brick, construction from standard concrete rings, arrangement from car tires and pouring the walls and ceilings of the pit from concrete.
The last option is one of the simplest and most “budget”, so it’s worth taking a closer look at pouring a concrete cesspool. In general, it is assumed that a cesspool with dimensions of 2x2x2 meters will be filled, which corresponds to the needs of an average family consisting of two adults and two children.
Materials and tools required:
- Portland cement M400-M500, sand, granotsev (fine crushed stone), superplasticizer S-3, water;
- Bitumen mastic for waterproofing;
- Steel reinforcement;
- Hot-rolled steel channel No. 10 for the floor slab;
- Edged boards 25-30 mm thick;
- Wooden beam 50x50 mm;
- Logs or wooden beams 100x100 mm for supports when pouring the floor slab;
- Soft (knitting) steel wire;
- Hatch design;
- Polyethylene film;
- Plastic pipe with a diameter of at least 100 mm for sewer drainage;
- Sections of steel or plastic pipe with a diameter of 100-120 mm, a length of 2000 mm, for drainage holes;
- Concrete mixing plant, shovels, buckets;
- Hammer, nails, screws;
- Building level.
Homemade septic tanks
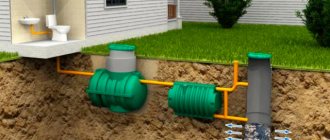
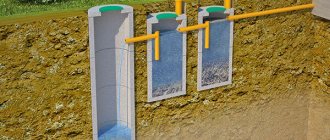
A septic tank, or sump tank, is a container consisting of a single sealed body (usually plastic), divided into several sections (for example, as in the figure - A, B, C), an intersection separator, a wastewater supply pipe and a pipe for purified discharge.
Such septic tanks are complex cesspools, but they can not only serve as a vessel for collecting wastewater, but also process dirty liquid into fertilizer for the garden. Homemade septic tanks are a design of 2 or 3 tanks. In the first, only rough purification of wastewater from large debris occurs, but in the second or third, bacteria will work - they process contaminated water into fertilizer.
You can build such a complex structure with your own hands, but this will require considerable financial investments. The essence of the work on arranging a septic tank cesspool:
- You need to buy two or three containers made of special plastic - they must be sealed with outlet holes to the outside.
- You will need to install overflow pipes between these containers - they must also be available. Moreover, they will need to be installed at an angle.
- The first container of the septic tank will contain a small filter - they are sold in stores and have a special marking “for a country septic tank.” This filter will be located at the outlet of the pipe leading to the second container.
- In the second compartment of a complex cesspool, bacteria will live that process waste and turn dirty water into practically clean water - at least, it can be used for watering the garden and washing the car.
- The third compartment is installed at will - it is needed to collect already purified water, but even without it the septic tank will be fully functional. The only clarification: in this case, you will need to install a drain valve in the second container - you will need to extract purified water somehow!
Experts say that the most practical thing is to invite professionals to install a cesspool. But it is quite possible to do it yourself, which will save significant financial resources. If you don’t have a construction/engineering education, and you have minimal or no experience in carrying out any construction work, then it’s better not to risk installing a septic tank yourself - specialists will do it with a quality guarantee.
( 89 votes, average: 4.89 out of 5)
Related Posts
The procedure for filling the pit walls
- Marking the pit, digging a pit, leveling the walls, planning the surrounding area;
- Production of formwork. The best option is sliding formwork, 2 x 0.5 meters long. Assembled from edged boards and wooden beams. A polyethylene film is placed on the side of the formwork facing the concrete;
- Arrangement of drainage holes. Pieces of pipes for drainage holes are driven into the walls of the pit in rows (2 rows for each pour), to a depth of 50 mm. The pitch between pipes in a row is approximately 300-400 mm, the distance between rows is 350 mm. The protruding parts of the pipes simultaneously serve as a kind of separation between the wall of the pit and the formwork, determining the thickness of the concrete wall - 150 mm;
- Installation of formwork. Along the perimeter of the pit, formwork panels 2 meters long and 0.5 meters wide are installed. In this case, the shields from inside the pit are wedged together with wooden blocks. The pit is ready for filling!
- A concrete solution is prepared in the following proportions: 6 parts granotsev, 4 parts sand, 1 part Portland cement, thoroughly mixed together. Water is added (until the required consistency of “thick sour cream” is obtained) and superplasticizer (according to the instructions for its use);
- Using shovels or buckets, pour the solution into the cavity between the wall of the pit and the formwork, inserting reinforcement bars into the middle of the resulting structure in increments of 150-200 mm and compacting it by tapping on the formwork and bayoneting with a shovel or a piece of reinforcement;
- The poured structure is left for 72 hours until it sets completely, after which another “portion” of drainage pipes is filled into the pit wall, the formwork is reinstalled higher and the next pour is performed;
- Before the last pouring of the formwork, a sewer pipe should be placed in the hole, positioning it at an angle of 3-5 degrees at a depth of approximately 300 mm from the soil level;
- The last pour is also kept for 72 hours, after which the formwork is dismantled. In this case, the released panels can be used to arrange “supporting” formwork for pouring the floor slab.
How to build a drainage hole with your own hands
Let's look at different types and methods of designing drainage systems that you can make with your own hands. They are conventionally divided into permanent and temporary.
From car tires
If you need a flush system for a toilet in a country house at minimal cost, you can make it yourself using old car tires.
This is a quick and budget option for constructing a sewer pit. The design is quite simple. A pit is made where old tires are laid one on top of the other. A layer of crushed stone is poured onto the bottom of the pit; if desired, the tires are sealed with a clay lock.
Advantages:
- if necessary, it can be easily restored;
- durability;
- speed, simplicity and low cost of construction.
Flaws:
- tires rot over time;
- the possibility of a negative impact on the environment due to high load on the structure;
- rapid silting with insufficient cleaning and pumping, resulting in loss of usable area.
Made from concrete rings
This is another way to quickly build a drain system. Its design is similar to a well. The rings are installed on top of each other. The connections between them, if desired, are sealed using a cement screed.
By its design, a sewer pit made of concrete rings is more of a sealed structure. Therefore, you need to pump it out regularly . Although there is an option to install a septic tank made of concrete rings.
Main advantages:
- Convenience of installing a protective cover with a hatch;
- durability;
- possibility of construction with your own hands;
- relatively low cost.
Flaws:
- the possibility of an unpleasant odor coming from ventilation pipes;
- the need for periodic pumping;
- complexity of installation.
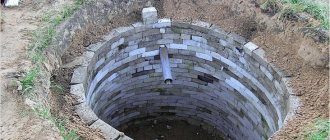
Brick drainage pit
This is the most successful and optimal option if you need a drainage system for a toilet or bathhouse in a country house.
Advantages:
- ease of construction - almost any summer resident can handle laying bricks for a drainage pit;
- environmental friendliness - the contents of the drainage structure are periodically pumped out by a sewage disposal machine.
Flaws:
- siltation. Siltation can be prevented by constantly pumping out the liquid in the storage tank;
- relatively short service life (up to 20 years), as a result of brick destruction in unfavorable conditions of the drainage system;
- Occasionally, an unpleasant odor may form. The use of various drugs that accelerate waste decomposition processes and timely pumping of the storage tank can help cope with this.
Pouring the floor slab
- Channels are laid on concrete walls in increments of 300-350 mm;
- In the center of the structure, a hatch structure is installed directly on the channel. In general, a reliable hatch design is a square frame with dimensions of 700x700, welded from four channels No. 20-No. 25 with the shelves facing outward. Hinges and a hatch panel with a handle are welded on top of the frame. There should be a hole with a diameter of 20-25 mm in the hatch panel for air to escape. Accordingly, the channels should not overlap the “mirror” of the hatch. To do this, they are cut “to size”, and the free end of the resulting piece of channel is attached to the channel shelf of the hatch frame with wire or screws;
- From the bottom of the planned ceiling, stepping back downwards (from the upper cut of the wall) 50 mm, over the entire area of the ceiling, with the help of logs or wooden beams, panels of “supporting” formwork are placed. In this case, a hole is cut in the formwork at the location of the hatch to allow exit from the pit. The horizontality of the shields is controlled by the building level;
- For the strength of the slab, the channels are tied together with steel binding wire;
- Having retreated from the outer perimeter of the pit walls to a distance of 50-100, formwork with a height of 100 mm is installed from wooden boards along the perimeter of the pit;
- Pouring the floor slab. The result is a monolithic slab 150 mm thick, in the center of which channels No. 10 are located;
- After soaking the poured slab for 72 hours, retreating about the hatch structure by 250-300, the formwork is installed (height depending on the height of the channel of the hatch frame) and is also filled with concrete.
After the concrete has completely dried, the inner surface of the walls and ceiling are treated with waterproofing mastic. The upper part of the slab is covered with soil up to the upper edge of the hatch.
A filter made of crushed stone of different fractions is poured into the bottom of the pit. The gaps of the drainage pipes are cleared of pieces of concrete. The cesspool is ready to receive waste!
Sewage plays an important role in the life support system. But if houses in the city are connected to a central system, then residents of the suburbs have to solve the issue of waste disposal on their own. Arranging a cesspool on the site is considered the simplest and most inexpensive solution. However, a dug pit with reinforced walls cannot at all be considered a full-fledged cesspool for wastewater. There are many rules, regulations and nuances, following which we can talk about a full-fledged waste disposal system. This article will talk about how to make a concrete cesspool.
Common types of structures
According to characteristic design differences, cesspools are divided into absorption structures and sealed containers. The functions of collecting, accumulating and treating wastewater are also performed by septic tanks. They are more technically complex installations with forced stimulation of the movement of wastewater inside and with biological and chemical treatment methods.
Violation of sanitary and epidemiological standards for the location of a cesspool is unacceptable
Containers without bottom - absorbent
Direct descendants of the “people's” cesspool. Their characteristic feature is the absence of a bottom, due to which the liquid component of the wastewater, having undergone purification by coarse filtration through a layer of a mixture of sand, gravel, broken brick and other “ingredients”, passes into the ground. The absorption option is considered the most economical; moreover, the construction of a pit of this type can easily be carried out by a contractor who has absolutely no experience in the field of construction. Another saving: due to the partial infiltration of purified water into the ground, there is much less need to call sewer trucks.
Structural diagram of a cesspool without a bottom - wastewater is filtered through crushed stone
The absorbent type of pit is chosen if there is no need to drain a large amount of wastewater, if the country house does not have a jacuzzi, dishwashers and washing machines. The land will not be able to process and accept a large volume. In addition, the cleaning carried out cannot be classified as a 100% effective procedure, which means that wastewater from the absorption pit will still pollute the environment.
Sealed waste water tanks
Their name contains a direct hint indicating the main design feature. Essentially, these are closed containers made of water-tight concrete, brickwork, plastic, and gas silicate blocks that require constant emptying after filling. Sealed structures will ensure the complete absence of odors typical of drains, but will force the owners to regularly call a sewer truck to remove accumulations.
Important. A cinder block is not suitable for building a cesspool; it will collapse too quickly from contact with water.
The easiest way is to buy and bury a factory-made plastic container in the ground to collect wastewater, connect a sewer pipeline to it and periodically call the vacuum cleaners to empty it.
The simplest scheme for constructing a wastewater tank would be to install a store-bought plastic container. It does not need to be sealed, however, it is advisable to fill the bottom of the pit with a kind of cement screed and strengthen the walls with reinforcement. In principle, if the owners are not embarrassed by the unpresentable appearance, then there is no need to bury it in the ground. Another very compelling argument in favor: a plastic structure can be installed regardless of the close level of groundwater. There will be no harm to the environment anyway.
The tank should not be completely filled with sewage; there should be at least one meter between the manhole cover and the liquid level; if the level exceeds the limit, the container should be emptied
The simplest homemade septic tanks
These are more complex structures that not only perform deep cleaning, but also process wastewater into fertilizer valuable for gardeners. Most often, they are a system of two or three chambers, in the first of which only collection and rough mechanical purification occurs, and in subsequent chambers specific bacteria enter the battle, finally processing the polluting inclusions of wastewater.
A cesspool with an overflow purifies water so well that it can be successfully used for economic and technical purposes, for example, for watering or for cleaning the area. But in order to make a septic tank with an overflow, considerable effort will be required.
The operating principle of a three-chamber septic tank is based on multi-stage wastewater treatment: in the first tank, the collected wastewater is subjected to coarse filtration, in the following chambers finer purification is performed
If you don’t mind the effort, but there is no surplus of financial resources, you can again resort to worn-out car tires. In the sense of “bald”, but not worn-out tires. Moreover, the owner will save money not only through waste building materials. To install a septic tank made from tires, you do not need a powerful concrete foundation; a compacted cushion of crushed stone with sand with a thickness of 30-40 cm and a ten-centimeter screed is sufficient.
- To increase the volume of the created reservoir, the sidewalls of the tires must be cut off.
- A concrete pipe is installed vertically in a well made of tires; its diameter should be approximately two times smaller than the same size of tires. The upper cut of the concrete pipe is located 10 cm below the well made of tire rubber.
- The bottom of the pipe is filled with concrete to form a monolithic concrete cylinder.
At the top you will need to make holes for infiltration and for installing pipes that provide overflow.
Design of a cesspool with overflow: the pipe entering the chamber must be located higher than the overflow pipe
- The sewer pipe must be inserted into a concrete container located inside the tires.
Places where sewer pipes enter vertically installed concrete pipes must be sealed.
Which is better - a sealed or drained cesspool?
If the daily amount of drained water does not exceed one cubic meter, you can use a drainage pit. This is convenient, for example, when organizing a drain in a bathhouse. It is enough to dig a pit with a volume of 3 m³, lay a cushion of 30 cm of sand and 50 cm of stones on the bottom, strengthen its walls with brick, concrete or even tires and close the hole.
Through such a filtration pad, water will slowly seep into the ground, purifying itself along the way.
If much more water is drained, it does not have time to seep through and be cleaned. Then you can make a completely sealed cesspool. Ready-made containers are sold that can be buried immediately.
Or you can do it yourself by concreteing the foundation pit or installing concrete rings on a concrete base.
The only drawback of such a pit is the monthly pumping of waste.
DIY cesspool system
There are two main types of pit arrangement:
- sealed;
- regular without bottom.
The option for arranging a sewer system in a country or private house is determined by the location of the territory, the daily amount of wastewater and the material capabilities of the owner of the site:
- if the daily amount of wastewater is no more than one cubic meter, it is possible to build a simple system without a bottom and without pumping. In this type of pit, the wastewater partially goes into the ground, where it is purified by anaerobic bacteria. An example of this cesspool is the classic rural toilet;
- with a large amount of wastewater (more than a cubic meter), the construction of a sealed structure is required, which must be pumped out from time to time.
This requirement is explained by the fact that in the absence of a bottom in the pit, wastewater passes into the ground and its purification occurs by microorganisms located in the thickness of the earth. But their cleaning capabilities are not limitless.
With large amounts of wastewater, microorganisms cannot cope with water purification. In this case, the wastewater will begin to pollute the adjacent area and may pass into water-bearing soil layers with further contamination of the drinking well.
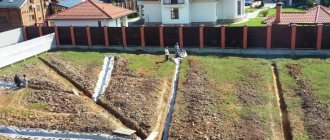
If you need to dispose of a large amount of wastewater, you can consider installing a septic tank with filtration fields.
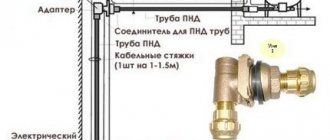
Pressure sewer
So we came close to the pressure sewerage device. The fact is that even if the terrain on which the house stands is on a slope, nothing can be left to gravity. Mainly due to the presence, albeit in a small proportion, of solid waste. They will accumulate on the walls of the pipes and clog the sewer system. Any system with a pump is called a pressure sewer. It is usually used for local sewers that are not connected to a centralized system.
Installing a pressure sewer is not difficult. As you may have guessed, its main element is the pump. The pump is installed last, after all the pipes have been laid and a pit or well has been laid. But keep in mind that the slope of the terrain should still not be too great.
If the pump is located much lower than the pit, it will be both impractical and risky. One fine day it may burn out from overvoltage, and you will be left alone with the entire contents of the drain pit. Therefore, before you start laying a sewer system, consult with specialists.
Location – sanitary restrictions
Some homeowners believe that they can do whatever they want on their property, and they are deeply mistaken. Sanitary services do not sleep - they require strict compliance with the rules and regulations in force in the state, regardless of the type of property.
The location of the drainage pit in a private house is also strictly regulated: the standards stipulate the minimum permissible distances from the wastewater storage tank to engineering structures, residential buildings and site boundaries:
- to the water conduit (central) – 10 meters;
- to the underground gas pipeline – 5 meters;
- to the drinking well: 20 meters - on clay soils, 30 m - on loams, 50 m - on sandstones and sandy loams;
- to a residential building (own and neighboring) - 10-12 meters;
- to the fence (site boundary) – 1 meter.
The maximum depth of the drainage pit is also regulated: it should not exceed 3 m, if the groundwater level allows it. These restrictions are contained in SanPiN 42-128-4690-88 and SNiP 30-02-97.
Important: Homeowners should be aware that failure to comply with sanitary requirements may not only result in a fine; if harm is caused to the health of others, a criminal case may be filed.
In addition, when making a drainage hole at the dacha with your own hands, it must be located on the site in such a way that it is possible to organize unhindered access to it for special equipment at the time of pumping out.
Advice: Practice shows that it is better to place the drainage pit at a distance of at least 15 meters from the windows of residential premises.
Calculation of volume and selection of materials
Sanitary standards require that a cesspool without pumping have a volume of no less than the three-day water consumption rate for all inhabitants of the house. It is generally accepted that a person needs 200 liters of water per day, including consumption for drinking and cooking, washing hands, showering, etc. Thus, the three-day norm will be 600 liters. To calculate the minimum permissible capacity of the treatment tank, it remains to multiply this number by the number of people living in the house.
It remains to be clarified that this refers to the total volume of all chambers during multi-stage cleaning, although the first tank in this case should be larger than the others - approximately 2/3 of the total capacity.
When installing a treatment system in a country house where people do not live permanently, the volume of the pit may be less than the standard, since there is no constant flow of wastewater.
A do-it-yourself cesspool without pumping for a summer residence can be made of various materials:
- bricks,
- monolithic concrete (the solution is poured into the formwork),
- concrete rings,
- plastic eurocubes, etc.