Features of the design of filters for washing
Despite the fairly simple design and principle of operation, filters of this type contain a large number of components and elements. Therefore, installing a water filter yourself should be in accordance with the complete set of the product.
The composition of the filter part is determined by the user's choice. The number of cartridges and, accordingly, purification stages is from 2 to 6, and their type is selected in accordance with the quality of the source water. Since the cost of the filter directly depends on the number of stages, in some cases it is advisable to strengthen one direction of cleaning, saving on the other.
For example, if there is sand and other types of mechanical impurities in a liquid whose composition meets quality requirements, you can do without an iron removal cartridge by installing an additional sorption filter instead.
The under-sink filter may include:
- carbon cartridges for mechanical cleaning,
- deferrization,
- mechanical filters for solid suspensions,
- softeners for removing hardness salts,
- reverse osmosis membranes,
- mineralizers that optimize the composition of the liquid,
- UV lamps for disinfection.
In addition to cleaning modules, the design is equipped with:
- bracket-console for mounting on the wall,
- a device for connecting to a cold water supply pipeline (adapter or tee) with a valve installed at the insertion point and regulating the water supply,
- gaskets for connections,
- faucet installed on the sink.
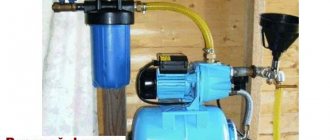
For ease of use, the kit may include a storage tank that ensures water supply, despite the decrease in pressure when passing through filters and especially through a reverse osmosis membrane.
The contents of the reverse osmosis water filter may vary depending on the manufacturer and model.
Preparation for use
Installing a water filter under a sink with your own hands also includes preparatory work before use. A new filter requires washing , during which the smallest particles of material are removed from the cartridges. Otherwise, such particles could quickly clog subsequent filters and especially the reverse osmosis membrane.
Before washing, the membrane (if the reverse osmosis stage is provided for in the design) is removed, and the storage tank is cut off from the system with a valve. After this, open the water supply and drain up to 15 liters. This is enough to remove foreign small particles.
After washing, the membrane is returned to its place, the storage tank is connected, and the entire system is filled twice, followed by draining the water. With the completion of these operations, preparation for operation can be considered complete. The installed filter is ready for use.
It is recommended to install main water filters at the entrance of the water supply to the apartment. They not only improve the quality of drinking water, but also extend the life of plumbing fixtures and water heating devices.
Under the kitchen sink you can install not only a filter, but also a sewage pump. And why it might be needed, read here.
And you will find instructions for self-installation of a shower drain in the floor here https://okanalizacii.ru/santeh_vodoprov/kabina/trap-dlya-dusha-v-polu-pod-plitku.html
Installation site requirements
A special feature of the operation of such treatment structures is the ability to work with only one point of water consumption. Therefore, the installation of water filters in an apartment, and in some cases in a house, is carried out in the kitchen . The place under the sink is perfect for these purposes - the device is not in sight, but it is accessible for maintenance.
However, it is necessary to measure the dimensions of the free space and ensure that certain conditions are met at the stage of choosing a model:
- The structure should fit freely under the sink without squeezing or squeezing.
- All flasks should be positioned so that it is easy to replace the cartridge.
- Plumbing components (valves, sink drain check valve, etc.) must remain in a freely accessible area for inspection and repair.
Despite the location of the filter under the sink, there is still enough free space under it
conclusions
It is not necessary to install a multi-stage filter system under the sink in your apartment. This is not the best or cheapest cleaning option for the average consumer; it can cost a pretty penny. For example, it would be wasteful to use all types of filtration if the only problem with the supplied water is the presence of excess insoluble iron, which is separated by a simple polypropylene cartridge.
Multi-stage filtration will most likely be required by users of individual water intakes in private homes. However, the final decision will only be made by a qualitative chemical and bacteriological analysis of water.
Which water filter is best to install?
There are a huge number of them, and each of the filters has individual characteristics. Before making an immediate purchase and subsequent purchase, study information about their types and operating principles.
There are two main types of filters: pitcher
and
flow-through
. If installing a pitcher water filter allows you to purify the water only slightly, then a flow-through filter provides a higher degree of filtration. A pitcher water filter has a lower cost, which is explained by low productivity and slow cleaning. Also, jug filters cannot be included in a chain of several filter elements.
Installation of a flow-through water filter begins with connecting it to the water supply system. There may be some difficulties with this, but they are quite easily solved.
In turn, flow-through hydraulic filters are divided into 3 subgroups:
- filter attachments for water taps;
- filters with possible connection to the tap;
- stationary water filters.
When using combined hydrofilter attachments, you can significantly increase the degree of purification of tap water, but then their service life will be minimal. You will have to choose between frequent financial costs and the need for the most purified water at home.
Articles recommended for reading:
- Types of water filters and their characteristics
- Water quality standards depending on purpose
- How to drink water correctly: practical recommendations
Installation of a flow filter begins with connection to a water tap. This may take some time as it involves a more complex installation process . When installing a water purification filter, you will need a flexible hose.
Often, flow-through hydraulic filters are also used for electrochemical water purification, which significantly improves the quality of the liquid. Here, stationary structures are more suitable for you, since installing a stationary household flow filter will provide a high degree of cleaning. When installing, you should take into account the possibility of a group serial connection, which will several times increase the quality of the process of purifying the liquid from foreign impurities. Installation of a stationary household flow filter occurs with a connection to a general water supply system.
A stationary flow filter for water purification has one feature: the connection to the water supply network is identical to any other water supply equipment, which, in turn, eliminates the problem of the water filter breaking down.
The design of a stationary flow filter for water purification is also unusual. Most models have the ability to change cartridges. Of course, such hydrofilters are quite expensive compared to one-time models, however, this design will very soon pay for itself, because it is much easier to change the cartridge than to reinstall the filter for water purification.
The most common and convenient location of a flow filter for water purification is the space under the sink . The advantages of this installation are as follows:
- The filter does not take up kitchen space necessary for movement.
- The installation process itself takes less time.
- You can easily replace the cartridge.
There are models of water purification filters that are also installed under the sink, but instead of connecting to the main water tap, they have their own additional tap. Installing such a filter for water purification will require a little more time, since it will be necessary to drill a hole for the tap outlet with a diameter of 12 mm. In this case, it will be important to take care of the cold water supply system and install a tee outlet together with a filter for water purification. To do this you can:
- Make a cutout in the pipe and install a tee-bend into it.
- Use the tee bend as a clamp. Then you will need to clamp the tee bend onto the pipe above the cut hole.
All parts of the hydrofilter must ultimately be connected using flexible wiring. After directly installing the water purification filter, about 10 liters of water should be passed in order for the entire filtration system to be cleaned. Only after this can you use a filter to purify tap water.
Read material on the topic: Types of water filters and their characteristics
Selecting a cleaner
A wide range of equipment for liquid filtration is presented in the online store “Water of the Fatherland”. We have all varieties - from small cartridge systems under the sink to equipping large water treatment plants.
There are three main criteria that need to be assessed before purchasing:
- Quality of water supply. Mechanical impurities that appear due to old pipes can be removed using a regular kitchen jug. But the presence of chemical elements such as salts and metals is a direct indication for connecting a water filter in the kitchen.
- Economic component. It is necessary to evaluate the expected amount of liquid that is used in the family, as well as for what period of time the manufacturer intends to use it. And then relate this to the cost of cartridges.
- Conditions for embedded equipment. In some apartments it is not possible to inexpensively and neatly mount the device under the sink, so you have to look for alternative options or places for installation.
What to look for when purchasing
Several parameters important when purchasing:
- Availability of a quality certificate.
- Technical characteristics, for example, pressure in the water supply system, pressure, etc.
- The resource of one cassette and the possibility of replacing them.
- Combining blocks with different functions.
- Trusted brand.
- The ratio of quality and price of products.
Main table dispenser AquaPro 919H/RO (hot and cold water)
Main table dispenser AquaPro 929CH/RO (cooling/heating)
Floor dispenser AquaPro 311 (empty, without cooling)
Which water filter is best to install under the sink?
The best solution for any housewife, because after installing it you can forget about long filtration processes. You can pour filtered water straight from the tap.
Thus, installing a household water filter under the sink has the following advantages:
- instant filtration process;
- high-quality water purification;
- rare cartridge changes;
- constant provision of fresh, purified running water.
A sink water filter helps clean tap water from rust, chlorine and dissolved organic matter. This improves the taste of water, improves transparency and eliminates unpleasant odors. Also, a filter for purifying water under the sink helps rid the liquid of heavy metals.
What types of filters exist for cleaning water under the sink?
- Reverse osmosis filters . Today this is one of the best and therefore popular designs for water purification at home. Water passes through a special cleaning membrane in which foreign substances are retained. The same technology is used to produce high-quality bottled water. Thus, by purchasing a reverse osmosis filter for your kitchen, you will no longer buy bottled water, because now you can “produce” it yourself at home. In this case, the cleaning process will be of the same quality, despite the degree of contamination of tap water.
Installing a reverse osmosis filter allows you to purify hard tap water, which will rid your kettle of annoying scale. After filtration, the water becomes soft and truly tasty. Any housewife will say that soft water is an ideal component for brewing tea and preparing various dishes. When purifying water using a reverse osmosis filter, nitrates, antibiotics, hormones, bacteria, viruses and cysts are removed from the liquid.
- Sorption filters . The principle of operation of the sorption filter is very simple: the cleaning process is carried out using an existing sponge, which retains foreign impurities. The flow of water passes through. Hence the name - flow-through water filter. The sponge is impregnated with activated coconut charcoal. It's no secret that activated carbon has filtration abilities, so this component is an integral part of the sorption filter. Some models of flow filters, in addition to carbon, contain additional “aqualene” fiber, which significantly speeds up the cleaning process and extends the life of the filtration cartridge.
Rules for use and frequency of replacement of filter elements
Each cleaning system has its own characteristics. There is no general or universal requirement with regulations for water maintenance and purification. Medium hard water with a low content of impurities and chlorine can be filtered on one cassette for 12 months.
There are models that have indicators and calendars that indicate when the media needs to be changed. If after long use the water begins to acquire an unpleasant taste or a foreign odor appears, this is a direct signal to change the filters and service the entire system.
Preparatory work
The highest degree of water purification is provided by a reverse osmosis installation.
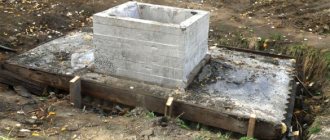
Before you begin to study the sequence of installing filters, you need to complete all the preparatory measures. They start by assembling some parts of the purification system, which are the plumbing connection. This is a small shut-off valve and tee. This work is carried out in two stages - assembly and installation of the unit on the water supply system.
- Assembling the working unit - inserts.
This stage does not cause difficulties, since it is only necessary to correctly and tightly connect the tee to the tap. One edge of such a tee is equipped with an internal thread of 0.5 inches, the second is external with 0.5 inches, and the third, intended for connection to the shut-off valve, has an internal thread with a smaller diameter. Fum tape or tow is tightly wound around the tap, after which this part is screwed into the tee and fixed well with a wrench. Now is the time to turn off the water supply and begin installing the prepared tap. Insertion of a tee and tap for supplying water to the filter - The next stage is more troublesome, but its implementation does not require special knowledge and skills. First of all, you need to find where the cold water pipe is located. It is equipped with a shut-off valve and needs to be twisted. The prepared working unit is mounted on the cold water pipe. Particular attention is paid to sealing the seams, otherwise the possibility of leaks cannot be ruled out.
After installation, it is recommended to check the functionality of the working node. To do this, place the small filter faucet in the closed position and turn on the water supply. If no leaks appear, you can begin installing the water purification filter.
Filter assembly and installation
The most important step in installing a filter yourself is assembling it into a single whole. To begin, connect the plastic hoses included in the kit to its inlet and outlet. Typically, the places where the hoses are inserted are closed with transport plugs. They must first be removed.
Installing the filter will be easier if you purchase a model equipped with special quick-release clamps. To attach a plastic hose, simply insert it into such a clamp using a little physical effort.
Filter cartridge system
The hose that is connected to the filter outlet must be connected to an additional tap installed a few minutes earlier. The hose connected to the inlet of the filter is mounted to a ball valve mounted on the tee.
Attention! The hoses must be securely fastened at the connections!
Required tools and materials
Incorrect assembly of the filtration system can lead to failure of the membrane filter, as well as increase the flow of water into the drainage.
To independently install a filtration system for tap water, you need to prepare all the necessary tools and materials in advance.
The equipment set includes the following elements:
- instructions: installation, operation and maintenance manual;
- cartridges: each should be stored in a separate flask to preserve the active substances;
- pass-through tap or tee;
- 2 connecting hoses – for outlet and inlet;
- faucet designed for purified water;
- wrench for unscrewing and replacing cartridges, fittings;
- gaskets;
- bracket for secure fixation.
Some systems are additionally equipped with a storage tank. To install the filter you will need:
- adjustable wrench and knife;
- pipe cutter;
- drills with different diameters;
- fum tape and tow.
Before proceeding directly with the installation, you need to familiarize yourself with the various installation methods and step-by-step algorithm of actions.
Features of operation and maintenance
In order for water to be effectively purified by the selected filter, it is important to follow certain rules when using it.
- Make sure there are no kinks in the hoses.
- Replace cartridges in a timely manner (the resource can be indicated in liters or indicating the maximum allowable operating time).
- When replacing cartridges, wash the flasks with soapy water and clean water.
- Install carbon cartridges with the membrane removed, followed by washing.
- Ion exchange cartridges must be regenerated in accordance with the instructions.
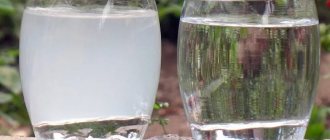
Even with good washing of the installed filter, a slight turbidity of the water may appear at the initial stage of operation. This does not last long, and after the water becomes clear, you can taste it. A slight bitter taste should not be considered a sign of incorrect operation of the filter device. This taste can be caused by the material of the cartridge for removing hardness salts (desalting blocks). Usually, water also tastes bitter for a very short time - it is enough to drain it a little so that clear, clean, tasteless and odorless water comes out of the tap, optimally suitable for use in cooking and drinking.
Methods for connecting a water filter to a water supply
Horizontal method of installing a filtration system
The installation algorithm for different types of cleaning equipment is not fundamentally different. Filters are mounted in a horizontal or vertical position; this does not affect performance or service life. The most popular installation option is under the sink or sink. There are two types of equipment - a reverse osmosis system and a flow-through version.
As a rule, the system, which is installed under the sink, consists of several sections for step-by-step water purification. Each section is flask-shaped and equipped with cartridges. They are made of glass, steel or high-quality plastic.
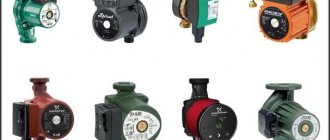
How to choose the right filter?
Filters come in floor and wall types. It all depends on their size and placement methods. For installation, it is necessary to install a connecting tap to the incoming water and make a discharge to cylinders containing all the necessary filter elements.
When you turn on and apply pressure to the pipes, water begins to circulate through the installed cylinders and at the outlet it already takes on a completely purified form.
All filters today are divided into 2 types:
- Flow-through.
- With reverse osmosis system.
In addition to the difference in name, each type has a common structure, but each has its own principle of filtering water.
Flow-through
Flow-through models include up to 4 replaceable modules. All of them are connected in series through a common drainage system. The liquid goes through each stage of purification and only after that it enters the tap. The system will fit perfectly in any type of apartment.
Each cleaning unit has its own filter elements. With their help, various microorganisms, sand and even the pungent smell of chlorine can be removed.
The following types of replacement cartridges are mainly used:
- antibacterial;
- for water with a large amount of metal impurities;
- for hard water;
- standard and universal;
- with mechanical cleaning method.
You can use several cartridge options at once. The system allows you to install from three to 6 replaceable modules. Cartridges have their own service life, which must be carefully monitored in order to replace them on time.
Reverse osmosis systems
The design with the flow system is externally similar. The main and only difference that can be noticed is the installed additional cylinders. The cleaning system can include up to 5 replaceable cartridges.
The internal difference is the presence of an osmotic membrane in the main cartridge. Using this method, the liquid undergoes a more finely purified process.
The following main media types are used:
- Standard type cartridges made of polypropylene.
- Coal sorbent retains organic substances and heavy metal impurities.
- Containers with active substances to reduce iron concentrations.
After the liquid passes through the purification filters, the water returns to the module with an installed reverse osmosis membrane. Only a water molecule passes through it. This is considered the operating principle of reverse osmosis.
Important! To connect such systems, it is necessary that the pressure in the water supply be at least 3.5 bar.
To achieve the required level of pressure, an electric pump is installed in some modern models. It pumps up the necessary pressure and allows the system to cope with filtration more efficiently.
Installation procedure
Aquaphor Modern faucet filter
The simplest and most cost-effective way to purify tap water in the house is a filter attachment. Its peculiarity is that it has a direct connection to the water supply. If a coarse filter is not enough in a particular case, it is better to purchase more expensive equipment that is mounted under the sink. All work can be done independently without the help of specialists. Algorithm of actions:
- Select the location where the filter will be located. It is important to maintain a short distance for easy access to the equipment, its maintenance and replacement of cartridges. It can be located horizontally or vertically under the sink; this point is not important. Since its location does not affect its performance and service life, it can even be mounted in a kitchen cabinet.
- Inserting a filter into the central water supply. First you need to stop the water supply. After this, all threaded connections are carefully processed using fum tape. Next, you can begin installing the insert. There is a cold water supply line under the sink; it is disconnected and the previously installed connection is carefully inserted. It is important that all tubes maintain their natural position, without any displacement or compression.
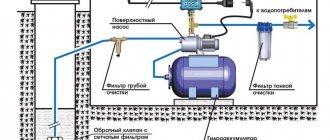
Installation diagram
Installation. When purchasing a filter, you need to pay attention to its packaging; it must include mounting nuts and pipe clamps. For proper installation, a hole is made in the sink for an additional tap. The diameter of the drill used is no more than 13 mm. During work, you need to exercise maximum care and caution. Once the hole is ready, the faucet can be installed.
- Installing the clamp is also an important step that cannot be avoided. Mount it above the hydraulic valve on a vertical or horizontal hose. Again you will need a drill, about 7 mm in diameter. Use it to make a hole in the drain pipe. A protective thick rubber band is attached near the hole for sealing. Next, install the clamp support so that the holes on it and the pipe coincide.
Before installing a storage tank, you need to consider whether there is enough space for it
One of the final stages is the installation of a storage tank. When installing, it is important to take into account its internal operating pressure; it ranges from 0.5 to 0.9 atmospheres. First of all, you need to wrap the thread with Teflon tape. Next, install a small plastic tap into the storage tank. In order not to damage the entire system, it is strictly forbidden to overtighten the threads. Before installation, it is important to find a suitable place for the tank so that it does not get underfoot.
- Conduct a test run of the filter. Turn on the water supply. To prevent leaks, you need to make sure that the valve on the storage tank is closed. Next, the tap opens through which purified water will flow. After 10-15 minutes, a thin stream will appear. Equipment, taps and pipes are carefully examined for leaks.
System connection diagram
Before using filtered water for food purposes, it is recommended to flush the system at least twice.
Before installing the purification system, it is recommended to conduct a water analysis and take a sample to the sanitary and epidemiological station. A detailed description of the composition and chemical formula will allow you to select the desired filler in the cartridge, since each of them has its own individual characteristics and affects tap water differently. Cartridges must be replaced at least once every six months.
Installation of a tap for purified water
For drinking water, a separate tap is installed or a combined tap is purchased - combined with the supply of domestic cold and hot water. In the first case, the tap is included in the accessories for the filters. If you don’t have one, you should purchase another one, and with it a suitable adapter and fittings for connection. The faucet is mounted on the sink or countertop, away from the mixer.
Crane installation procedure:
- A 12 mm hole is drilled for the tap. For this, an appropriate drill is selected. It is recommended to use a 5–6 mm drill first, and then larger ones.
- The faucet is installed into the finished hole through the seal at the top and secured with a nut screwed onto the hollow tube from below. Don't forget to check that all gaskets are in place.
Start-up and flushing
Before starting operation, it is necessary to flush and check the system. This is done like this:
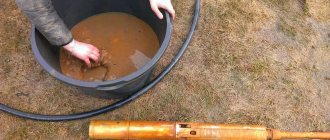
- Wash the filter elements by running water with the valve of the storage tank closed. About 10 liters of water are drained. Simultaneously with flushing, air is forced out of the system.
- Stop the flow of liquid into the filter. Check for leaks. If necessary, correct errors during connection.
- Fill the system with the valve of the storage tank open. This will take several hours. Afterwards all the liquid is drained.
- For drinking and cooking, use water only after refilling the container.
Tips for use
Contaminants retained during cleaning accumulate at the bottom of the system . And, in order not to clean it every time, a valve is cut into the bottom of the cleaning unit, which is subsequently connected to the drainage.
Reverse flushing removes any accumulated debris. This process can be easily automated - an electric drive with a timer is installed.
An equally important point is replacing cartridges. If you do not do this on time, then not only will they not cope with their task, but they will also pose a threat.
Dirt that accumulates during cleaning can end up in the water, making it even dirtier.
In flow-through models, replacement is carried out every year , but these systems have one feature - they must work constantly, otherwise microorganisms will begin to develop in the cartridge, and the quality of filtration itself will decrease with downtime.
How to properly install a water filter on cold water in an apartment or private house with your own hands
Professionals recommend performing the following operations in turn:
- Do not remove the standard tap; it is useful for cleaning the room and washing dishes. To release drinking liquid, install the second jib, included in the kit, on the opposite side of the sink. Cut a circle of the appropriate diameter in stainless steel and secure the tap with iron nuts, plastic disks and fumig tape.
- Turn off the valve to the general water supply and wait until the residue drains out. Next, using an adapter in accordance with the schematic diagram indicated in the instructions, make a branch.
- Release the metal-propylene hoses for input and output from the closing devices. A hose is placed on the valve inserted into the pipe, through which filtered moisture will flow. To do this, the part must be rested against the wall and pressed on it so that the gap between the boundaries of the valve and the pipe is minimal.
- The drainage outlet must be connected to the sewer, having previously made a passage of the required parameter in it.
- Before starting operation, all connecting points should be checked for sealing.
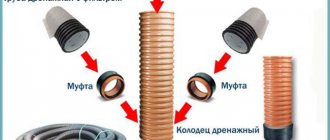
Installation of a coarse filter
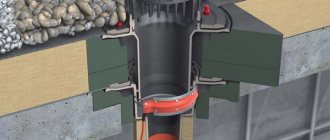
The coarse filter has another name - mud filter. The fact is that such a device is designed to retain the largest particles of mechanical impurities. The design of coarse filters has several options, but all types are installed according to the same scheme.
The main condition that must be observed when installing the device is the location of the filter immediately after entering the apartment or house. The second condition is installation before the meter, but after the locking fittings.
The installation process cannot be called very complicated. The filter housing has a thread through which the device is screwed onto the pipe. To seal the threaded connection, you can wrap a sealant around the pipe.
When installing a water filter, you must choose its location correctly. This is due to different types of filter: perpendicular and oblique. However, regardless of the type of device, the sump cover should always be on the bottom. Otherwise, water filtration will be carried out as usual, but impurities will cause the product to fail.
Installation price by a specialist
Many companies that distribute cleaning filters also offer equipment installation.
This is done by qualified specialists who understand plumbing.
On average, the cost of installation in Moscow and St. Petersburg varies from 1000 to 2000 rubles .
List of services performed by masters:
- Connecting equipment to the water supply;
- Installation of the faucet on any surface of countertops and sinks;
- Measuring pressure in the system;
- Installation of pumping equipment, if necessary;
- Water quality analysis before and after.
In Russia there is a special service for finding specialists - YouDo, where reviews and lists of work performed are available.
Reference. Prices for installing a cleaning filter start at 800 rubles.
Which manufacturer should you prefer?
We all know that both foreign and domestic manufacturers are engaged in the manufacture and sale of water purification systems. Some of them have been in this field for many years, while others are just starting to produce water filters.
Therefore, if you just can’t make a choice, it is recommended to forget about stupid stereotypes that foreign ones are always better. A good option would be to buy a model from a domestic manufacturer with a name and reviews. Moreover, there are enough of these in our market. What are such giants worth:
- AquaFor, whose filters are distinguished by the presence of a large number of absorbent substances that perfectly get rid of various impurities; in addition, models from AquaFor have a stylish design and convenient sizes;
- Geyser, whose filters are universal and cope well with complex water purification;
- Barrier;
- Atoll and others.
Read reviews of water purification filters depending on technical characteristics, scope of application and ]here[/anchor].
It is also worth giving preference to “our” manufacturers because if a malfunction is detected, it will be much more difficult to find the necessary part for an imported product. Moreover, filters from domestic manufacturers are designed for our water with all its features and disadvantages.
How to properly insert and connect a main water filter-purifier
If you do not want to contact specialists, then you will have to double-check every step.
Let's start the process:
- Get all the tools necessary for the job: drill, cutter, adjustable wrench, tape or tow, flexible hose, connecting rubber bands.
- Close the valve coming from the central pipe.
- Check several times to see if there is any liquid coming out of the tap.
- Make a mark on the wall; the distance from the floor to the filter cartridge should be at least 15 cm. This parameter is necessary for easy replacement of the unit. Attach the holder to the selected point.
- Hang the cleaning structure. Use sealing materials.
- The passport will indicate the direction of the water flow. Proceed according to the instructions. Do not confuse the abbreviation on the fitting and position the flasks correctly.
- After installing the equipment, you can open the tap. Don't be afraid if the water comes in jerks at first, that's how it should be. After all the air has left the filter blocks, the liquid will flow in a uniform stream. Add pressure to the tap to check the tightness of the joints of the connecting elements. The problems will have to be fixed.
- After repeated checks, you can start the system. The first liquid should not be consumed; let the structure rinse for five minutes, and then use it for its intended purpose.
To avoid mistakes, we recommend that you do not act on your own, but contact a reliable company that provides a full range of services from choosing a cleaning product to inserting into the main pipe.