For a person to live comfortably, water supply and lighting of the premises are necessary, as well as properly functioning plumbing fixtures connected to the sewer system. One of the most popular plumbing fixtures is the toilet and cistern. Currently, cisterns are most often equipped with buttons responsible for the smooth flush of water into the toilet. The toilet cistern button becomes unusable over time or requires repair. Read on to find out how to do this.
Drain tank equipped with a button for draining water
Toilet device with a button
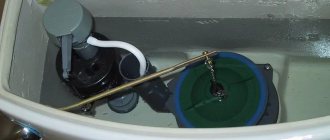
The toilet cistern is a reservoir for storing water for flushing. In order for it to work, it contains some fittings.
The flush tank mechanism with a button consists of the following two elements:
- Drain mechanism.
- Fill valve.
The drain mechanism is directly connected to the button and is responsible for draining the water. The drainage mechanism has a sealed membrane, which is located at the bottom of the device. It protects against the appearance of gaps through which water can flow into the toilet.
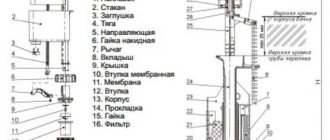
The device of the toilet cistern flush mechanism with a button
The drain mechanism can be equipped with:
- Single-mode button. When pressed, all the water in the tank drains.
- Dual mode button. The button has several operating modes and is divided into two parts: large and small. When you press the large part of the button, the water will drain completely from the tank. When draining water with a small part of the button, the water flows partially, up to half of the available liquid in the drain container.
Dual mode toilet button
The drain valve for collecting liquid into the tank . This mechanism has a float, thanks to which the water level in the drain tank is adjusted.
Toilet fill valve
There are two options for supplying water to the tank:
- lower supply;
- lateral inlet
When installing a valve with bottom water supply, all connections must be sealed. Tanks with a side intake of water are more common than those with a bottom intake. A feature of this type is the appearance of noise when drawing water.
Bottom and side water supplies to the toilet cistern
All parts of the fittings that are located inside the cistern are completely interconnected. When you press the button, water begins to drain from the tank. Accordingly, the fill valve float moves to the bottom of the tank, thus opening the inlet valve. Water begins to flow into the container, and with the water level the float rises until it is completely filled, until the inlet valve is closed.
Toilet button malfunctions
All signs of a malfunction of the toilet flush mechanism button can be classified as follows:
- insufficient volume of water for flushing (full or partial);
- sticking;
- sinking (falling through).
In the first case, we are not talking about how to repair the button, but about adjustment.
Adjustment
The full flush volume is adjusted using a float - its position on the rod relative to the overflow tube ensures the water level in the fully filled tank. The standard recommendation is that the supply should be cut off when the water surface is 15-20 mm below the overflow edge:
- Setting the float. At the bottom feed valve, the rack rod is disengaged from the float, which is then moved up or down along the guide. The side feed valve is adjusted in a similar way - the only difference is in the relative position of the float and the shut-off valves of the water supply system.
- Adjusting the flush tank button comes down to moving the overflow tube relative to the “glass” of the push-button mechanism and adjusting its height. To do this, unscrew the fixing nut on the tube, disconnect the rod, move the tube to the required position and tighten the nut. Then, pressing the petals on the glass and moving the guides, the height of the entire mechanism is set. At the final stage, the rod is snapped back onto the overflow tube clamp.
The fittings of a two-level tank also have a small flush float, which must be moved along its own rack guide on the overflow tube. The position of this float determines the volume of water during incomplete flushing.
Note. Two-button fittings may have an additional option - setting the full reset volume to a minimum using a separate damper on the cup body.
But if a button gets stuck or sticks, then what to do - adjustment or repair - can only be decided after finding out the cause of the malfunction.
Types of breakdowns and their elimination
There are several common malfunctions that manifest themselves as follows:
- water continuously flows from the cistern into the toilet;
- constant flow of water from the water supply into the container;
- To drain the water, you must press the button repeatedly;
- the button on the drain tank does not work completely;
- the toilet is leaking;
- The collection of water into the cistern is too noisy.
In any of the above cases, you can carry out repairs yourself, because the process of such work is not very complicated. The most important thing is to determine the cause of a particular problem and eliminate it.
Tank leakage
A cistern leak can occur for four reasons. The first and most common is due to the tank overflowing, when all the excess liquid begins to flow out through the overflow. This can happen for several reasons:
1. The gasket located at the outlet of the drain valve is not pressed enough. It is necessary that the gasket is securely pressed to the toilet part. After all, leakage can occur not only due to loss of elasticity or deformation.
The drain valve gasket may be loose or deformed during use, causing water to leak.
2. During use, the rubber gasket may become deformed and lose elasticity, so a gap appears through which water begins to flow.
3. A crack in the drain valve may appear inside the drain tank, through which water flows.
Drain valve
4. There is a pin in the valve body that holds the float. Due to frequent use, it can rust, which also leads to water leakage.
Toilet float pin
The second reason is the bolts that connect the toilet to the cistern . Bolts are either plastic or steel. In the case of the first, due to use it bursts and the liquid gradually leaks. If we talk about steel ones, the problem is that over time it rusts, and the effect is the same.
Connecting bolts
The third reason is a faulty rubber bulb . Over time, any rubber part becomes less elastic than when it was new, and a rubber bulb is no exception. It becomes hard and does not take the desired shape, causing water to leak.
Drain valve bulb
The fourth reason for the breakdown is the skew of the tank, or the shift of the float lever in the tank.
There are two main reasons for the misalignment of this device: poor-quality plumbing parts, or the presence of a hole in the float into which water flows. Another reason is the frequent use of the plumbing fixture.
Toilet cistern repair
If water leaks before reaching the overflow, then the problem is in the bolt . To solve this problem you need to do the following:
1. Check whether water flows only to the overflow level.
2. Shut off the water supply and drain the drain tank.
3. Remove the hose that supplies water to the tank from the water supply system.
Removing the water supply hose from the toilet cistern
4. Next, you need to unscrew the bolts holding the shelf on the toilet, and pay attention to the fittings, inspect them in order to understand what condition they are in. If it is working, then you should simply replace a couple of bolts, or purchase a new set of fittings.
The process of unscrewing toilet bolts
Old rusty bolts, if they prevent the tank from being removed, must be cut off with a hacksaw or other cutting tool.
5. Next, you need to remove the shelf from the toilet, drain the remaining water at the bottom of the tank and place the tank on a flat surface.
6. Next, you should assemble the tank using new, preferably brass, bolts and repeat the above steps in the opposite direction.
It will not be superfluous to replace all rubber gaskets.
Basic breakdowns and repair methods
Before repairing a toilet cistern with a button, it is important to figure out what exactly the problem is. Regardless of the type of fittings for the toilet flush tank, there are three main problems in the operation of this plumbing equipment:
- constant flow of water into the sewer system or into the premises;
- lack of water pressure at the entrance to the container;
- inability to control the drain mechanism.
These malfunctions can arise for various reasons , depending on which you decide how to fix a toilet flush cistern with a button:
- Loose fit of the bulb (plug) to the drain hole. You can minimize the likelihood of such a situation occurring by initially purchasing reliable plumbing fixtures from well-known manufacturers.
Diagnostics is carried out as follows: after removing the cover, additional force is applied to the plug rod, pressing it against the drain hole. If the leak is fixed, the situation can be corrected by making the plug slightly heavier by hanging additional weight on the stem in the form of stainless metal nuts, for example.If the leak does not stop, you should replace the plug or clean the surface of the drain hole from deposits that arise during operation (especially when using too hard water).
- It is also possible that the mechanism that regulates the flow of water into the container may malfunction .
In this case, the constantly incoming water is discharged into the sewer system through the overflow pipe. In this case, it is necessary to pay attention to the integrity of the structural elements of the fittings : rods, fasteners, float, inlet valve and, if necessary, replace/repair them. Or simply adjust the position of the float, and then securely fix it. - Leakage into the room is caused by two reasons : a violation of the integrity of the tank itself or a loose fit of the gaskets at the threaded connections - at the junction of the tank with the toilet or the outlet of the overflow tube.
Sometimes it is enough to tighten a loose connection, but more often there is a need to replace rubber gaskets . - Lack or insufficient water pressure at the inlet to the tank is usually caused by a clogged inlet valve.
To avoid this situation, it is necessary to install a water filter before the connection point to the water supply system. If such a problem occurs, you should unscrew the valve, first releasing all the water from the container and closing the inlet valve. Then clean the valve inlet with a ton of wire or a sewing needle and rinse under running water.
How to determine if the drain tank is faulty
Solving the problem does not require much effort or knowledge; the most difficult thing is to determine the cause of water leaking from the cistern into the toilet. To find the problem, you should conduct the following experiment:
1. Remove the lid from the toilet.
2. Raise the float one centimeter. If the liquid stops flowing, then the reason has been found. The water flows due to the fact that the lever is slightly bent and does not shut off the water when it reaches the filling line.
3. If water continues to flow from the tank, then you need to carefully check the valve itself. You need to be sure that the fixing pin is in place, that it is intact and that during operation it fixes the lever exactly in the valve itself.
It is necessary to check the fixation of the float with a pin (lever) at the water supply valve
4. However, if it is discovered that the pin has broken, it can be temporarily replaced with a thick piece of copper cable, and if the problem is the deformation of the hole intended for the pin, then you simply need to replace the valve itself.
5. If the problem is still not solved, then the last reason may be that the gasket (diaphragm) is not pressed to the valve hole. In this case, it should be adjusted, but if it still leaks, then you need to purchase a new gasket and replace it.
Valve hole gasket (diaphragm)
If the problem is in the pear, then there is no point in repairing it; it’s easier to just replace it with a new one. However, when purchasing, you should choose the softest one from all those offered, because with use they all become more rigid. The bulb is secured to a thread, so to remove it, you need to unscrew the bulb from right to left, respectively, to screw in a new one, you need to turn it in the opposite direction.
The rod on which the bulb is placed and twisted
To temporarily solve the problem, you can use some kind of weight; it should be hung on the rod. Thanks to the additional weight, the rubber bulb will be pressed against the saddle.
Installing the weight on the rod. After this, a pear is put on the rod.
Internal organization
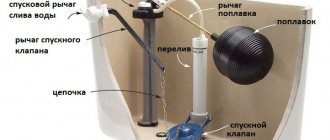
The toilet cistern consists of two simple systems: collecting water and draining it. To troubleshoot possible problems, you need to understand how everything works and works. First, let's look at what parts the old-style toilet cistern consists of. Their system is more understandable and visual, and the operation of more modern devices will be clear by analogy.
The internal fittings of this type of tank are very simple. The water supply system is an inlet valve with a float mechanism. The drain system is a lever and a bulb with a drain valve inside. There is also an overflow tube - it drains excess water from the tank, bypassing the drain hole.
Old design cistern design
The main thing in this design is the correct operation of the water supply system. A more detailed diagram of its device is shown in the figure below. The inlet valve is connected to the float using a curved lever. This lever presses on the piston, which opens/closes the water supply.
When filling the tank, the float is in the lower position. Its lever does not press on the piston and it is pressed out by water pressure, opening the outlet to the pipe. The water is gradually filling up. As the water level rises, the float rises. Gradually it presses the piston, cutting off the water supply.
The device of the float mechanism in the toilet tank
The system is simple and effective; the filling level of the tank can be changed by bending the lever slightly. The disadvantage of this system is the noticeable noise when filling.
Now let's look at how draining water in a tank works. In the version shown in the figure above, the drain hole is blocked by the drain valve bulb. There is a chain attached to the bulb, which is connected to the drain lever. We press the lever, lift the bulb, the water drains into the hole. When the level drops, the float moves down, opening the water supply. This is how this type of cistern works.
Modern models with lever flush
There is less noise when filling toilet tanks with bottom water supply. This is a more modern version of the device described above. Here the tap/inlet valve is hidden inside the tank - in a tube (in the photo there is a gray tube to which the float is connected).
Drain tank device with water supply from below
The operating mechanism is the same - the float is lowered - the valve is open, water flows. The tank filled, the float rose, and the valve shut off the water. The drainage system remained almost unchanged in this version. The same valve that rises when you press the lever. The water overflow system has hardly changed either. This is also a tube, but it goes into the same drain.
You can clearly see the operation of the drain tank of such a system in the video.
With button
Models of toilet tanks with a button have similar water inlet fittings (some with side water supply, some from the bottom). Their drain fittings are of a different type.
Tank device with push-button drain
The system shown in the photo is most often found in domestically produced toilets. It is inexpensive and reliable. The design of imported units is different. They basically have a bottom water supply and another drain and overflow device (pictured below).
Imported fittings for the cistern
There are different such systems:
- with one button the water is drained while the button is pressed;
- draining starts when pressed, stops when pressed again;
The working mechanism here is slightly different, although the principle remains the same. In this fitting, when you press the button, the glass rises, blocking the drain. The stand remains motionless. In short, this is all the difference. The drain is adjusted using a rotary nut or a special lever.
Siphon membrane repair
If water drains from the tank only after repeated pressing or the liquid constantly leaks, the membrane should be replaced.
Installation of a flush cistern with a side drain: 1 – overflow pipe; 2 - water supply; 3 - float valve; 4 — float; 5— float lever, 6— siphon; 7— membrane; 8 - metal plate with holes; 9 - traction; 10 — water release lever; 11 - gasket; 12 – siphon retaining nut; 13 — fixing nut; 14 - drain pipe.
This work is carried out as follows:
1. Instead of the tank lid, place a crossbar; for this you can use a small rail or tube.
2. Tie the float lever (5) to the crossbar.
3. Completely drain the water from the cistern.
4. The nut that connects the drain pipe to the tank (13) should be removed.
5. Simply loosen the siphon nut (12) a little.
6. The siphon itself (6) must be disconnected and removed.
7. Remove the damaged membrane (7) and install a new one, which should have exactly the same dimensions and shape as the old one.
8. Install the cistern fittings in the reverse order.
Replacing the button with a new one
If the push-button assembly fails, there is no need to replace the entire drain valve. The problem can be resolved by replacing the toilet cistern button. But it must be the same model as the broken part. The work is carried out in the following sequence:
- remove the faulty unit by disconnecting it from the tank lid;
- check the settings of the drain valve and the float of the shut-off valves on the water supply;
- install a new button, check the operation of the drain device.
If the toilet tank was produced a long time ago, or the model is so rare that it is not possible to find “spare parts” for it, then you will have to completely replace the entire flush valve with a new one that fits its installation dimensions.
Faulty tank drain button
If the flush button does not work, then in most cases it is necessary to repair the damaged rod (9), which connects the toilet button to the flush mechanism.
Wire traction
Button with pull rod in the form of a tube
It is necessary to disconnect the mechanism and the broken element, remove and install a new one. However, for temporary use, you can make the pull yourself using a thick piece of wire. But for normal and long-term operation, you should purchase a new, serviceable mechanism.
What should I do if the button must be held down to drain completely?
Sometimes there is a situation when, when replacing an old flush valve with a new model, you may find that for some reason the toilet button does not sink all the way in, and you have to hold it down to flush completely. But here you need to know that this may be a model with “economical dosing”. And for her this is a standard mode, and not a sign of a malfunction.
If a similar incident occurs with conventional fittings, then either the main float must be adjusted, or the valve malfunction must be found and repaired.
Noise from the toilet tank when filling with water
Sometimes the problem is the loud noise that appears when the drain tank is filling. There are several ways to solve it.
You can try reducing the water pressure. To do this, you simply need to tighten the water supply valve.
If this does not help, then you will have to disassemble the drain barrel and check all the gaskets. Perhaps one of them is leaky or very worn out, and it is its rubber that is the source of noise. Then you should replace it.
Worn float valve gasket
If everything is in order here, then you should check all the hoses and pipes of the toilet. Perhaps they are clogged with dirt or other deposits.
As a last resort, you can make a muffler that will absorb excess sound. To do this you need:
1. have or purchase a flexible plastic tube;
2. mount it vertically in relation to the liquid level at the entrance to the float valve;
3. Place the lower end of the plastic tube under water.
More details about this muffler can be seen in the video:
If such a homemade muffler does not solve the problem, you need to buy and install a stabilizing valve, which will independently regulate the pressure of water entering the drain tank.
In rare cases, it is necessary to replace the entire drain system.
How to regulate the water supply yourself?
The filling level of the toilet tank is adjusted in the same way in all modifications - by setting the correct position of the float . Its correct position is considered to be one in which the flow of water into the container completely stops upon reaching a level that is a few centimeters short of the edge of the tank.
Depending on the design of the fittings, adjustment is carried out by bending the brass rod , sliding the float along the plastic guide, followed by fastening (if it is horizontal) or by rotating the adjusting screw clockwise (if necessary, reduce the filling level) or against (if necessary, reduce the maximum level) – for modifications with a vertical float arrangement.
the position of the overflow tube affects the filling level of the container . Its upper edge should be located one to two centimeters above the water level in a completely filled tank.
In two-button modifications there are two such rods . To adjust the flush cistern of a toilet with two buttons, remember that one is responsible for performing a complete flush, the second activates the partial flush mechanism.
How to adjust the flush tank with a button - watch the video:
Problem with the toilet bowl installation
Breakage of the bowl is extremely rare. This is only possible if the toilet was initially fixed incorrectly to the floor or wall. Therefore, you should install the device correctly and repair the installation in a timely manner, thanks to this you can avoid serious and costly breakdowns. If a puddle appears on the floor around the toilet, then most likely the breakdown will be in the tank itself. Here are some possible reasons:
- the seat is damaged due to corrosion;
- the pear does not stick tightly enough;
- float valve is not adjusted correctly;
- insufficient tightness of the nut connection.
When any gasket wears out, it should be replaced immediately with a new one.
Replacing the installation gasket
In order to tighten the loose nut at the base of the overflow in the tank, you need to remove it and tighten the nut. However, sometimes a retaining clamp can be used. You can also replace a worn cuff.
Faulty intake valve
A malfunctioning inlet valve can also cause water leakage. To check, you need to press the button to drain the water, and if at this moment the valve does not close tightly or moves, then it should be repaired. This problem can occur due to clogging or a worn rubber gasket. To solve it you need:
1. turn off and drain the water in the tank;
2. remove the valve and check its gasket;
The intake valve is removed by turning its entire body clockwise
3. if it is worn out, then replace it with the same one;
4. if the problem is not with the gasket, then disassemble the valve and carefully remove all dirt from it and its parts (for example, with an old toothbrush).
5. assemble everything in reverse order.
You can also watch a video about repairing the intake valve:
However, simple cleaning of debris or even replacing a part does not always help. In such cases, a new filling mechanism should be installed.
How to put everything back?
To put the toilet tank back together, you need to carry out the following operations:
- secure the fittings responsible for filling/draining water, using rubber gaskets where necessary;
- adjust the position of the float and drain valve;
- cover the tank with a lid;
- screw the push-button glass (in models with one button) or tighten the fastening screw and latch the control buttons - in two-button versions.
As can be seen from the above, there is nothing complicated about self-installation, repair and configuration of flush cisterns for toilets with a button . And for most people with at least some technical skills, it will not be difficult to carry out these procedures on their own, saving on calling a plumber.
What do you think of this article?
Toilet float repair
There are many reasons why water constantly leaks. The float lever may have shifted or become skewed. In order to bring it into good condition, you need to put it in the correct position. Basically it is located 2.5 cm below the pipe through which the water is supplied. If necessary, it must be adjusted as in the image below.
Adjusting the toilet float
Also, to solve the problem of water leakage, you can pay attention to the float located inside the tank. If upon inspection it is found that there is water inside it, or damage is visible, this means that it has become too heavy and, accordingly, water is leaking. You can repair the float as follows:
1. Remove the float;
2. Completely pour out the water;
3. Seal the resulting hole securely;
4. Put the float in its original place.
To seal the hole on the float, you can use heated plastic or a regular plastic bag, which must be securely fixed to the float. However, sealing the holes in this way will only allow the float to be used temporarily, because over time this problem will make itself felt. Therefore, in the near future it is advisable to purchase a new float and install it in place of the old one.
Cistern float
Based on the above, the most important thing is to find the cause of the breakdown, then either repair it or replace it with a new part. When installing a new mechanism, it is important to adjust it correctly. If you really want to, all this work can be done without a specialist.
