The attractiveness of the architectural design of a private house largely depends not only on the chosen project, but also on how well the drainage system is designed and installed. The necessary roof accessory simply and elegantly emphasizes the entire ensemble of the building and gives it a complete look.
At the same time, the roof drainage system is one of the most necessary external engineering systems of a house.
Design features of drains
Like any other engineering system of a private house, drainage is a necessary element of the building's supply system.
The features of the drainage system are:
- gutters - metal, plastic or ceramic gutters designed to collect rain and melt water;
- connecting elements of gutters;
- funnels - elements of drains designed to receive water from gutters and further direct them into drainpipes;
- drainpipes - an element of drainage systems, the main purpose of which is to transport water through pipes down the facade of the building towards the water intake well;
- outlet hoses or outlet funnels are part of a system for directing water to a designated place or simply releasing water onto the ground.
In addition to the main elements of the drainage system, there are also auxiliary elements that play an equally important role in the effective functioning of the drainage system:
- fastening gutters;
- fastening of drainpipes;
- connecting elements;
- gratings;
- overflow;
- dividers.
How to solve a freezing drain problem
Unlike rainwater, snow poses a greater problem for gutters. To prevent it from accumulating, the gutters must be lowered below the roof slope line. Then the melting snow will slide over the gutter. To ensure this, it is recommended to reinforce a protective mesh over the gutters. If the roof slope is very flat and the snow slides slowly, you will need to install snow guards on the roof.
It is necessary to install frost protection on the roof gutter
There is also a more progressive method. A heating cable is laid under the gutter, melting snow and ice into melt water. The cable can also be laid under the roof, in close proximity to the gutter.
Laying the heating cable and installing a drainage system
Types of metal drainage systems
The originality of the technical solution for a house's drainage system largely depends on what material is chosen for it.
Until now, in the production of gutters, metal systems hold the clear lead. These include:
- copper drainage systems are the most durable, but at the same time the most expensive type of metal drains;
- gutters made of sheet metal with PVC coating , a feature of such systems is their durability and the ability to make the house even more expressive using the color range of PVC coating;
- gutters made of galvanized iron - the most budget-friendly type of drainage systems;
- gutters made of aluminum structures are a rare type of system, used due to its lightness.
When evaluating metal drains when choosing, you should know that such systems have good structural qualities, are easy to install, allow you to change the geometry and angle of the drains, have a large number of different elements, are cheap to purchase and install, but require careful attention during assembly, and, to unfortunately too noisy when it rains.
Popular gutter manufacturers
Many manufacturers present drainage systems for various types of roofs. One of the popular ones is gutters. The products are available in various colors and are resistant to mechanical and climatic influences. Döke products are divided into several series depending on technical characteristics, which makes it easy to make a choice.
provides a 25 year guarantee on its products
The products are also in demand and are presented in a large assortment. The elements of the drains are easily connected to each other, forming a strong and durable system. The company specializes in the production of plastic parts using modern technologies.
Plastic gutters are easy to install and look very attractive
produces various types of gutters, but one of the most popular options is a complex made of steel and plastic. The appearance, technical characteristics and size range of parts are varied, but all products are durable and easy to install.
Aquasystem gutters are a kind of hybrid of metal and plastic products
Video: installation of the Deke drain
Plastic plums
The roofing of houses and cottages using modern roofing materials has largely been driven by the market for plastic drainage systems. Today, the market for plastic gutters is able to satisfy all needs and the most incredible technical solutions for roofing.
The advantages of plastic systems today are obvious - all manufacturers, without exception, produce not just a set of individual elements, but almost universal designs.
Today, thanks to plastic gutters, it is possible to choose not only a drain that is suitable for the length of the building or slope, but also to harmoniously fit it into the external appearance thanks to the possibility of joining elements to bypass eaves, protrusions, change the angle of connection and extend the outlet sleeves.
Nowadays there are mainly four main types of plastic gutters available:
- gutters 75/63 mm are an excellent solution for roofing a small area - for a separate individual house, garage, outbuilding;
- 100/90 mm gutters are used for large buildings and structures whose roof slope area exceeds 200 square meters. meters;
- gutters 125/90 mm - used for large residential buildings, industrial premises;
- gutters 150/110 mm - a larger cross-section of the gutter ensures good drainage from the roofs of buildings with a large roof area.
Choosing drainage material
Modern roofing systems for draining rainwater from the roof are divided into metal and plastic. Let's look at the advantages and disadvantages of both varieties.
Metal
This category includes systems made from the following materials:
- carbon (black) steel;
- stainless steel;
- copper;
- titanium;
- aluminum.
The most affordable, and therefore the most common, are drainage systems made of ordinary steel.
To prevent corrosion, it is coated with zinc (galvanic method or hot-dip galvanizing) or polymers. Gutters with a polymer coating look very attractive because they are made in color.
However, plastic is a fairly soft material and even with minor mechanical stress it is easily scratched, as a result of which the metal begins to rust.
Copper drainage system
Galvanized steel is more durable in this regard, so those homeowners who are primarily interested in functionality and durability prefer it. Today, many manufacturers apply pural on top of zinc - a polyurethane coating with the addition of polyamide, which performs a protective and decorative function.
Products made of stainless steel, copper and other metals have a spectacular appearance, but are very expensive, so they can only be seen in elite mansions.
Metal gutter systems have two advantages:
- strength;
- wide range of operating temperatures (resistance to severe frost is especially important).
Flaws:
- heavy weight;
- high price;
- complexity of installation (special tools for cutting and welding are required);
- danger of corrosion.
The metal system will look most harmonious on a roof made of metal tiles and corrugated sheets.
Plastic
Various polymers are used to make drainage parts, but in the vast majority of cases polyvinyl chloride is used.
It does not have the disadvantages characteristic of metal products, that is, it is cheap, lightweight, resistant to corrosion and easy to process.
In addition, plastic can be shaped into any shape, so polymer systems often have more interesting designs than metal ones. But PVC parts are easy to damage, and in extreme cold they become too fragile. For this reason, they are not recommended for use in regions with harsh winters.
Plastic drainage goes well with non-metallic roofing, for example, bitumen shingles.
To ensure reliable fixation of the drainage system, use only metal fasteners, even if only plastic parts are used.
When choosing a drainage system material, you should take into account the average amount of precipitation falling during the winter. If the likelihood of icing of the system is high, it is better to install a metal structure.
To preserve buildings and plantings, you need to be able to properly organize the drainage system. Installation of a drainage system around buildings and sites - types of drainage (open, backfill, closed) and creation with your own hands.
You will find a water supply diagram for a private house with connection to centralized networks here.
You will find everything about storm drainage trays in this topic https://aquacomm.ru/cancliz/zagorodnyie-doma/avtonomnaya/livnevaya/lotki.html. Concrete, plastic, polymer-sand storm water inlets and their main parameters.
Types of gutters and downpipes
A rather original architectural solution for the appearance of the building will largely depend on what shape the gutters and drainpipes will be installed. Types of gutters are usually divided according to the type of cross-section of the gutter.
The most common gutters are:
semicircular shape;- square;
- trapezoidal gutters;
- rectangular;
- semi-elliptical gutters;
- gutters that follow the shape of the cornice.
Such a number of different shapes of gutters is associated primarily with the specifics of their use, so semicircular gutters, most often found among all manufacturers of drainage systems, have a universal purpose; such gutters can be mounted on any roof and under any roof covering.
Square gutters rectangular gutters are designed for specific solutions, so they are not widely used in individual construction.
Semi-elliptical gutters have found their use in the construction of buildings with a large roof area, since they have a larger area and are able to receive and remove rainfall for a much longer time compared to other types of gutters.
It is important to know that when choosing gutters, in addition to the standard sizes of drains, it is necessary to correctly select drain pipes. For each type of gutters, certain types of drainpipes and accessories are designed in the form of fasteners, brackets and other elements of the drainage system.
Generally, round downspouts are used for semi-circular and semi-elliptical types of gutters. For rectangular, square and trapezoidal - profile. At the same time, the versatility of the systems allows using adapters to combine profile and round drainpipes during installation.
Purpose of storm drainage
Sediment drainage systems are gutters and pipes connected in a certain way. They encircle the building along the perimeter of the roof and go down in several places. Next, the water is sent either to the central sewer system, city storm drains, or to storage tanks to collect precipitation.
Main purpose of the drain:
- protection of walls, foundations and basements from getting wet and flooding;
- protecting the site from erosion, and the local area from dirt and puddles.
An additional purpose, important for gardeners, is the accumulation of free rainwater for irrigation and other household needs. A bonus includes clean walls, windows and the basement of the house, which is also important.
Types of brackets for attaching gutters
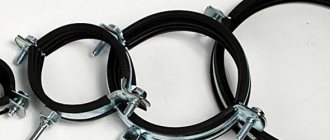
The design of the drainage system also provides a method for attaching the drainage gutter to the edge of the roof. Fastening is carried out using special fastening elements - brackets. Depending on the gutter material, manufacturers also provide a gutter fastening system.
This is largely due to the fact that the brackets must match the shape and color of the gutters. For example, it is problematic to secure box-shaped gutters with brackets for round types of systems.
Fastening the brackets involves securing them in several ways, and this is a very important point, since the choice of fastening type will determine the location of the bracket fixation:
- front brackets are necessary for fastening to the wind board, they are adjustable, however, during installation they require a lot of attention, since the slope of the gutter must be strictly observed;
- flat curved brackets are designed for fastening to the roof rafter system or to the outer board of the sheathing;
- The universal type of bracket allows for fastening both to the wind board and to the rafter system or sheathing.
It is important to know that when installing the brackets, you should maintain an angle of inclination towards the drain and maintain a certain distance to evenly distribute the load on the gutters in case of icing or a large amount of water.
Basic mistakes in installing roof gutters
- Incorrect gutter slope. Usually the slope is 3-5 mm per meter. If this standard is not observed, the entire drainage system may stop working. With a greater slope, the gutter may move away from the roof, and water simply will not flow into it. If it is less, areas with stagnant water are formed, dirt and vegetation accumulate. It is not always possible to correct the error; cleaning the drain (which will have to be done regularly) is a long and difficult task.
- Small number of brackets. The brackets distribute the load along the entire perimeter. If there are not enough of them (the distance between adjacent brackets is more than 0.5-0.6 meters), the structure will begin to deform and crack.
- Incorrect coupling connection. It is important to use seals and join elements with good force. If the connection is incorrect, leaks appear in these places.
- Incorrect gutter placement. The gutter is installed so that the distance between the edge and the roof line is 20-25 mm. This distance ensures safety for the structure in case of sudden snow melting and at the same time collects rainwater. If it is less, there is a risk of damage to the system from snow melting. If it is more, rainwater from the roof will not fall into the gutter.
During the cold season, ice forms inside the gutters and a large amount of snow accumulates. As a result, water begins to overflow and icicles appear. The risk of the entire drain collapsing increases.
A solution to this problem can be a heating cable - a special wire that generates heat when electricity is supplied.
They install it after installing the drain, simply laying it inside the gutter and vertical pipes, securing it with special clamps. Along with the cable, installation of a thermostat and sensors is provided.
The thermostat determines the required current for a given temperature. For example, at zero temperature the cable may heat up little and consume less electricity; in severe frost, stronger heating is required, which means electricity consumption increases.
The thermostat knows nothing about the temperature around it and can be installed inside a building. So that it can set the temperature depending on the weather, special sensors are attached to it (may not be included in the kit and must be purchased separately).
In some cases, the cable only in the drainage system is not enough, and it is laid in a snake on corrugated sheeting. The cable is secured using special clamps.
To calculate the power consumed by heating, the total cable length is multiplied by 25 watts.
The cable on the roof and in the gutter is one system. They are controlled by the same regulator and connected to the same sensors.
Installation of a rainwater drainage system from the roof
The drainage system is installed in the following order of main stages:
- calculation of the drainage system;
- marking, adjusting and securing brackets;
- installation of gutters and water intake funnels;
- installation of drain pipe brackets;
- installation of drainpipes.
Distributing the entire installation process into such stages will significantly save time and effort during work, but most importantly, prevent mistakes, the correction of which will take much longer.
Securing the brackets
The most critical stage of work on installing a drainage system.
It is important to secure the brackets correctly to avoid the following mistakes:
to prevent the wall of the house from getting wet, it is necessary to maintain a distance of 7 - 8 centimeters from the gutter to the wall of the building;- to quickly collect and drain water, it is necessary to maintain a slope of about 15 - 20 mm per 1 linear meter of the gutter, ensuring a good flow of both rain and melt water, even with the condition of freezing during cold weather;
- It should be remembered that the optimal gutter length is 10 meters ; if the gutter is larger, then two water intake funnels are installed or a slope is made from the middle.
The rules for attaching brackets are quite simple:
- The bracket is mounted first in the highest place;
- the extreme bracket is mounted on the opposite side of the slope;
- a marking cord is stretched between the brackets, along which the remaining fasteners are attached;
- the distance between the fasteners is selected to be approximately 50 centimeters , depending on the assembled gutter, so that there is no coupling or water inlet funnel in the place where the bracket is installed;
- The location of the water inlet funnel is chosen not in the corner, but 50 - 70 centimeters from the edge to the middle of the slope, while the outer bracket, after installing all the fasteners, is reinstalled so that the slope fits into the water inlet.
Installation of gutters
Gutters are installed on fixed brackets. Connected into a single unit, or if the design allows, the gutter section is installed in place in the brackets. Plugs are first attached to the edges of the gutter, and the location of the water inlet funnel is marked.
Standard sections with a length of 1, 2 and 2.5 meters are sequentially connected to each other, it must be remembered that the joints of the sections do not interfere with the flow of water, and the axis of the funnel coincides with the axis of the hole in the gutter. The installed gutters are secured with clamps in the brackets.
Installation of drainpipes and holders
Upon completion of the installation of the gutters, the drain pipe brackets are marked and secured. Along the marking cord, pipe brackets are attached 1 - 1.2 meters
Using corner elbows, if necessary, the drainpipe is connected to the water inlet funnel and secured in brackets. Installation is carried out from top to bottom; during installation, you need to pay attention to the correct connection of the pipes so that water does not leak at the connection points.
At the bottom, 45 - 50 centimeters before the blind area, a drainage elbow is installed and directed towards the storm sewer.
Pipe installation
Brackets with fastenings
What the system rests on is established first. It would be great if the diagram of the fastenings and the entire drain was previously drawn on paper. To begin with, markings are made taking into account the current slope of the roof. At this point, you need to calculate the degree of inclination of the gutter and mark the start/end points on the eaves. Now everything is connected along the line and the remaining fasteners are installed.
When using metal in the design of gutters, the brackets are spaced in increments of 1 meter, but if plastic roof drains are chosen - 60-80 cm.
Gutters
The gutters are secured to the brackets using self-tapping screws. Also, to eliminate the possibility of the drain twisting due to sunlight, there are additional holders on the mounts. If they are absent, you can solve the problem with several screws or plugs.
Installation of gutters is carried out on the roof or the edge of the rafter system. It is best to install a drainage system before covering the roof with roofing material; if this is not possible, the first option is used. To make it easier to catch the flow of water, when installing gutters, an indent of 1/3 from the pipe cross-section is added. This allows more of the gutter to protrude.
Each meter of length of the drainage system must have its own slope. In general, it is 3-4 mm to ensure an unobstructed flow path for water into the funnel.
To prevent the structure from being torn down by snow or ice, an indentation must be maintained. It is 30mm from the edge of the roof to the top of the gutter.
Pipes
After fixing the main drain elements, vertical pipes are installed. This leaves a gap between the pipe itself and the funnel, which can be filled using a fastener from the elbow fitting to the pipe location. This creates a smooth transition and aesthetic appearance of the structure.
To prevent water seepage, you need to secure the elements tightly. Rubber bands, sealing glue, or cold welding are suitable if the system is planned to be made of steel elements. In this case, the rubber band has the advantage of providing mobility to the system due to the thermal gap.
Yoke
To place them evenly, you can mark several lines along the line using a plumb line: 2 clamps are used per meter of pipe. On average, 2-3 holders are needed per wall with an additional mount in the middle.
Guide elbow
It is mounted at the end of the pipe in order to eliminate splashing, as well as adjust the desired direction. The ideal option would be to make a protrusion about 25-35 centimeters from the wall.
Leaf Trap
If there are trees near the house, the leaves of which fall on the roof during the season, then for convenience you can make protection from them. It can serve as a simple construction lattice. When bent, it should form a convexity 1/2 above the level of the gutter, easily fitting into it.
Where to drain water from the roof?
After installing a drainage system, the question of rainwater drainage usually arises.
There are several possible solutions to this problem, each of which has its own pros and cons:
- do nothing . In this case, it is possible that the foundation will be washed away, water will accumulate, and in winter, ice will form;
- arrange a drainage system - drain water through large-diameter perforated pipes to gradually seep into the ground;
- using drains , connect to the storm sewer with subsequent discharge into an autonomous or main sewer system.
Drainage routes
The drainage system has been installed, all that remains is to decide how to most profitably use the collected water.
- The drain from the roof into the barrel can be located in the immediate vicinity or at a distance of up to five meters from the house. Can be buried in the ground. The collected water is used to water the plants in the garden or vegetable garden.
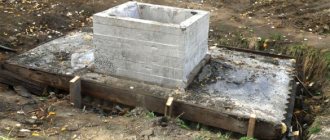
- Draining into a well for the purpose of filtration is suitable if nothing needs to be watered, but there is some crushed stone. To do this, you need to dig a pit in the ground, pour about 2-3 meters of crushed stone onto the bottom and build a concrete well on top. You need to pour crushed stone mixed with sand on top, adding a layer of clean sand to finish. The entire bedding forms an excellent absorbent element that will purify the water, but you need to keep in mind the distance from the house. When rains drain into a well closer than 2 meters from the house, there is a risk of groundwater rising. This phenomenon can lead to emergency loads on the walls, destruction of the foundation and other unpleasant things.
- Drain into a pond. The simplest option if no additional use of water is required. A drainage ditch or pond will receive rainwater without harm to the ecosystem.
- Drain into the sewer. In agreement with housing services, it is possible to organize the drainage of water from the roof into the public sewer system, if the house is connected to it. A certain fee is charged for this, which is specified directly at the housing department or housing and communal services.
Some rules for installing drains
When installing drains with your own hands, it is important to remember that normal operation of the drainage system is possible, including if the drains are installed correctly.
Installation of drain elbows is carried out at the bottom of drainpipes, so that the outlet of the pipe is directed away from the building. When extending the drain, it must be borne in mind that when freezing the mass increases, therefore, to provide greater rigidity, a supporting support should be provided.
If it is impossible to connect the drain with a storm sewer, it is necessary to install a divider on the socket in the summer to increase the drainage area and quickly drain water into the ground.
Specifics of installing metal gutters
One of the specific issues of installing metal gutters on buildings with roofs made of corrugated sheets, metal tiles and roofing iron is the installation of effective lightning protection. For this purpose, when installing a metal drain, a protective grounding device is provided.
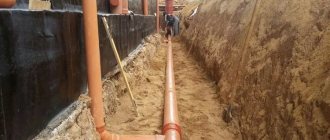
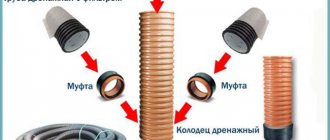
Installation of plastic and cement drains
A fairly simple solution for draining rainwater is offered by installing water drains made of plastic elements or concrete sections. As in the drainage system, the drainage system is installed taking into account the slope in the direction of water drainage.
Most manufacturers complete their products not only with universal connection systems, but also with protective grilles, the installation of which is mandatory in order to avoid injury to people.
Installation is carried out in a pre-marked direction, taking into account the slope direction. Sand or crushed stone is poured into an open trench as a cushion, the drain sections are connected to each other and installed in the trench. Depending on the manufacturer’s recommendations, the connection points can be additionally sealed with silicone or cement mortar.
You can buy a roof drain for a price of 100 rubles.
Tool preparation
For normal operation without interruptions and attempts to adapt available tools, you will need:
- Roulette
- Screwdriver/screwdriver and set of screws
- Bulgarian saw
- Thread or marking cord
- Plumb, level
- Marker
- Silicone sealant and rubber seals (or cold welding)
- Stepladder, ladder, or scaffolding
- Sandpaper
Reliability Recommendations
The most acceptable option for operating a drainage system is to additionally install a heating system in it. The presence of such an option will allow you not to worry about the safety of the gutters. Automatically turning on the heating will allow you to melt frozen ice and remove water without losing the reliability of your gutters.
In addition, it is recommended to install an additional synthetic mesh in the gutter to prevent fallen leaves, small branches, and other objects that impede the flow of water from entering the gutters.
conclusions
If we compare the technologies for installing gutters (round and rectangular), the design of rectangular systems looks more complicated. Some parts differ in size and configuration. For example, the thickness of the strips of brackets for a rectangular gutter is usually taken to be at least 3-4 mm.
However, from an operational point of view, rectangular systems are more preferable. With savings of 10-15% relative to the installation of round gutters, they provide greater throughput.
Sources used: vsadu.ru, xn--86-dlcaicfy2bts.xn--p1ai, kanalizaciya.online, infotruby.ru, nicespb.ru, bobrhouse.ru, expert-dacha.pro, stoki.guru, a1-exp.ru , housechief.ru, pvsservice.ru, kryshagid.ru, klub-masterov.ru, homius.ru, okanalizacii.ru, prostroymaterialy.com, vesnadompenza.ru, 1-proect.ru
Roof drains - design, functions and installation
The durability of the roof depends on many factors: the correctness of the calculations, the quality of the roofing material, as well as compliance with the installation technology. However, even such a small thing as draining water from the slopes has an impact on the life of the roof. Organizing a well-thought-out drainage system is an important stage of construction, which experienced roofers do not forget about. In this article we will talk about the drainage device for rainwater, how to choose the right one, and then install this drainage element with your own hands.
Calculation of the amount of material and the necessary tools
The amount of material is calculated using simple measurements and purchased with some reserve for cutting and scrap, but it is necessary to take into account a number of circumstances, namely:
- the angle of inclination of the gutter ranges from 2o to 5o and depends on the expected precipitation, area and angle of inclination of the slopes, which increases the total length of the gutters;
- the number of brackets must be calculated so that gutters and pipes are attached at least every 60 cm;
- for corner gutters, the fastening must be on both sides of the gutter;
- the funnel requires additional fastening;
- funnels are placed per 10 linear meters, 1 piece;
- if the slope is more than 10 m, then it is advisable to place two funnels at the edges or one in the middle with a corresponding slope;
- for a slope area of 90-150 m2, install a pipe and gutter 100X75, where the first number indicates the width of the gutter, and the second the diameter of the drainpipe;
- for a catchment area of 120-250 m2 you need to install 125X90;
- if the slope area is 200-450 m2, then it is better to use 150X110;
- The length of the pipe is calculated so that it is at a height of 20-30 cm from the blind area or is connected to the local storm drain.
In order not to make a mistake with the amount of material, you need to consult with a specialist who will help you make the correct calculation.
By assembling the drainage system yourself, you can save a significant amount. In order to complete the work, you need an assistant and a certain set of working tools and equipment, such as:
- measuring cord and plumb line;
- building level and tape measure;
- marker or construction pencil;
- nozzles and screwdriver;
- hammer drill and electric drill with drills;
- vices and pliers;
- sealant;
- hammer;
- saw and metal scissors for cutting material;
- electrical extension cord;
- working stairs and scaffolding.
After this, it is necessary to prepare the work front, distribute the material and prepare protective clothing and a safety rope. We should not forget about the safety rules and work while wearing protective gloves.
Calculation of the drainage system
The capacity of a gutter system is determined by the amount of water that the gutter removes from the roof. The calculation is made taking into account the configuration and design of the drain, the average monthly precipitation per month in the region. The amount of precipitation per drainage area is calculated by the formula: the roof area is multiplied by the maximum amount of precipitation.
Next, count the number of gutters. Since metal gutters have a standard length of 2.0 m, the figure is derived based on the length of the roof by dividing the length. Plastic gutters have a length of 3.0 and 4.0 m. The number of couplings should be two for each gutter.
The number of brackets N is made according to the formula: N = (L – 0.3) / 0.6 + 1, where L is the length of the roof, 0.6 is the pitch between the eaves.
Then the number of plugs along the edges is determined. A closed system has no plugs. The number of external and internal corners is taken into account. The number of funnels is determined by the number of pipes. How many elbows are required is determined based on the width of the eaves overhang and the height from the eaves to the ground.
The number of risers is calculated by the formula: N = Q / qn, where Q is the amount of precipitation, qn is the system capacity, which is taken from a table compiled for individual regions.
The calculation of the drainage system is carried out at the design stage of the house. When drawing up a roof diagram, indicate the diameter of the drain, and mark the location of the funnels. For ready-made systems, standard sizes are established: 8.0 cm, 10.0 cm, 12.5 cm. The gap between the funnels should not exceed 24 m. If the gutters are installed without tilting, then the optimal distance will be 12 meters.
An effective melt water drainage system is built on the basis of the ratio: 1.5 sq.cm of cross-sectional area of the gutter and funnel per 1.0 sq.m of roof.
Materials and components of drainage systems
The choice of material for organizing a drainage system depends on personal preferences and the affordable cost of the products. Different suppliers offer a certain color range and standard sizes of products, each of which has a certain service life. It is necessary to coordinate the color of the roofing, finishing of the eaves and components of the drainage system. Ease of installation for the conditions of a particular home is also important.
Let's consider the types of materials for drainage systems that modern manufacturers offer.
- Products made of galvanized metal are characterized by low cost, average availability and low corrosion resistance.
- Materials with multi-layer, polymer painting, have a variety of colors, have corrosion resistance and a large set of components.
- Drainage systems with zinc-titanium or copper coating are highly durable and impeccable in appearance, but their cost is very high.
- Polyvinyl chloride parts, highly resistant to ultraviolet radiation, corrosion, with sealed connections and a good set of components.
For efficient installation of the entire system, manufacturers offer sets of fasteners, connectors and other elements, which should be considered separately, taking into account the complex configuration of the water drainage system from different roofs.
It should be remembered that the color scheme from different suppliers, as well as the standard size, may differ slightly, therefore, in order to avoid inconsistencies and discrepancies, you need to purchase materials from the same batch.
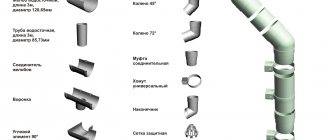
The drainage system consists of the following list of products:
- brackets of different sizes for attaching gutters and pipes, both to the rafters and to the wall of the building;
- gutters equipped with connectors, with the ability to adjust the direction of fasteners;
- internal and external corner gutters, for 90° turns;
- plugs with seals;
- adapter from gutter to funnel;
- funnel;
- universal rings with an angle of 72° or elbows;
- drainpipes;
- protective net against debris;
- taps with an angle of 60°.
All these components are light in weight, but when assembled they load the walls and rafters, so they need to be fastened at a recommended pitch of about 60 cm. Suitable ones are selected from the standard section of gutters and pipes, depending on the area of the slopes and the angle of inclination of the roof.
In the case of roofs with a complex configuration, in addition to calculating the area, consultation with a specialist is required.
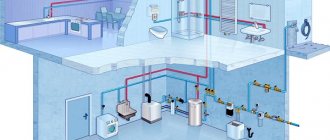
Sewage diagram for draining water in a private house
Before you begin installation work, you should draw up construction documentation, in particular a diagram of the wiring of the sewer network in a country cottage. When you need to drain water in a private house that has already been built, you need to develop a separate project or contact professionals so that they make all the necessary calculations.
1. We make a drawing
First of all, it is necessary to develop a sewer system project, taking into account the characteristics of your site, as well as adhering to the rules of SNiP. Many people decide to create a project on their own, without turning to professionals.
What are the first steps if you plan to drain the water in a private house yourself? First, we create a drawing, for this we select the optimal scheme that suits your requirements, and study how the sewerage system will work.
2. Consider important points before creating a project:
- When there is a central sewer system in an area, can you simply connect to it or will you have to additionally treat the wastewater?
- What load will the sewerage system experience? To determine this parameter, it is important to consider how many households are in your family, as well as the number of water intake points.
- It is important to determine the level of soil freezing in order to deepen the sewer outlet sufficiently.
- It is necessary to clarify the groundwater level. If the groundwater level is high and the groundwater table is close to the surface, in addition to the sewer system, you will have to make a storm drain.
- It is necessary to assess the terrain features of the territory to find out whether it will be possible to create a gravity-flow system. If this is not possible, you need to buy a fecal pump and decide on its location.