The toilets that were installed in private houses during the Soviet era were rooms that did not have the usual amenities. In most cases they had cold water and sewerage. The latter was intended only for the discharge of liquid waste. There was no toilet as such on the list of amenities. There wasn't much else either.
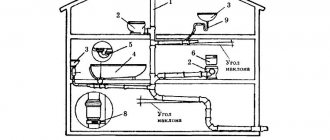
The process of installing a toilet is a fairly simple task. However, neither the toilet room itself nor the communications laid in it were included in the house design. Therefore, creating a toilet in a private house becomes a difficult task. The main problem is finding a suitable place to place the toilet. Another difficulty is the correct supply of sewerage , ventilation and water to the bathroom. We will talk in more detail later about how to arrange a toilet in a private house.
The toilet in the house should be warm
You should start by identifying a suitable room for arrangement. It should be small (3x2 m is enough), allowing you to place all the planned plumbing elements and accessories inside.
The best solution would be to choose a room that has at least one external wall in order to minimize the work on organizing waste disposal. Otherwise, you need to plan to lay sewer pipes inside the basement, which will complicate the connection process and make it more expensive.
Sometimes they fence off part of a large room and the bathroom equipment there with all the necessary communications connected. The strength of this solution is the ability to choose the location and allocate the required number of square meters for high-quality arrangement of the toilet room. The disadvantage will be the loss of living space.
When choosing the location of the bathroom in the house, you need to consider the following:
- sewage was discharged through pipes along the minimum path;
- the room was sufficiently distant from the bedrooms, kitchen or dining room;
- the room must be accessible for water supply pipes and sewage disposal, and the issue of ventilation must also be considered.
An example of installing an electric heated floor in a bathroom Source greempol.ru
Features of installing a bathroom for drainage
The sewerage connection to the bathroom is divided into stages: external work and internal work. The first involves connecting to centralized, local or storage systems, and the second involves the installation of plumbing fixtures and pipe distribution indoors.
When laying pipes externally, a number of nuances are taken into account:
- The influence of external factors and climatic conditions, such as the quality of the soil and the depth of its freezing, because they greatly affect the efficiency of the sewer system. Moderate latitudes require burial to a depth of at least 0.8 m, but it is better to go deeper and with additional insulation of the pipe.
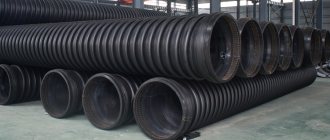
- It is necessary to select the correct type of pipes. Often the plastic option is sufficient, but high soil mobility in some places requires the installation of cast iron pipe products.
- When using local purifiers, it is important to find a compromise between minimizing the distance to them and compliance with regulatory documents on construction and sanitation (distance from the building by at least 15 m and 30° pipe slope per linear meter).
Installation of a toilet bowl to plastic pipes of the sewer system Source popgun.ru
In interior work, as a rule, questions arise only about the method of installing the toilet bowl.
The main thing is to take care of the presence of a rigid and durable foundation, which is not typical for old private buildings. Installation on a wooden floor is possible, but is considered impractical and unprofitable. It is better to take care of pouring concrete on the floors, which will lead to increased costs and labor costs, but will make the bathroom better and more durable. In addition, this will allow the installation of heated floors.
Pressure system
In some cases, installing a toilet with gravity sewerage is problematic.
Laying pipes with a diameter of about 100 millimeters through partitions and walls is quite difficult. Problems can be avoided if you install a pressure sewer system, the main element of which is a fecal pump (read: “Pressure sewer system - what is it, examples of devices”). The use of this device leads to the fact that waste waste can move from bottom to top, despite the fact that the cross-section of the pipes is reduced significantly. Fecal pumps designed for domestic needs are distinguished by their compact size, aesthetic appearance, and the ability to pump liquid several meters in the vertical direction and tens of meters horizontally. Toilets with a built-in pump are available for sale.
Concreting the toilet floor
First of all, wooden floors (if any) are dismantled. Then a depression of 40-50 cm is created, followed by careful leveling and compaction. After this, a 30 cm layer of sand is poured, compacted and watered. Cover everything on top with fine crushed stone (fraction up to 10 mm), level it and compact it again.
The next stage involves leading the sewer pipe out through the foundation. This will require the use of diamond drilling equipment to prevent cracking or partial destruction of the building’s load-bearing structures.
Diamond drilling of holes for drainage Source specteh-smol.speczakaz.info
See also: Catalog of companies that specialize in the design and installation of sewerage and water supply
The hole inside the building should be 15-20 cm above the floor, and the outlet of the pipe to the outside should be located below the calculated level of soil freezing.
Then the recess is waterproofed, reinforcement mesh is laid and concrete is poured.
Before the solution hardens, future toilet fasteners (threaded steel rods) are inserted into it.
After this, you can install electric heated floors, which will add comfort to the room.
Dismantling
The next stage is dismantling the old equipment.
Required Tools
Before starting the removal operation, check that you have the necessary tools. The minimum kit includes:
- hammer drill,
- drill,
- a set of keys (adjustable – a must!),
- fum tape,
- silicone sealant,
- roulette,
- building level.
Steps
Step 1. Turn off the water supply, drain the tank, drain the drain elbow.
Step 2: Remove the drain hose.
Step 3. Remove fasteners.
Step 4. Clean the joint.
Step 5. Remove the bowl and seal the hole with a lid or rag.
Cast iron sewer pipes were usually treated with a cement mixture. It will be easier to break the layer by drilling along its diameter.
Features of choosing plumbing fixtures
Before installing a toilet with your own hands in a private home, you need to make the right choice of this accessory, based on some recommendations:
- the toilet seat has a standard height of 40 cm with minor differences of 5 cm in one direction or another depending on the manufacturer (it is important to choose the most comfortable model);
- with a horizontal drain, the outlet of the hole in a standard toilet is located 18.5 cm from the floor level (this must be taken into account when organizing the connection to the sewer);
- with an inclined drain, the outlet of the hole is located 15 cm from the floor (normal gravity flow will be ensured by placing the wiring tee 10-15 cm below, i.e. near the floor level);
Possible options for flushing the toilet Source santehnika-nk.ru
- for vertical drainage, these models are usually placed on a drainage pipe and firmly secured with a clamp.
The vertical drain option is only possible if there is an underground of the required size with an appropriate foundation. Otherwise, it is better to use plumbing with an inclined or horizontal drain and install the necessary communications.
Foundation
The construction of each building begins with laying the foundation. Here, too, one cannot avoid a choice that is influenced not only by the size and design features of the future building, but also by the nature of the soil.
Most popular:
- Strip foundation if the ground is heaving;
- Made of brick, which is suitable for light buildings on a summer cottage;
- Pile foundation on soft soil;
- The foundation is made of ready-made reinforced concrete blocks, which is suitable for any residential buildings.
Home craftsmen who decide to build a house with their own hands are attracted to strip foundations. Its layout is simple: it runs along the entire perimeter of the building and under the internal walls. Before it is poured, a separate design can be developed reflecting its size and depth.
Toilet installation option
There is no clear answer to the question of how to properly install a toilet and sewer system in a private house. It depends on many factors. But you can consider one of the most common methods.
You should start by trying on the plumbing fixtures at the location and applying markings, i.e. actually tracing the contour of the base and marking the places for the mounting holes. At the same time, they check for horizontality and stability and take measures to eliminate the identified deficiencies.
They also check whether the toilet outlet coincides with the sewer outlet. If there are no deficiencies, a corrugation is attached to the drainage system of the sewer system using sealant. You should not connect to the toilet yet.
Connecting the toilet to the sewer with corrugated Source otvali.ru
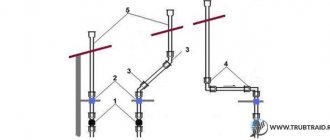
Features of connecting to the sewer
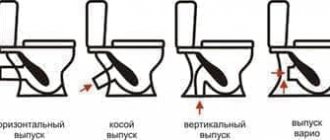
After this, the installed toilet requires connection to the waste disposal system. In fact, there are two types of entrance to the sewer outlet - horizontal (relevant for new buildings) and vertical (typical for old buildings). For them, plumbing fixtures with the appropriate outlet are selected - horizontal or vertical. Devices with oblique outlets are considered universal and can be connected to any type of sewer system.
Typically, the type of toilet is selected to match the existing drainage system in the building. In the case of laying sewerage “from scratch”, they are guided by their own preferences.
It is important to maintain the required distances and differences between the plumbing fixtures and the riser. The use of an eccentric helps with this, and the simplest and most universal method is the use of corrugation.
When making connections, it is important to apply plumbing sealant along the edges of the cuff to enhance the sealing effect and at the same time lubricate it in order to facilitate installation, but not much, because its excess will lead to a decrease in the reliability of the connection.
Installation of a toilet with vertical outlet Source teplo.guru
Vertical outlet bathroom
The most common drainage option in European countries due to the versatility of the design, which allows the installation of the bathroom to the wall at the desired angle. The device consists of a siphon in a bowl and an outlet pipe directed downwards.
Installation is quite simple:
- floor markings are carried out and a conventional screw flange with a lock is installed;
- a sewer hole is installed in the center of the flange;
- The toilet is mounted on a flange with reliable fixation of the outlet pipe.
Horizontal outlet toilet
Received maximum distribution in Russia. Another name for this option is “direct outlet into the wall.” The drainage of the device is directed backwards. The connection of the branch pipe to the sewer pipe is made using a specific cuff.
This type of toilet is fixed directly to the floor through special holes in the base of the device.
Recommendation! It is better to begin work on connecting direct outlet plumbing during installation. Fastening is done using dowels and standard screws.
Connecting elements
There are several connection methods.
Branch pipes and bends are indispensable when working with oblique bends. It is considered a practical and durable option.
The drain pipe is a guarantee of reliable operation of the water seal. Used to protect against the formation of air cushions in pipes. This point is relevant if there are a large number of water points. An analogue is a pipe with a check valve, manufactured as an integral mechanism.
The diameters of the pipe and drain outlet must be the same size.
Eccentrics - connecting cuffs with an offset axis - are successfully used. Plastic or corrugated eccentrics are a universal device for non-standard situations. Another advantage of such a coupling is the ability to be inserted directly into the sewer socket without an adapter.
The corrugation is suitable for difficult conditions. Where the discrepancy in the corners is more than 90 degrees, a corrugated cuff is indispensable.
Tank installation process
After installing the toilet itself in the room and connecting its outlet to the sewerage system, it is necessary to install the water storage tank in the appropriate place. To do this, a rubber gasket is installed, which seals the junction with the toilet, and directly on top of the tank itself. After this, both elements are tightened using standard bolts using rubber shock-absorbing and sealing bushings.
When performing these actions, the main thing is not to overdo it, so that there is no overtightening or distortion, which can lead to deformation of the washer and, as a result, constant leakage of water.
Installing a flush cistern on a toilet Source nash-remont.com
After this, the drain mechanism is installed inside the tank, the lid is closed and the drain button is mounted.
The main stages of building a bathroom with your own hands
The location of the shower plays an important role: firstly, it must have access to a water source, and secondly, it must be connected to a sewer system, or, at worst, a cesspool or treatment facility.
A bathroom in a wooden house (no matter what it is made of: profiled timber or logs, or chopped by hand) is equipped in several stages:
- arrangement of the sewerage system is the most important part, it needs to be addressed first;
- the next stage is a ventilation device;
- Next, waterproofing is laid and all necessary plumbing is installed;
- the final stage is finishing work.
Installation of a sewerage system in a wooden house
Communication between water supply and tank
At the last stage of installing a plumbing fixture, it is necessary to connect the tank to the water supply system using a conventional flexible hose with reinforcing braid. During this connection, it is recommended to use rubber gaskets or sealant without plumbing. To prevent cracks in the housing mount or the plastic fitting of the filling valve, the fitting must be tightened with the utmost care. The last step is to check the entire system for leakage and, if necessary, make final adjustments to the tank fittings.
Briefly about the main thing
Having asked the question of how to install a toilet in a private house, the average person should first think about the location of the future bathroom, its insulation and the connection of the necessary sewer lines to it. After equipping the place, it is important to choose the correct and most convenient model of plumbing fixture, taking into account the peculiarities of connecting to the sewer system - with a vertical, horizontal or oblique drain for sewage. Then the toilet itself is installed directly, with fasteners, gaskets, connection to the sewerage system, installation of a water storage tank and connection to the water supply system. All actions must be carried out in exactly this sequence.
Ratings 0