Have you discovered that your toilet flush tank is refusing to do its job? Agree that the toilet has long been one of the most necessary types of plumbing equipment for a comfortable human life, so its breakdown can hardly be called a joyful event. Do you want to repair the toilet cistern yourself, but don’t know where to start or where to look for the problem?
We will show you how to detect the source of trouble and fix it on your own - the article outlines ways to eliminate common malfunctions. The procedure for dealing with all common breakdowns is discussed in detail.
Repair tips are provided with photographs that will help you understand in detail the structure of the drain mechanism. To help the home handyman, video recommendations are provided for disassembling the tank, eliminating leaks and replacing fittings.
Types of cisterns
Before you start repairing equipment, you need to get acquainted with its structure and operating principle. The toilet itself consists of a bowl and a container filled with water. It is the container that is called the cistern.
The water in it enters the bowl, where it washes its contents into the sewer system. The drain system is activated by pressing a lever or button. This depends on the equipment model.
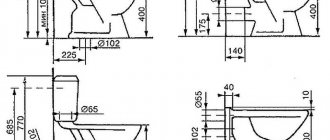
You can find various types of cisterns on sale. There are several classifications of such equipment. Based on the location of the tank relative to the bowl, there are two main categories.
Completely separate designs . It is assumed that in this case the tank and bowl are separated. This is the very first existing toilet option. The height of the tank can have different modifications.
A high position assumes that the cistern is located a meter or more away from the bowl. The elements are connected to each other by a pipe. This option was relatively recently the most common.
Separate design with low-mounted tank. In this case, the water drainage mechanism can be not only lever
This is explained by the fact that the high location of the flush tank guarantees high speed and good pressure of water entering the flush. Today such models are used less frequently.
Modifications with a cistern hidden in the attic or under a false ceiling are popular.
Another variety is built-in cisterns , which are equipped with wall-hung toilets. They are fixed in a special installation.
The low location of the tank suggests that it is mounted on the wall at a short distance from the bowl. They are connected by a short pipe. The drain fittings are located on the tank body.
Since the height from which the water drains is smaller, its speed and pressure are somewhat lower.
The flush cistern for compact toilets is placed directly on the bowl. For this purpose it is equipped with a special shelf. Such models are very convenient to install and operate, but the water pressure and its speed during flushing are minimal.
Compacts are produced with tanks of trapezoidal and triangular shape. Such toilets are called corner toilets. They fit very well into the corners of rooms, it is especially convenient to install them in small bathrooms.
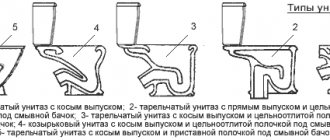
Monoblock toilets . The design is a toilet with a flush cistern built into the body. Such equipment is very easy to install. All you need to do is supply water and connect the device to the sewer.
This can be considered the main advantage of the candy bar. If serious damage occurs in any part of the monoblock, it most often has to be replaced, since the monolithic design most often prevents a full repair.
You can read more about the different types of toilets in this material.
Intake valve failure
Malfunction of this unit is often associated with a failure of the locking mechanism, which is why, after filling the tank, water continues to flow into it unhindered. And when the maximum level is reached, it will begin to overflow through a special outlet channel.
This malfunction can be detected by a characteristic murmur that appears some time after the tank is filled.
In this case, you will need to either update the inlet assembly or replace a part that has become unusable (cuff or locking plug).
Sometimes both of these parts have to be replaced.
Before changing them, you need to perform the following operations:
- First of all, you should shut off the water supply valve, and only then remove the inlet valve attached to the threaded part of the plastic bushing.
- Even earlier, you will need to unscrew the drain button housing and carefully remove the tank lid.
- Now manually unscrew the plastic nut that secures the valve.
- To access the locking plug, the drive is unfastened from the float, first removing its lever from engagement with the rocker arm.
- Next, the rocker itself is dismantled, at the opposite end of which a plastic cup with a rubber stopper pressed into it is attached.
After inspecting the rubber element, you can either change it completely, or try to reuse it by swapping the working planes.
Additionally, you can try lowering the float cup a little lower (this will increase the locking force). The same effect can be achieved by gluing a foam cube to it from the bottom. If none of these measures “worked”, you will need to replace the fittings in the toilet cistern (inlet assembly).
Design of various drain mechanisms
A water release mechanism is installed inside each drain tank.
Today there are several varieties of this design:
- Lever . It is a lever that, when pressed, activates the release of water into the bowl. Mounted in separate toilets, in tanks with an upper and lower location.
- Pneumatic . The trigger mechanism is activated by pressing the button of the pneumatic chamber, which is connected to the release valve using a flexible air duct.
- Stock . To open the drain valve, it is necessary to lift the vertical rod, which is located on the top of the tank lid.
- Push-button . The drainage mechanism in this model is started by pressing a button on the lid of the drain tank. There are two-button variations, in which one of the buttons is responsible for draining half of the tank, the second is responsible for draining all the water in the tank.
All tanks are filled with water strictly to a certain level, after which their filling automatically stops.
Lever mechanism for draining water. Used most often in old models of flush cisterns or in antique-style design devices
Depending on the method of supplying water to the tank, valves of different types can be built in. Floatless valves can be bottom or side.
In this case, the design contains a special chamber, which in appearance resembles an inverted glass.
The operating principle of the device is based on Archimedean force. It changes its value depending on the degree of filling of the tank and changes the position of the chamber that shuts off the water supply.
The side float valve is either a diaphragm or a piston type. In any case, it shuts off the water when a certain volume of liquid enters the tank.
All reinforcement can be presented as independent interchangeable elements or as a single structural set.
Toilet cistern with bottom water supply. The most trouble-free and silent option, therefore it is especially popular in city apartments
According to the type of connection of the water supply fittings, all drain tanks are divided into two groups.
- Lateral . The liner is connected on the right or left. The tank is usually equipped with two holes. The non-working part is covered with a special plug. The main disadvantages of such tanks are considered to be noise when filling the container with water and an unaesthetic connection to the water pipe, which cannot be disguised.
- Lower . The water supply pipe is connected from the bottom of the tank. This way you can hide the water fittings. In addition, when filling the container with water, minimal noise is created.
Each type of flush cisterns finds its consumers and is used in various models of toilets.
Bottom eyeliner
With this option for supplying water to the tank, there may be some difficulties associated with the design features. Most of all you will have to tinker with replacing the old filling fittings. As a rule, the problem is that the toilet is located close to the wall. There are also sewers through which water is supplied to the tank.
The set of tools for work is exactly the same as when supplying water to the tank from the side. The sequence of actions is the same as when replacing fittings in a tank with a side connection.
Basic elements of a drain tank
Structurally, all variations of flush cisterns are designed approximately the same. Each of them has three main mechanisms.
Drain or shut-off valves are designed to regulate the flow of water into the toilet bowl. Prevents liquid leakage from the reservoir.
During the process of filling the container, the water in it causes the shut-off valve to be pressed as tightly as possible against the drain hole, which prevents water from flowing into the bowl.
If there is constant water leakage, this may be due to a problem with the shut-off valve. Read more about the shut-off valves of the drain tank below.
The filling valve is combined with the water supply device. Designed to control the liquid level in the drain tank. Stops water supply as soon as it reaches a certain level.
To determine the amount of liquid in the tank, a float is used, connected by a rod to the filling valve.
Regardless of where the fill valve is located - the valve is on the side or below - the float is placed vertically in the tank. In older models - horizontally.
The overflow and drain mechanism is represented by fittings equipped with a start button or lever. Designed to prevent water from overflowing from the tank if the float valve breaks.
The overflow system is connected to the drain; when you press the start button, it is activated. Excess water is discharged to the sewer. An important element of the mechanism is the float valve. Water leaks from the tank are most often associated with its functioning.
The float valve was ubiquitous in older models. The float rises along with the water arriving in the container and closes the valve at a certain level
You need to understand that all common malfunctions of the drain tank are associated with these mechanisms. And to eliminate the problems, it is these elements that will have to be replaced or adjusted.
If chips or cracks appear on the surface of the tank, most likely it will have to be replaced. Despite manufacturers' statements, most modern adhesives used for repairs cannot cope with this task.
Image gallery
Photo from
Permanent damage to the toilet cistern
Repairing damage with universal glue
Application of epoxy resin
Using silicone sealant
How to replace toilet fittings
Hello dear homemade people.
Here's the bad luck - the toilet tank is leaking. No matter how much you press the flush button, water from the tank continues to flow into the toilet and does not want to stop.
Related article: Hygienic shower built into the wall
This is to blame for the flush mechanism, or otherwise the toilet fittings, and the main reason for its failure is the poor quality of the tap water that Vodokanal treats us to, and for which we pay a lot of money, so we will urgently correct the situation.
The first step is to determine the size of the disaster. It may be possible to get by with little blood, and very often this is possible.
The fact is that tap water contains various impurities, essentially dirt, and since the water in the toilet tank is mainly in sludge mode, this dirt settles on the fittings, as a result of which it stops working normally.
First, let's see how the toilet works, or rather the cistern.
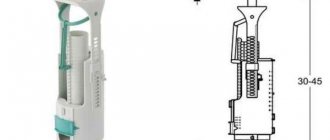
The fittings consist of two parts.
1. The float part serves to supply water to the tank.
2. The valve part is used to drain water.
In the standard version, these two parts are not connected to each other and each works on its own.
Floats come with side and bottom supply - depending on the design of the toilet. Side feed is almost never used. Previously, such toilets were installed in Khrushchev-era buildings.
To remove the drain and valve float for cleaning, it is not necessary to remove the tank.
The flush is removed as follows: turn off the water supply to the toilet, drain the water from the tank, unscrew the flush button, remove the lid, lower your hand to the bottom of the tank, grasp the flush mechanism and with force, but not with all your might, turn it counterclockwise, degrees 20.
You will feel the mechanism disengage, after which it can be removed.
The main reason for water leakage is dirt and limescale deposits formed on the valves. Often it is enough to clean it, it is easily removed from the rubber, and the drain will work normally again.
But the problem is not always solved so easily. The upper part of the valve is made of thin elastic rubber, and with prolonged use it loses its elasticity. In this case, the mechanism will have to be replaced.
So we go to the store and buy fittings for the toilet.
What I like about toilets is the amazing unanimity of manufacturers in following a single standard in the manufacture of fittings and mountings for tanks.
Almost all of them are interchangeable, so there is no need to look for fittings suitable for any one brand of toilet.
I can’t say the same about gold toilets, since I’ve never worked with them, and their owners most likely won’t surf the Internet looking for instructions on how to repair a drain, and therefore won’t read my website.
So, we remove the drain mechanism again, disconnect the water supply, unscrew the fastening nuts and remove the tank.
There is always some water left in the tank, so I recommend taking measures to prevent puddles from occurring during this operation.
After removing the tank, you need to carefully remove the gasket between the tank and the toilet, since it is not included in the repair kit and it can be different for different toilets, so it is advisable to keep the original gasket so as not to wear out your feet later looking for the same one in stores.
Then the lower part of the drain mechanism is removed. The float can be removed, but if it worked normally, then it can be left alone.
Now the old drain mechanism can be thrown away and a new one installed. But there are a couple of nuances here.
The first is that the lower part of the drain mechanism does not have a rigid fixation relative to the central axis, and the upper part is rigidly and fixedly attached to the lower part, therefore, when tightening the large nut of the lower part, it, this part, must be rotated so that when attached to he was on top, he took this position in the tank.
The second is that although all toilet fittings are interchangeable and universal, the tanks are all different, mainly in height, so the mechanism has three tools for adjusting its parts.
The overflow height adjustment is a nut with a clamping gasket, and the button height and valve lift height are adjusted using clips.
When installing the tank, it is advisable to add silicone to the old gasket on both sides of the gasket.
That’s it, I hope now it won’t be difficult for you to repair or change the leaking toilet fittings.
I wish you modest water bills.
leave a comment
A message confirming receipt of a response will be sent to the email address you provided.
Possible damage and repair methods
In every mechanism, even the most primitive one, various parts sooner or later fail. Most old style trigger device failures are fairly easy to repair.
If the tank is leaking
First you need to check whether the intake valve is leaking . To do this, remove the cover and lift the float lever. If water then enters the tank, the valve itself has broken and must be replaced.
To do this, close the tap in front of the tank and drain the water . The wrench connecting the valve to the water source is unscrewed, the float lever is removed, the mounting nuts and the valve are removed.
If the water flow is completely blocked when the lever is raised, the problem may be:
- The tilt of the ramp (thrust) lever leads to the fact that it begins to cling to the sleeve, the float does not quite jump and the valve does not close. In this case, pull it out and straighten it.
- If the seal of the float is broken, it is partially or completely immersed in water and does not close the valve. In this case, it changes to a new one. If a suitable model is not available, the damage can be sealed using heated plastic or sealant after removing all the fluid from the flow part, but this is a temporary measure.
Constant water flow
If water flows without stopping, this means that the tightness of the drainage mechanism is broken and water is poured between the body and the bell (pear). There are several reasons for this failure:
- Corrosion or contamination of the surface, in this case it is cleaned with emery cloth.
- The appearance of a gap leads to the same problems. In this case, tighten the mounting nuts using a socket wrench.
- Sometimes the guide sleeve falls out. This causes the lock to move when lowered. In this case, the sleeve is inserted into the arched hole and wrapped with an elastic band.
Overflow problems
This is a fairly typical phenomenon that can be easily identified. Water collects in the tank and begins to flow , if you close the tap, the flow of water from the device will stop, and when you press the bypass socket, the flow will stop - the clamping nut will loosen. In some cases, it is enough to turn it several times to the right, and the nut will take its place.
Otherwise, you will need to use the following techniques. You need to rinse the tank and wait until all surfaces are dry.
If the cap is not completely unscrewed, there will be a gap between the overflow hole and the bottom of the tank, wrap the sealing material tightly and fill with silicone silicone or paint . Wait until the coating hardens.
Replacing the supply hose
Damage to the inlet hose and seals on the connector results in water droplets appearing at the attachment points to the drain body. First of all, tighten the union nut .
If the leak persists, turn off the water and disconnect the hose. After replacing the threaded reel cap , reattach the hose to the reservoir and tighten the nut.
Loud noise when filling
Sometimes when filling the drain for an old type of tank, there is a lot of noise that can wake up the house. You can replace the part with a special stabilizing device and thus eliminate the problem. If the pressure is not too strong, the problem can be solved much easier.
The filling valve mechanism contains a short drain tube. For this purpose, install the muffler vertically using a flexible plastic or rubber hose , lowering the lower end to the water at the bottom. This will help to avoid noise when draining water and knocking down the float.
A person does not need much for good health. Sometimes comfortable furniture and adequate lighting are not always enough because people have daily needs such as satisfying hunger, thirst and others. To feel comfortable, a person needs a working hydraulic system.
As you know, every mechanism is not eternal, and the appearance of defects is a matter of time.
Causes of breakdowns:
- Mechanical damage;
- Poor quality of materials for manufacturing parts;
- Frequent use.
We adjust the water level
Manufacturers of drain fittings supply devices that are, by default, configured for the maximum volume of water in the container. Often this level is excessive. The filling capacity of the tank can be reduced by adjusting the mechanism.
If water is supplied from the side using a float valve, it is enough to change the position of the float. To do this, change the bend of the lever. The adjustment principle is simple, but to achieve the desired result you have to bend the lever several times, using trial and error. If the float is held on a rigid metal rod, it will require serious physical effort to bend the lever even slightly. In newer models, the lever is made of plastic - to adjust the level of water intake, the float is moved along the rod.
Conclusion
In fact, all currently produced flush tanks have a float valve that regulates the water supply, a flush button, drain fittings and a plug. Structurally, this list may change, but the fundamental components and principle of operation will remain the same (see also the article “What to do if water runs in the toilet: how to repair the tank and not pour money into the sewer”).
Much more often, repairs are carried out independently by simple adjustment; in difficult cases, it is better to replace worn-out parts with new ones. The video in this article will allow you to find additional information on the above topic.
Preventive measures
To avoid problems associated with leaks and excessive consumption of water constantly flowing into the toilet bowl from the reservoir, it is important to know the structure of the flush tank and be able to adjust and repair the mechanisms.
It is recommended to systematically:
- check the condition of the flexible connection and connection unit;
- inspect the fittings inside the container, clean it of lime deposits and other contaminants;
- check the tightness of the connecting collar and bolted fastenings using a paper napkin;
- Inspect the tank and toilet for cracks.
Preventive measures can extend the service life of mechanisms.