An impeccably designed and well-calculated drainage will collect and drain groundwater from the site. It will protect the foundation from premature destruction and ensure normal growth of cultivated plants. In order to ensure spontaneous drainage of the water collected by the system, it is necessary to ensure the slope of the drainage pipe. And its device requires accurate information, right?
You will learn everything about the angle at which drainage pipes are laid and how to properly organize a drainage system from our article. By following the technical recommendations we provide, you will be able to design and accurately calculate your drainage network. The basis for the given data is building regulations.
To help independent craftsmen, the technology of constructing a water drainage system is described in detail, and the specifics of the calculation and installation of its components are thoroughly analyzed. Photos and videos are attached for visual perception of the information.
Design features of drainage
There are three types of drainage systems, each of which has its own design features: horizontal, vertical, combined.
The working elements of horizontal drainage can be:
- tubular drains;
- gallery drains;
- trays and trenches.
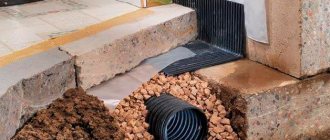
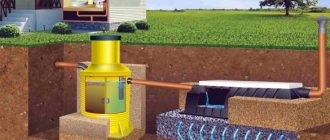
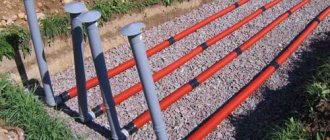
A system of drainage pipes in combination with a filter coating (multilayer) is a tubular drain.
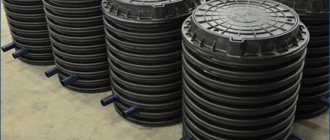
Multi-layer filter coating, in this case, is done to prevent washed-out soils from entering the system. According to standards, the drainage circuit is always equipped with inspection wells.
To organize the drainage system of a construction site (site), different schemes can be used. The specific choice depends on the geological conditions of the area, the intensity of precipitation and other factors
Unlike tubular drains, gallery drains are made from pipes of a larger cross-section. There are holes on the walls of the pipes for collecting waste.
The process of installing gallery drains also involves filling with additional filtration with geotextiles.
Tubular drain in section. It is on this principle that tubular and gallery drains are installed in modern house-building projects. Compliance with standards and accuracy of calculations guarantee high efficiency of drainage systems
A drainage system with trays and trenches is usually made in conditions where the groundwater level is allowed to reach 1.3-1.5 m. On stable soils, trenches are made with slopes; on unstable soils, the trenches are reinforced with reinforced concrete structures.
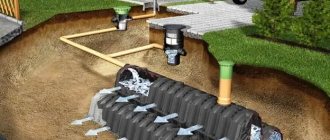
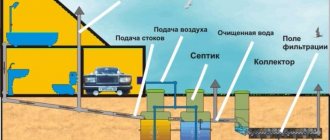
A vertical drainage system consists of a set of wells (wells) connected by a collector. Sewage is removed through the collector line using a pumping station. Also, drainage of wastewater on vertical drainage can be carried out by discharging into the lower layers of the soil.
The combined drainage system combines horizontal and vertical schemes. It is characterized by specialists as a complex drainage scheme and is usually installed in areas where highly efficient soil drainage is required.
Image gallery
Photo from
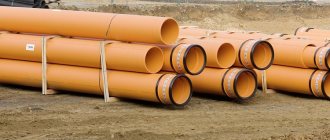
Laying drainage and sewer pipes
Drainage system around the foundation of the house
Inspection wells for sewer systems
Laying drains to the absorption well
Recommended slope levels
Required slope of drainage pipes, according to regulatory documentation
In addition to the diameter of the drainage pipes, an important parameter when installing the system is the level of slope of the drains. As a rule, these standards are regulated by SNiP indicating the minimum acceptable values. In this case, it is important to take into account the lowest speed of groundwater flow along the branches. According to the regulations of the official document, a larger angle of inclination is provided for a smaller cross-section of drains.
Minimum slopes for drainage pipes of different diameters according to SNiP:
- open (external) trays and ditches for water drainage - 3 mm per m.p.;
- free-standing gutters - 0.005 mm per square meter;
- cobblestone or asphalt blind area with trays - 3 mm per square meter;
- installation of paving stones or crushed stone with open gutters - 4 mm per m.p.;
- pipes with a cross section of 40-50 mm - 3 cm/m.p.;
- sleeves with a diameter of 85 mm - 2 cm/m.p.;
- drains 100 mm - 1-1.5 cm per m.p.;
- 150 mm - 8 mm per line;
- 200 mm - 7 mm per m.p.
Always take into account the type of soil on the site. In sandy ones, the level of filling of the circuit with water and its movement will be faster than in clay ones. Therefore, the slope should be made a little greater than with denser soil layers.
Features of installing drainage on a slope
Drainage systems provide drainage due to the slope of the drains. It would seem that if the site is located on a slope, water should be drained from the site naturally, and there is simply no need to install a drainage system.
However, in such cases the situation is completely different, and drainage of a site on a slope becomes just as important as for sites with a slope of less than 8%.
The construction of private residential buildings on steep slopes is a common practice. Water does not linger on slopes, but this fact cannot be considered a reason for refusing to build a drainage system
Of course, drainage of areas on slopes has its own characteristics. Often the soil on steep slopes has a heterogeneous structure. Different levels of groundwater may be observed at different horizons.
Therefore, it is often necessary to use combined types of drainage to ensure the required degree of drainage of the entire territory of the site.
Meanwhile, when constructing drainage systems on slopes with a level of more than 8%, the standards allow for the absence of drainage inspection wells.
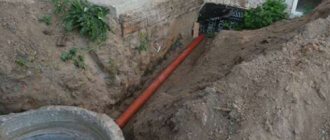
Methods for laying drains
There are two types of drainage systems - surface and deep. In the first option, drains are laid in small (30-40 cm) ditches. The second installation method is more expensive, since you have to dig deep trenches.
Important! On a site located on a hill, it is advisable to install a surface-type drainage system. This will make it easier to intercept wastewater.
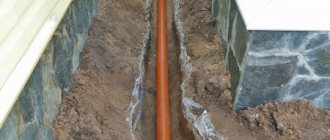
It all depends on the condition of the soil and the level of the foundation of the main building on the site. You need to find out to what depth the ground freezes in a given region. Every local construction organization probably has this information.
The pipeline must not be laid above the freezing level of the soil. Otherwise, the drainage system will freeze and fail in the winter. It is necessary to insulate the drains or bury them deeper into non-freezing soil.
Surface type of drainage system.
Excess moisture harms not only plants, but also buildings, including solid ones. During periods of spring floods, groundwater rises, washing away and destroying the foundations of even permanent buildings. To avoid such troubles, the drainage system should be laid half a meter deeper than the foundation.
Scheme and order of the system
The organization of drainage in an area with a slope level of more than 8% begins with geological surveys. Based on the survey results, aquifers and groundwater levels are determined. Based on the information received, a drainage project for the site on the slope is being developed, and construction work is being carried out.
Ultimately, the problem of eliminating the possibility of soil erosion by chaotic natural drainage due to the steepness of the slope must be solved.
In a simple version, this is done approximately like this:
- The first horizontal surface drain is created at the top elevation of the site.
- A second horizontal surface drain is created at the lower elevation of the site.
- Both drains are connected by perpendicular trenches.
- From the horizontal drain of the lower level, a branch is made into a drainage well.
If the landscape of the site has a stepped, complex shape and the project of the facility provides for the construction of retaining walls, stairs, transition platforms, for each of the project elements it is necessary to construct point drainage systems that turn into a system of linear drainage systems.
Large areas located on slopes, as a rule, are equipped not with single surface drains, but with full-fledged herringbone-type water collection and drainage systems.
A branched drain is installed on the upper horizon and is combined with a collector drainage circuit surrounding the construction site. From the circuit, wastewater is transported to a collection site outside the site or to a storm drain.
Diagram of drainage arrangement for a facility built on a slope. Typically, combined drains are constructed on slopes, since the area on the slope is traditionally characterized by complex terrain
This design solution is called ring drainage. Thanks to the construction of a protective contour located around the perimeter of the facility, it is possible to bring the groundwater level under control. In turn, the “herringbone” ensures the collection of water from the surface of the site and its effective drainage.
Installation of ring drains is carried out at some distance from the construction site. This factor makes it possible to construct a ring drainage system directly at the stage of operation of utility structures.
It should be noted that the effectiveness of lowering the groundwater level within the internal part of the contour directly depends on the following parameters:
- pipe depth level;
- depth level of galleries;
- well depth level (if any).
The effectiveness of protection is also influenced by the dimensions of the circuit.
What are the dangers of an incorrect bias?
Correct and incorrect pipe slope angle
It is important to correctly calculate what slope angle the drainage pipe should have. Failure to comply with recommended standards may result in emergency situations.
- With a small slope, a non-pressure drainage system will lead to water stagnating in the sleeves. The debris present in it in the form of small grains of sand will begin to be deposited. Sooner or later, their quantity will lead to a blockage in the pipe. You will have to dig up a section of the system and carry out repair work.
- If the slope is insufficient, groundwater will fill the entire lumen of the drains, but will not be able to flow in the desired direction. As a result, the groundwater level will remain at the same level, and the installation of a drainage system will simply be pointless. The area will remain swampy.
- If you increase the recommended slope, the water flow rate will be too high. This threatens to rupture the drains over time in any area under the influence of pressure. Or the water will flow at high speed to the discharge point, and heavier impurities (grains of sand, clay particles) will settle at the bottom of the circuit. Sooner or later this will lead to a blockage.
If the drainage pipes are not sloped sufficiently and groundwater stagnates, constant erosion of the soil will occur. The natural strength of the upper layers of the earth on the site will decrease.
Conclusions and useful video on the topic
Several practical tips on laying drainage pipes will help you independently cope with the installation of drainage in a suburban area.
Protecting areas (territories) from moisture oversaturation is an urgent task that has to be solved in almost every construction case. Existing developments of drainage systems allow solving such problems .
The main point is to calculate and choose a drainage device option that would be ideal in each specific case.
Are you planning to arrange the drainage of the site yourself, but have encountered difficulties at the design stage? Ask your questions in the comments block - we will try to help you.
Or have you successfully built a drainage system and want to share your experience with other private homeowners? Write your recommendations, add photos under our article - many users will find your experience useful.
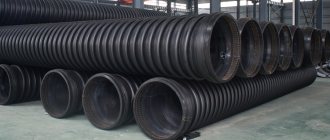
Polypropylene pipes
The great demand for polypropylene pipes is due to the presence of a large number of advantages. In particular we are talking about the following:
- Long service life and high stability.
- Ability to work under conditions of high loads and high pressure in the system.
- Low weight of products, which greatly simplifies their assembly and transportation.
- Thanks to the smooth inner surface, the pipes are almost completely self-cleaning.
- Low degree of clogging and siltation.
- The pipes are connected by thermal welding, resulting in a durable monolithic structure.
- Ideal value for money.
The main signs by which you can determine the need for drainage work
Clear signs of the need for drainage Source otoplenie-help.ru
You cannot do without drainage on the site if:
- Water-loving plants predominate in the garden and vegetable garden, sow thistle has appeared, the ground is soft and wet all year round, trees grow poorly, some die, moss has appeared on the soil and trees in the garden. All these are signs of excessive soil moisture - drainage is required.
- High humidity in the basement or basement, condensation on the basement walls, the appearance of microcracks in the basement of the building, distortions in door and window openings, a feeling of dampness and mold in the room. The building needs to be saved - without drainage work, the foundation and the house will be destroyed.
- Even after light precipitation, puddles remain for a long time, blind areas crack and move away from the base, sidewalks and road surfaces sag - at a minimum, drainage of surface water is necessary.
Significant advantages of arranging a drainage systemSource vse-o-kanalizacii.ru
Roof drain for water - drainage device for pitched roofs
The roofs on older houses have a simple gable roof structure. But modern houses are equipped with more complex rafter systems. There are more slopes, they adjoin each other at different angles. This requires a proper roof drainage system.
Therefore, we will consider each of the elements step by step.
Draining water from the roof
This point is important because water can get inside the house before reaching the drain. There are three high-risk areas on the roof that can cause the roof of a house to leak (and ways to fix roof leaks).
The junction of two slopes to form an internal corner. If a private house has a roof, such as in the photo, then installation of a valley or valley on the roof is necessary.
There are two types of valley:
Single overlap (lower valley).
Nuance. The choice of overlap is influenced by the roofing material and the angle of the roof slope. With a high wave height of the roofing material (slate, metal tiles) and with a slope angle of more than 30°, a single overlap is used. If the material is flat (bitumen shingles) and the angle is smaller, there is a double overlap.
Double overlap (lower and upper valley).
Nuance. The design of the lower valley is very simple, so it is usually done by hand. It's just a sheet of metal bent in half. But, in order for it to fulfill its functions, you need to know how to correctly install the lower valley. Proper installation is as follows: the bottom valley is secured using clamps (the use of self-tapping screws is not allowed).
Place (node) where the roof meets the wall
In this case, a special abutment strip for the roof is used. The plank is installed in the corner between the house and the roof.
Specifics of choosing a strip for abutment
The photo shows three types of planks.
But only plank “c” will ensure the tightness of the joint, due to the small edge that fits into the notch on the wall. Plank “a” has no rolling at all. Plank “b” has an external lower fold. This is the place where the plank will begin to rust.
Nuance. To make a tight connection in the brick, you need to make a gash and insert one edge of the strip there. The second one rests freely on the roof.
Roof plumb
According to the rules for installing a drainage system, the roofing material should end in the middle of the gutter. Then, water from it will not fall on the walls of the house.
However, this is not always possible. This may be due to the characteristics of the roofing material (for example, the length of a metal tile is always a multiple of 350 mm, and a regular one is a multiple of 1 piece) or a miscalculation during the design of the rafter system. In this case, an additional cornice strip is installed.
The second component of the system for draining water from the roof is the drainage system.
Let's get acquainted with its main elements and see how to make a drainage system yourself.
Components of a drainage system
Before you start making the ebb, you need to figure out what elements (components) are needed:
gutter Used to receive water from stingrays. Its diameter depends on the area of the slope;
funnel or storm drain. Connects the gutter and pipe;
pipe. Directs water to the drainage system or away from the foundation;
corners and turns. Allows you to bypass the house, protruding elements or install the pipe at the desired distance from the wall;
stubs. Used in places where a funnel is not provided.
Advice. The plugs are installed in the highest place.
fasteners. For gutter and pipe.
The elements of the drainage system are clearly shown in the diagram.