Here you will learn:
- Drainage pump device
- Causes of drainage pump failure
- Drain pump diagnostics
- Pump disassembly
- Common problems
- Basic malfunctions of drainage pumps and methods for eliminating them
- Approximate cost of parts
- Preventive measures and regular pump maintenance
It is possible to repair drainage pumps yourself. First, you will need to disassemble the device and diagnose it, identifying the malfunction.
Drainage pump device
The following are installed in the device body:
- Protective mesh on the bottom of the device. Prevents debris and large parts from getting into the impeller.
- Impeller (impeller). Rotating, it creates a rarefied environment around itself, due to which liquid is absorbed.
- Bearing shield. Protects the electric motor, rotor and shaft from moisture.
- The rotor sets the rotational energy for the impeller.
- The shaft is considered an element of the engine, passing through the entire cavity of the unit and attached to the rotor.
- The capacitor serves as a switch.
- Float. Located outside the device, when lowered it prevents the engine from starting, preventing overheating from dry running.
- Cable. Designed to supply electricity.
The design of the unit is sealed. In each compartment, including the engine, there are sealing rubber gaskets between the partitions.
What is the phenomenon of cavitation
Everyone knows that a certain amount of gases is dissolved in water. When a liquid moves at a certain speed, rarefaction zones sometimes form in it. In these areas of low pressure, gas bubbles begin to emerge from the water. Once the bubbles enter the high-pressure zone, they collapse. This process occurs with the release of a large amount of energy, which destroys the impellers and volute of the pump. The following photo shows a unit impeller destroyed by cavitation.
The energy from the collapsing bubbles can create shock waves that cause vibration. It spreads throughout the entire unit and affects not only the impeller, but also the bearings, shaft and seals, causing these parts to quickly become unusable.
The cavitation effect can most often be observed in pumping stations that operate on suction. In such systems, the impeller creates a vacuum, due to which water rises through the hose from the well. But if there is a lack of liquid at the pump inlet, then excessive vacuum occurs in the impeller area, causing cavitation.
To prevent cavitation from occurring in pumps, you should adhere to the following rule: there must be more water at the inlet than at the outlet. This can be achieved in several ways:
- you should move the device a little closer to the source;
- you can increase the diameter of the suction pipe (hose);
- to reduce resistance in the suction section, the suction pipe can be replaced with a pipe made of a smoother material;
- if there are many turns in the suction pipe, then, if possible, their number should be reduced;
- It is desirable that all bends have large turning radii.
Advice! The suction hose of the station should not be lowered into the well to a depth of more than 8 meters. Typically, the maximum immersion depth of the hose (pipe) is indicated in the equipment manual.
Causes of drainage pump failure
There are many reasons why drainage pumps fail, here are the most common ones:
- Violation of operational standards (the device is constantly under overload, it is not fully immersed);
- The pump is not regularly maintained;
- The pump was not installed correctly;
- Perhaps this is a manufacturing defect.
Before starting repairs, it is necessary to exclude the last of the listed options. If you bought a pump recently, check to see if the warranty period, if any, has yet expired. Because if you try to repair the pump yourself, it will no longer be accepted under warranty service.
To prevent pump breakdown, it is necessary to carry out its maintenance on time. Preventive measures to avoid repairing the float drainage pump, points that need to be paid special attention to:
- The air entering the pump must flow freely through it and out. If air does not flow freely, then there is an air lock somewhere in the pump.
- There should be no visible damage to the piston.
- It is necessary to monitor the distance between the valves and the inlet opening.
Violation of the tightness of the pumping unit
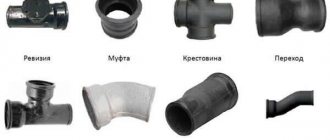
First of all, eliminate the possibility of the storage tank leaking - inspect all the interfaces between the pump and the toilet and waste pipes. Over time, the integrity of the rubber pipes and couplings may be compromised, resulting in water leakage from the system. This affects the correctness of the pressure readings taken by the sensor.
The pump is equipped with several pipes for connection to plumbing fixtures and a drain pipe
Another “thin spot” of the sewage pump is the check valve located in the outlet pipe of the installation. This part prevents the pumped substance from returning inside the pump’s storage tank. A clogged valve can lead to unstable pump operation. The valve must be checked and cleaned, and if faulty, replaced.
Drain pump diagnostics
You can repair the drainage pump yourself in situations where the breakdown is not so significant. To do this, you will need to diagnose the operation of the device, identify the malfunction and try to eliminate it. For example, it will not be difficult to replace a worn or broken part, or clean the filters. It is also possible to carry out simple electrical repairs at home - replacing a broken electrical cable or capacitor.
But if a crack appears in the body of the device, the winding of the electric motor burns out, or the valve stops working, it is better to contact a specialized workshop or purchase a new pump.
A break in the power cable can be easily repaired if it breaks near the plug. It will be more difficult to close the gap on submersible models of the drainage pump, in an underwater location. Here, due to the likelihood of a short circuit, you cannot connect the break using simple twisting.
You will need to cut the cord at the fracture site and reattach it to the engine. To do this, you will have to remove the cover and remove the cut off remainder of the cable. Instead, using a tension element, we attach a long cord with a plug, after which we put the cover in place, carefully and thoroughly tighten the fastening bolts.
How to care for an autonomous heating system
Autonomous heating requires constant attention. Emergency repair of a circular pump will cause a lot of inconvenience.
- Connections and joints must be waterproof.
- Gaskets and bearings contain sufficient lubricant.
- A special device will help evaluate the connection and compliance of the electrical network.
- A test run will identify extraneous sounds and problems with the system in advance. The engine must operate without vibration and noise.
- Prolonged downtime is harmful to the pump. During the warm season, it is necessary to turn on the system once a month for 15-20 minutes.
- Starting the device without water in the pipes will lead to serious damage. It is also necessary to ensure normal fluid circulation and do not close the valves near the pump.
- The filter must be free of contamination. In its absence, only clean water is poured into the system.
- Limescale deposits interfere with the operation of the shaft. It must be removed periodically or try to use a less hard liquid for the device.
Pump disassembly
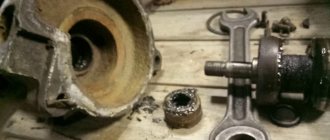
After lifting the device from the well, you should blow out the outlet fitting, removing any remaining water from the pump. All mating parts of the device should be marked with a marker in order to set them in the exact position during assembly. Then we proceed to disassemble the case, holding it in a vice by the ledges near the screws. The screws holding the two halves of the housing together (4 pieces) should be loosened evenly. After removing the cover, the vibrator is removed from the housing - the main working unit of the pump.
By unscrewing the fixing washer located on top of the vibrator, you can disassemble the entire assembly. All components are strung on the central rod one after another, like the rings on a children's pyramid.
The main thing is to remember the correct sequence of all these parts when disassembling the vibrator. To do this, it is recommended to capture each stage of dismantling with a phone camera.
Troubleshooting algorithm
This sequence of actions applies to all types of pumping equipment, regardless of the location and method of installation. It should be noted that the power supply system of the pump, apart from the wires switched by switches, does not have complex circuits, so if the submersible water pump does not pump water, but starts and hums, problems with the supply of the required supply voltage in the vast majority of cases can be eliminated.
If the drainage pump or well model does not pump water, it may not start if the built-in or external condenser malfunctions and will require repair and replacement.
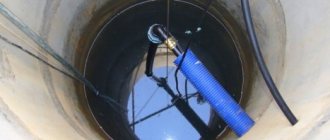
First of all, repair of electric pumps should begin by turning off the supply voltage, removing it from the water intake source and disconnecting the outlet hose.
When reconnecting, the reasons why the pump does not work can be divided into several areas according to the location of the manifestation - we will consider them below.
Rice. 2 Water supply scheme for a private house
Common problems
Nature of the failure and cause of its occurrence:
- Doesn't buzz and doesn't work. The drainer is lowered into the water, the float has surfaced and is on the surface, the cable is connected to the circuit, but the engine does not work, there is no vibration. The cause of the breakdown is a discrepancy between the declared motor power and the electrical network to which the device is connected. Carefully read the characteristics of the pump, its power and efficiency. The pump is not lowered deep enough into the water and the float does not work. Remove the device and, lifting the pillow up, turn it back on.
- It works, but doesn't download. The engine is on, but no water comes to the surface. There are several reasons for this. The protective mesh blocking debris and stones at the bottom of the case is clogged. Raise the device and clean the filter. The thick fraction got into the discharge hose and a blockage occurred. If such a breakdown occurs, it may be knocked out of the base of the pump; if this does not happen, you need to disconnect it yourself and wash it. The impeller is broken. Its augers may break or the bearing may collapse; this can be found out by disassembling the pump.
- Vibrates and overheats. The electric motor braid was broken, water got into the engine compartment, and the shaft bearing was destroyed. The unit vibrates and heats up, while the water flows in jerks or stops altogether. We urgently turn off the power to the equipment and pull it to the surface. The cause of the breakdown is hidden inside. For diagnostics it is necessary to disassemble the case. Several impeller blades are broken. The rotation occurs with an eccentric and hits the body on one side.
- Low pressure with a properly running engine is a consequence of a breakdown of the mechanical part of the pump. Impeller or bearing, clogged discharge hose or suction filter. It can be eliminated by simply washing it in clean water or replacing mechanical parts.
- When the unit is connected to the network, the automatic switch is activated. The fuse cuts off the network if a short circuit occurs. Check all electronic parts of the pump. Go through the cable with a tester and find out where the short circuit occurred - replace it. The motor's copper braiding is also at risk if the unit is run dry. The braid can be replaced or a new engine installed only in a repair shop.
- The device works, but turns itself off. Connected to the network and working, pumping water properly. Suddenly it turns off on its own. The reason is a mismatch between the power of the motor and the electrical network. Voltage surges can also affect the smooth operation of the unit. The solution is simple - study the instructions and characteristics of the pump in detail, install a voltage stabilizer.
Tip: to pump out all the liquid completely, the float is tied to a cable in a vertical position and lowered into the water. Adjust the switching on and off of the device by unplugging the plug from the socket.
Main types of home appliances
The choice of a car pump always depends on its purpose. Namely: for what needs is it needed? The device can be used in everyday life for completely different purposes. For example, for a heating system, as a rule, a circulator is suitable; even a small, low-power device can cope with watering. There are also universal units that can cope with different tasks.
Before repairing a water pump, it is worth studying the advice of professionals.
Today on the market you can find a huge selection of household water pumps. They all have their own individual design, advantages and purpose.
Types of water pumps:
- Submersible. Such equipment only works when it is completely or partially immersed in liquid. Deep well immersion devices are usually made of high-quality stainless steel or polymer.
- Drainage structures. Their purpose is to pump water from a number of different places (swimming pools, basements).
- Superficial. Garden devices of this type are very popular, suitable for pumping drinking water.
- The most common pumps are centrifugal ones. They are installed on heating systems.
- Vibrating. Serve for pumping liquid.
All these pumps are of an electric type, booster in nature, and are high-pressure apparatus. There are also manual devices that operate from the effort of one person.
Basic malfunctions of drainage pumps and methods for eliminating them
Repairing drainage pumps with your own hands can be done using a simple tool in the form of a vice, a rubber hammer, screwdrivers, pliers, a soldering iron; it is useful to have consumables on hand: lubricant, silicone. Many domestic and foreign manufacturers, in order to avoid unauthorized access to the internal parts of the electric pump, make the heads of the housing mounting screws of a special shape (three-pointed star). This doesn’t stop anyone, but before disassembling the drainage unit, you will have to spend some time turning a screwdriver of the desired profile.
The pump does not hum and does not work
The main reason for this malfunction is the lack of supply voltage to the electric pump, so first of all you need to check the power cord or switch that monitors the water level in the pumps, working according to the following scheme:
- The drainage pump is turned off, the presence of supply voltage is checked - if it is supplied, the unit is removed from the water intake tank.
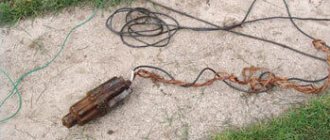
- Next, you need to visually check the power cable for internal and external breaks and damage to the insulation.
Floats for pumps and a drainage section in a section.
The most problematic areas of the power cable are the entry point into the pump and the connection point with the plug; they will have to be checked first. It is better to do this with a connected electric pump by bending or pressing on the wires; to avoid electric shock, diagnostics should be carried out with gloves.
- If the pump does not work and the place of possible breakage cannot be felt with fingers, you will have to start disassembling the electric pump. To do this, in some cases you may need a vice and a rubber hammer. Sequentially remove all the parts (it is better to lay them out on the table in the same sequence) and remove the engine from the housing by gently rocking or using additional tools (a vice, a rubber hammer).
- After removing the electric motor and accessing the power wires, they are tested using a multimeter. If a break is detected, if it occurs a short distance from the ends of the wire (this happens most often), it is better to cut off a small piece at the point of damage, slightly shortening the cable, and reconnect the remaining ends.
Drainage disassembled
- Another reason the pump stops is a faulty float switch or its damage, while it does not monitor the water level. During repairs, it may be necessary to replace the float and unsolder it from the drainage circuit.
If the break occurs closer to the middle, the cable should be completely replaced - operating a connected or soldered wire in water is dangerous for the electric pump and the owner himself.
The pump works but does not pump water
In the case when the electrical part of the pump, judging by the sound, is working properly, but water is not supplied to the surface, or its pressure is significantly weaker than before.
There are several reasons for this:
- The water supply line - hose or pipe - is clogged. You will need to disconnect the hose supplying water upward from the pipe and clean them of dirt. If the new pump cannot create the required pressure, it is likely that the length of the water pipes exceeds the technically recommended values, and the device simply cannot create the required pressure. A similar reason lies in the too small diameter of the pipeline. To increase the pressure, you will need to reduce the length of the line, or increase the diameter of the pipes (hose).
- Wear of the working mechanism – the water impeller. Due to constant contact with mechanical debris contained in the water, its blades may wear out, bend, or break off over time. This problem can be corrected only by replacing the part with a new one.
- Difficulties in supplying water may arise due to the pump or its suction tube being too low. At the bottom of the well there is always an increased concentration of silt, suspended sand and clay. Such a suspension has difficulty passing through the filters, and the pressure drops. To solve this problem, you should raise the pump higher from the bottom of the well.
- The filters are clogged. You can wash them with a powerful stream of running water. In particularly “severe” cases, you will have to disassemble the case and clean the mechanism manually.
- When the power of the electric motor decreases, the housing or water hoses may have depressurized, the bearings have failed, or there is insufficient voltage in the power supply network.
- Malfunctions in the electrical part can be determined by “ringing” the wiring of the device using a special device - an ohmmeter. It will show a broken wiring or a burnt out winding of the electric motor.
To accurately determine the malfunction and repair the drainage pump yourself, you will have to disassemble it. This should be done carefully so as not to damage the parts and components of the device.
The power cord is faulty
The flexible element - the cable - is always at risk, since due to regular twists and kinks (which often happens during transportation and reinstallation of equipment), the wires under the layer of plastic or rubberized protection are torn, resulting in the power supply to the pump being cut off.
It is necessary to find the break point and make a connection. This operation is easy to carry out if the break occurs near the plug - you just need to clean and connect the wires, finally carefully insulating the work area.
When removing the cable, try to mark and remember the attachment points of each wire (they are of different colors) so that during reinstallation you do not confuse “phase”, “ground”, “zero”
A cable break in the pump connection area requires more time to repair. First, you need to remove the equipment from the water, wipe and dry it, then disassemble it to get to the internal connection unit. Get ready for the fact that instead of hexagonal holes you will encounter triple ones, which will make it difficult to select a screwdriver.
The cover should be removed carefully, without jerking or effort. By unscrewing the bolts holding the tension element, you can examine the cable and determine the area of \u200b\u200bthe break. We remove the worn piece, mount the cable in its original place, attach the tension element, and fix the bolts.
The pump constantly overheats
To prevent constant overheating of the pump, do not overload it. You need to give him a rest at least every hour and a half. There is no special cooler for the pump; it is cooled by the liquid that it passes through itself. If the pump runs for too long, the water itself begins to heat up, especially in the summer, which is why it will be necessary to take short breaks of ten to twenty minutes in the operation of the pump.
The article listed only the main reasons for the breakdown of drainage pumps. Before you begin repairing drainage pumps, you need to find the exact cause of the breakdown. If you haven’t found exactly your case from the listed problems, then it’s better not to undertake repairs at all, especially on your own.
You can only undertake repairs to the drainage pump if you are confident that you have correctly identified the cause of the breakdown. Also, you should not undertake repairs if you do not understand the fecal pump system at all. If your device is still under warranty, then do not repair it yourself, because you can only damage the device, and the service center will either repair or completely replace the unit completely free of charge (if this is stated in the warranty card).
Never overload the drainage pump - malfunctions will not be long in coming. If you are not confident in your abilities and doubt even a little, it is better to consult with someone who really understands this area.
Turning on the pump knocks out the electrics
When the pump is turned on, plugs fly out or wires burn out. The reason should be sought in the parts directly responsible for conducting electricity - the cable or stator winding. The serviceability of the wires can be checked using a tester; if a worn section is detected, the entire cable should be replaced or (if the break is near the end) shortened.
Winding repair is a labor-intensive task and requires special knowledge. Even with a carefully installed secondary winding, a short circuit cannot be ruled out. If you don’t have time to tinker with a burnt-out part, take the device to a service center - perhaps, after diagnostics, they will advise you to buy a new pump.
If you decide to repair the winding yourself, try to take into account all the parameters - from the number of turns to the thickness and type of wire
Next step
You have checked the device for contamination and the electrical system, so why is the pump still not pumping water? Now inspect and thoroughly check the device itself. The pump has a filter device that may become clogged. In this case, clean it or replace it. This clogging problem can also occur with the check valve of the pumping station.
If everything is in order, then a more unfavorable option comes next. If the pump suddenly worked while there was no liquid in the tank, then the sensor inside the device could simply burn out due to overheating. In this case, you can’t do anything with your own hands. It is not even recommended to go to a specialist, because the water pump will no longer show as reliable a result as in the old days.
Preventive measures and regular pump maintenance
As you can see, the cause of wear of parts can be both inevitable wear and tear and violation of equipment operating rules. To make the device last longer, try to follow the manufacturer's recommendations. For example, position the housing so that the suction device is at a certain distance from the base of the tank and does not capture coarse particles.
At least once a year, check the serviceability of the cable and internal parts by disassembling the case as much as possible. Perform preventive cleaning, which will increase the service life of parts several times. Do not confuse the drainage device with the fecal one - it does not have a special grinder and cannot cope with the movement of large inclusions.
Varieties
All drainage pumps with a built-in float switch are divided depending on their location - submersible and surface tools are distinguished.
- Submersible - equipped with a sealed housing, thanks to which it can operate even when completely immersed in water. It has great power and makes virtually no noise during operation. It is also worth noting the high efficiency and versatility. But if the case is damaged, it is difficult to repair it, in some cases even impossible. The pump gets dirty quickly, so it must be cleaned frequently.
- Equipment with an internal float - the device includes a rubber hose or PVC pipe, which is immersed in the waste liquid, while the body remains on the surface of the ground. The advantage of the tool is its easy installation and maintenance. But when pumping liquid, such a pump makes a lot of noise.
- Fecal pumps - designed for pumping liquid from septic tanks and cesspools. The advantages include high power. The device has an additional part - a mesh that crushes large waste. There are submersible and surface pumps.
- Vertical models are equipped with a vertical float switch, which automatically pumps liquid out of confined spaces. Often such equipment is used to drain broken pipelines. They can also be used as regular drains.