Because the home's foundation is below ground level, the basement is often flooded with groundwater and sediment. The premises become unsuitable for storing property and food supplies. Moreover, large volumes of moisture in the soil create pressure on the foundation walls. Water can violate the integrity of the structure, making its way into the room through the joints of walls and floors and other, even the smallest cracks. Waterproofing and properly done basement drainage will help protect the room from the negative effects of the environment.
Walling
Building walls is one of the simplest tasks: they are simply built to the required height from the selected material.
If the walls are assembled from individual bricks or blocks, then a water-repellent additive must be added to the cement mortar for the joints, prepared from the same cement, that was used to fill the bottom.
Monolithic walls should be filled with the same composition as the bottom.
However, for better waterproofing, it is much more convenient to build walls from blocks, since they can be coated on the outside with special liquid rubber, which causes the material to absorb water and collapse.
It also wouldn’t hurt to cover the finished walls with a layer of waterproofing.
Purpose and need for drainage
In modern construction, drainage effectively serves as protection for the basement and basement from flooding.
First you need to find out the reasons for the appearance of water near the foundation of the building. This may be nearby underground water horizons or atmospheric precipitation coming from the surface of the earth. In any case, double protection is provided - drainage with waterproofing of the entire foundation base. This is interesting: do-it-yourself technologies for waterproofing the basement of a house.
Drainage is needed in areas of high water.
If the building's blind area is damaged or there are constant water leaks in the drainage system, the soil becomes saturated with water and negatively affects the foundation and base. In this case, drainage is also performed. Another reason for installing the system may be nearby underground structures, such as cellars and a swimming pool.
Determining the groundwater level
If in swampy or low-lying areas the close passage of groundwater does not surprise anyone, then flooding of the cellar in dry areas can be an unpleasant surprise for the gardener.
Groundwater is a rather unpredictable thing: it can not only accumulate in lowlands, but also flow down from the mountains or rise to the surface when the snow cover melts.
Therefore, so that the funds and effort spent on construction are not in vain, it is necessary to check their availability in advance.
Finding out the level of groundwater is not at all difficult, and the verification operation must be carried out during the flood period, when they come as close to the surface as possible in order to protect against unexpected spring flooding.
To work, you only need an ordinary drill no shorter than two meters (the average depth of a standard cellar) or, as it is popularly called, a brace and a rod made of any material of the same length.
With this drill, a simple hole is drilled to the maximum depth, which is left for a day, after which it will be necessary to determine the result.
After the required time, a rod is immersed in the hole, the moisture content of which at a certain length from the ground will indicate the depth of the flooding.
If the rod remains completely dry, this is a great success, meaning that the site is completely dry and ideal for construction, however, more often than not, water is present at some level.
When assessing the result, it is necessary to remember that also in a day, like a test well, the pit dug for the cellar will be filled with groundwater to the same depth.
We recommend watching a video on the topic:
Therefore, in order to avoid diving during construction when the water level is too high, you must either choose another location or purchase a special drainage pump (not to be confused with a regular water pump) for the duration of the entire construction.
Types of strip foundations by depth
According to SNiP 3.02.01–87 “Earth structures, foundations and foundations”, strip load-bearing foundations are classified according to two criteria:
- by depth;
- according to the device method.
The depth of the foundation depends on the bearing capacity of the soil and the design load that will be exerted on the foundation being built. The bearing capacity of the soil is determined based on its type, freezing depth and the presence of groundwater in the area where the building is planned to be built. Read about the design and method of constructing a strip foundation in the next section.
Shallow strip foundation
A shallow strip foundation is a strip of concrete and a reinforcing frame located at a shallow depth in the ground. The minimum laying level depends on the depth of soil freezing, its heaving and the height of groundwater.
A shallow strip foundation can be made of reinforced concrete, brick or foam blocks
The recommended minimum depth of the strip foundation can be found in SNiP II-B.1-62. For your reference, we offer a table compiled based on data from this document. On average in Russia, the laying depth varies from 0.4 to 0.75 m. Additionally, you can consider the depth of seasonal soil freezing in the region where it is planned to lay the load-bearing foundation.
The essence of the internal drainage system
The drainage system is a structure designed to collect and remove excess moisture from groundwater or condensate from the basement of a house.
Scheme of basement waterproofing with equipped drainage system.
Drainage systems can have different design expressions, new variations appear constantly, so that there is a choice in a certain situation. You can invent your own model and introduce amendments to the design if you know the basic elements of the drainage system. Drainage under the house consists of a system of pipes (drains), wells and pumps. Drainage pipes are the basis; they collect excess moisture through holes or joints and take it to the collection point - wells. When natural outflow is difficult, submersible pumps are used, which are placed at the bottom of wells - they force water out of the house. A mandatory principle when installing drainage is the slope towards the wells.
Construction of a storage or collector well
All moisture from the drainage system must go to a specially organized place, which can be a drainage pit, a storage well or a septic tank. If you completely simplify the procedure for setting up such a place, you can dig a deep hole and fill it with broken bricks, gravel chips or crushed stone, and other construction waste.
It is very important that the bottom of the pit is waterproof. This is achieved in a simple way - when digging a trench, you need to get to the sandy layer of soil or sandy loam. If clay soil predominates, then retreating 1-2 m from the trench, dig another hole, which are connected by pipes without perforation.
A drainage storage well can be assembled from concrete rings or purchased ready-made in a store. An excellent and cheap choice would be plastic storage wells.
Making the bottom
The bottom is a very important element, representing both the floor and the foundation of the future cellar. A lot will depend on the correctness of its construction.
Whatever the method of drainage and the level of groundwater (even if there is none at all), the base is prepared in exactly the same way as for drainage pipes: compacted sand, geotextiles, and then a coarse fraction.
Then the formwork is assembled for the future concrete slab, the bottom and walls of which are lined with roofing felt or film, which will not allow water to escape from the cement into the ground during pouring until it hardens.
The thickness of the lining should be about 20 cm, and it must be reinforced, otherwise the floor will crack due to ground movements, especially characteristic of flooded areas.
Pouring also needs to be done at the same time, if possible, so that the concrete sets all at once, otherwise the slab will not be monolithic, will quickly collapse, and will also be able to allow moisture to pass through.
Cement for the floor must be taken of the highest quality possible, for example, M300, and when pouring it, use special additives that provide a water-repellent effect.
The floor in the basement pit will take much longer to dry, so it will be possible to erect walls no earlier than after 28 days.
Organization of waterproofing for different types of foundation
Arrangements for protecting a constructed building from moisture vary depending on the type of foundation. The most common types are slab, pile, column, strip and monolithic foundations.
Plates
Here it is best to wrap the foundation with rolled roofing felt. When any irregularities are detected.
They must be removed using a leveling screed.
Then a water-repellent material and insulation are placed on the concrete slabs and the surface is leveled again.
Pile and column types
It is not easy to waterproof concrete piles and pillars. It is provided by adding water-repellent additives to concrete. Wooden structures are treated with special liquids that prevent rotting and moisture absorption.
Strip and monolithic foundations
Most often, monolithic structures are insulated with hot bitumen mastic.
To properly waterproof these types of foundations, the following several methods are used. They are varied and quite effective.
- Treat the foundation with a special mastic, only the surface must be dry and smooth. This method is not entirely reliable, so to strengthen the composition it is necessary to cover it with insulation or build a brick wall.
- Just as in the first case, you need to carry out all the manipulations using hot bitumen mastic, and stick roofing material on top in 2 layers with an overlap of about 15 cm.
- Using a special sprayer, a water-repellent composition is applied to the dry foundation. It is advisable to use geotextiles on top, then the waterproofing will last a long time.
- Another reliable and high-quality method is penetrating waterproofing. It contains quartz sand, cement and special additives. This mass has penetrating properties.
Moisture and precipitation occur almost everywhere, so a waterproofing system is important in the process of protecting a structure from their penetration.
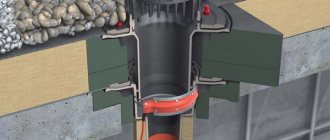
How to mount and install an iron box for a cellar at a high groundwater level
It is not necessary to make a container the entire height of the cellar. It can be made in the form of a trough with low sides, the dimensions of which depend on specific conditions and the extent of flooding. On the sides of such a container there must be fastening wings, by which the “trough” can be removed from the cellar and lowered into it.
Construction of a cellar in places with a high ground level: 1- trough-type box made of sheet steel; 2 – a piece of half-inch pipe; 3 – tap; 4 – mounting wings; 5 – fastening the box to the ground.
At the bottom of the box, in one of its corners, you need to weld a pipe with a tap built into it. This locking element of the structure must be located at the end of the pipe, the height of which must be at least half a meter. Next, they begin to disinfect and paint the box. To do this, it is first treated with orthophosphoric acid, then coated with red lead for iron.
On the outside, additional waterproofing is carried out to prevent rust: a layer of bitumen is applied to the surface of the box. If everything is done correctly and carefully, such a container will last for many years and will not give a single leak.
Upon completion of the work, they begin to lower the box into the pit that was dug to construct the cellar. In conditions of high water and high groundwater level, the pit will always be filled with water. If formwork was not installed along the walls of the pit, the height of the iron container should be greater than the depth of the pit. Otherwise, if the groundwater level is high, the walls of the pit will quickly be washed away by water. The box is lowered into it after opening the tap. It will gradually sink and sink to the bottom, as water will flow into its interior.
After the container is firmly in place, its position is fixed by concreting the outer wings. After this, the water is pumped out using any powerful pump. Upon completion, close the tap. All that remains is to complete the simplest work: make a cellar lid and install a staircase. In a similar way, you can make a viewing hole for a car if the garage is located in an area with a high groundwater level.
https://youtube.com/watch?v=eKg24j5LKg8
Video: expert advice ↑
In this video, famous construction expert Andrey Kuryshev talks about possible ways to drain a flooded basement of an existing building
Description
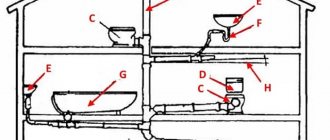
The ground floor, or as it is also called the zero level of the house, is one of the few ways in which you can increase the interior space of the house. The ground floor can also be used as a living space. However, most often a laundry room, gym, swimming pool, sauna, billiards or garage are placed there, and this level is also used for storing things.
External drainage
Along the entire perimeter of the future structure, it is necessary to dig drainage trenches about 40 cm wide, preferably 20-30 cm below the proposed base.
It is necessary to dig trenches at a slight slope so that the water drains faster, and to make digging easier and the bottom does not wash away, you need to dig so that the shovel goes towards the flow of water.
Then, at the bottom of the trench, a compacted sand cushion is created, which is covered with geotextile to prevent mixing of layers.
It is important to remember that some inexpensive types of geotextiles conduct water in only one direction, which must coincide with the direction of water flow in the trenches. Larger drainage material in the form of pebbles, expanded clay or crushed stone is laid on top of the geotextile
Larger drainage material in the form of pebbles, expanded clay or crushed stone is laid on top of the geotextile.
Special drainage pipes made of asbestos or polymers, equipped with holes on top or on all sides, are laid in prepared trenches and connected into a single system.
If there is too much groundwater, then it is likely that at the place of its main exit from the drainage pipe system it is necessary to dig a special reservoir into which it will flow during a flood or after rains, and then seep out of it back into the ground.
The storage tank will also have to be protected from the soil sliding with geotextiles, concrete walls or a large plastic container.
When filling drainage trenches with pipes, the operation is repeated: first sand, then geotextiles, then gravel.
The area under the bottom of the cellar is leveled with gravel. The advantage of external drainage is that it removes water before it reaches the structure, but requires a little more excavation.
DIY installation rules
Drainage installation on the site involves a large amount of excavation work.
It is easier to order the installation of drainage systems from a specialized organization that has special machinery and equipment, but if you wish, you can do the work yourself. This will significantly save your budget.
When installing drainage with your own hands, you should follow certain rules:
- In order for the constructed drainage system to operate effectively, it is important to order a drainage system design from specialists.
It must contain plans for the location of drainage pipes, inspection and storage wells, indicating sections and depths, cross sections of trenches and wells, necessary calculations and explanations. Independent decisions can lead to the fact that after the work is completed, dry places will be adjacent to waterlogged ones.
- When laying drainage pipes, care must be taken to maintain a slope towards the drainage well to prevent the formation of places where water will accumulate in the pipes.
- Perforated pipes must be protected with geotextiles to prevent clogging of the drainage pipe holes with small impurities.
- At all turns and forks of the route, it is necessary to install inspection wells to clean pipes or assess changes in water levels.
- To create a budget option for a storage tank, you can use a plastic barrel without a bottom, filling it with broken bricks, coarse gravel or crushed stone.
It is necessary to complete the installation of external drainage systems before starting work on the improvement of the site.
Properly executed drainage can effectively remove water from the house throughout the entire operation of the building and extend the life of buildings for decades.
Inspection element DN110, grid size 190x190 mm, AISI304 stainless steel
In stock RUB 13,512.
Buy in cart
Inspection element DN150, grid size 190x190 mm, AISI304 stainless steel
RUB 14,687
Order
ACO Self rain inlet made of polymer concrete with galvanized grating, 250x250x350 mm.
In stock RUR 5,305
Buy in cart
ACO Self rain inlet made of polymer concrete with a cast iron grate without edging 250x250x350 mm
In stock RUR 7,188
Buy in cart
Semi-buried cellar
If the groundwater level is very high, and there is little money to build a cellar with your own hands, then it is better to build a semi-buried cellar.
- The top fertile soil is removed, then a hole up to a meter deep is dug.
- The bottom is leveling out. Sand is poured 10 cm thick and compacted well, after which a 15 cm layer of crushed stone is laid and also compacted.
- Reinforcement is laid on the crushed stone and formwork is built.
Layout: semi-buried cellar
- Concrete is poured in a layer of 8 cm.
- Waterproofing is laid on the floor surface and a screed is made.
- The walls are built of brick. Wall height 2 m.
- The roof is made monolithic.
- The walls are sheathed on the outside with extruded polystyrene.
- Additionally, the entire structure is waterproofed with rolled bitumen materials.
- The cellar is filled with earth, leaving only the entrance open. The land can be planted with grass or ornamental plants.
Semi-buried cellar in a summer cottage
Installation of drainage systems
There are two types of drainage systems - external and internal, which, in turn, are divided into several varieties. The external system is a centralized sewerage system and a network of treatment facilities. Wastewater flows through pipes into a central collector, which redirects it to a treatment plant. At the station, contaminated water is purified in several stages and enters the reservoir.
The city network of external drainage system is:
- Combined, in which all types of waste (domestic and industrial) are transported through pipelines to treatment complexes located on the outskirts of the city.
- Rainwater - receives precipitation and directs it through its own network of channels directly into the reservoir.
In this video you will learn more about drainage: The internal system is divided into three types:
- Household. It is designed in such a way that it drains water from the home to the external sewage system on a slope without additional pumping units.
- Industrial. Depending on the production method, the effluents are quite different in aggressiveness. This drainage system is used on the territory of enterprises to remove contaminated water beyond its boundaries. The wastewater does not enter the citywide network. The industrial system has its own treatment facilities, pumping stations and other equipment. Industrial liquid wastes are discharged into the sewer: oils, emulsions, fats and lubricants, as well as liquids that may contain radioactive elements.
- Rainy. It is used to remove atmospheric precipitation from roads, sidewalks, roofs of house buildings and other objects using metal and plastic pipes that are laid along roads and pedestrian areas. Collecting water, pipelines direct it to a centralized sewerage network.
Each of the systems considered is carried out separately to ensure the greatest drainage effect.
Advice. City-wide storm sewers should accept only surface water to prevent the ingress of third-party chemical liquids into it and not to harm the health of operating personnel at sedimentation stations and wastewater treatment plants.
Pipe for drainage water
The optimal solution for draining drainage water from the basement is a low-resistance HDPE pipe. Such a tube can be laid without connections. The diameter corresponds to the pump discharge pipe. It is advisable to first lay the pipe vertically to a level equal to the discharge mark. The passage in the basement wall must be made through a casing, carefully sealing the passage with cement mortar and applying a layer of penetrating waterproofing. Outside the building, the pipe is laid in a trench. The laying depth can be higher than the freezing depth of the soil if its slope towards the discharge is greater than 0.005. Open pipe installation is not recommended.
Classic plinth drainage system
The classic system is a circuit located at a certain depth, consisting of pipes. As a rule, the laying is carried out at or below the lowest point of the building or structure. The ground floor is the lowest level.
Important! The basement floor drainage should be laid with a slope of several degrees. Otherwise, water will stagnate in the ground and the system will not function.
In order to monitor the condition of the drainage system from the base and, if necessary, clean it, a special well is installed at each corner. All excess moisture seeps through the soil into the pipes and then into the wells. Subsequently, the water is discharged through outlets outside the site.
Construction of a monolithic concrete cellar
You can build a waterproof concrete cellar, either semi-buried or completely buried in the ground, as follows.
When the water level drops, we dig a pit for the cellar. If the depth of the pit is more than two meters, then we must install formwork to avoid unexpected ground collapses.
- We level the bottom and lay waterproofing material.
- We pour a layer of sand 10 cm high onto the waterproofing and compact it, add crushed stone on top and compact it tightly.
- We cover the formwork along its entire height with thick film or roofing felt.
Construction of a concrete cellar
- At a distance of 10 cm from the first formwork we install the second. We cover the walls with waterproofing material. We lay reinforcement between the formwork and pour concrete.
- We pour concrete in a circle, gradually increasing the formwork and reinforcement.
- After a week, the formwork is dismantled, the floor surface is reinforced with mesh and filled with concrete. Additional waterproofing is carried out after the concrete gains strength.
You can build a concrete hydraulic lock in a slightly different way:
- a pit is dug, the bottom is leveled and a cushion is made of sand and crushed stone with obligatory compaction;
- formwork is made and 10 cm thick walls and floors are cast from concrete;
Concrete formwork
- after 14 days, the entire surface of the concrete is thoroughly coated with hot bitumen and waterproofing is glued in two layers: along and across;
- The formwork is erected again, reinforced and a solution 8 cm thick is poured.
Advice. Add special hydrophobic additives to the concrete solution, which will give the composition water-repellent properties.
Caisson cellars
Plastic caisson for cellar
Caisson cellars are completely different from concrete ones both in structure and appearance. But this particular option is one of the best when it is necessary to build a cellar on water, or if groundwater passes close to the surface. In this case, the cellar is a box made of plastic or stainless steel with sides and fasteners, thanks to which, subsequently, this same box can be removed from the pit and lowered back.
- In the corner of the box, a pipe with a shut-off valve is placed (welded) vertically.
- The outside of the box is covered with waterproofing (bitumen), and the inside is painted with special paints (for iron).
- Open the valve on the pipe and lower it into the pit. This allows water to fill the box.
- When the box reaches daylight, it is poured with concrete from the outside (to fix it in the ground), then all the water that got into the box is pumped out through a pipe with an open tap, and only after that the tap is closed.
- At the end, a ladder is installed inside the box to create ventilation and a roof for the cellar.
This is interesting: How to build a dugout: we explain point by point
Materials, tools and equipment
If you are planning to build a drainage system with your own hands, you should stock up on the following materials:
- crushed stone, expanded clay or gravel;
- coarse sand and geotextiles;
- corrugated plastic pipe with perforation, with a diameter of 100 mm;
- corner fittings, tees;
- main metal-plastic or steel pipe;
- ready-made inspection wells or pipes with a diameter of 200 - 500 mm;
- penetrating impregnation of the “Penetron” type;
- waterproofing materials based on liquid rubber or bitumen;
- storage tank made of concrete rings, wide pipes, metal or plastic tanks.
- a set of products for installing a light pit.
Figure 5. Perforated corrugated pipe and geotextile.
ACO storage tanks from the MegaLine campaign, which are distinguished by their strength and vertical rigidity, are ideal for collecting wastewater.
In addition, you will need the following tools:
- bayonet and shovel shovels for soil development;
- bucket for preparing waterproofing compounds;
- wide brush for applying waterproofing;
- grinder and knife for cutting pipes;
- tape measure and construction cord for marking the drainage route;
To control and ensure the slope when laying drainage pipes, you need to stock up on a level or water level with a length of 60 cm.
You can select and buy materials and components for installing drainage systems on the website. We always have in stock everything necessary to carry out work on drainage of water from the site, at affordable prices. The high quality of products from world famous brands ACO, HL, Plastmo will ensure maximum efficiency and long life of the created drainage systems.
How to get rid of groundwater in the basement
rlotoffski 2-03-2014, 19:00 21 479 Construction
OK
Groundwater problem and possible basement flooding
- two complex issues that should be resolved at the stage of construction of a country house. Ignoring these points can lead to such undesirable consequences as destruction of the foundation, its subsidence, flooding of the basement and damage to all its contents, as well as the floors of the first floor. How should protective measures be taken to prevent disaster? If the problem could not be avoided, what should I do? You may find the following information helpful.
What causes groundwater to rise?
For example, this could be floods of nearby rivers or an increase in water levels caused by heavy rainfall. Can we influence the first factor? We personally, as summer residents, are unlikely. But we can provide for the fastest removal of precipitation.
How to drain groundwater?
So that groundwater in the basement of a country house does not create problems, it simply should not be there. To do this, it is worth taking protective measures. What should we include? Well, firstly, this is timely drainage and secondly, waterproofing.
Waterproofing is necessary from moisture contained in the soil in any case, even when groundwater flows significantly below the level of the basement floor, without affecting the underground part of the structure. You can treat all concrete surfaces with special water-repellent compounds and seal wall-to-wall and wall-to-floor joints.
Thanks to its special properties, the substance, introduced under pressure using special equipment, quickly fills all existing external and internal voids, hardens, thereby reliably blocking the access to water. You can forget about flooding basements if, in addition to waterproofing, you take care of the drainage system on the site.
Option 1.
Using a drill, we will make several wells with a minimum diameter of 10-15 cm and an average length of 3-5 meters.
As a rule, this length is sufficient to provide liquid access to permeable layers through dense clay layers, which retain water, causing it to accumulate.
As a result, water does not accumulate in the upper layers of the soil, for example during rain or melting snow, but flows freely and deeply through the impermeable layers of the soil. And very quickly! It is recommended to make such wells along the entire perimeter of the basement and in its surroundings.
Option 2.
You can also build a drainage system as follows. First of all, it is necessary to assess the nature of the slope at the summer cottage, which in turn will determine the degree of slope of the pipes. In addition, the larger the diameter of the pipe, the greater the slope. Thus, the independent flow of water in the direction opposite to the site is ensured.
We dig trenches around the perimeter of the house and another one or two in the direction from the house to drain the liquid. They should be about 1.5 meters deep, 0.4 m wide, and the exit slope should be below the basement level. We cover the bottom with waterproofing tecton, then with geotextile (the width of the material should be sufficient to cover subsequent elements of the entire system).
If the basement is already flooded.
If there was no talk about organizing waterproofing during construction, and the basement is flooded, then it is urgent to drain it, and then think about the drainage system.
A properly laid network of drainage pipes will collect and drain not only groundwater, but also melt and rainwater, constantly protecting the foundation and basements from excess moisture. Drain the flooded room using a submersible drainage or fecal pump.
There is nothing complicated in their design or operation, which does not prevent the devices from effectively solving their problems. The choice of model depends entirely on the composition of the liquid in your area, the number and size of foreign particles in it. The drainage pump will do an excellent job with clean or heavily contaminated water.
www.kak-sdelat.su
Become the author of the site, publish your own articles, descriptions of homemade products and pay for the text. Read more here.
OK
Why does a previously dry basement floor flood ↑
If the basement walls do not “leak”, and moisture appears from below, there may be two main reasons for flooding of a previously dry basement floor:
Storm water penetration ↑
If the basement floods immediately after a heavy rainfall or after heavy snow melts, and the water quickly (within a few days) disappears, storm water penetrates into the basement. There is no point in hoping that this happened once and the trouble will not happen again after the next rainstorm.
Perhaps the problem can be solved in a simple way by diverting the water away from the walls of the house. The first thing you should pay attention to is the blind area and stormwater system that drains runoff from the roof. If they exist, of course. There should be no gap between the walls and the blind area. If there is a gap or cracks in the blind area, they should be sealed with construction sealant. The wider the blind area, the better. A meter and a half and an outward slope of 2-4% is the best option. Under the drainpipes coming down from the roof, it is advisable to place trays that will divert the flow of water to the maximum possible distance from the house, based on the landscaping of the site.
Proper wide blind area, trays that divert storm water from the walls
Drainage trays with gratings built into paving (pictured above) are quite expensive; cheap open concrete trays can be used
But if, during the construction of the basement, the pit was backfilled incorrectly, even the correct installation of the blind area and stormwater system may not give the desired result. Often, during construction in dense clay and loamy soils, the pit dug for the construction of the basement floor is thoughtlessly covered with sand. And the foundation and base of the floor are located on a sand and gravel bed. It turns out that in the middle of the waterproof clay there is a permeable sand lens in which the house is located. If the blind area does not cover the width of the sand backfill on top, moisture penetrates into the sand in large quantities during rain or melting snow. But she has nowhere to go, because there is clay all around. And if there are “gaps” in the waterproofing of the foundation and basement floor, water gets inside. Those who are just building a house should understand that in clay soil, backfilling of the pit must be done with the same soil removed earlier, thoroughly compacting it. Or immediately arrange drainage for the basement of the house.
Rising groundwater level ↑
The rise in groundwater level (GWL) can be seasonal or permanent. If a house was purchased or built in the summer, and in the spring the basement flooded and the water lasted for several weeks, a seasonal, flood-like increase in groundwater level occurred. Next spring, if the winter is snowy, the problem will repeat itself if countermeasures are not taken. A constant increase in groundwater level can occur due to changes in the hydrogeological properties of soils and it is difficult to predict its dynamics.
Improving the waterproofing of the basement of an existing house, especially if water penetrates from below, is problematic and often impossible or unreasonably expensive. Often the only means of draining a constantly or periodically flooded basement is drainage of the basement.
All about basement drainage in a private house
The dangerous location of the site in places where there is a large accumulation of water inevitably dictates the need to arrange drainage in the basement in order to avoid flooding, as well as to prevent destruction of the foundation.
When is basement drainage required for a private home?
Basement drainage in a private house is needed in the following cases:
- at a high level of groundwater;
- the location of the site on a slope, which leads to the accumulation of sediment on it;
- if the spring flood affects the area of the land plot on which the private house is located;
- the soil is clayey or loamy;
- There is a body of water near the land plot (pond, lake, river, streams, etc.);
- if reeds and willows grow nearby.
If these circumstances are not identified, this does not mean that basement drainage is not needed. Savings by owners of private houses on the drainage system can lead to the problem of basement flooding.
Even if there is very little water in a given room, this can lead to the formation of mold and fungi.
These formations affect the integrity of the walls and basement floor, and lead to the destruction of the foundation.
There are times when you have the choice not to drain your basement. But they are more the exception to the rule.
And they are used only for the purpose of initial savings when building a house. Subsequently, drainage should be installed outside and inside the basement.
So, these cases include:
- groundwater is located half a meter below the basement floor level;
- the land plot where the house will be or is already located is located on an elevated area where precipitation does not accumulate;
- not near bodies of water.
However, such situations are quite rare. Therefore, drainage from the basement is necessary and mandatory.
External drainage around the foundation
The external version of the basement drainage system can be presented in two varieties:
- wall-mounted, which is located at the base level and is not suitable for dilapidated houses.
- annular.
The wall drainage system is done like this:
- As soon as the foundation hardens, the wall areas need to be insulated and impregnated with moisture-resistant agents.
- Trenches are dug 60 cm deep.
- You need to choose a place for the drainage well. It is selected relative to the natural slope of the land. In this case, this well must be located at least 10 meters from the foundation of the house.
- The bottom of the trench must be covered with geotextile with one edge supported on the wall. This is necessary to freely cover the bedding in the groove.
- Next, 10 cm of crushed stone is poured onto the geotextile. You can use gravel.
- Taking into account the slope, perforated pipes are laid in the trench. The entire system of these elements is closed into a single highway.
- The top of the pipe should be covered with a layer of crushed stone and coarse sand.
- The remaining edge of the geotextile is placed on top.
- After this, the pit must be covered with a layer of soil.
The second option - ring drainage is done like this:
- Trenches are dug. Their size should be 40 cm wide. And the depth is set lower by half a meter than the foundation of the house.
- Slope noted
- 20 cm of expanded clay, crushed stone or gravel is poured into the trench.
- After this, geotextiles are applied.
- Perforated pipes are laid out in grooves into the general contour.
- Inspection drainage wells must be provided at corner locations.
- Next, another layer of geotextile is needed.
- After this, the entire trench should be covered with waterproof gravel. You can also use sand.
The ring drainage system is suitable for all houses, including dilapidated ones. It is installed at a distance of one and a half meters from the base of the foundation.
Surface waterproofing
When draining the basement, experts recommend simultaneously waterproofing the surface inside and outside the room. The following materials are suitable for protection against moisture.
- Deep penetration mixture. A practical material that does not require additional finishing work.
- Polymer mastics. They include components that provide waterproofing properties.
- Roll materials. A traditional type of house waterproofing, which is laid in several layers, depending on the level of humidity of the area.
- Coating materials. Mastics based on polymers and bitumen.
In some cases, you can do without drainage by performing only high-quality waterproofing. We are talking about a situation where groundwater is located below the foundation level, the house is located on an area with sandy soil, and there are no ponds or swamps nearby.
Basement drainage device
The first thing that needs to be done is to develop a project that will determine the depth of the pipes, their diameter, and the location of water drainage (reclamation ditch, storm sewer, river, etc.).
Once the project is in hand, it is necessary to dig a ditch on a slope. It is worth considering that the initial drainage must be installed when pouring the foundation. This method is considered optimal, because excavation costs are minimized. If this is not possible (for example, the house has already been built), drains must be laid at a distance of no closer than 1.5 meters from the outer edge of the foundation. With this layout, subsidence of the house during work is practically eliminated.
The depth of the trench for pipes is determined by the calculated slope. Depending on the intensity of the discharged wastewater, it varies from 2 to 5 mm per 1 meter. The bottom is equipped with a filter layer (to remove excess) or a waterproof base. The differences are determined only by geodetic tests, which approve one or another method.
Tecton or geotextile can be used as a waterproofing material. The main tasks of such fabric are to protect the basement drainage from silting and premature failure. Being an excellent filter material, geotextiles support the filtering properties of crushed stone and sand. Next, pipes are laid for drainage, after which the entire structure is again wrapped with overlapping geotextiles. Sand, sawdust, and turf are poured on top. Water passes through sand or sawdust as if through a filter. This eliminates the risk of clogging drain pipes. Thus, it can be argued that the throughput of pipes is affected not only by the frequency and size of perforations, but also by the properties of the filter materials.
Inspection wells are installed in the corners of the house, and a pumping well is installed at the lowest point of the system. An additional element to prevent the penetration of moisture into the basement is the installation of a clay castle at a distance of 0.5-1 meter from the wall of the building.
After the installation of the basement drainage is completed, you should start waterproofing the walls, floors, corner joints and surfaces inside the basement. To do this, you will need a waterproofing substrate and a self-expanding waterproofing cord designed to hermetically seal the corner joints of the walls and floor. They reliably prevent moisture from penetrating into basements.
Types of drainage from the basement
Today, there are several systems for draining excess moisture from buildings and structures that have a basement or ground floor. The main ones include:
- ring (trench) drainage of the basement;
- wall-mounted drainage;
- reservoir drainage.
The trench drainage system is most often used on sandy and sandy loam soils. This is due to the fact that excess moisture easily penetrates through sand. Trench drainage of the base is a pipe lining located at a distance of about 5-6 meters around the foundation of the building. In this case, the internal part of the system must be isolated from groundwater. Since sandy soils are characterized by high water conductivity, the ring system must be installed below the base level. If it is known (it was revealed through hydrological studies of the soil) that water flows from only one side, you can lay a ring drainage with a gap, thereby saving on materials.
Wall basement drainage is most often used on heavy clays and loams with low water permeability. Often, the wall-mounted option is installed as a measure of additional preventive protection of the basement floor from flooding. The distance of laying this type of drainage from the walls is equal to the thickness of the foundation itself, in depth - from or more than the level of the base of the foundation. Wall drainage of the basement is laid with a mixed type of groundwater formation.
In many cases, reservoir drainage is installed in combination with one of the above types. The use of wall and reservoir systems is advisable when forming groundwater of a mixed type. The system laying level is considered to be the soil layer located below the base of the foundation. To integrate reservoir drainage with external drainage, a drainage system is laid through the foundation of the building.
What materials may be needed
Before starting work, you should calculate the amount of building materials needed. This does not apply to bulk substances (gravel, crushed stone, sand), but applies to specialized parts and assemblies.
If you decide to install foundation drainage yourself, mistakes can lead to unnecessary costs and reduced efficiency of the system. To avoid these troubles, you should involve specialists in the calculations. For example, you can contact ]Vodolov[/anchor].
To install a drainage system you will need: a drainage design or diagram, drainage pipes, geotextiles, drainage wells, free time or a team of builders.
Drainage pipes
The use of high-tech plastics has practically replaced metal products for the formation of drainage systems. Modern materials have a number of undeniable advantages:
- low specific gravity;
- ease of installation and connection;
- immunity to corrosion;
- low cost;
- good strength properties - possible depth of installation in the ground is 6 -7 m.
The construction market offers specialized drains made from corrugated plastic pipes of various (100 - 200 mm) diameters. The perforation for water to enter the pipe is applied at the factory. Thanks to the stiffening ribs, they perfectly withstand mechanical loads, the inner surface is smooth, which promotes self-cleaning, and the flexibility allows the product to be laid at any angle. The drains are offered ready-to-use in a geotextile braid; coconut fiber is used for filtration. A foundation drainage system made of such materials will last for many years.
Instead of specialized pipes, you can use sewer pipes, but you will have to drill the perforation yourself, which takes additional time, and connecting with fittings is not always convenient.
The diameter is selected based on the length of the structure and the volume of incoming water. The throughput of the drains must ensure the flow of any power.
Plastic wells
Ring or wall drainage for any foundation cannot be done without wells. You will need two types of products - audit and storage.
- Audit - designed to control the system. If a blockage is detected in a certain area, the pump is lowered inside and the pipes are washed. Such units are installed at every turn or every 50 meters on straight sections. The standard diameter of products is 600 mm.
- All collected water will go into the storage tank. If there is a lot of it, you can provide additional capacity. Water is used for irrigation and technical needs.
To connect the system you will need plugs, fittings, adapters and other small parts. Connections are made using sealing gaskets that ensure no leaks. All these elements are always available in Irkutsk at ]Vodolov[/anchor].