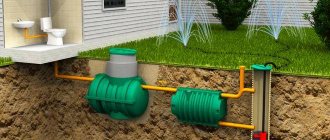
Drainage is an engineering system designed to collect and drain excess water from the surface of the earth and deeper layers of the soil. It consists of channels, gutters, perforated pipes, inspection and collector wells, and wells.
Laying drains is a necessary part of the construction work in areas with high groundwater levels, large amounts of seasonal rainfall, and in swampy lowlands. The article highlights the main stages and rules for installing drainage pipes, which will help the developer to effectively drain the site and the area around the house.
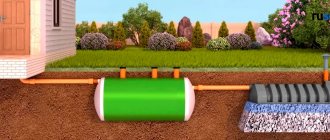
Drainage system for draining water away from the house
Reasons for installing a drainage system
If the pipes are placed along the perimeter of the land plot, then a reliable drainage system can be built. It is known that ground and flood waters, as well as precipitation that falls in quantities exceeding the monthly norm, pose a serious danger to the foundation of private housing.
Most often, the laying of drainage pipes is carried out before the construction of the house begins. But it happens that after the completion of construction work, serious reasons arise for waterproofing the foundation. Then, under special conditions, you can start preparing the drainage.
Let's consider the situation when pipes are installed at the beginning of construction, but for specific reasons:
- high groundwater level - less than one and a half meters to the ground surface;
- gentle slope of the area, promoting regular accumulation of moisture;
- the presence of clay and loamy soil with low drainage characteristics;
- The building is located in an area where, according to statistics, the level of monthly precipitation is exceeded.
The depth of construction of other structures in the local area also plays an important role. If there is a buried foundation next to the main building, then groundwater will not be able to drain freely and will constantly accumulate under the house, increasing the risk of flooding. Asphalt and concrete blind areas on the site act as a barrier to the natural circulation of wastewater. In this case, it would be correct to connect stormwater waste to the central system.
Installing a drainage pipe eliminates the damage caused to the foundation from the accumulation of moisture in the ground around the home and changes in the level of wastewater.
Plot
0 votes
+
Vote for!
—
Vote against!
The most effective way to protect the foundation of a private house from the destructive effects of groundwater and storm water is a high-quality drainage system. This is especially important when water accumulates in the upper layers of the soil, as it can cause flooding of the basement or basement, wetting and deformation of walls, as well as the occurrence of fungal formations. This article will discuss how to lay drainage pipes.
Pipes for the drainage system, which are installed along the entire perimeter of the site, allow you to create high-quality drainage. After all, the danger of flooding is posed not only by groundwater, but also by flood water. Damage can also be caused by precipitation that exceeds permissible limits.
Drainage pipe photo
Unlike waterproofing the foundation, the drainage system can be installed after the house is built, if there are grounds for it. But under certain conditions, it is better to install it at the initial stage of construction. The following reasons are needed for this:
- flat location of the site, facilitating significant accumulation of water;
- clay and loamy soil, which have poor drainage characteristics;
- statistics of excess precipitation levels characteristic of the area in which the building is located;
- increased level of groundwater (less than 1.5 meters to the ground surface).
In addition, it is worth focusing on the depth of construction of other buildings on the site. The presence of a buried foundation next to the main building not only prevents the natural outflow of groundwater, but also contributes to its accumulation, thereby increasing the risk of flooding. The concrete blind areas and asphalt pavement installed on the site are also a barrier to the free circulation of water. In such a case, it is considered competent to connect storm drains to the main drainage system.
Laying a drainage pipe will help prevent the consequences of changes in groundwater levels and accumulation of moisture in the soil around the building.
Types of drainage systems
There are two main options for designing a drainage system:
- Open (surface) - used to remove excess moisture resulting from the accumulation of precipitation or melt water. The open drainage system is presented in the form of ditches and trenches.
- Closed (deep) - installation uses pipes with perforations, which are laid to a certain depth in a previously prepared trench. The main function is to drain groundwater and protect the foundation of the house.
Materials required for laying a closed drainage system
The process of installing a drainage system is quite labor-intensive and requires thorough preparation. From bulk building materials you will need:
- Sand . River sand is mainly used in drainage work. Its main function is to create a filtration cushion around the drainage pipe.
- Crushed stone . To set up the system you will need a medium and large fraction. The purpose of crushed stone is to form a stable layer to prevent the penetration of dirt and large parts of soil. In addition, crushed stone prevents excessive soil pressure on the corrugated pipe.
Basic materials:
- drainage pumps . They are used only in case of significant flooding of the area with groundwater. Promote mechanical drainage;
- drainage pipes . With their help, the main drainage system is formed. The quantity and diameter depend on the complexity of the laying pattern. Plastic pipes are most often used for drainage;
- geotextiles – protects the drainage pipe from soil contamination. As a rule, interlining or dornite is used. In addition to strength, both types of textiles have filtering ability;
- couplings - necessary for attaching drainage pipes to each other.
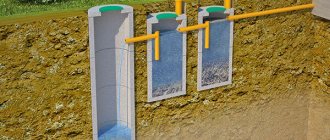
As a rule, the drainage system needs periodic cleaning; for this purpose, inspection wells are installed along its perimeter. A collector well is installed to collect water into the system.
Selection of drainage pipes
Before installing a drainage system, special attention should be paid to the selection of pipes for work. The first thing to consider is the use of perforated pipes in the arrangement of the drainage system. The second is the diameter and the presence of holes for moisture outflow and air exchange. And no less important is the material from which the pipes are made.
Currently, the following types of pipes are presented on the building materials market:
- asbestos-cement;
- ceramic;
- from polymer materials.
The most popular in arranging a drainage system are polymer drainage pipes. Their advantage over other types is as follows.
- Long period of operation - up to 70 years.
- High strength indicators.
- Resistance to corrosion processes and aggressive environments.
- Reduced weight, which simplifies the process of transportation and installation.
- Self-cleaning ability due to smooth surface.
- Resistance to siltation.
- Value for money.
- Easy to maintain. Thanks to the geotextile filter, the system does not need to be flushed.
Diameter of drainage pipes:
- up to 150 mm – for a drainage system that drains a small amount of water;
- up to 300 mm – for systems with high loads.
For a branched drainage system, you will need pipes of both small (for branches) and large diameter (for the main branch of the system).
Plastic drainage pipes
Polymer pipes, which are usually used for laying drainage systems, are made of PVC, polypropylene or polyethylene and are available in the following types:
- single-layer or double-layer . The choice of the number of layers depends on the density of the soil;
- flexible and rigid . Rigid pipes are suitable for simple drainage schemes, while flexible pipes allow you to create complex branching throughout the area;
- pipes with or without filter casing . As a rule, drainage pipes already have holes along their entire length. But if the purchased material does not have special holes, you can make them yourself using a drill and a thin drill bit;
- corrugated or smooth.
As for covering with geofabric, as a rule, samples already covered with filter textile are presented on the building materials market. When purchasing uncoated pipes, you can wrap their surface yourself by securing the material with rope or thin wire around the perimeter of the pipe.
Design of drainage pipe installation
Before starting work on installing a drainage system, it is worth first drawing up a plan for its location on the site.
- This requires taking into account the type of soil and the height of groundwater. The most often used is a branched scheme, at the joints of which inspection wells are installed.
- The distance between the branches directly depends on the type of soil. For clay soil it is 10 meters, for loamy soil - 20 meters, for sandy soil - 45 meters.
Laying drainage pipes with your own hands
First you need to determine the location of the drainage system. There are only two placement options:
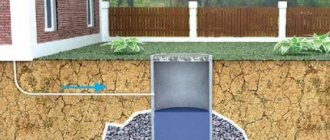
- “wall” drainage - passes only near the foundation of the house and prevents moisture from entering directly into the building itself;
- a drainage system located along the entire perimeter of the site protects not only the base of the building, but also other outbuildings and plantings located on the territory.
Stages of work
- The first step will be to mark the area for placement of drainage ditches. To facilitate the process, you can use a special laser rangefinder. Particular attention should be paid to places where moisture accumulates after rain - this means that water exchange in this area is difficult due to the density of the soil or the presence of obstacles.
- Trench. The recess under the drainage trench must be made taking into account differences in height. The main task of the prepared ditch system is the rapid and unhindered outflow of water.
Tip: during work, you can use a watering hose, running a certain volume of water - make sure that water does not accumulate in certain parts of the trench.
- Before installing drainage pipes, the bottom of the trench must be thoroughly compacted. Then any filter material is laid, and its ends should extend beyond the trench. Next, river sand and crushed stone are poured, first coarse, then medium fraction, to a thickness of no more than 20 cm.
- Drainage pipes are cut according to the dimensions of the diagram using a jigsaw or a special device - a pipe cutter. Next, you should begin laying the pipes, connecting the joints using fittings. In order for the joint to be strong, it is necessary to join the parts after pre-heating the joining sections.
- The pipes must be carefully wrapped with geotextile, securing the joints with rope or thin wire. The choice of such material is not accidental, since it must allow water to pass through the perforation. In addition to throughput, the functions of geotextiles include protecting the perforations of the pipe from clogging.
- Pipe laying must be done at a slope, connecting the ends to inspection wells. The system can use two types of wells: sealed, which allows the collected water to be used for technical purposes, and absorbent - the water will go back into the soil. The slope of the drainage pipes depends on its diameter; the larger it is, the less slope is required.
- The next step in installing drainage pipes will be filling the surface with crushed stone and sand. After which the structure is wrapped with sheets of filter material located on the surface and covered with a layer of soil.
Drainage pipes video
Drainage system maintenance
When arranging a site with a drainage system, it is important not only its thoughtful and high-quality installation, but also compliance with operating rules. This will allow the system to operate for as long as possible.
Approximately once every four years, it is mandatory to inspect the condition of pipes and wells as a preventative measure. In addition, once every two years it is worth measuring the water level in the wells; a significant change in it may indicate the following factors:
- damage to the integrity of the pipe;
- formation of dense blockage;
- accumulation of silt deposits on the entire surface of the pipe;
- partial settlement of the pipeline due to soil movement.
In order to avoid such problems, it is necessary to promptly inspect the drainage system and clean it from various types of contaminants.
Errors in laying drainage pipes
The efficiency of drainage directly depends on the quality of the installation. Any disturbances during operation will lead to system failure. In the best case, you can repair the damaged area, in the worst case, you will have to completely reinstall the drainage system.
The most common mistakes include:
- selection of a pipeline system without taking into account soil quality. For example: on loamy soil it is not recommended to use pipes without a filtration system;
- violations associated with a change or absence of the angle of inclination of the drainage system;
- initially there is no option for draining water from the well;
- the technology for arranging drainage pipes is not followed - the installation was carried out without filter filling of crushed stone and sand;
- absence of geotextiles and filter material;
- poor-quality pipe soldering;
- no perforation.
When choosing the type of drainage system, you should base it on the location of the site and the quality of the soil. To independently arrange a drainage system, it is necessary to plan the drainage layout in advance. When choosing materials, preference should be given to the most practical and durable. These include plastic corrugated pipes with perforations. By following all the stages of laying the drainage system, you can obtain a high-quality drainage system. In addition, drainage guarantees protection of the basement or basement of the house from the harmful effects of groundwater.
Varieties of drainage schemes
The following options for their preparation are known:
- open (superficial);
- closed (deep).
The first type - open - is necessary for draining excess liquid that has accumulated in the ground from precipitation. This drainage system is represented by trenches and ditches.
The second is designed to remove groundwater and protect the foundation of the building from destruction. For this purpose, a drainage pipe is laid in a ditch of a specific depth. Moreover, the tubular product must be perforated.
Work order 10 steps: step-by-step instructions
Drains are laid in the following order:
- a plan is drawn up and markings are carried out on the ground;
- trenches are dug along the marking line, their depth should be below the freezing point of the soil;
- a layer of sand up to 10 centimeters thick is poured onto the bottom and thoroughly compacted with a roller;
- crushed stone or gravel is laid on top (layer thickness 20 cm);
- pipes are laid on the prepared cushion;
- the system is mounted using couplings, and then the angle of inclination of the pipes towards the water collectors is checked;
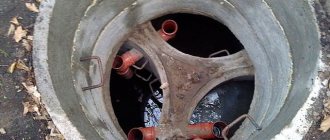
- inspection wells are installed at the joints and turns of pipes (a piece of plastic pipe is cut off and a protective cover is installed);
- backfilling is carried out - a layer of crushed stone, sand, and soil is laid out sequentially;
- You can lay turf on top or sow herbaceous plants;
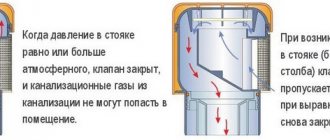
- at the end of the outlet pipe after the collector, a check valve is installed or a well is installed to collect water (a sealed plastic tank is used).
Arrangement of a closed system
Before you begin this labor-intensive procedure, you need to prepare and purchase bulk building materials:
- Crushed stone of medium/large fraction, which is needed to obtain a stable layer that prevents dirt and bulky soil fragments from entering the system. This material also protects the corrugated pipe from the increased pressure of the earth layer.
- River sand creating a filtration cushion.
In addition to bulk substances, the following will be useful:
- Drainage pipes that form the drainage system itself. Depending on the intricacy of the project, the diameter and number of pipe products are selected. Recently, PVC products have become relevant.
- Drainage pumps providing mechanical drainage. They are used when the site has suffered serious damage due to flooding by underground runoff.
Maintenance
Even a properly installed and well-functioning drainage system requires regular maintenance. Inspections of drainage and inspection wells are carried out once or twice a year. Owners should be alert to low water levels, which may indicate:
- about clogged drains;
- about the appearance of a leak in the pipeline;
- about silting of the drainage well.
Silt is the easiest to deal with. To do this, it is necessary to clean the drainage drain using a fecal pump with a float shut-off mechanism. Such a unit will automatically cope with contaminated water containing large impurities.
Drains are washed using special equipment. To solve the problem of system clogging, you need to contact a specialist.
Source: greenologia.ru/eko-zhizn/sistemy/kanalizacia/ukladka-drenazhnyh-trub.html
Plastic drainage pipes
All polymer products that are used for the installation of drainage systems are made of polypropylene, polyvinyl chloride or polyethylene.
In addition, they are:
- One-/two-layer, the number of layers is introduced in proportion to the soil density.
- Flexible/rigid. The former have found application in complex branched schemes across the site, the latter in simple drainage projects.
- With/without filter casing. Most often, drainage pipes have a number of holes along their entire length. If they are not there, then using a drill and a thin drill, you can make holes yourself.
- Corrugated/smooth. On the building materials market you can purchase pipes with a filter coating on the surface - geofabric. If it is missing, then wrapping textiles around the perimeter of the pipe can be done independently, using the material at hand to secure it - thin wire or rope.
Tips for choosing
For deep drainage, the most popular in civil engineering are two-layer corrugated pipes made of polymer materials with an additional filter shell. And the same profile, but without the geotextile winding, is used for the construction of closed-type storm drains.
The internal walls have a smooth surface, which ensures high self-cleaning and does not create prerequisites for silting of the horizontal part of the drainage system.
The outer walls are corrugated with a ring profile, which provides the required rigidity. The corrugated surface also allows the use of O-rings when connecting pipes with couplings and tees.
For installation in areas with normal operating conditions (blind areas, lawns, pedestrian paths), ring stiffness class SN4, SN8 is sufficient.
For drainage installation under access roads or parking areas, pipes with ring stiffness class SN16-SN24 are selected.
Self-installation
Laying drainage pipes with your own hands begins with specifying the installation location.
Placement can be done in two options:
- “Wall” drainage system, which is installed around the perimeter of the foundation of a private building and protects it from moisture getting inside.
- Drainage along the perimeter of the entire local area, allowing to protect the basement of the building, all utility structures, and green spaces.
Sequence of installation work:
- Mark the area where the drainage ditches will be located. With the help of a laser rangefinder, starting actions can be significantly simplified. In this case, it is necessary to pay attention to the accumulated excess water after rain, which clearly demonstrates the difficulties of water exchange due to the increased density of the soil or existing obstacles.
Features of factory-made drains
Although making drains with your own hands does not take too much time, many people prefer to buy special factory pipes that have the following distinctive features:
- Design. Most factory drains are produced in the form of corrugated pipes with slotted perforations applied at angles of 120, 180 or 360 degrees relative to the profile section. Typically, corrugated pipes are supplied with two walls, with steel rings soldered into the outer one, and the inner one is smooth to reduce hydraulic losses.
- Materials. Most corrugated pipes are made from HDPE in black, green or blue colors; the inner shell can be made from LDPE or PP polypropylene. Some companies produce their products from unplasticized PVC-U polyvinyl chloride. Usually these are short sections of pipes no more than 6 m long, red-brown in color.
- Dimensions. The dimensions of corrugated pipes are determined by their outer diameter; they correspond to the standard number series of 63, 75, 90, 110, 160, 200, 250, 320, 400, 500, 630 mm. The first few standard sizes, including the 160th, are produced in coils of 50 m, others in lengths of no more than 6 m.
Operation of the drainage system
When arranging a drainage system, you need to think through everything down to the smallest detail, install it efficiently, and follow the basic rules of operation. Thus, the life of the drainage system will be significantly extended.
As a preventative measure, a mandatory inspection of the technical condition of drainage and wells will be required - approximately once every 4 years. The liquid level in inspection wells should be measured every 2 years.
Even a slight deviation of this parameter from the norm indicates:
- violation of the integrity of the tubular product;
- dense blockage;
- sludge deposits on the surface of products;
- partial deformation of the pipeline due to ground movement.
Such problems can be prevented if you promptly inspect the drainage system and clean it of various debris.
Basic moments
The drainage system must meet technical requirements. Amateur activity in this matter is not encouraged. For this reason, owners should pay attention to some important points:
- To carry out the work, you will need to create a vertical site plan taking into account the occurrence of groundwater in a specific area. Specialists will help you compile it for a fee.
- The exact depth of the pipeline, its diameter and type are calculated. At this stage you will also need the help of specialists.
- When digging a trench, you need to ensure that its size is approximately 40 centimeters larger than the diameter of the pipes used. The slope of the trench is from three degrees (from 0.5 to 1 meter of slope).
- Inspection wells are located no closer than fifty meters from each other.
- Installing a check valve or arranging a water collector is a prerequisite for the proper functioning of the entire system.
Possible errors when installing drainage
The quality of installation and the efficiency of the drainage system are interconnected. Any defects during operation can damage the system, which will lead to repair of the site or complete reinstallation of the drainage system. Therefore, we will add to the current topic: installation of a drainage pipe: how to lay it correctly.
The most common installation errors:
- the pipeline system was selected without taking into account soil conditions;
- the angle of inclination is changed or missing;
- at the initial stages there were no plans to drain water from wells;
- no geotextile or filter material;
- pipes are soldered in bad faith;
- the technical process for arranging the system was not followed - installation was carried out without filling sand/crushed stone;
- there is no perforation.
Knowing how to properly lay a drainage pipe, taking into account the location of the site and the condition of the soil; By preparing a laying plan and following the installation instructions step by step, you can achieve a high-quality drainage system. This means that the ground floor and basement of your building will be reliably protected from the negative effects of wastewater.
Tools and materials
For work you will need:
- shovel and bayonet shovel;
- garden wheelbarrow for soil;
- manual roller for compacting sand and crushed stone;
- assembly knife for cutting pipes;
- drill or grinder, if you need to make notches (perforation);
- geotextile scissors.
You should also prepare building materials:
- pipes;
- adapters for inspection wells and collector;
- fittings for pipe installation;
- plastic pipes with a diameter of 30 to 50 cm for arranging inspection and drainage wells (you can also purchase ready-made wells with a hatch or plastic tanks);
- geotextile in rolls;
- crushed stone or gravel, sand.
Reinforced concrete products
The first step is to choose the drainage material. In this case, it is very important that it withstand strong pressure loads. Therefore, you first need to find out which pipes are best suited for driving through a ditch.
Reinforced concrete products are quite common. Their strength is not disputed by anyone. It is impossible to install them yourself. Very heavy products have to be installed using special equipment.
Concrete pipes are manufactured in two stages:
- First, a steel frame is made from reinforcement rods welded in a circle to each other.
- Next, the base is filled with high-grade concrete mortar. After this, the workpiece is compacted using a centrifuge and vibrocompression.
Due to the peculiarities of production, reinforced concrete products are very durable and smooth. Therefore, in this case, you should not worry if you decide to lay the ends of the pipe under the stones.
The structure of the vibrocompressed material is as dense as possible. Therefore, water cannot penetrate inside it and cause the steel frame to rust.
Let's consider the parameters of reinforced concrete pipes:
- their cross-section can be 0.3-1.2 m;
- wall thickness is 140-200 mm;
- length ranges from 250 to 500 cm.
Reinforced concrete pipes for drainage ditches have two classes of rigidity:
- The parameter of the first category means that the product can be laid in the ground no more than 6 m. Such structures are not suitable for deeper burial.
- The material of the second class of rigidity has a higher load-bearing capacity. It can be placed at depths of up to 10 m.
The main advantages of reinforced concrete drainage are its high level of strength and long service life. The main disadvantages are high cost, large size and weight. Concrete structures can only be laid using special equipment.
A separate type of such structures are asbestos-cement pipes for drive-in installations. They are lighter and more compact than reinforced concrete analogues.