- Types of toilets
- Material for toilets
- When you can't do without a vertical outlet
- Equipment installation process
- Installation problems
There is no equipment that would serve you all your life and at the same time would not lose its attractive appearance and work properly. This also applies to plumbing: toilets and bathtubs lose their attractiveness over time and become covered with limescale, so the question of replacing them arises. Installing a toilet yourself is quite easy, you just need to take into account its design. Installation of a toilet with a vertical outlet can most often be found in private homes.
Replacing the tank
installing a toilet cistern
Replacing a toilet cistern with your own hands is the last stage of the work associated with replacing a toilet. If we are talking about a barrel that is attached to the toilet shelf, then the pipe must be connected to the neck using a rubber cuff. This will be quite enough to ensure a strong and tight connection. One third of the rubber cuff is put on the pipe, and the remaining two thirds are turned inside out. Then this part must be pulled over the previous one. Here we get a situation where the end of the pipe is released. Then the pipe and neck are combined with each other. The inverted part of the rubber cuff is pulled over the neck. Thus, we can say that the tank is perfectly secured. No additional action is required. The rubber cuff is enough to ensure a tight connection. At the same time, it is worth checking the tightness of the cuff nozzle so that unpleasant events do not happen to the neighbors below.
attaching the toilet cistern to the toilet itself
Sometimes a situation arises when the tank is mounted a short distance from the toilet on the wall. In this case, a rubber cuff alone is not enough. You'll have to put in a little more effort and skill. In this case, a pipe is screwed to the barrel, and its opposite end is lubricated with red lead and wrapped in tow. The neck of the toilet and the pipe itself are connected by means of a cuff. It is fixed to the pipe using a thin wire. Now you can energize the flush tank and adjust the water level in it.
Thus, the work on replacing the toilet can be considered completed. As you can see, all actions do not require any special training. The work can easily be done with your own hands. Of course, if we are talking about a toilet that is installed on the floor. Otherwise, it is difficult to do without the help of a plumbing specialist. By the way, even before starting work on replacing a floor-standing toilet, you should consult with a professional. He will help you understand all the intricacies of the work. For those who are well versed in the work associated with installing plumbing, this manual will definitely help. It is also suitable for those who have never tried to do such work on their own before. Here you can find detailed instructions describing all the main stages of the work, and also attach a video showing clearly how to replace a toilet with your own hands. Many will definitely find this guide useful. In addition to the work associated with installing the barrel and the toilet itself, it provides information on how to correctly dismantle the old unit so that there are no further problems in operation. The video will help even those who decided to save money and not call specialists, although this is the first time they are dealing with this type of work. Everything is shown clearly and will be understandable to absolutely every person.
DIY installation sequence
In general, the algorithm for performing operations will be as follows:
First, the inner surface of the sewer pipe is cleaned, after which it can be closed using a plastic bottle. Now the toilet corrugation is being installed (for more details: “How to install the corrugation on the toilet correctly”). The toilet bowl can be installed in the place where it will stand in the future. There should be a gasket under the landing heel, which should be included in the purchased set of equipment. If the gasket is missing, it can be replaced with a regular rag. Now the toilet needs to be moved towards the wall so that it is closer to it. It is advisable to position the toilet so that it looks symmetrical and does not disturb the overall interior of the bathroom. The place where the toilet will stand and the points at which the fastening will be carried out are marked on the floor. Now the entire structure is moved to the side, and holes are drilled in the floor, which are intended to secure the toilet. If the floor has already been tiled, then the top layer is carefully drilled first, and only then a hammer drill is used. Dowels are placed in the created holes. Now a gasket is placed on the selected area, after which the toilet is installed. If there is no gasket, you can use silicone sealant
It is important to ensure that the toilet mounting holes and dowels match. Each hole in the heel is equipped with its own screws and washers. They need to be installed in place and screwed into dowels.
It is prohibited to hammer in the fastening - this is fraught with unpleasant consequences. The edges of the corrugated pipe are treated with sealant, after which the outlet and sewer are connected. Of course, the previously inserted plug must be pulled out. When the base of the structure is installed, you can install the toilet flush. For this purpose, the kit includes bolts coated with anti-corrosion protection. When installing a bathroom, you must use only sealing washers, which are ideal for fastening all elements. Now a hose is connected to the structure to provide water supply. To secure it, just tighten the nuts securely. To seal the hose, you can use rubber washers or flexible silicone. After starting the water, you need to make sure there are no leaks at the connections. Experts do not recommend using a winding during installation: it can cause water leakage.
What is the best design for a combined bathroom - interior ideas for a bathroom with a toilet
Advantages and disadvantages
The advantages of toilet models with horizontal (parallel to the floor) outlet include the following features and factors:
- fits even where previously there was a toilet with an oblique type outlet (that is, there is versatility);
- it is possible to connect not only to a horizontal sewer pipe, but also directly to a vertical riser using adapters;
- mounted close to the wall without taking up extra space;
- low cost;
- wide model range.
There are also many disadvantages:
- attachment of the installation site to one of the walls of the room - the one where the sewer pipeline passes;
- relative complexity of installation, especially in terms of connecting the outlet to the sewer;
- careful sealing of the connection points between the outlet and the sewer main, the need to monitor for leaks during the first time after installation;
- Possibility of clogging of the outlet channel.
Switching from cast iron pipes to plastic products
The cast iron sewer pipes running from the toilet to the riser have a diameter of 123 mm, and from the bathroom and kitchen sink - 73 mm. Plastic products of gray or orange color differ from the elements of a cast iron sewer system in diameter: 110 mm and 50 mm, respectively.
When connecting a new toilet or replacing an old pipework, it becomes necessary to connect plastic pipes to a cast-iron riser that has a larger diameter.
To solve this problem, a special rubber cuff is purchased, which is inserted into the cleaned sewer socket.
Dismantling cast iron pipes and cleaning the socket
To carry out dismantling work related to the removal of hardened cement mortar at the junction of the old pipe with the socket, you need to stock up on a hammer, a flat-head screwdriver, and a pry bar.
By gently tapping the handle of the screwdriver with a hammer, slowly but surely, free the connection of the sewerage system elements from the cement mortar. When the entire cement layer has been removed, a wooden stick is inserted into the pipe.
Raising and lowering the stick, stir the fixed position of the cast iron pipe, and with a little effort pull it out of the socket
Rust, plaque, and deposits are removed with a metal brush attached to an electric drill. A flat screwdriver or chisel is also used to clean cast iron walls.
You can treat the inner walls of the socket with a special substance that corrodes contaminants in sewer pipes. This will greatly facilitate the process of cleaning the sewer outlet. Complete cleaning of the bell by wiping its walls with a clean rag or rag.
The cleaner and smoother the walls of the socket, the better and more reliable the connections between pipes made from different materials.
The process of cleaning an old cast iron sewer socket from the remnants of a linen cord impregnated with red lead, for the installation of a transition to a plastic sewer
Installing the rubber cuff on the socket
Reliable fixation of the cuff in the sewer socket is ensured using a sealant that is applied to its walls.
The sealant is applied in a thick layer to the outer surface of the cuff, and then inserted into the socket hole
By gently tapping the edge of the cuff with a hammer, a tight adhesion of the contacting walls of the two elements of the system is achieved. A small amount of technical petroleum jelly or special plumbing grease is applied inside the cuff, which makes it easier to push the outlet of the plastic tee into the socket.
If the pipe does not want to climb into its proper place, take a piece of plywood, attach it to the pipe and tap it with a hammer. This will allow you to clog the pipe without damaging its walls.
Next, a corrugation or pipe is connected to the plastic tee, thereby connecting the toilet to the sewage system.
Materials required for connection
A modern scheme for connecting a toilet to a sewer system assumes that cuffs (eccentric or corrugated), drain pipes and plastic outlets will be involved in the work process. The plumbing fixture fits well with the drain pipe, resulting in the toilet looking like a complete product.
But when using this product, several requirements must be taken into account:
- it cannot be trimmed;
- It is prohibited to change the geometric shape.
In the photo you can see components designed to connect the toilet. When connecting the toilet to the sewer, you should remember that corrugation is easy to work with - such cuffs can be bent at different angles, as well as extended in length. But the eccentric cuffs are rotated relative to their axis.
When connections are made in hard-to-reach places, it is preferable to use a corrugated cuff. It is also preferred if they are solving the problem of how to connect a toilet to a sewer system equipped with various inlet sockets.
How to install a toilet with a vertical or floor outlet
Floor-mounted toilets with floor outlet are in demand mainly in Europe. Structurally, they are designed in such a way that the siphon in the bowl, together with the outlet pipe, is directed straight down. Toilets with this outlet are connected according to the following algorithm:
- At the point where the drain pipe exits the toilet, a screw-type flange with clamps is installed.
- The sewer pipe is located in the middle of the flange and is clamped as a result of rotation.
- The toilet is placed on the flange, and the outlet pipe is securely and hermetically fixed.
The flange and vertical outlet of such toilet models are standard, so even beginners do not face any insurmountable difficulties during installation and connection. The seal between the flange and the toilet flush hole ensures a tight seal.
Popular lines
Plumbing stores offer models from Russian, Italian, German, and Czech manufacturers in the range of 2,000–150,000 rubles. The price is determined by the brand rating, design features and material of manufacture.
The budget line, costing from 2 to 10 thousand rubles, is represented by faience toilets “Sanita” and “Iddis”, “JIKA”, “Roca”, “Ifo” “Gustavsberg”. The basic design of units with floor inlet is equipped with the necessary installation kit. The products are made in a standard design: a rectangular bowl and tank.
Elite samples of sanitary ware are produced by European, Finnish “Ido”, Swiss “Laufen”. The price threshold is from 20,000 to 150,000 rubles. The toilets are made in an original design with bizarre shapes of the constituent elements.
Expensive models with vertical output are made of porcelain, clay and stainless steel. The material is coated with an antibacterial and dirt-repellent layer. The design can be equipped with a control panel, liquid for disinfecting nozzles and a hair dryer for drying.
Which installation to choose for the toilet
When purchasing a wall-hung toilet, be sure to take into account the type of supporting structure, installation method, location, price and reputation of the manufacturer. This section will cover the technical aspects of choosing the installation that is right for you.
Block or frame installation
There are two main groups of installations for toilets, based on different approaches to the method of their installation.
Block installation
The block structure consists of individual elements that are attached directly to the wall. Communications in this case have some freedom of placement. This kit consists of only the most necessary parts, so it is relatively cheap. It can only be installed on a load-bearing wall, which takes on additional load. It will be quite difficult to add anything to such an installation during operation or replace the main components.
Frame installation
The frame structure has its own rigid frame, which can easily be hidden behind a decorative plasterboard wall. This type of installation rests on the floor and expands the possibilities when choosing an installation location. The disadvantages of this option are the larger dimensions and the high cost of the kit.
Selecting an installation depending on the installation location
Manufacturers of wall-hung toilets have provided several installation options, adapted to various features of the bathroom layout.
Standard installation
This installation has typical dimensions: 112 cm in height, 50 cm in width and 12 cm in depth. It is usually installed in medium to large sized toilets.
Low installation
This option has a height limitation of 82 cm. It is used when there are structural elements in the room that prevent the installation of a higher support.
Corner installation
This type of installation is a great way to save space in a small bathroom by compactly installing the equipment in the very corner.
Double-sided installation
This design consists of one frame and two toilets, which are attached to it on opposite sides, separated by a light wall. A good budget option that fits well into the space of a public toilet.
Linear
Linear installations allow you to place several similar or different plumbing fixtures side by side, including a toilet, bidet, urinal or sink. This option is often found in shopping, office and entertainment centers.
What are the methods of flush control?
When choosing the type of flush control unit, hygienic requirements, ease of use and economical water consumption are taken into account. There are only three most common options here.
Dual mode button
A good budget option, which includes a couple of buttons for economical (up to 6 l) and full drainage (6-9 l). The volume of water discharged can usually be pre-adjusted.
Flush-stop
Here, one button is used, giving the command to open and close the valve. This system allows you to accurately control the supply of the required amount of water.
Proximity sensor
The device includes an infrared device that responds to a hand brought to it. Such equipment is considered the most hygienic. It is installed in medical institutions and public toilets.
Parameters worth paying attention to
Having decided on the type of installation you need, it’s time to carefully consider the technical features of the model you like.
What is the weight of the installation?
Before purchasing, be sure to ask the seller and check the product data sheet for information about the maximum loads for which the structure is designed. The most reliable installations can withstand more than 400 kg. The safety factor is directly related to the service life of the device. Choose a model that will save you from unexpected emergency repairs.
What you need to know about the installation tank
Cheap installations are often equipped with a welded plastic tank. Solid containers are considered more reliable. Responsible manufacturers cover them on the outside with a layer of insulating material, which prevents condensation from settling on the outer walls and greatly reduces the noise that occurs when water enters.
Installation tank with sound insulation.
Pay attention to the installation fittings
If you want to save yourself from leaks, buy equipment equipped with bronze or brass fittings. They do not change their structure and do not corrode for many decades. Steel products do not have similar qualities, but are cheaper.
Choosing a new toilet
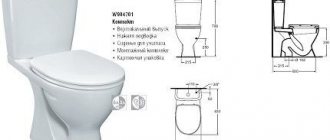
Before going to the store for a new toilet, you need to decide on the size of the device and the method of connection to the sewer pipe. This will depend on the outlet of the device. It can be of three types.
- Vertical.
- Horizontal.
- Oblique.
Vertical sewer pipe
After this, you can select a device from those models whose outlet drain design is suitable for connection to your sewer system. No adapter will help connect a toilet with a vertical flush to a horizontal sewer pipe. So this choice parameter is the most important, everything else is a matter of taste and wishes.
The shape of the toilet bowl can be:
- disc-shaped;
- funnel-shaped;
- visor.
Types of toilets according to bowl shape
The visor design prevents the formation of water splashes when flushing. Water flushing can occur in a circular manner or in a continuous stream.
The toilets themselves can be of different designs. It can be a monoblock, a corner toilet, a compact toilet or a separate one, when the bowl and toilet are located separately.
Toilets by mounting method
According to the method of fastening, toilets are divided into attached and free-standing. The attached one looks like a wall-hung toilet. Available for sale with or without a tank. Attached in different ways. Most often this is an option with two or four mounting lugs for an anchor or screw, but there are models that are attached to special corners fixed in the floor.
Installation sequence
A toilet with a bottom flush to the floor is easy to install. Even a novice repairman can handle this job.
It’s just important to take your time and do the job well.
Removing an old toilet
In the case of a major overhaul, this stage cannot be avoided. It is likely to be the most labor-intensive part of the entire installation process. The work strategy directly depends on the method of installing the old bowl. If cement mortar was used, it is unlikely to be dismantled without damage.
Before taking up a heavy tool, you need to drain the water and soak up any remaining water with a rag. Then they knock down the solution, the work requires not only strength, but also accuracy, even if the condition of the old bowl is unimportant, but the pipe in any case should remain undamaged.
https://youtube.com/watch?v=pXJvl518-bA
Flange installation
Surely after the first step you will have to completely re-lay the floor covering, although you may be able to get by with little damage. The surface on which the toilet is installed must be smooth and level, the only recess is the outlet of the sewer pipe. This is where the flange is installed.
All models of toilets with a vertical flush are equipped with a special adapter on which the toilet will be attached. It connects to the sewer outlet and ensures the tightness of the joint.
Fixing the toilet
In order for the bowl to lock in place, it is enough to insert the drain pipe into the already installed flange and turn it. As a result, the latch will work, which will prevent the device from moving and ensure proper connection reliability.
Connection to water supply
The drain will not work until water is supplied to the tank. This is not difficult to do, you just need to purchase a flexible hose of the appropriate length. One end of it is screwed to the entrance of the tank, the other to a free water outlet on the wall. Both the tank side and the water supply side need to use FUM sealing tape.
It is important not to forget that the thread of the connecting pipe fittings can be left or right. Both types are often found in plumbing; pairs of threaded parts must have the same thread direction, otherwise they will not be able to be twisted
Anyone can install a toilet with their own hands, you just need to want to and approach the issue competently. This is not a difficult task, but it requires responsibility, accuracy and cannot be rushed. When planning to connect any plumbing device, you must remember that a poorly done job can cause a serious accident.
Advantages and disadvantages
Before installing hanging plumbing, you need to make an objective decision. To do this, you need to know all the features of this equipment, let's start with the advantages:
- The process of cleaning the bathroom is greatly simplified; in particular, there are no problems with access behind the toilet, the same applies to the bidet and washbasin.
- The space in the room is used more efficiently, since some of the equipment is built into the wall.
- The space of the bathroom is visually increased.
- The room takes on a more aesthetic appearance.
Of course, such a solution also has its negative sides, namely:
- Access to communications is blocked. Even if there are false panels, it will not be possible to quickly turn off the taps in the event of a leak; this will require some time or, as an option, shutting off the input.
- If the drain valve of the tank breaks down, problems will arise with its replacement. In most cases, it will not be possible to solve the problem on your own; you will need the help of a specialist, which entails additional costs. Choosing quality equipment from well-known brands such as Grohe, Jacob, Vitra or Belbagno significantly reduces the risk of such a problem.
- Problems arise when replacing plumbing equipment; first of all, this is associated with finding a toilet or sink from the same manufacturer or with suitable fastening and connection of water inlet and outlet. Replacing the installation is tantamount to a major renovation of the premises.
- In order for the frame to withstand the required load, it must be installed on a strong foundation; partition walls are not suitable for this purpose, and this reduces the choice of installation locations.
How to connect a toilet to a sewer with pipes
Pipes with rubber cuffs
It is the connection using pipes that is recommended by experienced plumbers. Despite some inconvenience that may arise when connecting the toilet in difficult cases (when moving the toilet to a new location, etc.), with the help of pipes the connection will be the most durable, airtight and durable. In the distant past, the toilet was installed on a wide board - a pedestal, but now it is much more common to install it directly on the tile. Moreover, if the toilet is located at a distance from the sewer riser, it is necessary to ensure that the pipe has a slope of about 2 degrees for the unhindered passage of wastewater.
Toilet pipes
Since the toilet outlet can have different exit options, the pipes must be selected in strict accordance with the size and angle of inclination. Let's consider connection methods depending on the type of toilet outlet.
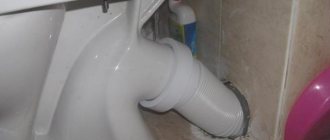
How to connect a toilet with a vertical outlet (to the floor)
Toilet, outlet - vertical
Toilets with a floor outlet are designed for installation in houses where the sewer line runs under the floor slabs. This system is especially relevant in private homes, since toilets with a vertical outlet can be placed not only close to the wall, but also in any convenient place.
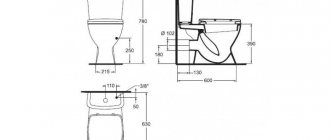
Compact toilet with vertical outlet
- The first stage is purchasing a toilet and preparing the sewer line. Before installation, the toilet must be “trimmed” to the installation site. It may turn out that the drain hole in the floor simply does not correspond to the dimensions of the toilet and you will have to dismantle the floor covering in order to move the sewer bell.
- The second stage is preparing to install the toilet. To do this, markings are made for the toilet mountings, and then the edge of the sewer pipe is processed (the edge must be strictly level with the floor covering and in no case protrude above the floor level), into which the sealing collar is inserted.
- The toilet is temporarily moved to the side, and holes are drilled for the fasteners according to the markings. Dowels are inserted into the holes.
- The toilet is put in place, the tightness of the flange (cuff) in the toilet outlet pipe is checked. Next, the fixing screws are tightened (a washer-gasket must be used so as not to damage the porcelain or earthenware) and the tank is connected to the water supply.
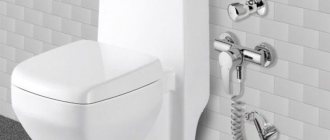
Toilet with floor outlet
There is another type of toilet mounting with a floor outlet. In this case, the cuff is supplemented with a special washer into the grooves of which screws are inserted. A sealing cuff is inserted into the center of this washer and then the toilet is installed using the technology described above.
Installing a toilet with a vertical drain pipe
Toilet connection
Toilet installation
How to connect a toilet with a horizontal (into the wall) outlet to the sewer system
Typically, this connection method is not compact, and all communications are hidden behind a decorative false wall. At the same time, in modern construction, a sewer distribution system is most often installed that is suitable specifically for connecting toilets with an outlet into the wall.
The toilet outlet should be as close as possible to the sewer hole. In this case, the connection is made by sealing collars and a connecting pipe. If the toilet outlet is slightly offset relative to the sewer hole, the connection is made using an eccentric seal or several adapters.
Before installing the toilet, it is necessary to prepare and level the flooring and, of course, dismantle the old toilet.
First of all, let's deal with the sewer pipe and markings. We insert a rubber seal lubricated with sealant into the hole in the sewer pipe. And already inside the seal we insert an eccentric or a connecting pipe. We install the toilet, aligning the outlet with the pipe/eccentric. The part may not fit and an additional outlet may be needed. Then we mark the floor for fasteners and move the toilet to the side.
Drill holes according to the markings and hammer in dowels. Now we put the toilet in place, combining it with the eccentric and dowels. Screw the toilet to the floor. We check for leaks, assemble and connect the tank. This completes the connection to the sewerage system.
Connection using corrugated pipe
Corrugation (this is the abbreviated name for corrugated pipe), intended for installing a toilet in a sewerage system, is used when other materials simply cannot be used.
Installation is carried out as follows:
- install the toilet in the selected position;
- determine the drilling locations for the floor tiles, marking them with a simple pencil inserted into the holes in the plumbing fixture;
- after marking is applied, the toilet is moved to another location in order to drill holes for dowels at the designated points;
- insert dowels into the drilled holes, fixing the stable position of the toilet;
- one end of the corrugation is inserted into the sewer hole, lubricating the joint with silicone sealant;
- the other end of the corrugation is put on the toilet outlet;
- carry out all other installation operations and test the plumbing fixture, using it for its intended purpose.
- check the reliability of the connection by filling the drain tank with water and performing a test drain;
- the absence of leaks indicates a tight connection of all elements.
Check the levelness of the concrete base before installing the device. If a difference in height is detected, fill in a self-leveling screed. Otherwise, after installation the toilet will wobble.
Connecting a corrugated plastic pipe to the toilet outlet pipe, ensuring the connection of the device to the sewerage system
It is recommended to coat the seam between the device and the floor tiles with colorless silicone. This will prevent dirt from getting under the sanitary ware, which will make cleaning the bathroom much easier.