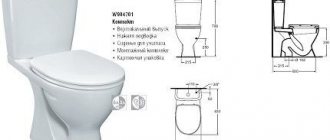
The plumbing market offers a wide range of toilets of various shapes, textures and colors. But when choosing, first of all, you need to take into account the type of release: straight or oblique. You can buy any option, but during installation there will be many difficulties, especially if you decide to do all the work yourself. Next, you will learn how to install a toilet with an oblique outlet, what its fundamental difference is, and in which cases it is worth choosing just such a piece of plumbing.
installing a toilet with an oblique outlet
Toilet features
A toilet with an oblique outlet is considered universal, since it can be connected to any socket coming from the sewer system. If we take a plumbing item with a direct outlet as an example, then the pipe for it must be located on the floor. When the socket is installed at an angle, it is quite difficult to install a toilet with a direct outlet. This will require modifications to move the sewer pipe forward. However, the finished result looks unaesthetic, and it is unacceptable to take up extra centimeters in a small room.
A toilet with an oblique outlet is in greatest demand for several reasons:
- Most modern houses are designed to install just this type of plumbing;
- The oblique outlet increases water resistance, which reduces the frequency of blockages.
- Cleaning the pipe is quite easy using chemicals. Due to the convenient location of the pipe, decomposed garbage will easily pass into the sewer.
- Installing a toilet with an oblique outlet is much easier than its closest brother. Even if there are slight deviations with the bell, it is not difficult to correct.
Features of installing a toilet with an oblique outlet
Difficulties of cast iron sewer
- Difficulty connecting;
- Impossibility of conversion;
- Difficult installation;
- High price.
Installing a cast iron sewer system is a difficult task. Specialists can quickly cope with it, but in the absence of professional skills it is better to abandon such an undertaking. Subsequently, re-equipment will turn out to be unrealistic, since cutting off a piece and installing another in its place is almost impossible. Moreover, branched communications are also impossible, because the choice of elements supplied by manufacturers is limited.
The only serious advantage is the service life. Cast iron is almost not destroyed when exposed to aggressive environments, which makes it indispensable for harsh conditions. Also, designers always take into account possible mechanical loads. The iron alloy withstands them perfectly, so it is convenient to install it in multi-story buildings for risers. Skewed structures are a common situation, but now it will not affect the functionality of the system.
You can connect a toilet, a bathtub, and a sink to the sewer with your own hands. Such actions do not require any special knowledge. You should take all details seriously to avoid making mistakes. Experience shows how easily you can get rid of difficulties if you carefully check your own system. Only this guarantees reliability and durability, which is the dream of every home owner who tries to assemble utility lines without outside help in accordance with the existing diagrams.
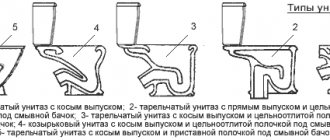
Types of toilets with oblique outlet
Before purchasing and installing a toilet, you should decide on its type. Based on the type of design, plumbing fixtures are divided into the following subtypes:
- Separated. This type is characterized by a separately installed tank. It can be mounted on a wall or even a ceiling, and is connected to the structure by a drain pipe. This toilet is not in demand because it does not efficiently use the space in the bathroom. So, you can build a small cabinet or shelves on the wall, but you have to install a tank.
- Compact. This type is the most popular due to saving space in the bathroom. The tank and bowl are connected into a single structure, which allows it not to take up extra space. Installing such a toilet is quite easy.
- Monoblock. This is a modern and quite expensive type of toilet, in which the tank and waste bowl form a single unit. It is compact, does not take up much space and looks very attractive.
- Angular. A corner toilet is installed in the corner of the room, which allows rational use of space. Not suitable for all apartments.
Features of a corner toilet with an oblique outlet
The remaining selection criteria are inherent for all types of toilets, regardless of the location of the socket. So, you will have to choose between earthenware, porcelain type with cascade or circular flush, with bottom or side water supply.
Description of the "release"
The drain hole that connects to the sewer is the toilet outlet. Connection is carried out in three ways:
- A universal option for connecting to the drain system, when the drain hole and its pipe are in a horizontal plane, at the same level. Finnish sanitary ware and Swedish models are produced.
- The drain pipe of the structure is directed to the floor, where the sewerage distribution is hidden. Common in houses built in Soviet times (Stalinist).
- The drain hole of the model is connected to the water drainage pipe at a 45° angle - this is the direction of the outlet obliquely. Models are produced by manufacturers in the Russian Federation.
Which toilet outlet is suitable will be determined by the selected design of the sewerage layout. If its installation is entrusted to a specialist, then his recommendations will not hurt either.
Toilet installation
Installing a toilet with an oblique outlet during the process of renovating an apartment with your own hands will require a little patience and effort from you. It is necessary to follow several rules and recommendations, which will allow installation to be done quickly and competently. You can't make mistakes! If installed incorrectly, the operation of the plumbing will be disrupted, which will bring additional difficulties. For example, the most common mistake is the formation of gaps between the sewer socket and the drain pipe. All work is carried out in several stages, the first of which is the preparation of tools.
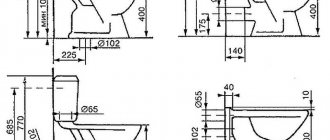
Installation diagram of a toilet with an oblique outlet
Typical errors and ways to eliminate them
When installing a toilet on their own, home craftsmen may make typical mistakes, which you can also eliminate with your own hands:
- non-compliance with the height difference rule - when moving the toilet, the angle between it and the sewer system should be 15 o or 3-5% of the displacement distance. For example, when moving a toilet 2 m, it must be raised to a height of 6–10 cm;
- lack of “audit”. It is imperative to provide a technological window on the sewer riser through which the system can be cleaned. It must be freely accessible;
- violation of the order of work. Installation of the toilet should be done at the very end of the renovation, so as not to damage it during finishing;
- incorrect installation of the bidet. The toilet and bidet should be located side by side, with their bowls on the same horizontal line;
- wrong choice of seat. It may not coincide with the edges of the bowl, then there is a risk of damaging the enamel on the toilet and breaking the seat itself;
- incorrect installation of shut-off valves. If water constantly flows from the tank or overflows, this indicates damage to the drain or fill valve;
- water leak. This malfunction is associated with poor tightness of the connections; they can be eliminated by installing new seals;
- the appearance of an unpleasant odor. Typically, this problem indicates a leak in the connection between the toilet and the sewer.
If you do not fasten the toilet tightly, this can soon lead to a violation of the tightness of the connections, as well as to its damage.
Video: editing errors
Almost any DIYer can install a toilet on his own. To do this, you need to choose the right type of toilet and install it accordingly. If you strictly follow the instructions and recommendations of specialists, then a toilet installed by yourself will perform the necessary functions for a long time and reliably.
Preparing to install a toilet
In most cases, a toilet is installed due to the replacement of old plumbing. Therefore, it is necessary to prepare the place, or rather, dismantle the bowl and tank. There are two options here:
- If the toilet was installed using conventional fasteners, simply remove them.
- If the toilet is filled with cement, you will have to work with a chisel and hammer. When dismantling, calculate the impact force. If you hit the earthenware too hard, it will simply crack, and the remaining drain liquid will flood the room.
After removing the fasteners or removing the cement, tilt the toilet bowl back. This will allow the remaining liquid to drain down the drain. Next, remove the corrugation or dismantle the pipes, depending on the method of attaching the plumbing.
We dismantle the old toilet
Often the toilet is installed on a wooden base. It must be completely removed. This is not difficult to do - most likely, it is destroyed mostly due to high humidity. Similar work is carried out with a metal substrate (a grinder is useful here).
Dismantling the old toilet is considered complete after there are no parts, plumbing parts or construction debris left on the floor. Next you will need to fill the base with cement and level it. You will install the new toilet on a flat, clean surface. This will extend the life of the plumbing fixtures and make the installation process easier. There is no need to lay the board down. A cement base into which the fasteners can easily fit will be sufficient.
Instructions for replacing a toilet
wall hung toilet in the bathroom
Now the main problem remains to be solved, namely, installing a new toilet. The toilet installation option depends on many factors. The most important thing is the type of fastening and the type of toilet itself. A wall-hung toilet for a small bathroom is often installed by specialists, since its design is quite complex. If we are talking about installing a floor-mounted option, then you can use traditional installation methods. So, you can get to work.
Replacing a toilet can be done by installing it on a tile or concrete floor. This is the traditional method. In this case, self-tapping dowels serve as fasteners. the second option is to attach the toilet to a wooden board or taffeta. The best wood for this installation method is oak.
fixing the toilet to the floor using dowels
In this case, anchors are installed at the bottom of the board. They provide a fairly strong attachment to the floor. Nails that are driven in in a checkerboard pattern can be used as anchors. At the same time, they should protrude from the board by 30 centimeters. A recess is made in the floor, which is filled with cement mortar. Taffeta is placed in it. After the solution has hardened a little, you can screw the toilet using ordinary screws.
Regardless of the method used to secure the toilet, it is worth placing rubber washers under it to protect the base from damage. There are cases when fastening is done not with screws, but with epoxy glue. For proper connection, the surfaces must be thoroughly cleaned and then degreased. Only after this can you connect them to each other. It is worth pressing the toilet tightly to the floor to ensure a reliable and durable connection. The toilet cannot be used immediately. First, you need to soak it for 10-12 hours so that the solution or glue can harden.
You should also pay special attention when connecting the toilet to the drain line. The part of the toilet that connects to the sewer is called the outlet. Moreover, it can be straight or oblique
Any outlet has grooves that must be coated with red lead diluted in drying oil. The release itself must be wrapped with a resin strand. At the same time, you should ensure that it does not reach the pipe by 2-4 millimeters. If this rule is not followed, resin strands may get into the pipes and clog them.
Moreover, it can be straight or oblique. Any outlet has grooves that must be coated with red lead diluted in drying oil. The release itself must be wrapped with a resin strand. At the same time, you should ensure that it does not reach the pipe by 2-4 millimeters. If this rule is not followed, resin strands may get into the pipes and clog them.
The outlet itself must then be inserted into the socket. In this case, the annular gap is caulked using flagella made from linen yarn. After this, the gap must be sealed with cement mortar.
Toilet mounting
Wait until the cement is completely dry and make holes for the fasteners. You will later insert dowels into them that will hold the plumbing fixtures. Do not make the holes too wide, as this will prevent the toilet from being installed correctly and will allow moisture to penetrate into the substrate.
Additionally, it is worth replacing the metal pipe through which water is supplied to the toilet. Install a flexible hose that will last much longer and will not leak water.
Variety of species
Classification of vertical type models is carried out in several directions.
Material
Stainless steel, bronze, glass and many other materials are used for production. Although all such models are expensive. The most popular designs include:
- Earthenware toilets. Ceramic material is inexpensive. But the porous surface gets dirty quickly and is difficult to clean. The situation can be corrected by covering the device with glaze.
- Porcelain models are more expensive. But it keeps the surface clean perfectly.
Rules for installing a toilet
As mentioned earlier, flush toilets are universal and suitable for all types of pipes. Installing plumbing is not difficult using a drain pipe or a plastic socket, but only if the sewer socket is on the same axis as the bowl outlet. If deviations are observed, then use eccentric cuffs.
installing a toilet with an oblique outlet
So, do-it-yourself installation is carried out in several stages:
- Take a thick layer of red lead (you can buy it at any hardware store) and coat the toilet outlet.
- Wrap a strand of resin over the lead. Leave about 1 centimeter of the process free. If this is not done, the resin will get inside the pipe and cause blockages.
- The selected connecting element is put on the outlet, covered with sealant and connected to the sewer pipe. Please note that the connecting material must get onto both elements, otherwise you will not achieve a seal.
- Wait 20 minutes for the sealant to set on the surfaces and dry.
- To complete the work, tighten the connecting fasteners at the base of the bowl, firmly connecting the toilet to the floor surface.
Connection to plastic sewer pipe
Modern construction technologies involve the use of plastic pipes for sewer systems. And the question often arises about methods of connecting the toilet to the plastic part of the sewer system.
Types of connection of plastic pipe elements:
- Gluing method. This method involves connecting two parts of different diameters using special glue. But the difference shouldn't be big. The method involves degreasing the surface of the parts to be joined, then applying glue to the smaller part and inserting it into the larger one. Excess glue comes out of the gaps between the two parts.
- Application of welding technology. This installation method requires a professional approach. This method of connecting to a sewer riser involves the use of special equipment that heats plastic elements. The parts are heated, then pressed tightly against each other until the seam cools completely.
- Method of using fittings. This method requires the purchase of additional parts that are used to connect plastic elements.
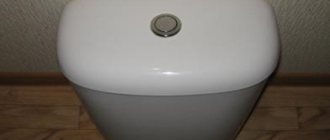
Tank installation
After installing the bowl, proceed to install the tank. If the structure is solid, monolithic, then it is enough to connect it to the water supply pipe. If you chose a “compact” toilet, then the tank is secured using screws, nuts and sealed fasteners, which are included in the kit. When installing the tank, follow several rules:
- The fasteners can only be tightened after the rubber ring has been correctly installed and the connection to the drain holes has been made.
- In the kit you will see a large rubber ring. It is designed to connect the tank and the drain hole. The ring protects the structure from water leakage.
- The screws are tightened until the tank stops wobbling. Then you can turn on the water and check for leaks. If liquid enters the tank and does not pour out of the cracks, then the installation was carried out correctly.
Special features of the model
A toilet with a vertical flush is installed more often in private homes. The device is convenient in that it can be installed in any way convenient for the owners.
Thanks to the design features of the model (built-in siphon, hidden pipe), it can be installed in any place; in relation to the wall at any angle.
With a vertical toilet it is easier to bring your design ideas to life. In apartments of multi-storey buildings, installation is difficult due to the connection to the central sewer pipe that runs along the wall. It is impossible to move the pipe in an apartment, especially in modern high-rise buildings. In “Stalin” buildings, on the contrary, the sewage system runs along the floor and installation of other models other than a vertical toilet is impossible.
Installing a toilet without screws
Installing plumbing fixtures on fasteners is the most reliable and easiest way. However, you don’t always want to spoil the base if tiles are laid on it. What to do in this case? Do as you did before, using a cement backing:
- Mix the cement mortar and dump it on the floor where the toilet will be installed;
- Place the bowl on top, press it tightly to the cement;
- Remove excess solution with a rag.
The connection to the sewer pipe is carried out according to the scheme described earlier. After two days, the cement will completely harden, so you won’t be able to move the toilet even a couple of centimeters.
You can replace cement with liquid nails and cold welding. Working with these materials is a little easier, but their price is much higher.
we install the toilet without using screws.
The disadvantage of this method is the impossibility of accurately dismantling the toilet. If you need to replace tiles or repair pipes, you will have to remove the plumbing along with the base. Unfortunately, it will not be possible to reinstall the toilet.
Materials and tools
Before connecting the toilet to the sewer system in an apartment or private house, prepare the following tools and materials:
- Corrugations, cuffs, eccentrics, pipes, shaped parts through which the toilet outlet is connected to the sewer.
- Fasteners for screwing the base to the floor. Typically the set consists of a pair of dowels with hex screws included in the package.
- Flexible hose for supplying cold water to the tank.
- Adjustable or regular wrenches for fixing the liner and bowl to the screed.
- Tape measure and pencil for marking cut pipes and mounting holes on the flooring.
- A hacksaw or grinder with a disc for metal or concrete for cutting hard PVC pipes to size, sandpaper for removing burrs from their edges.
- A hammer drill with drills matching the size of the mounting dowels for ceramic tiles and concrete for drilling holes for attaching the bowl to the floor.
- The sealant that most plumbers use to seal flexible rubber pipes to prevent leakage is completely useless in this application. It may be needed to coat the bottom of the bowl in order to give it a stable position in case of an uneven floor. Also, under the bottom you can place scraps of the substrate for laminate, linoleum, rubber and other waterproof elastic materials cut along its perimeter.
Dimensional parameters of standard horizontal bends and their connection through cuffs
Options for solving possible problems
If the floors in the bathroom are uneven, then before installing the toilet, lay sealant, construction foam or, as mentioned above, cement as a base. Do not install plumbing fixtures on uneven surfaces.
The problem in which the outlet of the bowl does not coincide with the sewer pipe deserves special attention. For example, it may be located slightly higher or lower. This is, in fact, why eccentric cuffs exist. They allow you to eliminate errors in the axis and connect the toilet to the sewer system. They can also be used when installing a bowl with direct outlet, but only if the error in distance does not exceed 5 centimeters.
Classifications of sanitary devices
Progress does not stand still - manufacturers systematically bring new varieties to the market.
They can be classified into several groups based on criteria. Depending on the location of fixation, it is customary to distinguish the following categories:
- Floor-standing.
- Hanging.
Manufacturers also make allowances for the age of their customers and offer:
- Sanitary products for adults.
- Children's options.
The bowl in the equipment may differ in shape:
- Funnel-shaped.
- Rounded.
- Design form (in cases where custom production is acceptable).
The drainage system has differences, and manufacturers have gone as far as possible in this matter. The following options are available:
- Single-mode. When you press the button, the tank is completely emptied.
- Dual mode. You can pour out all the water or only part of it.
- Contactless. Flushing is carried out automatically. This is the most expensive option.
A common question is the availability of side release devices. The reasonableness of such a question occurs only if you have to deal with very small dimensions of the bathroom. The ingenuity of our people is truly limitless, and the side release is proof of this. The thing is that if you place the toilet on its side, you can easily free up the space needed to install a washing machine.
So, such varieties have not yet gone on official sale today, but if you wish, you can literally do everything with your own hands. To ensure lateral descent, adapters can be used. On horizontal sections, you should make a 90-degree turn out of two 45 degrees, although some recommend 90 degrees at once, just to ensure a slope.
Some tips
- When purchasing connecting elements, pay attention to their thickness. The larger it is, the less likely it is to damage the part during operation. Also, the thick walls of the corrugation extend its service life.
- Do not cover the sewer pipe with sealed elements. In case of blockage, the structure will have to be removed. Modern elements blend perfectly with the plumbing, so there's no need to do any extra work.
- If you install a toilet on a base with garbage, then such plumbing will not last long. After installation, you will notice unevenness, which looks unattractive. Be sure to remove all construction debris and vacuum the base to remove dust.
- If you decide to cement the toilet rather than secure it with additional elements, then be extremely careful. Do not put too much pressure on the bowl and, especially, do not make pushing movements. Quite fragile earthenware may not withstand this.
- According to the instructions given, you can install a toilet with an oblique outlet of any type, regardless of the material, type and size of the bowl.
You can install a toilet with an oblique outlet yourself, without the help of specialists. This way you will save money and make a personal contribution to the repair work. But if during the installation process you begin to realize that finishing the process is problematic, it is better to stop and ask for help from specialists.
What you need to know when buying a toilet
The main criteria that you should pay attention to when choosing a plumbing fixture are not only its model, brand and color, but also its size. Before purchasing a toilet, it is necessary to measure the distance from the sewer drain to the door to the toilet room, and the result must be divided by 2. The result will be the maximum size of the device that can be installed in a given room.
The result is the maximum size of the device that can be installed in a given room.
The color and shape of the toilet are chosen in accordance with the interior design of the toilet room; it should correspond to the design as much as possible. When purchasing plumbing equipment, be sure to check its integrity and completeness. The existing mechanisms in it should work easily, without making creaking sounds.
Nuances of the work
If you have to carry out work in the bathroom of an old house where cast iron pipes are installed, then the device must be connected in the following way. The outlet is inserted into the hole in the sewerage system. The remaining gap should be filled with cement mortar, this must be done in such a way that the composition does not get into the riser. You can use a cuff that fits over the outlet, which is immersed in the opening of the sewer pipe. The surface must first be cleaned of cement, dirt and foreign objects. Unevenness can be eliminated using sealant.
DIY installation sequence
The procedure for dismantling the old structure will not be considered in this review, and we will focus specifically on installing a toilet from scratch.
What will be the procedure when installing new plumbing? In general, the algorithm for performing operations will be as follows:
- First, the inner surface of the sewer pipe is cleaned, after which it can be closed using a plastic bottle.
- Now the toilet corrugation is being installed (for more details: “How to install the corrugation on the toilet correctly”). The toilet bowl can be installed in the place where it will stand in the future.
- There must be a gasket under the landing heel, which must be included in the purchased set of equipment. If the gasket is missing, it can be replaced with a regular rag.
- Now the toilet needs to be moved towards the wall so that it is closer to it. It is advisable to position the toilet so that it looks symmetrical and does not disturb the overall interior of the bathroom.
- The place where the toilet will stand and the points at which the fastening will be carried out are marked on the floor.
- Now the entire structure is moved to the side, and holes are drilled in the floor, which are intended to secure the toilet. If the floor has already been tiled, then the top layer is carefully drilled first, and only then a hammer drill is used.
- Dowels are placed in the created holes.
- Now a gasket is placed on the selected area, after which the toilet is installed. If there is no gasket, you can use silicone sealant. It is important to ensure that the toilet mounting holes and dowels match.
- Each hole in the heel is equipped with its own screws and washers. They must be installed in place and screwed into the dowels. It is prohibited to hammer in the fastening - this is fraught with unpleasant consequences.
- The edges of the corrugated pipe are treated with sealant, after which the outlet and sewer are connected. Of course, the previously inserted plug must be pulled out.
- When the base of the structure is installed, you can install the toilet flush. For this purpose, the kit includes bolts coated with anti-corrosion protection. When installing a bathroom, you must use only sealing washers, which are ideal for fastening all elements.
- Now a hose is connected to the structure to provide water supply. To secure it, just tighten the nuts securely. To seal the hose, you can use rubber washers or flexible silicone.
- After starting the water, you need to make sure there are no leaks at the connections. Experts do not recommend using a winding during installation; it can cause water leakage.
At this stage, the installation of the toilet ends, and no more serious work is expected. The structure cannot be used immediately; the silicone must first dry, which usually takes about six hours. It is not worth saving sealant during installation, as this can also cause leaks or poor contact. But there shouldn’t be any silicone in the inner cavity of the pipe.
Replacing a vertical drain with a different design
If the area of the room allows you to move the structure to the side by 20 cm, then it is realistic to install any other device with a different type of descent instead of a vertical device. The connection is made through a corrugation.
- The old model of plumbing is being dismantled.
- The new design is placed at an accessible distance from the sewer pipe so that there is enough corrugation and the connection is not cumbersome.
- The end of the toilet pipe is treated with sealant.
- A corrugation is placed on the joint.
- The other end of the corrugated pipe is fixed in the sewer pipe. The slope of the pipe should be towards the sewer. There should not be even slight bends on the surface. Otherwise, it is a pre-arranged place for garbage collection.
Right choice
Having decided on the release form, you need to consider a few more important points:
Toilet material
Traditionally, ceramic appliances are installed in houses and apartments. However, you should know that ceramics come in different varieties. Two varieties have gained the most popularity:
- Faience: attractive at its affordable price, but has a porous structure. When the glaze coating wears off, the material begins to absorb water (the product becomes less durable), dirt and unpleasant odors.
- Porcelain: this material is somewhat more expensive than earthenware, but it is not characterized by porosity.
Note that the difference in price is not significant, so it is better to choose the porcelain model.
Porcelain floor-standing toilet
If you are interested in a very budget option, pay attention to acrylic toilets. Just be prepared for the fact that they quickly lose their attractive appearance and are short-lived. Those who want to add some zest to the interior will certainly like a copper toilet
And if you need a vandal-proof device (usually installed in public toilets), then the best would be a stainless steel toilet
Those who want to add some zest to the interior will certainly like a copper toilet. And if you need a vandal-proof device (usually installed in public toilets), then the best would be a stainless steel toilet.
Bowl shape
For a long time, the most common were toilets with a sloping back wall and a drain hole placed forward. But this form has a drawback: after each session, the bowl has to be cleaned with a brush.
Today, a new type of toilet is becoming fashionable - funnel-shaped, in which the drain is located almost in the center. Feces go directly into the water, so the bowl does not get dirty. But at the same time, they can splash the user, which, of course, no one likes. This problem is less noticeable for owners of toilets with an anti-splash system.
First of all, such toilets are taller than their regular counterparts, that is, the distance from the rim to the surface of the water in the siphon is increased. In addition, they have a special collar around the drain hole, which is designed to extinguish “gurgles”.
Diagram of a funnel-shaped toilet with horizontal outlet
Toilet bowls are produced that have a platform instead of a sloping wall. Most users consider this form to be outdated and impractical, mainly because the device may splash its owner when the water is released. But if you take a closer look at such toilets, you will discover a significant advantage: waste falls into a small puddle of water (the platform has a concave shape).
Therefore, the porcelain remains clean; at the same time, no splashes or “gurgles” annoy the user.
Design
For most users, a toilet design is familiar, in which the bowl and tank are made in the form of two autonomous elements. This design has its benefits: if chips or cracks appear, only the damaged part will need to be replaced.
Autonomous toilet and cistern
But there is also a drawback: due to wear of the sealing gaskets or fasteners, water may leak out from under the tank. If you don’t want to deal with such troubles, purchase monoblocks in which the tank and bowl are made as a single piece.
Type of plum
There are two options. The classic one is direct drainage, when water simply runs down the shortest path from the inlet of the bowl into the siphon.
A circular drain is considered more advanced, in which streams of water first rush into the channels under the rim and then flow down, washing the entire surface of the bowl.
Types of toilet flush
When choosing a toilet with a circular flush, you should take into account its important feature: if the water contains a large amount of dirt, hardness salts and other impurities, the narrow channels under the rim will quickly become clogged.
Drain mechanism
Regular drainage is no longer quoted. The most popular have become toilets with two buttons: with one, the entire tank is emptied, with the other, only half. If you have a water meter, such a system will help save a lot of money. Economical toilets may have one button, but it has a design feature: when pressed again, the drain valve closes.
Thus, the user has the opportunity to pour as much water into the toilet as he sees fit.