Have you discovered that your toilet flush tank is refusing to do its job? Agree that the toilet has long been one of the most necessary types of plumbing equipment for a comfortable human life, so its breakdown can hardly be called a joyful event. Do you want to repair the toilet cistern yourself, but don’t know where to start or where to look for the problem?
We will show you how to detect the source of trouble and fix it on your own - the article outlines ways to eliminate common malfunctions. The procedure for dealing with all common breakdowns is discussed in detail.
Repair tips are provided with photographs that will help you understand in detail the structure of the drain mechanism. To help the home handyman, video recommendations are provided for disassembling the tank, eliminating leaks and replacing fittings.
Toilet design
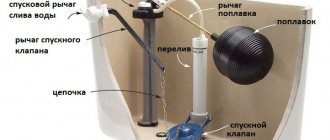
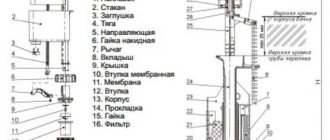
First, let's look at which components are responsible for the operation of the system and what functions they perform:
| Filling valve | The main function is to fill the tank to a certain level. This means that the mechanism provides the supply of rinsing water in the required quantity. All main working elements have a float, this is the main regulatory element |
| Drain mechanism | This part of the system is designed to provide water when you press a button or turn a lever. There are many options for implementing the system; below we will look at the most popular solutions today. |
| Bypass valve | It is also an important element of any design and is responsible for ensuring that if the water level in the tank is too high, it will not spill. Most often it is connected to the filling valve, which simplifies maintenance and repair. |
IT IS IMPORTANT! DO NOT HURRY TO BUY SPARE PARTS BEFORE STARTING WORK. FIRST OF ALL, YOU NEED TO OPEN THE COVER AND FIND OUT WHAT VERSION OF THE SYSTEM YOU ARE USING. THEN DECIDE WHETHER TO REPAIR THE EXISTING PARTS OR REPLACE THEM WITH NEW PARTS.
How to replace fittings in a toilet cistern
If minor problems arise in the operation of the mechanism, you can get by by adjusting the components and replacing small spare parts. However, if problems constantly arise during the operation of the toilet, it will be more effective to completely replace the insides of the tank.
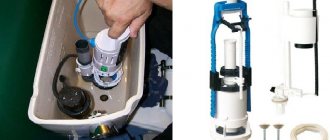
Complete replacement of fittings
A simple way to solve toilet problems is to replace all internal parts.
Each type of tank with a unique fitting model. Therefore, you should not throw away the old mechanism. It will come in handy when choosing a new design - you just have to show the old design in the store. Dismantling and installation of the new system is carried out in strict sequence:
- shut off the water supply;
- unscrew the button in the drain tank;
- remove the cover;
- unscrew the fitting and dismantle the water supply system;
- disconnect the valve with the lever;
- after completely removing the insides of the tank, begin assembling new mechanisms;
- Install the tank cap and check that it fills and drains correctly.
We must not forget to check all seals during assembly of the structure.
Detailed overview of the drain system
We will now discuss the existing options and their main features in more detail. In order not to describe each model separately, we will consider the two main parts of the system, this way you can understand the problem in as much detail and as clearly as possible.
Inlet valve
The valve performs the function of filling the tank to a predetermined level. Even with the same functions, the appearance of the structure can vary greatly, so we will tell you which option is the most common.
Let's start with the classical systems that have been used since the middle of the last century; their characteristic features are the following factors:
- The float is made of brass; it is a very reliable material that is not afraid of contact with water and retains its original characteristics for decades;
- The system is located on a beam, which must also be made of brass, because steel will start to rust very quickly, and after a few years the corrosion will render it useless;
- A valve with a rubber seal opens and closes the inlet port . This is also brass, but here the quality of the sealing element is of great importance, because it must ensure an accurate fit and remain flexible for a long time;
- The principle of operation is simple: the valve is lowered, when the water falls, the water supply opens . Since the filler cap covers the hole, it is sealed with a rubber gasket.
Regarding this option, you will notice that the system is very reliable and easy to maintain, you will easily solve the problem. Experts call this option an old-fashioned flush head because other types of designs are being created these days.
As for malfunctions, the following can be noted:
- The valve nozzle becomes clogged with sand, rust and other foreign objects. The problem is solved simply by cleaning the cavity with a wire;
- At the right time, the pin that holds the suspension arms can wear out, it can be easily replaced by using a suitable piece of copper wire.
When it comes to modern solutions, they are as follows:
- A copy of the classic version with the only difference that the float is made of plastic, and all metal parts are made of galvanized steel. This solution has a low cost and its reliability is much lower;
- There are options made entirely of plastic. they are cheaper, but less reliable;
- A system in which the float is located on a movable handle, characterized in that after filling the element it tilts back, and the nozzle fully opens and closes when the float is tipped over, which reduces the time of filling the tank;
- In many modern versions, the valve has a vertical design, in which the fastening element is made with the side wall of the tank. The float can be adjusted vertically using a special screw. The system is quite simple and has gained a good reputation;
- Finally, the most modern solution is to install the valve not on the side, but at the bottom of the tank. This design simplifies installation.
Drain system
When considering a device for flushing a toilet, one cannot fail to mention this part of the structure; it is all the more important since it provides high-quality flushing and is subject to high loads. There are several basic options.
The oldest of them, the bell, has the following features:
The second solution is plastic corrugations; the operating principles of such structures are as follows:
- When you pull the chain , the ripple bends, it sucks up water and delivers it to the toilet;
- When the chain is released, the element returns to its original position and the water supply stops;
- The biggest disadvantage is that plastic does not work under constant loads ; after a few years, only replacing the components can help.
Older design flush tanks are simple in design. This makes the system quite reliable, but even the most primitive devices periodically fail.
If primitive people could repair hammers, then a modern Internet user has sufficient skills and knowledge to repair an old mechanism with his own hands.
Most "ancient" old model toilet bowls consist of a cast iron plug with a soft rubber gasket . When you press the outer lever, the bell rises and water rushes down through the hole.
More recent designs have replaced the bell with rubber or plastic bulbs .
Once the tank is released, the float lowers and a lever opens the valve through which water begins to flow. When the container is full, the lightweight object is raised until it is in a position where water stops flowing into the device.
Setting up the drainage system
By ensuring your drainage system is working properly, you can save a significant amount of money that would otherwise be spent on excessive water consumption. In order to begin repairing the flush cistern without the help of a specialist, all stages of the work should be performed in strict sequence , without missing possible breakdowns and shortcomings.
- Get rid of float mechanism failures. It is quite easy to understand if there are problems with it. The main indicator is that the tank is constantly filled with water, and it immediately flows into the toilet. There are several reasons leading to this process:
- poor condition of the inlet valve (in some cases it fails due to high water pressure);
- improper functioning of the buoy (as a result of prolonged use, the float may crack and fill with water);
- the lever is skewed (it should be horizontally 20 mm below the hole through which water is drawn).
- Eliminate the constant flow of water into the toilet . Most often, this problem occurs due to the expiration of the siphon membrane. It needs to be replaced with a new one. To do this, drain the water, remove the siphon, replace the old membrane with a new one , put the siphon in place, attach it to the lever and tighten the fastening nut.
To fully adjust the drain mechanism of the toilet cistern, if it is broken, it is necessary to eliminate all these faults.
Sources
- https://sansovet.com/remont/unitazy/slivnoj-bachok.html
- https://iseptick.ru/raznoe/remont-slivnogo-bachka-unitaza.html
- https://UnitazVdome.ru/ustanovka/bachok/kak-pomenyat-slivnoj-mehanizm
- https://septik.guru/santehnika/unitazy/kak-pomenyat-slivnoy-mehanizm-v-bachke-unitaza.html
- https://UnitazVdome.ru/remont/ne-rabotaet-knopka-sliva-v-unitaze
- https://teplo.guru/santehnika/zamena-slivnogo-mehanizma-v-bachke-unitaza.html
- https://bez-santehnika.ru/articles/%D0%B1%D0%B5%D0%B7-%D1%80%D1%83%D0%B1%D1%80%D0%B8%D0%BA% D0%B8/zamena-ustrojstva-slivnogo-mekhanizma-bachka-skhemia-i-instrukczii.html
[collapse]
Possible damage and repair methods
In every mechanism, even the most primitive one, various parts sooner or later fail. Most old style trigger device failures are fairly easy to repair.
If the tank is leaking
First you need to check whether the intake valve is leaking . To do this, remove the cover and lift the float lever. If water then enters the tank, the valve itself has broken and must be replaced.
To do this, close the tap in front of the tank and drain the water . The wrench connecting the valve to the water source is unscrewed, the float lever is removed, the mounting nuts and the valve are removed.
If the water flow is completely blocked when the lever is raised, the problem may be:
- The tilt of the ramp (thrust) lever leads to the fact that it begins to cling to the sleeve, the float does not quite jump and the valve does not close. In this case, pull it out and straighten it.
- If the seal of the float is broken, it is partially or completely immersed in water and does not close the valve. In this case, it changes to a new one. If a suitable model is not available, the damage can be sealed using heated plastic or sealant after removing all the fluid from the flow part, but this is a temporary measure.
Constant water flow
If water flows without stopping, this means that the tightness of the drainage mechanism is broken and water is poured between the body and the bell (pear). There are several reasons for this failure:
- Corrosion or contamination of the surface, in this case it is cleaned with emery cloth.
- The appearance of a gap leads to the same problems. In this case, tighten the mounting nuts using a socket wrench.
- Sometimes the guide sleeve falls out. This causes the lock to move when lowered. In this case, the sleeve is inserted into the arched hole and wrapped with an elastic band.
Overflow problems
This is a fairly typical phenomenon that can be easily identified. Water collects in the tank and begins to flow , if you close the tap, the flow of water from the device will stop, and when you press the bypass socket, the flow will stop - the clamping nut will loosen. In some cases, it is enough to turn it several times to the right, and the nut will take its place.
Otherwise, you will need to use the following techniques. You need to rinse the tank and wait until all surfaces are dry.
If the cap is not completely unscrewed, there will be a gap between the overflow hole and the bottom of the tank, wrap the sealing material tightly and fill with silicone silicone or paint . Wait until the coating hardens.
Replacing the supply hose
Damage to the inlet hose and seals on the connector results in water droplets appearing at the attachment points to the drain body. First of all, tighten the union nut .
If the leak persists, turn off the water and disconnect the hose. After replacing the threaded reel cap , reattach the hose to the reservoir and tighten the nut.
Loud noise when filling
Sometimes when filling the drain for an old type of tank, there is a lot of noise that can wake up the house. You can replace the part with a special stabilizing device and thus eliminate the problem. If the pressure is not too strong, the problem can be solved much easier.
The filling valve mechanism contains a short drain tube. For this purpose, install the muffler vertically using a flexible plastic or rubber hose , lowering the lower end to the water at the bottom. This will help to avoid noise when draining water and knocking down the float.
A person does not need much for good health. Sometimes comfortable furniture and adequate lighting are not always enough because people have daily needs such as satisfying hunger, thirst and others. To feel comfortable, a person needs a working hydraulic system.
As you know, every mechanism is not eternal, and the appearance of defects is a matter of time.
Causes of breakdowns:
- Mechanical damage;
- Poor quality of materials for manufacturing parts;
- Frequent use.
Problem #3: eliminating internal leaks
How to fix the tank if water flows into the toilet bowl? First, you should check that the overflow tube is set correctly. You need to lift it a little and see if water flows into the tube.
If yes, then the float valve needs to be repaired. If not, you need to adjust the lever.
Valve problems can be caused by debris. You just need to remove it from under the gum.
If the rubber is worn out, you can simply turn it over to the other side, but it is better to change it immediately. If the valve is broken, you will have to replace it with a new one.
We offer video instructions for replacing the cistern fittings:
Types of toilet breakdowns
The design of the flushing tank, regardless of its type, consists of two parts, one of which is responsible for accumulating water, and the other for draining it. If any of them is faulty, the entire mechanism does not work properly. Remember that you must use the faucet to turn off the water supply before starting any repairs. This can be done manually.
Types of damage:
- Deformed float.
- Gaskets are worn and do not provide a proper seal (need to be replaced).
- The float fix is not strong enough.
- The rubber pads are worn out (replacement is required).
- The shut-off valve is faulty.
Intake Valve Replacement
Before repairing the toilet, you should turn off the water supply valve. It is connected to the pipeline from the riser. Then the flexible hose is unscrewed from the inlet mechanism. It can be easily removed if the fastening is loosened. A new or repaired one is installed in its place. Assembly is carried out in reverse order. Plastic threads do not require sealing, and fluoroplastic tape is wound onto brass threads.
Toilet repair
Repairing the toilet yourself is possible, but in order for everything to go well and the result to meet expectations, it is necessary to study the structure of the structure, but since we explained everything above, now we can cope with this.
Each toilet consists of two main parts:
- Floor bowl;
- Drain tank.
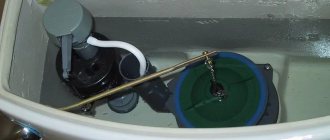
To see the device, which is also reflected in the photo, just remove the cover. The design consists of a float, a lever mechanism and a seal. The entire structure can be divided into a drainage system and its drainage.
Works on the principle of waterproofness. Using a lever mechanism, which is activated by pressing a button, a hole opens through which water, under the influence of the laws of physics, is thrown vertically. When you release the button, the shutter closes, blocking the path to water that begins to accumulate in the drain tank. The liquid level is regulated by a float, which can be manually set to a certain height.
Types of cisterns
Before you start repairing equipment, you need to get acquainted with its structure and operating principle. The toilet itself consists of a bowl and a container filled with water. It is the container that is called the cistern.
The water in it enters the bowl, where it washes its contents into the sewer system. The drain system is activated by pressing a lever or button. This depends on the equipment model.
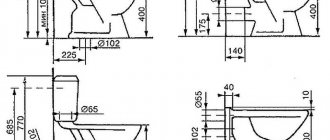
You can find various types of cisterns on sale. There are several classifications of such equipment. Based on the location of the tank relative to the bowl, there are two main categories.
Completely separate designs . It is assumed that in this case the tank and bowl are separated. This is the very first existing toilet option. The height of the tank can have different modifications.
A high position assumes that the cistern is located a meter or more away from the bowl. The elements are connected to each other by a pipe. This option was relatively recently the most common.
Separate design with low-mounted tank. In this case, the water drainage mechanism can be not only lever
This is explained by the fact that the high location of the flush tank guarantees high speed and good pressure of water entering the flush. Today such models are used less frequently.
Modifications with a cistern hidden in the attic or under a false ceiling are popular.
Another variety is built-in cisterns , which are equipped with wall-hung toilets. They are fixed in a special installation.
The low location of the tank suggests that it is mounted on the wall at a short distance from the bowl. They are connected by a short pipe. The drain fittings are located on the tank body.
Since the height from which the water drains is smaller, its speed and pressure are somewhat lower.
The flush cistern for compact toilets is placed directly on the bowl. For this purpose it is equipped with a special shelf. Such models are very convenient to install and operate, but the water pressure and its speed during flushing are minimal.
Compacts are produced with tanks of trapezoidal and triangular shape. Such toilets are called corner toilets. They fit very well into the corners of rooms, it is especially convenient to install them in small bathrooms.
Monoblock toilets . The design is a toilet with a flush cistern built into the body. Such equipment is very easy to install. All you need to do is supply water and connect the device to the sewer.
This can be considered the main advantage of the candy bar. If serious damage occurs in any part of the monoblock, it most often has to be replaced, since the monolithic design most often prevents a full repair.
You can read more about the different types of toilets in this material.
Tank and its repair
There are one- and two-channel flush tanks, photos of which you will see later. In this section we consider the first option. The trigger mechanism can perform several functions:
- You can regulate the amount of liquid using a float, which, in the absence of water, is in the lower position, thereby opening the inlet. When the liquid reaches a certain level, the float rises and closes the nozzle.
- Drain. After pressing the button, the drain pipe opens, through which the water flows into the sewer.
High water consumption is a common problem. The reason may be:
- Float distortion;
This problem can be resolved by moving it to the desired position;
- Faulty cork rubber seal.
In this case, you can repair the toilet yourself. First, turn off the water and remove the toilet lid. This can be done according to the following scheme:
- Remove the retaining ring that is located around the start button. You can do this yourself. Remember that in most cases this product is made of plastic, so if you press hard, it may break.
- Remove the cap and start repairing the tank using the button .
Raise the float to its maximum height and lock. The tank is connected to a drain tube by a lid, which you need to unscrew with your own hands. If you can't do it yourself, take the key.
Now you can get the mechanism working, find the leaking gasket and replace it. After repairing the tank, reassemble the structure in reverse order.
If the drain valve is faulty, it is most often caused by a rubber gasket that wears away from time to time, reducing the seal of the connection. Replacement - any gasket of the required size. Now you know how to fix a toilet using a button. If you forgot something, you can read it again and then try it yourself or watch the video.
You can do plumbing repairs yourself only after familiarizing yourself with its design (photo above). This type of design has a membrane valve responsible for draining water, and a lever control system that regulates its amount.
Toilet repair in most cases is limited to replacing gaskets, although not always. To do it yourself, first turn off the water supply to the pan, then disconnect the inlet pipe from it and remove the screws.
Find the old gasket and discard it, install the new gasket in place, and then reassemble the structure in reverse order. Replacing the valves in the tank follows the same principle, but with several additional steps.
Possible faults
There are many known problems associated with tank repair. Repair of fittings is considered one of the most difficult and time-consuming. Flush fittings for toilets are a device with the help of which the tank is refilled with water after the flush is completed, automatically controls the volume of water drained, as well as its overflow .
To understand what problem arose in the fittings, you need to know what elements it consists of:
- a drain hole located at an angle;
- an overflow tube is connected directly to the drain hole;
- valve covers with tight rubber;
- mechanism required for filling;
- drain button mechanism.
Having the following problems with the tank at home, it’s time to think about repairing it or completely replacing it:
- Constant continuous filling.
- Water does not stop flowing into the toilet (even in a small trickle).
- The merging process does not occur immediately after pressing the button, but as a result of repeated repetitions.
- The flush button has become unusable.
- The toilet itself is leaking.
- The process of filling the tank is very noisy.
If individual elements of the cistern fittings become unusable, you can only replace them, but it is important to ensure that all connecting elements fit 100% together. Otherwise, the repair will fail and this will entail a complete replacement of all fittings.
Next, we will look at how you can repair the toilet cistern yourself and what is required for this.
Water from the tank flows onto the floor
If dampness or a puddle of clean water appears behind the toilet, this indicates that the gasket installed between the tank and the toilet has become unusable and must be replaced.
To make a replacement, you will first need to purchase an O-ring. Then follow the instructions to fix the problem.
- Turn off the water supply to the toilet.
- Drain the water from the tank
- Disconnect the water supply hose
- Release the tank from the lid
- Remove the drain tank
- Replace gasket
- Reassemble in reverse order.
To increase the seal, you can use waterproof silicone.
Water is not delivered to the storage tank
This malfunction has several causes.
- Something with a flexible hose for water supply. The check is carried out as follows. The water is turned off, the tank is emptied of its contents, the hose is disconnected from the product, directed into the toilet bowl, and the shut-off valve is opened. If water flows with normal pressure, then the hose is fine. Let's look further.
- Water does not flow from the hose. We replace it with a new one. We connect the new product to the shut-off valve and check it again. The liquid has gone. The problem has been resolved. If there is no result. We continue checking.
- The inlet valve may be clogged. You can clean it with a thin wire, knitting needle or needle. Then we dismantle the valve and wash out the remaining dirt.
As soon as the water begins to flow freely, we install the valve, the valve with the lever and the float in its original position. Sometimes the valve cannot be cleaned, in which case it should be replaced.
Water constantly leaks into the bowl
- The reason is the incorrect operation of the float. It does not stop the flow of liquid, and it constantly flows through the overflow.
- The lever has changed position to inoperable
- The water supply valve is broken
If the design of the tank is from Soviet times, you should start identifying the fault with the float. Perhaps it burst, water flowed into it and it can no longer rise and stop the flow of water. If this is the reason, the part must be replaced.
Modern toilets have a flush column and do not have a float. This part cannot be repaired, simply replaced with a new one.
Water may leak due to a broken inlet valve.
- Check the lever next to the valve for mechanical damage.
- We empty the tank and watch how water fills
- You should move the lever. It closes the valve. If there is a bend, straighten the lever.
- The lever doesn't move. A jam has occurred. We are replacing the unit.
If the intake valve itself breaks down, it needs to be replaced. The part is dismantled, a similar one is purchased from the store and installed in the system.
The internal fittings have failed
Sometimes several faults occur simultaneously. The entire drain system should be replaced.
Replacing the drain mechanism with bottom water intake.
- Close the tap that supplies water to the tank and empty it of liquid.
- Remove the cover.
- Unscrew the flexible hose
- Turn the top of the column and remove it
- We dismantle the tank by first unscrewing the retaining bolts
- Remove the inlet valve and drain button
- We take out the old mechanism
- We install new fittings.
- We put the tank in its original position.
Loud noise when drawing water
This fact is not a malfunction. Top supply tanks are noisy.
Models are available where you can adjust the diameter of the hole. It won't get rid of the noise completely, but it will reduce its level.
If it is not possible to make adjustments, there is a modification option.
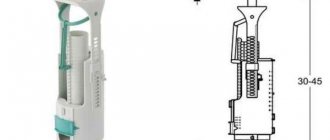
Take a rubber tube with an inlet diameter and a length of up to 30 cm.
The tube is placed over the inlet hole, fixed, and the end is lowered to the bottom of the tank.
This prevents water from falling from a height; filling begins from the bottom, which means the noise disappears.
A button or two buttons are stuck
A toilet model with two flush buttons is in demand. In this product, sometimes the buttons get stuck. To make repairs, you need to remove the cover.
First, the nuts holding the buttons are unscrewed, after which you can open the tank. Pressing the buttons at the same time sometimes helps them fall into place.
If the manipulation does not work, you should check the button shaft. Sometimes it gets clogged. After cleaning the shaft, repeat the check. If there is no result, a new part must be installed.
The unit is dismantled, exactly the same one is purchased and installed.
Repairing an old tank
Common faults that can reduce the effectiveness of an old tank:
- It is no secret that each part also has a certain life expectancy and fastening rings. A decrease in the properties of these products leads to shutdown of the valve. Repairing an old model toilet at this stage consists only of replacing the clutch.
- Damage to the float can only be repaired by replacement.
- Damaged old style gasket. To replace it, simply remove the lid and remove the valve found on the older style toilet.
Seat stabilization
Inexpensive rubber bushings and seat stabilizers can help fix your toilet for years to come. Remove the nuts from the toilet seat and insert the rubber grommets. Wrap a rubber band around the toilet seat and center the stabilizers so they touch the inside edge of the toilet.
Wrap the rubber band around the toilet seat and position the stabilizers so they touch the inside edge of the toilet. Drill a hole for the starter and secure the stabilizers with the screws provided. Next, install a set of toilet seat stabilizers. This will eliminate loosening caused by side to side movement.
Repair of a toilet with bottom water supply
Not long ago, manufacturers offered consumers a completely new design - drain tanks with a bottom connection. It consists of drain valves, trigger button (single or double mode) and fill valves. Possible malfunctions and repairs to the tank drain fittings are described in detail below, so now let’s move on to the filling system.
Disadvantages may be related to the method of water supply. They can be:
- Insufficient water pressure. For proper operation of the diaphragm valve, only 0.05 MPa is required. If the pressure is weaker, it means that it will not work, causing water to collect continuously. It is recommended to install a rod valve instead of a diaphragm valve, since its operation is not dependent on pressure.
- Incorrect installation. Most often this can be detected during a visual inspection of the structure. Each part of the exhaust system must not touch the walls of the tank. The same problem can occur in older models.
Check the position of the float and adjust if necessary. If it is not installed correctly, the water in the tank will flow through the overflow hole. This can be corrected by lowering the float level using the adjusting screw. One of the most common causes of leakage is insufficient tightness of the connection. You can clean the toilet yourself.
Adjustment of individual elements
To install a new system responsible for filling with water, you will need the following tools:
- plastic ruler or metal tape measure;
- adjustable wrench;
- spanners;
- recently purchased fittings components.
Water can enter the tank from below or from the side.
If we are talking about a lateral connection, for repairs you need to perform the following steps:
- Set the diameter of the water intake pipe.
- Choose the system that is needed for your model. This is quite simple to do - you need to remove the lid from the tank and see what kind of fittings are in it. After that, buy the same one for sure.
- After the entire structure has been purchased, you can install new water intake fittings.
- Shut off the water supply to the toilet.
- Open the lid and drain the water completely.
- Remove the old fittings. This can be done after you unscrew the nut located on the flexible hose with a wrench. At the same time, be sure to support the entire structure. This event can be completed by one person - the main thing is to work harmoniously with both hands .
In the case where the water comes from below, you will need to struggle a lot to unscrew the nut. This can be done only with improvised materials or by first shortening a standard wrench:
- Carefully inspect the used gasket. If it has no visible damage or irregularities, it can be reused for a new structure being installed.
- The new fittings should be positioned so as not to interfere with the operation of the drain system, and also not to touch the walls of the tank itself .
- Connect the water.
- Check that the work has been completed correctly.
Repair of a toilet with side water supply
If there are any defects in this type of drain bowl, you will most often need to buy a new check valve and replace it.
Problems you can solve yourself:
- Low water pressure may indicate a blocked inlet filter. To clean, remove and wash the product. There may be a second reason - a dead diaphragm valve. We wrote above how to repair the drain tank in this case.
- Float. To eliminate the error, just adjust the position of the rod.
Why does the toilet start to flush poorly?
Having understood the structure of the device, it is easy to formulate the entire list of reasons for poor flushing:
- the drain hole in the tank is clogged;
- not enough water is collected;
- the annular channel under the rim of the bowl is clogged with deposits (in models with a shower-like circular flush);
- the surface of the bowl has become rough due to natural wear or damage;
- problems with the sewer pipe: incorrect slope, blockage, etc.
Installation repair
Modern models are not only special designs, but also differ in the way they are installed. The installation of a toilet deserves special attention. Since the installation of a drain pan has its own characteristics, there are also requirements for repair work. Once the false walls are installed and finishing work is completed, it is almost impossible to get to the tank, so you should check everything carefully in advance.
If the installation tank stops working properly, this means:
- Leakage problems. To eliminate them, check the underwater hoses through the inspection hatches.
Required tools and materials
If your plumbing is leaking, you must turn off the water before making any repairs. Due to the fact that the liquid is supplied to the system under pressure, in the process of troubleshooting we can flood the premises. For repairs you will need the following tools:
- sealant suitable for plumbing fixtures;
- sandpaper;
- screwdriver;
- burlap, twine or tow;
- hammer;
- knife;
- pliers;
- If it is necessary to replace a component, a working part of a certain type will be required.
When the necessary tools have been collected, you can begin to carry out repair work.
Toilet installation
The device is quite simple, although nothing can be said about the installation method. After installation, the structure becomes practically inaccessible, with the exception of the toilet, so repairs should be carried out very carefully.
The drainage system will work normally if a coarse filter is installed at the inlet, because small particles of dirt that are filled in the centralized water supply will eventually become clogged with dirt.
Knowing the basic designs of drainage systems, how they work, and having basic repair skills, it is quite possible to replace the entire valve itself. But the question arises, where to start?
BEFORE YOU START, JUST TAKE 5 MINUTES AND THINK ABOUT HOW YOUR TOILET FLUISH SYSTEM WORKS. THIS WILL SAVE TIME AND MONEY.
How to open (remove the cover)?
Modifications are currently being made to allow the cover to be removed without any additional operations. The buttons in them are equipped with rods that transmit force to the control elements of the tank fittings.
But most plumbing manufacturers continue to produce models that require certain manipulations to remove the cover.
To remove the cover in single-button modifications, you need to moderately press the ring surrounding the button and turn it in the direction opposite to the clockwise movement.
Next, you should carefully move the cover to a position perpendicular to its normal position, and carefully release the button block from the plastic clothespins. After this, you can remove the lid from the tank and set it aside.
How to disassemble (open) a toilet cistern with a button for subsequent repairs with your own hands - learn from a short video:
To dismantle a cover equipped with a two-button block, it is usually enough to press any button, after which the technological groove on the adjacent button will become accessible . All that remains is to pick out this button and remove it, and then dismantle the second one. Then unscrew the fixing screw and remove the cover.
Dismantling of old equipment
Gradually, all preliminary work looks like this:
- Cut off the hose responsible for the flow of water into the tank, disconnect the water supply hose.
CLOSING THE TAP, DRAIN ALL THE WATER.
We disconnect the tank from the drain pipe (old model) or toilet in newer products. In the first case, unscrew the large metal nut on the pipe. The second contains two plugs located below, under the toilet. Older versions have difficulty disassembling - the iron fasteners rust and loosen. A problem has arisen - cut off the nuts. This can be done using a saw.
- Delete;
- Place the removed tank on a wide, stable surface;
- First remove the float and water connection to the valve;
- Remove the main drain system.
BE CAREFUL WHEN DISASSEMBLYING THE DRAINAGE MECHANISM. IMPROPER USE OF METAL TOOLS WILL DAMAGE THE SURFACE OF THE HYDRAULIC EQUIPMENT.
After removing old pieces of equipment, wipe the tank dry.
It was mentioned above that older models of drainage systems have more holes for attaching fittings. It does not matter if, instead of used reinforcing parts, new ones similar to the design are installed. But often, in order to complement the old plumbing system with a more reliable new “filling”, we have no choice but to replace the used toilet fittings with modern ones. In particular, we will pay several lines in the overall build process.
Let's start:
- On older models we attach a bracket with a barrel and bulb with a metal fastener to the bottom of the tank. In the new drainage system, it is secured in the middle with a plastic nut.
- Be careful! Handle plastic fasteners carefully. Over-tightening may damage one of the fastener components.
- Install the water pipe. In older systems we attach a needle with a float to it. In the new system, the pipe can be combined with a water level control system. This means that the float and water intake are combined into one structure. Install everything together.
WHEN BUYING ACCESSORIES, YOU MUST FOLLOW ORIGINAL PRODUCTS FROM.
general information
The most common design of a modern toilet is the “compact”, which involves installing the tank directly on the toilet. Control mechanisms were initially produced in two types : a ball attached to a retractable rod attached to a “pear” - a rubber plug that covers the drain hole and a lever located on the side surface of the container.
Today, almost all manufacturers have switched to producing push-button models of tanks.
There are two main types of these modifications:
- with one button;
- with two buttons or one button divided into segments.
The second variation involves a slightly more complex design of the valves for controlling the drainage processes , but it pays off quite quickly due to the possibility of choosing one of the modes:
- when you press one button, the tank is completely emptied;
- when the second is activated, it is partial, which allows you to significantly save on water consumption.
You can learn more about the operating principle and design diagram of toilet flush cisterns with a button from the materials on our website.
Installing an old toilet
1. If you have no installation experience and will be installing a direct flush toilet, you will need the following instructions. The plumbing must be connected in such a way that it is completely aligned with the screw flange built into the floor surface. Then the entire device should be turned sideways and the O-ring should be installed to ensure a tight connection. 2. When replacing an old toilet, be careful in any action, the new plumbing equipment must be installed exactly in the same place where the old one was. 3. When choosing plumbing installations, give preference to proven and reputable brands and stores. They will be able to provide a guarantee for the long life of the product. 4. Installation of a direct release toilet begins with applying the necessary markings to the floor surface. Then install the screw flange with the special handle. This flange has a round hole in the middle into which the sewer pipe is inserted. Then attach the toilet, spread it on the collar until it clicks.
What to do if water constantly flows into the toilet from the tank? In this case, the main cause of failure is damage to the siphon, or rather its membrane. The way out of this situation is to replace the membrane. What should I do if the lowering lever only works after a few presses? If the release lever does not operate properly, the siphon diaphragm is the cause of the problem and must be replaced.
Rusty bolts
If lubricant doesn't work to remove the nut, grab a drill, a set of drill bits, and safety glasses.
Using a 1.5-2mm thick drill bit, drill the nut and bolt along the threads, and then gradually enlarge the hole using thicker drill bits.
Then try the socket wrench again. Your goal now is not to unscrew the nut, but to break the bolt when you turn the nut. If the bolt does not break, continue to enlarge the hole. Eventually you will loosen the bolt enough to break it.
Water is retained in the bowl
If the tank works perfectly, but water fills into the toilet and slowly leaves, the problem is a clogged sewer.
There are three ways to clean drains:
- using a plunger through the drain hole of a nearby sink or bathtub. If the blockage is weak, the pressure applied by the plunger will move it out of place;
- plumbing cable. They act in the same way as with a string when cleaning a water pipe: they rotate the cable while simultaneously feeding it into the sewer;
- chemical means. Modern compositions based on acids and alkalis effectively corrode even the most resistant corks. One of the most popular is “Mole”. These products are caustic, so you must follow safety precautions and act strictly according to the instructions.
In private homes, the causes of frequent sewer blockages may be:
- use of small diameter pipes. The minimum diameter of pipes after the toilet is 100 mm;
- incorrect pipe slope. The source of problems is either insufficient slope or excessive slope. In the second case, the water runs off too quickly, not having time to carry the solid fractions with it, and they remain in the pipe. The amount of slope depends on the diameter of the pipe. For products DN100 it is 0.02 (2 cm per meter). The minimum permissible slope for such pipes is 0.012 (1.2 cm per meter);
- a significant distance from the toilet to the riser. According to the standards, it cannot exceed 1 m;
- lack of a vent pipe. This is the top of the riser, brought out through the roof. Provides communication between the internal space of the sewer system and the atmosphere, so that when a large amount of water moves in the pipes, a vacuum is not created. If an air valve is installed instead of a drain pipe, gas pressure may back up the drains from the toilet, causing them to move more slowly.
Air valves can be installed if there is at least one drain pipe in the system.