Owners of dachas usually live on their plots seasonally or only occasionally visit them. As a rule, people live in private houses all year round. Therefore, different sewerage options are chosen for country houses and private houses.
There are four types of local sewerage:
- Cesspool.
- Storage capacity.
- Septic tank for settling wastewater.
- Biological treatment station (BTP).
A cesspool is prohibited by sanitary standards and regulations; it smells and pollutes the soil, including in neighboring areas. It cannot be done in clay, since the wastewater will not be absorbed into the soil. With such a sewer system, a private house is not recognized by law as residential, and it will be impossible to register in it.
The drive must be constantly pumped out. It's expensive and troublesome. You'll have to get used to communicating with the sewer man. For permanent residence, storage devices are usually not used (only as a temporary measure).
Septic tanks made of concrete rings cannot be reliably sealed. When groundwater is low, runoff will seep out of the septic tank and contaminate the soil. If the groundwater level is high, the septic tank will quickly overflow due to water entering from the outside. It is difficult to install a concrete septic tank - special equipment and additional materials are required - liquid glass for sealing, staples for fastening rings. We do not recommend such sewerage.
You should immediately abandon cesspools, storage tanks and concrete septic tanks. They do not add comfort, but, on the contrary, create problems (odor, wastewater getting into the soil, frequent and expensive pumping).
For permanent residence, it makes sense to choose factory-made septic tanks or biological treatment stations (BTP). We will talk about them in this article.
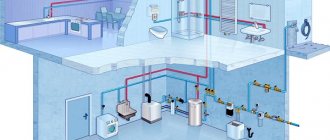
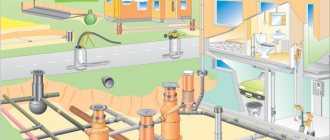
Sewage system in a private house
The main difference between local sewerage and centralized sewerage is the need for independent neutralization and neutralization of wastewater. When connecting to a centralized sewer system, internal sewerage wiring must be installed to connect to a common collector or riser.
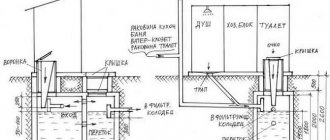
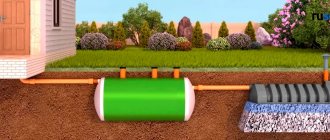
Local sewage system at the dacha
Mounting a local system is somewhat more difficult, because it consists of:
- internal wiring;
- external sewer network;
- storage tank, septic tank or septic tank.
Internal sewage system for a private house: how to install it correctly. It is a system of pipes connected to plumbing fixtures. The diameter of the pipes is different: for drainage from a sink or sink, Ø40 mm is sufficient, for a bath or shower – Ø50 mm, for fecal drains, sun beds and risers – Ø110 mm. Currently, pipes made of PP or PVC are mainly used; in old houses you can still find cast iron pipes.
Plastic pipes for sewerage
Plastic sewer pipes have many advantages: light weight, easy installation, smooth internal walls that prevent the formation of plaque and deposits. For internal installation, gray pipes are used - they are resistant to high wastewater temperatures.
You may be interested in information about insulation of sewer pipes
For external wiring, high-strength plastic pipes are used - when laid in the ground, they must withstand its weight. They can be distinguished by the orange color of the plastic - it is clearly visible in the ground, which reduces the likelihood of damage to the laid sewer during excavation work.
Pipes for external sewerage
Plastic pipes are connected with O-rings or special glue, and the socket should be located against the flow of water. Branches and turns are made using special fittings - couplings, bends, tees and crosses. When connecting, it is important to avoid sharp and right angles that contribute to the formation of blockages.
Fittings for sewer pipes
Receivers for local sewerage can be of several types:
- sealed wells;
- wells with a filter bottom;
- settling wells;
- septic tanks with mechanical cleaning;
- biological treatment stations.
The efficiency of a wastewater treatment system for a private home in different containers varies greatly: wells with a filter bottom can only purify wastewater by 40-60%; additional treatment occurs due to the work of soil bacteria. They must be added in strict accordance with SNiP, otherwise the soil may become infected with microorganisms and toxins.
Sewage well with filter bottom
SNiP 2.04.03-85. Sewerage. External networks and structures. Downloadable file (click the link to open the PDF in a new window).
SNiP 2.04.03-85
Septic tanks purify wastewater much better, and the purified water entering the soil is safe for the environment. Biological treatment stations produce purified process water at the outlet, suitable for watering gardens, as well as fertile sludge.
Septic tank
When considering the feasibility of installing a particular system, it is important to consider several factors:
- volumes and composition of wastewater;
- area of the site and its relief;
- proximity to water sources and reservoirs;
- proximity to groundwater and the possibility of flooding;
- region of installation and its climatic features.
The volume of wastewater is calculated based on the composition of the family; 200 liters per day for sanitary needs is taken as the norm; it is also necessary to take into account the water consumed by the washing machine or dishwasher.
Sources of sewage and use of septic tank treated water
The wastewater may contain only water for domestic and sanitary needs or its mixture with fecal wastewater. In the second case, effective cleaning is possible only by installing a sealed container, settling tank system, septic tank or biological treatment station. Wells with a filter bottom do not do a good job of cleaning mixed wastewater; in this case, a persistent unpleasant odor may appear. Another option is to separate the drains and use different treatment methods for them.
Separation of fecal and domestic wastewater
The possibility of installing sewerage in accordance with sanitary standards depends on the area of the site. The distance from the septic tank to the well and other objects must be no less than that shown in the figure. If these requirements are not met, it is better to install a sealed storage tank or biological treatment station.
Minimum permissible distances from a cesspool or septic tank
Note! On a small dacha plot where water is drawn from a well, the easiest way is to separate the wastewater: drain domestic and sanitary water through a sewer into a well or septic tank, and provide a dry closet for human waste.
If groundwater is close and there is a possibility of flooding, the installation of local sewerage must be carried out taking into account these conditions. Flooding a well or sump can lead to contamination of the soil and the appearance of an unpleasant odor. If there is a sharp rise in groundwater, the septic tank may float up, which will lead to the destruction of the external sewerage system.
A septic tank poorly anchored in the ground after flooding
There are several standard solutions to this problem:
- installation of a sealed storage tank that prevents the influx of groundwater;
- installation of a vertical septic tank with anchoring;
- arrangement of a drainage system for drainage of groundwater;
- in case of poor absorption of treated wastewater, installation of forced pumping and a post-treatment system.
The climatic conditions of the region affect the possibility of freezing of the system. External sewerage pipes are laid below the freezing level of the soil or insulated and equipped with a heating system using a special electric cable. A septic tank and biological treatment station in cold regions also need insulation.
Using a heating cable to heat a sewer pipe
Note! When installing a storage tank or septic tank, it is important to provide convenient access for the sewer truck!
Deep biological treatment station
This autonomous sewage system is the most complex and modern type of treatment system. It is impossible to build such a station on your own, but installing an independently purchased engineering structure is quite simple. The most popular models are local installation Topas and local sewerage Astra.
Advice! In this case, the installation and installation of local sewerage involves locating the station so that its pipe does not bend before the entrance.
Biorefinery stations use another principle of wastewater treatment - biorefinery with forced aeration. Air is forced into the environment to be cleaned (using a compressor) by feeding it through an aerator installed at the bottom.
Thanks to this, the environment is actively mixed and saturated with oxygen, necessary for the life of bacteria that actively decompose organic inclusions contained in the wastewater.
Without the compressor running, cleaning processes will not be carried out, so these installations are volatile. It makes sense to install them only if there is a stable power supply. But the stations provide complete purification, removing up to 98% of impurities from water. No additional purification is required.
Installation of internal sewerage
The rules for installing internal sewer lines do not depend on the type of septic tank and are always carried out using the same technology. Before starting installation work, it is necessary to draw a sketch indicating all plumbing fixtures and room dimensions.
Sewerage diagram in a private house
If plumbing fixtures are installed on two or more floors, they try to place them one above the other - this facilitates the operation of the sewer system and reduces the number of communications. Based on the sketch, the required number of pipes and fittings is calculated.
You might be interested in designing an external sewer system
Tools required for work:
- hacksaw for plastic or metal;
- fine-grained file;
- level and tape measure;
- clamps for attaching pipes to the wall.
When installing pipes, they try to select them in such a way as to obtain a minimum number of connections. If it is necessary to cut pipes, use a hacksaw or jigsaw with fine teeth. The required section is sawed off strictly perpendicular to the axis of the pipe, the burrs are cut off with a sharp knife, and the outer side is chamfered at 15° using a fine-grained file.
Pipe connection
Note! Connecting fittings must not be cut! They are selected from the available assortment, and adjustment is made using straight sections of pipes.
The pipes are connected using an O-ring or sealant. Installation with an O-ring is easier and takes less time. To connect the pipes, cut off sections of the required length, as described above, lubricate them with silicone grease (if the pipes fit tightly) or liquid soap to facilitate sliding, and insert the smooth end of the pipe into the socket until the notch. After this, the pipe is removed in the opposite direction by 9-11 mm. This allows the ring to seal the joint tightly and also provides clearance for thermal expansion.
You may be interested in information: sewer return valve
Step 1. Installation of internal sewerage begins with the installation of risers. They are made from pipes with a diameter of 110 mm, installed strictly vertically. The installation location of the risers is determined by the project; most often they are located in the bathroom or toilet. The pipes are leveled and secured to the wall with clamps. When connecting straight sections of pipes, make sure that the sockets are directed upwards. Tees or bends are installed in the right places.
Installation of the riser
Step 2. At each turn or branch, in places where congestion is most likely to form, the sewer risers are equipped with an inspection. If pipes are laid hidden in the wall, an inspection hatch must be installed at the inspection site.
Sewer audits
Step 3. Each riser is equipped with a drain pipe of the same diameter, led through the ceilings to the street. It (the pipe) is necessary to remove gases and reduce noise in pipes; it cannot be combined with a chimney or ventilation system!
Exiting the drain pipe to the roof
Step 4. Horizontal sections of sewerage are installed to the risers through installed tees and bends. Their length should not exceed 10 m, and it is necessary to ensure a slope of 2 cm per 1 linear line. m for pipes Ø110 mm and 3 cm per 1 linear. m for pipes Ø50 mm. If it is necessary to turn 90 degrees, use two 45-degree bends or three 30-degree bends - this will ensure a smooth transition and reduce the likelihood of blockages.
Horizontal sewer sections
Step 5. The horizontal sections at the joints are also equipped with a revision - a tee with a lid. The branch of the tee is installed straight up so that water does not leak through it.
Inspection of sewer pipe branching
Step 6. Connection to plumbing fixtures is made using a siphon - it prevents gases from the sewer from entering the room. In addition, debris, sand and other contaminants accumulate at the bottom of the siphon, which can lead to clogged pipes. They can be easily removed during inspection using a removable cover.
Drain with siphon
The diameter of the pipes for connecting the points must correspond to the diameter of their outlet. The transition between pipes is carried out using a transition coupling or, when combining pipes from several devices, using tees with different branch diameters.
You may be interested in information - settling tanks for wastewater treatment
Step 7. The toilet is connected to a horizontal pipe Ø110 mm using bends or a flexible coupling (depending on its design and type of outlet). In this case, the water seal is provided by the design of the toilet.
Toilet connection diagram
Step 8. The risers, and in one-story houses - horizontal pipes, are connected to the external sewerage system. It is better to do this by connecting three outlets at 30 degrees - this will ensure a smooth drainage of water.
Connection of internal and external sewerage
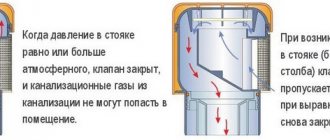
Note! When using a sealed storage container, it is recommended to install a check valve at the exit from the house to prevent the escape of foul gases.
Prices for sewer inspection
sewer inspection
Riser and its ventilation
Since the riser is the central link of the entire intra-house sewer system and connects the internal wiring with the external one, planning its arrangement requires special attention. In addition, it performs the function of ventilation of the system. Therefore, it is necessary to take into account a number of nuances.
- It is best to place the riser in the toilet, since the distance between the riser and the toilet should be as minimal as possible.
- The central vertical pipe should be equipped with a hatch, which will make it possible to inspect and clean it. It is recommended to install such hatches on each floor.
- It is worth considering soundproofing options for risers in advance. You can cover them with mineral wool or cover them with plasterboard.
- A prerequisite is to provide ventilation for the risers, since its absence can lead to the appearance of odors, emptying of siphons and the creation of vacuum in the pipes during draining.
To avoid these troubles, the riser is placed on the roof or attic. The pipe opening is partially closed to prevent debris and precipitation from entering it. The part of the riser that goes to the roof is called the fan pipe. It is usually located at a slight slope and should be 4 m away from windows and balconies.
Fan pipe
It is possible to install a ventilation valve at the top of the riser, which allows air into the pipe system if necessary and prevents water from leaving it.
At the bottom, the sewer ventilation riser is connected to horizontally directed pipes of the same or larger diameter. They carry wastewater outside the house.
Prices for fan pipes
fan pipes
Installation of external sewer network
For the external sewer network, high-strength plastic pipes of orange color or cast iron are used. The depth of laying pipes without insulation and heating should be below the depth of soil freezing.
Soil freezing depth
Step 1. Prepare a pit for laying pipes using special equipment or manually. The trench should be as straight as possible, without turns. Its length of more than 20 meters is undesirable, since to ensure the required slope the pipe and septic tank will have to be deeply buried.
Digging a trench using special equipment
Step 2. Lay the pipes, connecting them in the same way as pipes for internal sewerage. When laying, observe the required slope in all areas; to ensure this, you can use sand filling with its pouring and compaction.
Laying external sewer pipes
Step 3. The pipe passes through the foundation through metal sleeves placed at the stage of pouring the foundation. They are sections of metal pipe with a diameter of 130-160 mm, passing through the foundation at a depth below freezing of the soil at an angle of 2-3 degrees. The ends of the pipes must be exposed on both sides of the foundation by at least 15 cm. The pipe is brought inside the basement and connected to the outlet of the internal sewage system of the dacha. You can read what a gravity sewer is in our article.
Diagram of pipe passage through the foundation
Step 4. The second end of the external sewer network is discharged into a septic tank or septic tank of the selected type. When using an industrial septic tank, it is enough to connect the pipe to the inlet pipe. When installing a concrete well, the pipe is inserted into the prepared hole, wrapped in foam insulation to avoid damage. Cover the insertion site with cement mortar.
Connecting a sewer pipe to a concrete well
Step 5. The trench is backfilled with soil removed from it. On wet and heavy soils, especially when laying pipes with heating cables, it is recommended to first fill the pipes with coarse sand in a layer of 20-30 cm, and then with natural soil. This will improve the flow of groundwater and prevent freezing.
Backfilling of pipes
6) Technical characteristics of the equipment
6.1 Some of our cleaning structures are made from fiberglass. The scope of application of products made from composite materials based on fiberglass when using different types of resins is maximally expanded due to the strength of this material. The strength characteristics of fiberglass are comparable even to metal, and sometimes even exceed it in some indicators, such as corrosion and chemical resistance, specific gravity, etc. Thus, cleaning structures made of fiberglass are much more convenient to use than equipment made of polyethylene or reinforced concrete. In fact, septic tanks made of polyethylene are cheaper than those made of fiberglass, but they require special installation due to their low strength. Such a process requires the installation of a special reinforced concrete box, which will significantly increase the cost of the equipment and its installation in total. Reinforced concrete has a number of significant disadvantages - it is very heavy, requires the mandatory use of special equipment for transportation and installation, is also leaky and can allow water to pass through. Aggressive environments can destroy reinforced concrete structures.
Therefore, fiberglass is one of the best options, since it meets all the requirements for cleaning facilities. It is light, strong, durable, and it is these qualities that must be taken into account when choosing a sewerage system for a country house.
Installation of a sealed sump
A concrete well with a concreted bottom and plastered joints can serve as a sealed wastewater receiver. It is installed no closer than 5 m from the walls of a residential building and 2 m from the neighboring plot.
You may be interested in information - septic tanks for a private home
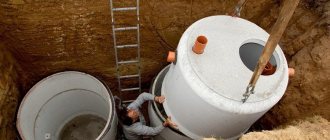
Step 1. Prepare a pit for concrete rings of the required depth with a diameter 20-30 cm larger than the diameter of the rings. It is better to carry out work in dry weather immediately before installing the well, so that the soil does not crumble.
Pit for a storage well
Step 2. Install the bottom of the well and the required number of rings (usually no more than three). The joints are sealed with cement-sand mortar.
Concrete products for wells
Step 3. Place an external sewer pipe into the well, as described above. Carefully isolate the joint using foam material and cement mortar.
Inserting a pipe into a well
Step 4. Close the well with a lid and install a hatch for pumping, as well as a ventilation pipe through which gases will be removed from the well. This pipe must be above the breathing zone.
Hatch installation
Step 5. Backfilling is done with sand mixed with dry cement. When the soil is moistened, the cement will set, which will ensure reliable fixation of the well and sealing of microcracks and pores in the concrete.
Backfilling a well
Note! Instead of a concrete well, you can use a plastic container - for example, a Eurocube.
Recommendations from the experts
Of course, autonomous sewerage can make life in country houses more comfortable. But know that the uninterrupted operation of such a system will only be ensured by periodic maintenance and monitoring. If an unpleasant odor spreads even from a closed container, add anaerobic bacteria to the cleaning tank.
It is worth noting that the autonomous sewage system of a private house is not able to process cellulose. That is why such a sewer will clog sooner or later. Thus, a local sewer system for a country house can easily be built independently. The main thing is to follow our recommendations and decide on the type of treatment system before construction begins.
Installation of a well with a filtration bottom
A special feature of a filtration well is its ability to purify wastewater due to the activity of soil microorganisms. The volume of wastewater is limited (1 m3 per day); the well itself is placed no closer than 5 m to a residential building.
Filtration well
Step 1. They dig a pit measuring 2x2 m and 2.5 m deep. Its walls are covered with geotextiles, and 0.5 m of coarse sand is poured onto the bottom.
Pit for a well with a filtration bottom
Step 2. A 0.5 m layer of crushed stone is poured onto the sand, leveled and a plastic filtration well with perforated walls in the lower third of its height is installed. The walls of the well are also wrapped with geotextiles.
Backfilling crushed stone at the bottom of the pit
Step 3. The walls of the pit prepared for the drainage well are wrapped with geotextiles. A layer of sand 0.4-0.5 m thick is poured onto the bottom, then a layer of crushed stone of the same thickness. A drainage well made of perforated concrete rings is installed. Place a Ø50 mm pipe into the filtration well, ensuring a slope of 3 cm per 1 meter of pipe length. Backfilling is carried out first with crushed stone, and the upper 0.3-0.4 m with soil removed during the preparation of the pit. The well is equipped with a lid with a hatch and a ventilation pipe.
Installation of a filtration well
Note! A well with a filtration bottom can also be made from concrete rings, bricks, car or tractor tires.
Installation of settling wells
A system with settling tanks is an improved version of a filtration well. It consists of two wells connected in series, with the first well having a sealed concrete bottom, and the second being equipped with a filtration bottom layer.
In the first well, the wastewater settles and is separated into a solid fraction, which settles to the bottom, and settled water. Through an overflow pipe, water from the first well flows into the second, where residual filtration and wastewater neutralization by soil bacteria occurs.
Settlement well diagram
The advantage of such a system is that it allows you to efficiently process large volumes of wastewater, especially when installing several sealed settling tanks. The solid fraction from them is pumped out periodically (about once a year).
A simplified version of the sump is a perforated pipe laid in a layer of crushed stone over a sand bed.
Step 1. Prepare pits for sealed and filtration wells. The technology for their preparation is described in the previous sections.
Preparation of pits for wells
Step 2. Install a sealed well with a concrete bottom. Install an inlet pipe Ø110 mm and an overflow pipe Ø50 mm so that the height difference between them is approximately 20-30 cm. The well is equipped with a lid and a hatch.
Installation of a sealed well
Step 3. Install a drainage well from concrete rings placed on a layer of crushed stone over sand preparation. To avoid silting, the crushed stone is wrapped in geotextile. Place a Ø50 mm pipe into the filtration well, ensuring a slope of 3 cm per 1 m of pipe length. Equipped with a lid with a hatch and a ventilation pipe. Backfilling is carried out with soil removed during the preparation of the pit.
Installation of a filter well
Note! Specialized plastic containers can be used as wells, but it is important to provide good drainage so that the sealed container does not float up.
Installation of a mechanical septic tank
The principle of operation of a mechanical septic tank is generally similar to a system of settling wells: several chambers are placed in a durable plastic casing, connected by an overflow pipe.
Once inside the septic tank, the wastewater is divided into fractions, clarified and treated with anaerobic bacteria. Water, purified by 80-90%, after the septic tank enters the filtration chamber or filtration field, where post-treatment occurs.
Installation of a septic tank
The septic tank is installed at a distance of 5-15 m from the walls of a residential building, the filtration chamber is installed in any convenient place on the site, the maximum distance to the septic tank is limited to 40-50 meters. The volume of the septic tank is determined by the number of family members permanently residing in the house, and you can use the data from the table as a guide.
Table 1. Required volume of septic tank.
| Family size, people | Number of chambers in the septic tank | Septic tank volume, m3 |
| 1-2 | 1 or 2 | 1,0 |
| 3-4 | 2 or 3 | 2,0 |
| 5-7 | 2 or 3 | 3,0 |
| 8-9 | 2 or 3 | 4,0 |
| 10-12 | 2 or 3 | 5,0 |
| 12-18 | 2 or 3 | 8,0 |
| Over 18 | 10.0 or more |
Installation sequence
Step 1. Prepare pits for a septic tank and filtration chamber. A layer of sand 10-15 cm thick is poured onto the bottom of the septic tank pit to level the bottom and prevent damage to the septic tank by stones or other solid inclusions. The bottom of the pit for the filtration chamber is covered with geotextile and covered with crushed stone to a depth of 40-50 cm.
Pit for a septic tank
Step 2. Place the septic tank and filtration chamber on the prepared base. Connect the pipes using a level and ensuring the desired slope. The supply pipe must be equipped with a branch for ventilation if a vent pipe is not installed in the risers. The filtration chamber is also equipped with ventilation.
Installing a septic tank in a pit
Step 3. Backfill the pits. The space around the septic tank is covered with a sand-cement mixture to avoid its displacement or floating. The filtration chamber is filled with ordinary sand. The sand layer is 15 cm higher than the upper level of the chambers.
Filtration chamber installation
Step 4. A layer of insulation – foam plastic in slabs – is laid on top of the sand. Cover with soil right up to the surface. The hatch for pumping out sludge should be located 10-15 cm above the backfill level, and convenient access for a sewage truck must be provided to it.
Infiltrator insulation
Note! The given figures and installation technology are general; specific conditions can be determined for a specific septic tank model.
3) Water sources of drinking water and sanitary areas
3.1 Consideration of the issue regarding the installation of a sewerage system on a site involves taking into account such factors as the presence of a water well or drinking well. In this case, it is necessary to determine the depth of water in the well and the depth of the well. Such information will allow us to approximately determine the depth of the drinking water level in this area.
3.2 When considering the option for water drainage, one should take into account the presence of devices for water intake not only directly on the site, but also in the territories adjacent to it (neighbors, water protection zones). It is necessary to take into account the location of the site on the general scale of the area, and also determine the area of adjacent sites.
3.3 If the neighbors’ plots are located close to the water drainage point, then the sanitary zones of the neighbors’ plots should be taken into account, and also determine whether they have devices for collecting drinking water.
3.4 If the site is located in the water protection zone of a fishery reservoir, then this implies additional restrictions regarding the use of wastewater treatment facilities, as well as their additional disinfection using special equipment. Chlorine cartridges, ultraviolet lamps, ozonation, etc. are used to carry out the disinfection process. At the design stage, all this is agreed upon by the supervisory authorities in accordance with the existing scheme within the framework of regulatory documents.
3.5 When carrying out work on the project, the supervisory authorities agree on the type of treatment facility, its necessary indicators and quality characteristics of wastewater treatment. All the above factors are carefully taken into account, sanitary zones are also determined, and the final point of wastewater discharge is agreed upon. The most important thing when agreeing on the water discharge point is to take into account the level of protection of the aquifer for drinking water.