The plumbing in a house or apartment should always be in perfect order, because this is extremely important for the comfortable life of a modern person. If you do not take care of this moment in time, one uncorrected breakdown will lead to another, a third, which will inevitably push the complete replacement of plumbing fixtures from the distant future into the near future. That’s why many home craftsmen, who are used to dealing with minor troubles themselves, are interested in how to remove a toilet lid with a button, with two buttons, and how to properly handle a microlift. This is exactly what we will discuss in our article today.
Toilet cistern and lid: why disassemble them?
If a person is thinking about how to remove the toilet lid from the tank, then there is definitely some kind of breakdown that needs to be fixed. Modern toilet models, unlike even those to which we were accustomed five to ten years ago, are becoming more and more structurally complex. Therefore, often old-school craftsmen simply cannot imagine not only how to remove the lid from a toilet, equipped with various newfangled “bells and whistles,” but also how to disassemble the tank itself. It is precisely to clarify these issues that this article was written.
Important
In addition to newfangled cisterns, toilets may now be equipped with high-tech devices, which may not be easy to understand without experience. They greatly simplify operation and increase comfort, but they are quite difficult to repair. Such devices include a lid with a device called a microlift, which prevents it from falling sharply onto the toilet bowl when closing.
The more complex the system, the more often it can fail if it is not provided with proper care and regular maintenance. Parts of the mechanism can become covered with dust and dirt, which first leads to breakdowns. To inspect and clean them, you will first need to remove the lid of the toilet with a microlift and only then continue with the repair.
Regarding the tank cap of various designs, there may be some nuances that you need to know. If experience and knowledge are not enough, it is better to call a professional technician. He will cope with the task faster and easier, but you will have to pay for his services.
How to open (remove the cover)?
Modifications are currently being made to allow the cover to be removed without any additional operations. The buttons in them are equipped with rods that transmit force to the control elements of the tank fittings.
But most plumbing manufacturers continue to produce models that require certain manipulations to remove the cover.
To remove the cover in single-button modifications, you need to moderately press the ring surrounding the button and turn it in the direction opposite to the clockwise movement.
If this operation does not succeed immediately, you should drop a couple of drops of any liquid oil or use a screwdriver, pressing its tip onto the ring and turning it. Once the ring comes off, it can usually be easily unscrewed by hand.
Next, you should carefully move the cover to a position perpendicular to its normal position, and carefully release the button block from the plastic clothespins. After this, you can remove the lid from the tank and set it aside.
How to disassemble (open) a toilet cistern with a button for subsequent repairs with your own hands - learn from a short video:
To dismantle a cover equipped with a two-button block, it is usually enough to press any button, after which the technological groove on the adjacent button will become accessible . All that remains is to pick out this button and remove it, and then dismantle the second one. Then unscrew the fixing screw and remove the cover.
Innovations in plumbing: we disassemble and repair a microlift
A modern modification of a regular toilet lid, called a microlift, has its own characteristics, which are easy to appreciate as soon as you start using them. The main purpose of such a design is to smoothly raise and lower the lid, completely eliminating the possibility of sharp impacts on the sanitary ware from which the toilet bowl is made. This will prevent its preliminary damage, which can significantly reduce costs from the family budget.
Design Features and Benefits
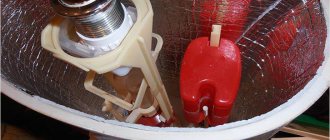
The principle of operation of a toilet with a lid that has a built-in microlift is akin to a conventional door closer, which is already so familiar to most modern people. The microlift is usually already pre-installed in the lid, so it is unlikely to be purchased separately. The microlift is made from durable plastic or its analogue, a material called duroplast. It is entirely a polymer, although in appearance it can be confused with metal or even ceramics, and in properties it is closer to it.
This mechanism implies a rigid fixation to the toilet, but the designers did not forget about air shock absorption. The lid must have compartments with shock-absorbing silicone.
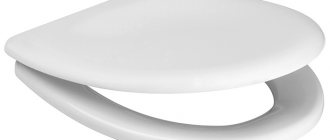
- Polymer toilet seat and lid.
- A special rod that secures the lid to the toilet bowl.
- A metal or duraplast spring that regulates and balances the weight of the entire structure.
- Microlift, that is, a hinge mechanism, which ensures a smooth change of lid positions.
You need to know that in more expensive designs, instead of rods and springs, specially designed pistons and cylinders in which they run can be used. Such models are generally considered non-separable; they operate on the basis of pneumatics or hydraulics, and can only be replaced, not repaired.
Simply remove the lid of a toilet with a microlift
Contrary to expectations, almost all toilet lids are equipped with ordinary, standard fasteners, which makes them easy to remove from their place and replace. The design can be incredibly complex and even equipped with electronics, but the fastening elements remain traditional.
- Lift the toilet lid as if you are going to use it. That is, the lid must be raised, while the toilet seat remains in place.
- On the left and right below the rim of the bowl there are special fasteners, which can be plastic, metal or also duroplate. Unscrew the fastening nuts first from one side and then from the other.
- Gently pull the toilet seat towards you so that the pins come out of the holes and remove the lid.
As you can see, removing a toilet lid with a microlift is not at all difficult, at least no more difficult than a regular one, so even a complete novice in plumbing can handle it. In a similar way, but in reverse order, you can easily install a new toilet lid, both with and without a closer.
Adjusting the shutter button
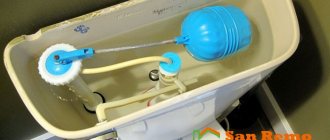
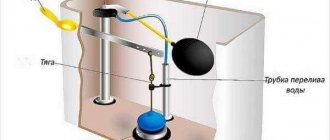
For the shutter button to work, it needs to be calibrated. This can be done by repeatedly selecting the height of the button mechanism, and then tightening it and checking the level to see if the button sits tightly on top and at the same time returns when you press it back to its original “not pressed” position. The height calibration of the button mechanism must be adjusted through the top (usually blue) mount, as shown at the very beginning of the article. When the button is pressed, the lower mount is lowered, which lifts the rubber bolt at the bottom of the tank to allow water to flow into the toilet and returns back when water is drawn back into the tank. It is this that needs to be calibrated so that the tank is tightly closed with the lid on top of the release button.
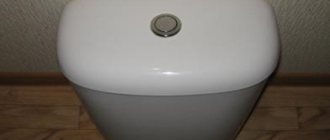
Removing the lid from the toilet cistern: two design options
When you have sorted out the toilet seat, all that remains is to understand how to properly remove the toilet tank lid with a button or two buttons that are located on the tank, reliably hiding its insides from public view, and also from clogging. There are many more reasons to remove this cover than to remove the toilet seat. For example, water may leak from the tank, the liquid may “run away” into the sewer in a continuous stream, not be drawn into the tank or overflow. In all these cases, the structure will have to be disassembled, for which you will first need to remove the cover.
Please note
If you are planning to remove the toilet lid and repair it, do not forget to first completely drain the water from the cistern system, and also turn it off at the underwater pipe. If a special tap valve is not provided there, you can turn off the general water supply taps to the apartment.
It is interesting that earlier, in old, Soviet-style designs, no devices were required at all to remove the lid from the toilet cistern. It was enough to grab it at both ends and carefully lift it, and it would come off the guides on its own, leaving the button with the float free to stand in its place. Now the designs have become more complicated, but not so much that it is impossible to figure it out on your own. For any handy home craftsman, such manipulations will not be difficult.
How to remove a toilet lid with a button
In order to remove the lid from the new design of the tank, you will have to prepare a few but necessary tools. For example, it wouldn’t hurt to take flat pliers, a screwdriver, and a set of keys that may not be useful.
- Inspect the toilet button. Usually it is placed in a ring, which is the upper part of a special sleeve in which the button moves. You need to unscrew this sleeve first.
- There are two options for sleeves, some have a notch for a screwdriver, and others do not. In the first case, you need to unscrew it using this tool, and in the second you simply turn the sleeve, pressing it tightly with your fingers, in a counterclockwise direction. Since this element is most often made of plastic, you need to work with it very carefully.
- When unscrewing the sleeve, count yourself how many turns it took until it comes out freely. This way you can find out how many times you have to turn it when screwing it into place.
- Remove the sleeve and set it aside, grasp the edges of the cover with your hands and gently lift it until the button comes out of the groove.
Once you have opened the button cover, set the part aside and proceed with the repair that was required. After the necessary parts have been corrected or replaced, and all the necessary manipulations have been completed, install the cover in its place and screw the sleeve back into place, holding it by the upper ring.
How to remove a toilet lid with two buttons
Modern designs of toilet tanks may include not only one button, but also two, which provide additional functionality to the device. For example, a double “smart” drain system will save water and, therefore, your money, depending on what kind of human waste needs to be sent to the sewer pipes. Let's figure out what to do if the button on your tank is composite and has two parts.
- Any of the halves of the button (with the water released in advance) must be pushed in all the way, after which a groove for a screwdriver on the second part of the button will become visible on the opposite side.
- Carefully insert the screwdriver and pull the half-button out; it should give in easily, without much effort.
- Looking into the hole, you will immediately see a special slotted screw, which you need to unscrew. Proceed very carefully, since most likely the entire structure is made of polymers that can break, although they are quite strong.
- After the screw is unscrewed, the cover will immediately release and can be removed. Grab the edges of the lid with both hands, pull it towards you, remove it and set it aside, after which you can proceed to repairing the tank.
Practice shows that sanitary ware has a rather fragile structure, so it must be handled with care. It can crack, crumble or simply burst even from a small impact. Therefore, try not to throw the lid or knock anything on its surface.
Some useful tips for novice plumbers
After reading the article, it is expected that it will be much easier for you to figure out how to remove the microlift cover, remove the cover from the tank and do all this thoroughly, easily and quickly. However, professional craftsmen share some tips that it wouldn’t hurt to take into account when starting work in order to avoid annoying troubles and mistakes.
- As soon as you remove the lid to repair the tank, it is best to immediately remove it from the premises. This will allow you not to worry that you will accidentally touch it and ruin it.
- Install the cover and secure it only when you are completely sure that the system is working properly. Otherwise, you will have to do everything again, from beginning to end, or even several times.
- Make sure the float is in the correct position and there is no overflow before screwing the cap into place.
Due to the fact that there is a huge amount of a wide variety of plumbing fixtures on the modern market, there may be some design differences between different designs. The buttons may not be round, but square or even triangular, but still, the essence and operating principle of such a design does not change.
If you have tried everything, trying to remove the lid from the toilet with one or two buttons, as well as with a microlift, but have not achieved anything, then you will have to turn to professionals so as not to completely break the structure, which will subsequently entail its complete replacement, and this can be quite costly.
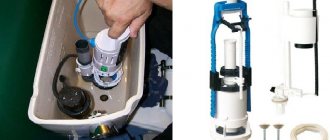
Replacing and adjusting the fill valve
Replacement involves unscrewing the nut securing the old valve and tightening a similar nut on the new valve. Of course, there must be a rubber gasket on the inside of the tank to ensure a tight seal.
This uses a bottom mounted fill valve. Water is supplied through the bottom of the tank.
However, there are a couple of nuances associated with installing the fill valve.
- Bottom fittings are often equipped with a fine plastic filter, which must be placed between the fill valve and the hose. Throw it away immediately: it will constantly become clogged with fine sand, which is safe for the operation of the valve. A coarse filter at the entrance to the apartment is much more effective.
- The flexible hose is connected without tension or bending with a small radius. The load on the fitting will significantly reduce the already short service life of the hose.
Attention: when tightening the union nut, do not use too much force. Not only are they unnecessary for soft padding; Excessive force can also cut off the threads on the valve.
How to adjust the valve actuation level in modern kits?
There are two options.
- The float can move with some effort along a plastic rail with projections . To raise or lower it, just move the rack to the wider part of the hole in the float slot.
The float moves relative to the rack with projections.
- Screw adjustment is no less common . The float is adjusted by turning (using a screwdriver or manually) a long plastic screw.
Exclusive toilet seats
Plumbing fixtures for the toilet, equipped with electronics, have not been surprising for a long time. Recently, toilets have also come close to the electronic fraternity. Regulators for drainage, water intake, disinfection, filtration - these functions become integral parts of bidets and urinals.
Some of these functions are also used on toilet seats. Thus, electronic bidet covers and heated seats are quickly gaining popularity.
The installation of the electric model is basically the same as the standard version. The only addition is cable laying and installation of an electrical outlet.
The toilet is from the group of “exclusive” products. In addition to the usual functions, the device is equipped with an additional feature - a seat heating system. Installation of such plumbing requires an additional supply of electrical communications.
The designs of models with illuminated bowls are not entirely clear - what benefit do they bring to the toilet visitor? However, these solutions remain relevant due to the stability of their demand in the market.
The installation of a backlit seat must include the installation of an electrical network in the toilet area. At the same time, there are models of seat covers, where the backlight lamps are powered by batteries.
The batteries are built directly inside the seat structure. You cannot do without installing electrical communications in the case of using toilets with a motion control function.
Other faults
Mechanism repair is also required if:
- Cracks have formed on the seat or cover;
- The spring is broken;
- There are faults in the rod.
the crack on the seat with dichloroethane or acetone: drop a little liquid on the cracked edges and join them, fixing the lid in a stationary position for several minutes. A badly cracked or broken lid is glued together with liquid nails.
Replacing a broken spring is more difficult to deal with. It is almost impossible to select a similar part in diameter and length. But you won’t be able to find a single element on sale, because the device is considered non-separable.
The same problem arises when it comes to replacing rods. They can only be found in already used, broken similar structures. But this happens extremely rarely. It is much easier and more correct to purchase a new product that has a lift mechanism.
Preventive measures
To prevent malfunctions from occurring, you must follow the rules for using the mechanism. The first thing to remember is that you cannot put additional pressure on the lid or seat. It should work at a slow pace initially.
Every 2-3 months it is necessary to monitor the position of the toilet seat. If deviations occur, adjustments are made. To do this, you need to loosen the supporting fasteners, align them and fix the structure again.
Cleanliness must be maintained. Blockages provoke corrosion of parts, interference with movement, and as a result, failure of individual elements or equipment in general. In addition, pollution becomes a comfortable place for the development of bacteria and the appearance of an unpleasant odor.
Instructions
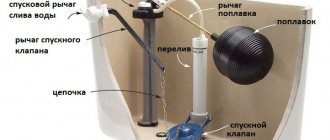
The reason for dismantling the cover is the same in almost all cases - the main mechanism is located in the tank. It is responsible for both collecting water and draining it. The mechanism can break at any moment.
The container is filled to the set level, after which the water supply stops. The liquid is retained thanks to a shut-off valve. The device is activated by pressing the release button. The valve is instantly lifted by a lever and the water drains into the toilet.
Non-specialized information
Troubles with the lid and seat happen quite often, so they are, perhaps, in second place after breakdowns of the drain tank. Until relatively recently, these devices were simply a circle with a lid, much more often made of plastic.
Nowadays, these products can be a fairly complex design, including such functions as:
- Microlift,
- Heating,
- Intestinal gas analyzer,
- Built-in bidet, etc.
Covers can break due to a variety of circumstances:
- From time,
- Due to a manufacturing defect,
- Due to mechanical damage.
The most common types of breakdowns are:
- The appearance of cracks on the surface,
- Broken fasteners.
There is no point in trying to repair the lid yourself. It is much easier and faster to buy a new one.
Content:
- General description.
- Device.
- Possible malfunctions and ways to eliminate them. Identifying the problem
- Trouble-shooting
- Bolts broke
- The support system has weakened
- The spring burst
- The bushing is broken
- The bolts and nuts are rusty
- Piston microlift lubrication
Conclusion
As we found out, anyone can dismantle and install a toilet seat on their own. The only thing is that the procedure should be performed carefully, especially if tools are used for this purpose, so as not to damage the toilet itself. (See also the article Valve for the flush tank: features.)
You can get some additional information on this topic from the video in this article.
Did you like the article? Subscribe to our Yandex.Zen channel
Advantages
Many people who have not yet had time to evaluate a toilet seat with a microlift doubt the advisability of installing this mechanism. Advantages of the device:
- simple and quick installation;
- possibility of functioning in automatic mode;
- quiet operation, which is especially important at night;
- long service life;
- The microlift ensures neat and smooth lowering of the lid, so there are no scratches left on the surface of the toilet.
Useful tips
After removing the cover, it should be immediately placed away from the work site. It is made of fragile material (porcelain), so it can crack.
- the upper part of the tank is installed back only after a complete check of the system’s functionality - water should be well collected and flushed;
- Having repaired the main mechanism, it is worth checking the float;
- at the end, the reliability of the valve is tested, which should tightly shut off the liquid supply;
- The button should be pressed with optimal force.
Important! All components must be handled with care. If disassembling the cover does not help fix the problem, it is better to contact a professional plumber.
Is it worth buying a toilet seat with a microlift?
Strengths of a microlift for plumbing:
- silent lowering/raising;
- absence of scratches, chips, cracks on the installed structure, thanks to the smooth,
- neat operation of the mechanism;
- long service life with proper use;
- simplicity and speed of installation;
- Some models have a presence sensor.
However, along with the advantages, the microlift mechanism for the toilet lid also has weaknesses:
- easy to break due to physical impact;
- cannot close quickly if necessary, since only one mode works - smooth;
- difficult to repair and restore, and some elements cannot be replaced or repaired at all;
- During disassembly, damage to internal parts and connections may occur.
Only after assessing the positive and negative qualities of a microlift can you make a choice for or against the purchase.