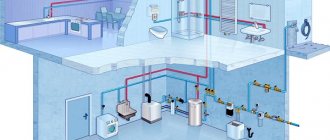
For many owners of suburban real estate, the problem of removing excess moisture from areas is pressing, to solve which specialized systems are used. The combination of deep drainage and storm sewer allows you to protect buildings from the negative effects of water and prevent waterlogging of the soil. With the help of Uponor specialists, we will look at how to implement similar systems on your site.
This article is part of the FORUMHOUSE Academy course.
- What functions do drainage systems perform?
- Features of drainage systems
- Features of storm drainage
- Nuances of installing drainage systems
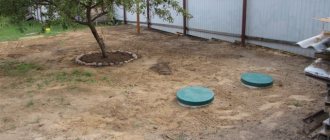
What are drainage wells for and what are they?
A private house or cottage is often located in an area prone to waterlogging; its foundations can gradually collapse under the influence of groundwater. Also, owners are often faced with the fact that there is no sewerage system, which means there is nowhere to put the water from the septic tank.
There is a possible threat of flooding of residential and non-residential buildings, especially such as a cellar, garage, bathhouse, garden and vegetable garden. In these cases, a drainage well, and possibly an entire drainage system, is needed.
Collecting excess water in an underground container, by gravity or pumping, with constant or periodic removal - this is the meaning of a drainage well. The system is installed once and will work for the entire period of operation of the house.
But during use, the drain well requires periodic cleaning. To do this, silt deposits are lifted from the bottom of a clogged well with a stream of water, followed by pumping or draining them.
The drainage well device can be of three types:
- Viewing (inspection) and drainage wells for sewerage, located at the places where drainage pipes turn and intersect or every 40-50 meters of drains, periodically clean them, and if there is no drainage, pump them out. To construct such wells, it is often enough to use a pipe with a diameter of 34 cm or more.
- Collectors (water intakes) are the final points for draining water, most often only surface water (storm water, melting water, stream water), with its pumping into a sewer system, reservoir, or use for household needs. They are characterized by a rather large volume, often an impenetrable bottom, and a built-in staircase is common for them. The placement of the pump and maintenance procedures impose restrictions on their diameter - at least 70 - 100 cm.
- Cementing (absorption, filtration), they are located in places where they want to get rid of puddles, for example after washing cars. Around them it is planned to pour a large mass of rock, crushed stone, and screenings, both for supplying water to the well and for draining it through its bottom into deep water horizons. In particular, the bottom of the grouting well is covered with a layer of crushed stone 30 cm thick. In this device, partial bacterial and mechanical treatment of wastewater occurs, with periodic washing or mechanical extraction of silt and sand.
In cases of mixed type wells, their functions overlap, and the design of the drainage well changes. Thus, a water intake well can discharge water into a grouting well.
In this case, it does not require a sealed bottom and can do without a pump, but it still needs periodic inspection and cleaning, like an inspection well.
Types of drainage elements
Based on the material of manufacture, the drainage pipeline can be:
- ceramic;
- reinforced concrete;
- asbestos-cement;
- polymer.
Pipes made from the first three materials are now rarely used, as they have many disadvantages:
- They weigh a lot. Therefore, their transportation and installation are quite expensive. The system must be installed using special equipment.
- Installation of ceramic, concrete and asbestos-cement pipelines is just as difficult. It is produced only by specialists.
- Such network products have low performance characteristics. Its elements in most cases are not equipped with holes. The pipes have to be perforated manually. As a result, they become clogged faster and need to be cleaned regularly.
Manufacturing materials
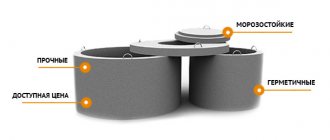
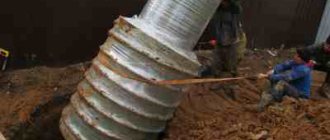
The traditional material for the walls of drainage wells is reinforced concrete rings. Reinforced concrete is also used as a bottom material (a reinforced concrete disc is placed at the bottom of the hole, at the base of the future drainage well) and a cover (with a hole for a hatch). Reinforced concrete is quite cheap, strong, and durable.
However, the installation of ready-made reinforced concrete requires the use of lifting equipment or large labor costs; the joints formed during installation can be difficult to seal.
These structures are usually installed by first digging a large pit. And after installing the first ring and installing asbestos, ceramic, cast iron or other heavy and fragile pipes, it is gradually covered with soil using bulldozers and excavators.
This is a rather expensive technology that disturbs the top layer of soil. Recently, wells made of plastic and composite materials are increasingly being used.
Source: https://m-strana.ru/articles/drenazhnyy-kolodets/
Dosing chamber
The dosing chamber will ensure the gradual removal of liquid into the drainage field Source nk.pl
The dosing chamber is a container that has a capacity of up to 1 cubic meter. For construction, a ready-made plastic container corresponding to the required volume can be used.
The bottom of the excavation is leveled, where the container is then loaded. Uninterrupted operation of the system at the outlet of the tank is achieved by installing a siphon, which has a diameter of 100 millimeters and an elbow height of 200 millimeters. As the siphon fills, it will self-charge, then self-empty. Thanks to this, the purified liquid is supplied to the pipelines for distribution.
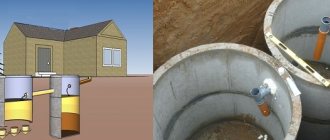
DIY installation guide for a drainage well for a septic tank
Regardless of the characteristics of the material used in manufacturing, the volume and other characteristics of the drainage well for the septic tank.
Independent construction of a structure for drainage requires mandatory compliance with all location rules and is carried out in accordance with pre-prepared design documentation.
For installation, a space on the site is cleared, markings are made, a special pit is dug, which will allow the drainage structure to be installed to be deepened below the level of winter freezing of the soil.
To create a bottom filter, a meter-long backfill is used. A backfill of gravel, crushed stone or expanded clay slag can be used as drainage. Such material will not only last a long time, but will also ensure unhindered drainage of liquid into the ground.
Particular attention is paid to organizing the correct connection of the constructed structure for drainage with the serviced septic tank using a sewer pipe. The insertion area must be reliable and airtight.
Where can and cannot be located?
The location of the drainage well on the site must comply with all building codes in force in our country and is carried out in accordance with the requirements of regulatory documents:
- the distance from the foundation of the home is at least 5 meters, which will prevent flooding of the basement and destruction of the foundation;
- the minimum distance to bodies of water with standing water is 30 meters;
- the minimum distance to bodies of water with running water is at least 10 meters;
- distance from trees - 3 meters;
- distance from bushes - 1-2 meters;
- distance from the edge of the road and fence - 5 meters;
- the distance from the underground gas pipeline is 5 meters.
It is prohibited to install drainage wells and filter structures in areas with a high level of groundwater, if there are waterproof soils and steep slopes on the territory.
Drainage structures of this type cannot be erected in close proximity to water protection facilities.
Design and dimensions
During the design process, not only the optimal dimensions of the drainage system are taken into account, but also the main parameters are calculated, including the volume of wastewater discharged and the area of the absorbent surface.
Also, when drawing up the project, the location for installation is determined and the expected load on the area and height of the bottom filter, and the area of the wall perforation of the well are calculated.
To correctly calculate the filter surface, several parameters are taken into account, including the bottom and walls of the lower ring with perforated holes.
The load on each square meter of such a surface in sandy loam and sandy soils is 40 and 80 l/day, and for medium- and coarse-grained soils the load increases accordingly by 10-20%.
Excavation and installation
According to the reference diagram, all typical elements of a drainage well are represented by a standard sewer hatch, which provides free access to all communications underground, a neck (in some designs there is no such element) and a shaft part.
And also a filtration layer at the bottom, which is responsible for the flow of purified water into the ground.
A brick drainage well is built from baked bricks, which can be replaced with rubble stone if necessary. The design can be round or square, but the first option is preferable in many cases.
The filtration structure is standardly deepened to 2.5 meters. The pit is dug with the calculation of backfilling with a layer of crushed stone, broken brick or gravel (40 x 100 cm). A meter of drainage is also poured into the bottom of the structure. A ventilation pipe with a cross-section of 10 cm should rise 50-70 cm above ground level.
A plastic drainage well can be prefabricated or monolithic. Any type of structure is mounted on a low sand bed, which helps level the walls of the polymer material.
A twenty-centimeter layer of fine crushed stone is poured into the bottom of the shaft, on top of which it is advisable to lay a small amount of broken brick or slag. The space between the walls of the pit and the installed treatment well must also be filled with drainage material.
A pit is dug under a concrete drainage well, the width of which should be slightly larger than the size of the well.
A half-meter crushed stone cushion is placed at the bottom of the pit, after which the first concrete ring is installed on the concrete screed, the upper part of which is coated with liquid glass.
The remaining rings are lowered in a similar way, and a hole is made to connect the sewer pipe. A hatch for inspection and maintenance is mounted on top, and the space between the walls of the pit and the drainage well is filled and compacted.
A drainage well made of plastic barrels is small in size and has low productivity. Two or three barrels are connected to each other in series, and the joints are sealed with standard silicone sealant.
In this case, the last barrel can be installed upside down. An external sewer pipe is used to connect the drainage well to the septic tank.
The barrel is backfilled with crushed stone. Similar bulk material ensures effective drainage inside the structure.
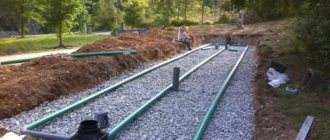
Types of storm sewer system
Storm sewerage, as mentioned above, performs the function of collecting melt and rainwater, as well as draining it outside a specific territory. There are several types of storm sewer systems that you need to pay attention to:
- Spot. This system performs the function of collecting water on the roof and is a structure of rain inlets that are installed under each roof drain. In addition, this system includes pipes that are laid in the soil at a certain slope to effectively drain wastewater. Such pipes are connected to the main collector (a well that drains water outside the site).
- Linear. A structure that collects moisture from roads, as well as concrete and other paths. It is carried out in the form of special channels at a certain slope. Such a system, like a point system, transports water to the main collector.
- Combined. Such a system includes both point and linear storm drainage. The combined system also includes various auxiliary elements (for example, pallets).
Installing any of the above systems is a rather complex process that is best left to specialists with experience in this field. The preliminary design should take into account such items as: site features (topography), the volume of collected water, as well as the place where this water will be discharged.
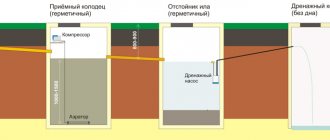
Drainage field, tunnel: when needed and how to do it
Standard drainage tunnels and fields are designed for the collection and subsequent disposal of storm water, as well as pre-treated sewage water. Such structures are best installed when large volumes of wastewater are processed.
When choosing a design, it should be remembered that all drainage tunnels are a special type of filtration or aeration fields for discharged wastewater.
The drainage depth of the treatment plant in the form of an aeration field is approximately 50 cm, and the level of inclination of the pipeline system should have an angle of 1.5°.
The drainage is located with a minimum distance of at least 30 m from water intake structures, which will eliminate the risk of contamination of drinking water. At the first stage of installation, the area for laying perforated pipes is prepared.
The lower part of the trench is filled with coarse sand, and then with crushed stone or pebbles. The drainage structure is represented by two or three or more branches, and ventilation provides air flow into the system. After laying the perforated pipes, backfilling is performed.
To remove treated wastewater, the installed tunnel is deepened by approximately 160-180 cm. Pipes are installed from the end of the tunnel. For this purpose, a 120 mm hole is first drilled using a crown, after which a transition collar with a diameter of 110 mm is mounted.
The supply pipeline must be buried 20 cm into the drainage tunnel. At the top of the tunnel, using a special cuff, a pipe is installed for air release and system inspection activities.
Under the drainage tunnel, a pit should be dug, the dimensions of which exceed the dimensions of the tunnel by about 5-10 cm.
The bottom and walls of the trench are covered with geotextile and filled with a layer of crushed stone, after which the drainage system itself is installed and the structure is backfilled.
Source: https://septikexpert.com/ochistnye-sooruzheniya/septiki/drenazhnij-kolodec/
Video description
How to choose pipes for a drainage septic tank:
All drainage pipes for the drainage field of a septic tank must have an equal laying slope - the slope of a drainage pipe per 1 meter, the slope is 1.5 centimeters. Every 6 meters, a riser is installed for ventilation.
Sand, with a fraction of up to 10 millimeters, as well as crushed stone with a fraction of 30 millimeters, is used for laying pipelines. In addition, geosynthetics are used, namely geotextiles, which are intended for thermal insulation of pipelines. The material provides additional purification of water waste.
The pipes are “wrapped” in geotextile, sand and crushed stone - these materials trap all large inclusions and additionally protect the pipes from freezing Source infourok.ru
What else do you need to know about making drainage?
When making drainage, there are no financial costs for waterproofing materials, and the structure itself should be installed in areas that do not have problems with the presence of high levels of ground aquifers.
When installing, it is recommended to deepen the system below the clay layer, which will ensure more thorough drainage and filtration of wastewater.
To avoid soil heaving, obtain maximum wastewater treatment and achieve the best absorption effect.
It is advisable to use a 20-centimeter layer of backfill based on coarse sand or fine sand-gravel mixture at the bottom of the well being installed.
The level of absorption is influenced by the type of soil: sands absorb about 90 l/day, sandy loam soils - 50 l, and loams - no more than 25 liters.
Particular attention is paid to the perforation of well walls. The holes are made no lower than 50-80 cm from the level of the bottom, which ensures uniform and unhindered release of water.
To avoid silting of the perforation, the circumference of the well is covered with expanded clay or medium-fraction gravel. Trouble-free operation of the system will be ensured by high-quality ventilation and mandatory waterproofing in the upper part of the well, as well as insulation of the top.
What to do when a drainage well becomes silted
Filling the reservoir of a drainage well with debris or sand prevents the outflow of water and indicates siltation of the well. There are several reasons for this phenomenon, but in any case, urgent measures will need to be taken:
- maximum reduction in water volume by pumping out liquid with a fecal drainage pump;
- thorough but careful removal of all contaminants from the walls and bottom of the well using a scraper;
- washing the container and perforated holes from silt deposits using a special apparatus.
In some of the most difficult cases of siltation, it is necessary not only to pump out the water and clean the inside of the well, but also to partially or completely replace the drainage layer at the bottom.
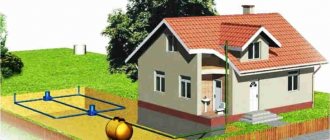
The organization of wastewater disposal and disposal of processed wastewater from treatment facilities of various types is today one of the priorities when arranging local sewage systems in suburban households.
Not a single type of treatment plant, be it a simple septic tank or an expensive biological treatment station, is capable of functioning normally in the absence of a drainage system.
Therefore, the normal operation of treatment facilities requires the presence of a drainage system that receives and transfers processed wastewater into the ground.
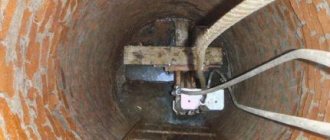
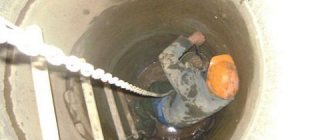
Well cleaning
Timely maintenance of the entire drainage system, including pipes and wells, is an important task that extends the life of the entire structure, as well as the buildings located on the territory. For such work, it may be necessary to pump out accumulated water from wells.
How can you pump out water?
To pump water out of drainage wells as quickly as possible, you should use a pump. Typically, a submersible electrical device is used for such work. The device has a reasonable price, so it is available for purchase.
If you plan to use the device only for work with the drainage system, there is no need to purchase a particularly powerful pump.
The optimal power indicator will be 100-200 liters per minute. Submersible pumps with higher power are needed for industrial use only.
There are times when there is no need to use a pump to pump out water. This option is possible if the flow has a gradient slope directed into a body of water.
Sequence of work
The specific design of the drainage system requires a special approach to its maintenance. To clean any drainage well yourself, you should carry out a set of sequential measures.
The method consists of gradually pumping out water by about 50 centimeters, accompanied by pumping by washing and cleaning the walls of the tank.
- To clean the bases, it is best to use a large sponge or a soft brush designed for processing metal products. You should act carefully so as not to deform the surface and structure of the well.
- During the cleaning process, contaminants from the walls may enter the water. There is no need to be afraid of this, since the existing liquid will be completely pumped out later.
- The use of any chemical detergents or cleaning products is strictly prohibited as they can be harmful to humans.
- Having reached the bottom of the well, you should completely pump out the remaining water and begin work on thoroughly cleaning the bottom of the container.
- The only disinfectant that can be safely used for washing is a 10% bleach solution. You need to treat the base of the well with this composition, and also pour a small amount of the substance onto the bottom if there is water. Then close the lid tightly, additionally wrapping it with a tarpaulin to prevent the chlorine from evaporating.
- The container must be left in this state for at least two days. After time has passed, the lid and material can be removed and the well can be completely filled and drained twice to flush out any remaining chlorine and protect against possible contact with a hazardous substance.
Source: https://stroy-podskazka.ru/vodostochnaya-sistema/drenazhnyj-kolodec/
Some tips
- There is no need to spend money on waterproofing materials; they are not needed here. On the contrary, the better and more evenly the water flows out, the easier it is to use the system and clean it.
- The well cannot be installed in an area where there are problems with a high level of the ground aquifer. It is best to go even below the clay layers so that the effluent undergoes as thorough filtration as possible;
- A thin (200 mm) layer of coarse sand or sand-gravel mixture (small fraction) placed on the bottom of the well will help to avoid soil heaving, clean the wastewater as much as possible and achieve better absorption;
- Perforation of the walls must be done correctly: not lower than 500-800 mm from the bottom level, so that the water comes out evenly;
- To avoid silting of the perforation, it is necessary to cover the circumference of the barrel or ring with expanded clay and medium-fraction gravel;
- High-quality ventilation, waterproofing of the upper part of the drainage well, insulation of the top - all these requirements are mandatory for the uninterrupted functionality of the system. It would be correct to install a removable type cover on the structure in order to have access to the inside;
- Calculation of parameters, corresponding volumes of water discharge, determination of a location for a drainage well are the primary tasks that need to be resolved before the start of construction.
The consumable part of the structure is large, however, following the tips you can slightly reduce costs:
- The depth of the trench is equal to the modular size plus half a meter, the total depth of the pit is 2 meters. The bottom is lined with 500 mm of sand, then 300 mm of crushed stone, the cushion is compacted and only then the module is installed. The method will help to avoid the cost of geotextiles or other expensive filter materials;
- For non-silting of modules, you can use geotextiles (cover), or you can also use fine-grained expanded clay;
- After all, the system is covered with medium-fraction crushed stone, without sealing the holes for the ventilation pipes;
- All that remains is to add the layer to the soil level. You don’t need to take expensive compounds; just make a mixture of soil and sand. In some cases, a geogrid will be required.
PVC
PVC pipes have been used for the construction of storm drains for quite a long time. These rigid single-layer structures have good performance characteristics and are inexpensive. However, you should be careful when choosing PVC pipes. They are different for interior and exterior work:
- the pipe for laying in the ground is orange in color and has a diameter of 110 or 160 mm;
- PVC pipes for storm drainage are very durable. They can be placed in the ground at a depth of 4-10 meters. To make high-quality connections, the products are equipped with special rubber seals;
- the smooth inner surface of the pipes facilitates the free passage of liquid by gravity;
- It is easy to select connecting fittings and fittings for a PVC pipe.
There are also disadvantages to pipes made of polyvinyl chloride. Firstly, they are made only up to 3 meters long. Secondly, the rigid structure is inconvenient on curved sections of the route. Therefore, if there is a need to manufacture a curved pipeline or assemble a complex drainage structure, you will have to use various shaped products when installing PVC pipes. This makes sewer more expensive compared to flexible pipelines.