Current requirements for laying external pipelines
Scheme of external sewerage in a private house
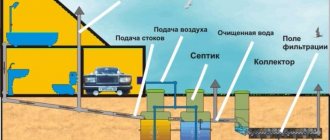
The entire sewerage system of a private house is divided into internal and external. Pipes laid in the building collect wastewater from household appliances, sinks, toilets and bathtubs, feeding them into a common riser. A single pipe leads to the street, where the outer part of the sewer begins. It includes a pipeline through which liquid waste is sent to treatment facilities.
You can get rid of impurities in the following ways:
- Connecting external sewerage to a centralized system. It is enough to lay a pipeline and equip a well.
- Arrangement of an individual cesspool or septic tank (the most important structural element). In this case, you will need to install a local cleaning system.
According to the requirements of sanitary standards, wastewater must be disposed of in such a way as not to pollute the aquifers of the adjacent territory.
Individual methods of cleansing sewage:
- Cesspool. The inconvenience of the solution is compensated by its low cost.
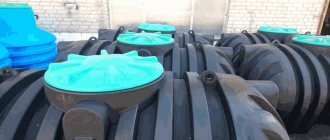
- Septic tank - to clean it, you will need to regularly call the vacuum cleaners.
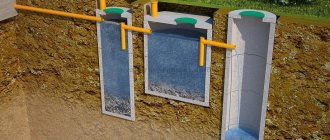
- Double chamber tank with double cleaning. Heavy fractions settle in the first tank, additional filtration is carried out in the second, after which the water is discharged into the ground.
- Biological treatment station. Sewage decomposes under the influence of certain microorganisms.
If funds are limited, you should choose a cesspool. With a sufficient budget, you can install a biological treatment station.
Before laying an external sewer system, a project is prepared that meets the requirements of the codes of practice “Sewerage. External networks..." (SP 32.13330.2012) and "Single-apartment residential houses..." (SP 55.13330.2011). These documents replaced the SNiPs of the same name.
When developing a sewer system, the following factors are taken into account:
- relief of the local area;
- soil characteristics;
- number of people living in the cottage;
- general climatic conditions;
- distance to sources of clean water;
- Possibility of connecting to the central sewerage system or calling sewer trucks.
The sewage system of a private house operates on the principle of gravity flow. Installation of horizontal sections of the pipeline outside the cottage must be done with a slope towards the cleaning system. The slope should not be too large, as blockages of solids may form at the entrance to the sump. The optimal angle is selected based on the diameter of the pipes:
- D500 mm – the slope should be 30 mm/linear meter.
- D1000-1100 mm – 20 mm/m.
- D1600 mm – 8 mm/m.
Errors when creating an external sewerage project increase the risk of regular blockages and poisoning of drinking water sources.
Internal wiring
The indoor sewage system is assembled in such a way that its lowest point is where the pipeline exits to the outside. In order not to make a mistake with the angle of inclination, you can start assembly from this point.
If you have a project, the connection order is not important, but you must strictly follow the rules for performing internal wiring:
- Each device and functional section of the pipeline requires a pipe of the appropriate diameter: for the riser and toilet - 11 cm, for showers, bathtubs, kitchen sink - 5 cm, for everything else 3.2 cm is enough, but if several devices are connected to one pipe at the same time , its diameter must be at least 7.5 cm.
- Since wastewater moves through the pipes by gravity, a pipeline slope of 2-3 cm per linear meter is required.
- The connection of the pipes must be sealed and not impede the free flow of liquid: the pipes are connected along the flow, and there should be no roughness or burrs at the junction.
- Right angles should be avoided, as this is where blockages most often form. To perform a turn, it is better to use several elbows with smaller angles.
- It is necessary to prevent backflow from the sewer and the penetration of unpleasant odors into the house. To do this, a siphon or an S-shaped bent pipe is installed on the pipe of each plumbing fixture, which acts as a water seal.
- If the house has several floors and each of them has plumbing, a common riser should be installed.
- Toilets are installed closer to other household and plumbing fixtures to the riser.
- Pipeline units cannot be installed in areas where walls or ceilings pass through.
- Holes for passing pipes through walls and ceilings are cut with a margin; it is advisable to insert special sleeves or sections of wider pipes into them.
- The connection points to the riser and pipeline turns are equipped with a tee with an inspection window closed with a plug. Through these windows, pipes will be cleaned in the future if they become clogged.
- The riser is located as close as possible to the place where the sewage system is discharged to the outside.
We recommend that you read: How to properly fasten and fix polypropylene pipes to the wall
The pipe is removed from the house as follows:
- Firstly, a hole with a diameter of 13-16 cm is made or left during construction in the foundation or basement of the house.
- Secondly, a sleeve is inserted into this hole, along the walls of which insulation is laid.
- Thirdly, a pipe is pulled through the insulated sleeve, which is connected inside the house to the rest of the internal sewerage system.
Fan pipe
In a house with several bathrooms or a swimming pool, the volume of wastewater entering the sewer at the same time can be so large that a vacuum occurs in the pipeline - a decrease in pressure. As a result, the water plug located in the siphons will go into the pipeline. Accordingly, the water seal in the toilet, bathtub, sink and other plumbing will disappear and sewer odors will enter the house.
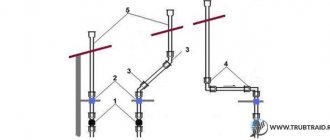
To avoid such unpleasant incidents, the sewerage system is equipped with a drain pipe - a special sewer ventilation system. It ensures the removal of gases from the pipeline and air intake in case of vacuum formation in the pipes.
If the house is equipped with a riser, it is enough to extend it upward and extend it 30 cm above the roof. The fan pipe can also be routed through the wall by making a branch from the riser or the bottom of the pipeline upward and then towards the wall using two 135-degree elbows or a corrugated pipe. In this case, the street part of the sewer pipe is mounted vertically upward as high as possible so that gases from the sewer network escape into the atmosphere. The top of the fan pipe is partially covered with an umbrella nozzle.
Note! The sewer pipe must not be routed into the ventilation system, as in this case sewer odors will enter the house through the ventilation.
Pipe selection
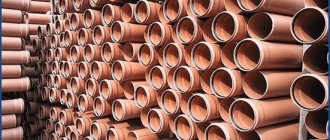
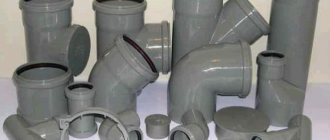
Red-colored polymer pipes are produced for external sewerage.
Cast iron and asbestos cement are heavy, so it is difficult to lay sewerage from such pipes yourself. Polyvinyl chloride is very popular when constructing an internal drainage system - it is a lightweight, convenient and non-toxic material. However, it is not suitable for the outside - during severe frosts the risk of cracking the walls increases.
Polypropylene has the following advantages:
- high resistance to low temperatures;
- chemical inertness;
- low weight of products;
- high mechanical strength;
- no corrosion;
- long service life;
- low roughness coefficient.
Polyethylene pipes have a significant advantage - they do not burst even when completely frozen. In addition, these products can withstand wastewater temperatures up to 95 degrees and are resistant to aggressive chemicals. The service life of polyethylene products is 40 years or more.
Features of pipe selection:
- Polypropylene products must be smooth.
- When choosing polyethylene, it is better to purchase corrugated elements. They are better suited for constructing an underground highway because they cope well with high mechanical pressure (for example, if they are laid under an asphalt path).
Plastic products are easier to install, but when choosing them, you need to take into account the operating conditions: depth of location, presence of a passage area above the pipes.
Helpful operating tips
In order for the autonomous drainage and water purification system to become clogged as little as possible and to function for a long time and efficiently, it is enough to adhere to a few simple operating rules:
- Periodically, it is recommended to carry out preventive flushing of all systems with large volumes of hot water,
- If possible, avoid washing fats of animal origin into the sewer - they harden when cooled and accumulate on the walls of pipes,
- Clean the septic tank in a timely manner - for a MAPLE septic tank, cleaning should be done at least once every 2 years,
- Be sure to use protective debris catchers in bathtubs and sinks to prevent hair, dirt and other waste from ending up in the drain.
Now you know everything and even more about DIY sewer installation. Good luck!
Design and preparatory work
The project is a mandatory document required when installing a sewer system. It should be included in the plan of the house as a whole. If you have a ready-made option, adapted to a certain climatic zone, you can prepare tools, look for materials and get to work. If the project is created independently, it is better to show the planning result to a specialist.
The installation of external sewerage networks is carried out in accordance with documentation that takes into account:
- soil freezing level;
- depth of groundwater - the installation location is chosen so that wastewater cannot enter aquifers and flood the foundation or basement of the house;
- possibility of access to a sewage treatment plant;
- the volume of the septic tank must correspond to the number of permanent residents; for 3 people, a 4 m3 tank is enough;
- location of inspection wells.
When creating an external drainage network, it is important to consider the location of the storm drainage system.
How to test your sewer
Upon completion of work, conduct leak tests of the sewer system.
Verification options:
- turn on all existing plumbing fixtures at the same time;
- Fill a bucket of water, pour it in one gulp into the sink, then into the bathtub.
During the inspection, examine all joints and connections. If no problems are found, the test is successful. If there are leaks, seal and re-treat the problem areas with sealants or construction adhesive. After the insulating substances have dried, perform the tests again.
During tests, pay attention to joints and fastenings to fittings
By following our recommendations, you will be able to install high-quality sewer lines in your house or apartment yourself.
Installation features
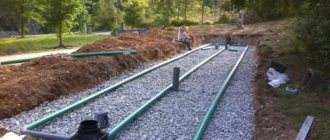
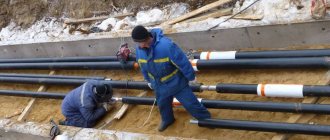
The pipes are laid below the freezing level of the soil with a slope towards the septic tank.
Technology for laying an external sewer network:
- Preparing the pit. The trench is dug with the calculation of such a position of the pipes that they would be 50 cm below the soil freezing level (for the southern regions - 1.5-2 m, for the northern 3-3.5 m). For pipes with a diameter of 110 mm, dig a trench 60 cm wide. The bottom of the ditch must be leveled and compacted. A layer of sand 10 cm high is formed on top. At the point where the pipe enters the septic tank or collector, a platform 2 m wide and 1 m long is created.
- Pipe laying. Having completed digging the pit, pipes are laid out along its length without trimming. Tees, crosses, and revisions are placed at the required points. Assembly begins from the local septic tank. Before connecting sections of pipe ends, they must be lubricated with silicone sealant. If you need to create turns, it is better to use 45 degree corners. In these places it is worth installing a well with an inspection.
- Insulation. When installing external sewerage, sometimes it is necessary to additionally protect the pipes from frost. If the trench is dug of sufficient depth, this is not necessary, but in regions with cold winters it is worth playing it safe. Polystyrene, polyurethane foam, heat-insulating paint, basalt fiber or glass wool are used as insulation materials.
- Backfilling. At this stage, be sure to use the soil that was selected from the trench. To prevent damage to the pipe, it is necessary to remove stones, hard clods and debris from the ground. It is better to use sand, at least up to the level of the top edge of the product. To compensate for the shrinkage of the earth above the trench, you need to make a small mound. If electrical equipment will be installed in the treatment plant, a shielded cable must be laid in the ditch before backfilling.
You can complete each of these steps yourself. Before work, it is better to consult a specialist.
Professional secrets
Assembling a sewer system is not a difficult task, however, there are some nuances here:
- installation is carried out from the riser in the direction of plumbing fixtures;
- the pipe sockets should be directed from the riser to the plumbing fixtures - in this case, the likelihood of leakage will be minimal;
- turning the line 90 degrees is carried out using two 45-degree bends - this will reduce the risk of blockages;
- for each of the plumbing fixtures it is advisable to use a siphon with a water seal;
- connection to the pipeline of drain hoses and sections with a smaller diameter of pipes is made through rubber cuffs that ensure the tightness of the connection;
- when assembling a pipeline from several materials:
- When connecting a plastic line to a cast iron riser, it is necessary to use transition elements specially designed for this purpose.
It is necessary to provide revisions in the system to service problem areas of highways.
The dimensions of plumbing hatches for hidden installation must provide access to all connections of the system.
How to properly install sewer pipes with your own hands, watch in the video filmed while the plumbers were working.
Common Mistakes
It is possible to install an external sewage system efficiently and in a short time by avoiding the following mistakes:
- Saving on materials. The difference in cost with cheap analogues may be less than repairing the system.
- Installation of external sewerage pipes in a short time. Pipeline sections must be carefully measured and carefully cut. Angles of inclination must be created in exact accordance with the project.
- Insufficient amount of drainage pipes are laid. If they become clogged or have low throughput, fluid stagnation will occur.
Prices per meter of work on laying external sewerage start from 270 rubles (when installing non-pressure PVC systems with a diameter of 110 mm). For pipe sizes of 500 mm, prices increase to 800 rubles.
