Autonomous sewer systems or local treatment facilities, the same VOCs and septic tanks from many manufacturers are an excellent alternative for a summer cottage. They can be installed for various reasons: remoteness of the site from utilities, impossibility of connection, certain benefits for the summer resident when using an autonomous system, and others. In the case of purchasing and installing a septic tank in a country house, a number of questions arise that we have already dealt with earlier. But the most important thing is not only the choice of VOC, but also its correct installation on the site and the removal of purified water. If you neglect the recommendations and requirements, the meaning of wastewater treatment in some cases is completely lost. Therefore, in addition to choosing the right septic tank, you need to think about how to make the right drainage well or aeration fields for the septic tank.
At the moment, some articles on the site have been written on the topic we need, but today we will try to expand the knowledge of summer residents and tell you how to make drainage for a septic tank with your own hands.
Why is drainage needed for a septic tank?
Most septic tanks operate according to a fairly simple scheme, but it is optimal and effective only if all internal units and system elements are correctly installed and connected. During wastewater processing, a certain amount accumulates in septic tanks, which settles to the bottom in the form of solid particles and is converted into sludge. This may be due to the factors we described in previous articles where we talked about the operation of septic tanks.
The settled part remains in the tank, and the purified water is discharged into the ground through the drainage system. It is worth noting that with high-quality water purification, it can reach a very high degree of purity, but a certain part of the contaminants still remains in it. If the water is not purified, it will go into the ground in a rather undesirable form, as a result of which not only unpleasant odors will develop in the vicinity of VOCs, but also the risk of disease through various infections will increase.
There are also risks if such water is not discharged correctly and is not absorbed into the ground at a certain depth. Of course, one can object to this, because there are many cases where water is diverted into ditches and rivers. But this is only until summer residents pay huge fines for environmental pollution. Otherwise, this fact must be recorded and resolved, and the water from the septic tank must be purified as much as possible.
Next, DachaDecor.ru suggests considering the highest quality and most popular systems for removing purified water from a septic tank - drainage wells, aeration fields and drainage tunnels.
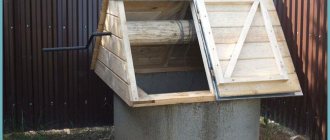
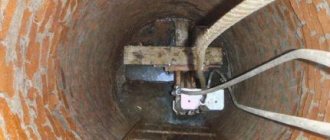
Installation of a well made of reinforced concrete rings
Before installing the rings, a drainage layer of broken brick, sintered slag, gravel, expanded clay or crushed stone is laid on the bottom; the height of the layer should reach 20-30 centimeters. The next ring is placed on ordinary concrete mortar and does not need waterproofing, since water will flow out of the drainage well along the entire perimeter.
If ground movements occur in this area, it is better to secure the rings together with metal brackets.
It is necessary to make additional holes in the first and second concrete rings for the entire height of the filter to increase the absorbing area. The holes should be 4-6 centimeters in diameter, staggered and occupy a total area of 10% of the total area of the septic tank.
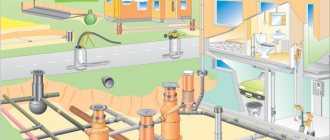
1 — water barrier; 2 — neck rings; 3 — hatch cover; 4 — insulating cover; 5 — hatch body; 6 - floor slab; 7 - ventilation riser; 8 — blind rings; 9 — perforated rings; 10 - filter media; 11 — holes in the rings; 12 — concrete base; 13 - supply pipeline
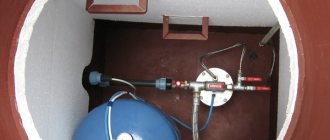
The next step is to install a supply pipe, the diameter of which should be 10 centimeters and it should be installed 5 centimeters above the outlet pipe.
Please note that if you are making an overhead line, you should not use plastic pipes; they quickly fail due to temperature changes.
Internal overflow pipes are laid with a slope of 2 centimeters per linear meter; if this slope is increased, then the likelihood of blockages is high.
Next, tees are installed to direct the flow of water downwards, the upper hole of which serves to clean the pipe; this design will protect the outlet pipe from the ingress of suspension and other particles into it.
The necessary ventilation is installed in each chamber of the septic tank, an outlet riser, which must have a diameter of at least 10 cm and extend 70 cm above the ground surface, but, of course, no one installs 70 centimeters so that odors from the sewer do not spread throughout the area, so the pipe is taken to roofing Just pay attention that in order to avoid frostbite in the pipe during the winter months, it should not be higher than 15-30 centimeters above the roof of the house.
Drainage systems for septic tanks
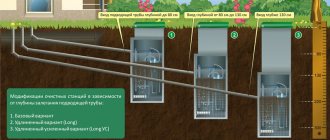
Drainage systems differ mainly in their ability to drain a certain volume of treated wastewater. Naturally, there could have been only one system, but creating several gave us the necessary choice. Therefore, we are confident that in the near future several more innovative methods of water drainage are expected, which will be harshly criticized, as well as studied and tried by summer residents and craftsmen.
In fact, this is an alternative for each of us also in terms of finances. For example, if a drainage well can be made independently and from scrap materials, then for drainage tunnels it will be necessary to seriously invest in special materials for assembling this system. Naturally, all investments will bring a certain result, but summer residents who visit the site only a couple of times a week obviously do not need this. So, let's look at all the drainage systems we have indicated for a septic tank in more detail, and also focus on the features of the systems and the recommendations of experts.
Installation of a plastic well
Preparing the pit, pouring 10 centimeters of sand to the bottom, no need to water it, just level it using a level.
Installation of the bottom of the drainage well and its leveling.
Sawing off the required section from the pipe, please note that you need to cut in the center of the outer part of the corrugation; the pipe can be easily sawed with a regular saw.
Now you need to prepare the place where the pipes will be supplied. First, a hole is made in the shaft using an end mill of a suitable size.
Next, a rubber seal for the pipe is inserted.
Then you should coat the inner surface with silicone and install a plastic adapter.
It is necessary to clean the tray and lubricate it with silicone. Now you can press the shaft into the bottom socket.
And connect the drains to the well using transitions.
Fill the finished well with external drainage layer-by-layer, compacting it evenly as you fill it, and the last step is to install the hatch.
You can do this work alone and in a fairly quick time.
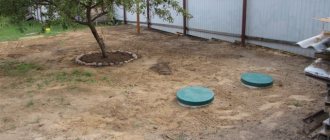
Filter drainage well
This structure is similar to a cesspool, but with certain differences. Treated wastewater from the septic tank comes here, is further filtered and goes into the ground.
This option can be called the best solution for a summer residence. It is simple, inexpensive, copes with small volumes of water (for larger volumes it is better to use other structures), and can be installed even on soils with partial problems.
What’s good is that the drainage well takes up virtually no space, and therefore if you have a small area, then there’s nothing to worry about.
How to make a drainage well with your own hands?
There are no problems in building a drainage well, and even more so for summer residents who have been with us for a long time and have been involved in even more serious construction.
You need to dig a hole and properly arrange the foundation pit. There are several options for constructing such a well, and all of them are affordable.
You can immediately settle on used bricks, which are laid in a circle around the pit, near the walls. Perforations and gaps without mortar are left between the bricks so that water can escape not only through the bottom, but also through the walls.
You can make a drainage well simpler - install a reinforced concrete ring in the hole, in which you also fill holes for water drainage. A similar option is to install a large plastic barrel without a bottom in a hole.
Expert advice on drainage wells
- There is no need to spend money on waterproofing. Here it is not needed, and on the contrary, we will be satisfied when the water goes evenly into the ground.
- The drainage well is installed in an area of the site where there are no problems with high groundwater levels. It is also recommended to set the depth of the structure below the clay layer.
- For better water absorption, to eliminate problems with soil heaving, as well as for maximum post-treatment, a 20 cm layer of coarse sand and gravel is placed at the bottom of the well.
- Perforation is carried out at a level of 50-80 cm from the bottom; water will also escape through it.
- To prevent the perforation from silting, expanded clay or the same gravel is sprinkled around the circumference of the installed barrel or concrete ring.
- Be sure to think about choosing the right location - away from residential buildings, wells, boreholes. Also, do not violate the law with your construction.
- It is necessary to accurately calculate all the parameters of the structure, which must correspond to the amount of water discharged.
- You will also need waterproofing and insulation of the upper part of the drainage well, and high-quality ventilation.
- It is important to install a removable cover on the well, which will provide access to the inside.
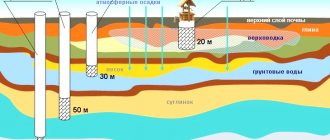
Soil filtering capacity
The possibility of installing a filter structure depends on the type of soil. Thus, sandy and sandy loam soils have good water permeability (high filtration coefficient, m/day). Such soils are quite suitable for constructing filter structures. Clays are characterized by minimal water permeability, and loams (soils with a content of clay particles in the range of 10-30%) occupy an intermediate position. Light and medium loams often have sufficient water permeability for arranging ground filtration systems, while heavy ones do not.
The most accurate information about soil characteristics can be obtained through engineering-geological surveys (drilling exploratory wells). However, there are several ways to independently determine the carrying capacity of the soil. For example, for this purpose, a test pit is made at the site of the proposed construction of an underground filtration structure, the depth of which should be slightly lower than the expected depth of the base of the structure. The pit is repeatedly filled with water, measuring the average time of its absorption (minutes/hours converted to days). Knowing the area of the wetted surface of the pit (m²), its volume (m³), calculate the approximate filtration coefficient: (volume : area) x time = m³/m² per day = m/day. Then the permissible load per 1 m² of the filtering surface of the treatment facility is determined (liters per day) in accordance with the data specified in STO NOSTROY 2.17.176-2015 “Autonomous sewerage systems with septic tanks and underground wastewater filtration structures” (Table 1).
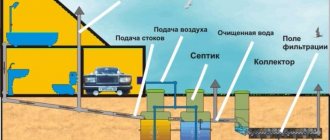
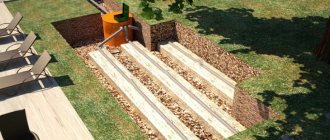
DIY aeration fields
Aeration fields, irrigation fields or even filtration fields are all names that describe a single treatment drainage facility that helps with the discharge of treated wastewater into the ground.
The operating principle of filtration fields for a septic tank is the distribution of purified water over a certain area. Properly constructed aeration fields further purify wastewater, and according to some information, by another 20-40%. This is a very good result, which means that you do not pollute the soil of your own summer cottage with such a system.
Constructing filter fields is quite simple. To do this, you need to dig several trenches, depending on the number of branch pipes from the septic tank. Next, fill these trenches with sand and gravel, creating a 20 cm cushion over all of them. Afterwards, install perforated pipes over the trenches, which will produce a distributed discharge of water.
What do filter field experts recommend?
There are many opinions of experts on installing drainage systems, but we have selected the most significant of them:
- For aeration fields, plastic perforated pipes are used, at the edge of each of which a ventilation outlet must be installed.
- To prevent siltation of the perforation, the pipes are wrapped with geotextiles, backfilled with gravel, and special load-bearing platforms are built.
- The system is installed in an unused place in the dacha so that it does not disturb the plants with an increased amount of water in the area, and the plants do not spoil the system with their roots.
- The entire system is assembled with obligatory attention to the requirements of the septic tank and water discharge, as well as depending on the characteristics of the soil. By the way, the system is being built on sandy loam, loam and sandstone, always below the freezing level.
- For laying pipes, the same slope is selected and set for proper distribution of water.
Aeration filtration fields
Filtration field diagram
This soil treatment system is preferable for large daily volumes of wastewater. The aeration field is a system of perforated pipes in the ground connected to a septic tank, laid on a gravel bed.
The diameter of the pipes is selected from 100 mm, and perforation is preferable in the form of cuts of half the diameter. The width of the cuts is made in 5-10mm increments of 10 centimeters.
The arrangement of pipes can have two types and be:
- Parallel;
- Radial.
With a radial arrangement, the drainage pipes extend from the septic tank or distribution tank of the filtration field in all directions, and with a parallel arrangement they are located side by side. The latter arrangement is in most cases more convenient, since it allows rational use of the site area.
Calculation of the productivity of underground filtration fields is done based on the area of their sand-crushed stone base, using a coefficient of 0.4-0.6, according to the calculation table.
Installation of aeration fields
Installation of aeration fields includes:
- Preparation of the base;
- Soil cutting;
- Filling the gravel base;
- Pipe laying;
- Backfilling with gravel;
- Covering with geotextiles;
- Burial.
Before you begin installing irrigation fields, please note that their sanitary zone for a productivity of up to 15 m³ is 15 meters.
If possible, fields should not be located near large trees. As the roots grow, they clog the drainage pipes, damaging the structure and ultimately the septic tank.
Installation begins with digging a pit for a filtration field of the required area. Separate trenches for each drainage pipe or a general pit for the entire system are possible. Next, a gravel-crushed stone base with a thickness of 20 centimeters is prepared. On clay soils, additional sand bedding should be provided.
Important! Under no circumstances should a rammer be used to level the base of a pit! Moreover, the soil cannot be leveled by adding soil. It is carried out exclusively by cutting off the top layer of soil. Before adding gravel and sand, the top layer must be cut away to open the natural pores of the soil. A tool such as the “Fokina flat cutter” is well suited for this.
Otherwise, the trampled soil will become a kind of waterproof layer and will not allow the aeration field to work effectively! It is also necessary to take into account the depth of soil freezing in the region. The infiltration field must be below this mark so that its operation is not disrupted in winter.
Get a response within 3-12 hours from a specialist
An important aspect is the distance between the pipes. When positioned parallel, it ranges from 1.5 m on sand and up to 3 m on clay (loam).
With a radial arrangement, the divergence angle is critical, which should be maintained at 30 degrees or less. The entrance to the pipelines must be at the same level.
Note! The length of each drainage pipe should not exceed 15 meters. Otherwise, the wastewater will not reach its end and part of the structure will be inoperative.
At the end of each pipe there is a ventilation riser with a diameter of 10 cm, with an outlet height above the ground of 70 cm or more. Next, the pipes are covered on top with a 5-10 centimeter layer of crushed stone and a geotextile membrane is laid to prevent soil from entering the gravel backfill. After this, the treatment plant is finally backfilled.
Drainage tunnels
Drainage tunnels or blocks are a newer and more modern system, which is intended for summer cottages and recreation areas in a larger format. The thing is that this replacement of filtering fields no longer requires a separate place with mandatory requirements.
Due to the characteristics of the prefabricated system, you can even install a gazebo over the drainage tunnels, a parking area in the country, or deploy an original landscape structure, the same rock garden.
But it is immediately worth noting that along with the advantages of the system in terms of quality of work, strength and durability, one must immediately consider its cost. It seems average and acceptable, but for many it can become a serious budget cut. Therefore, when exploring the possibility of installing filtration tunnels at your dacha, immediately pay attention to the price.
Advantages of a drainage tunnel system
- We can say that this is a fairly durable system that is installed once and for many years.
- The overall design has increased strength, due to which the area on top of the system can be used beneficially.
- Truly improved performance so you don't have to worry about the number of resets.
Drainage tunnels for a country septic tank: installation recommendations
Few people have worked with drainage tunnels, since this system is not suitable for everyone in terms of costs. More often, drainage wells or even just cesspools are installed instead of a septic tank. But if you want to install just such a system on your site, we will give you some advice:
- It is highly advisable to install drainage tunnels to greater depths. This often happens in the following way: a trench is dug the size of the module, plus 40-50 cm on each side. The depth of the pit is about 2 m. 50 cm of sand is placed at the bottom, then 30 cm of crushed stone, and only then the module is installed, preferably on an already compacted surface.
- The modules are installed on the finished pad and connected both to each other and to the leads from the septic tank.
- To prevent the perforation from silting, the modules are covered with geotextiles.
- Next, the system is sprinkled with crushed stone, and ventilation outlets are installed in special holes.
- All that remains is to add the layer to the soil level. This is done with a mixture of earth and sand. Also, in many cases, to make the surface usable, a geogrid is laid, which we discussed in several articles on the site.
We would like to note the fact that this information is general and may partially change when choosing a particular system, as well as in combination with a septic tank installed at the dacha. It is very advisable to consult with specialists at the place of purchase of VOCs about the choice of drainage for a septic tank, because each treatment facility has its own characteristics.
Almost every one of us can do drainage for a septic tank with our own hands, we just have to approach the issue seriously and with all responsibility. All we can do is wish you success in your work and invite you to share your opinion about the material in the comments column.
How to make a drainage hole
How to make a drainage hole
Nowadays, a cesspool is a worthy alternative to local sewerage and, if properly installed, can effectively and for a long time rid you of wastewater.
Such a pit is designed very simply, it is easy to make it yourself, without the involvement of specialists and equipment.
At the same time, you can make a drainage hole in different ways, each of which will not require any special expenses from you.
What is a cesspool
A cesspool is the simplest structure in its essence, but it is strengthened and built in different ways.
It is represented by a dug hole to which a sewer pipe is connected. Wastewater directly enters there and is absorbed into the soil through the drainage pad.
If the type of soil is not capable of absorbing a large amount of water, then it is forcibly pumped out of the pit using different types of pumps.
You can see an example of arranging a drainage pit in a private house below.
The advantages of this design are low costs and the ability to do it quickly and independently.
The disadvantage is that the waste pit pollutes the environment and, if not properly sealed, can spread an unpleasant odor in the area.
If there is a source of drinking water nearby, then you must make a completely sealed pit.
Types of cesspools
All cesspools differ in strength and degree of strengthening. Of course, it will take more time to build a more durable pit, but it can last for many years.
The wastewater pit can be open or closed. If you make a reliable hatch for the drainage pit, then unpleasant odors will be felt less or will not be heard at all.
When the hole is open, the water simply flows into the hand-dug hole, without being closed or strengthened by anything. If necessary, this pit is simply covered with earth.
In addition, pits can be built using different materials.
Depending on this criterion, cesspools are divided into permanent and temporary.
Permanent options include:
- drainage pit made of brick, cinder block. The walls of the dug pit are lined with bricks or cheaper blocks;
- pit made of concrete rings. It is made in the form of a sealed well, the walls of which consist of ready-made concrete rings. During installation, it requires the participation of a crane or other equipment, since the parts are too heavy;
- a monolithic concrete pit is an expensive but more reliable option. The device is carried out according to the type of foundation. May require external waterproofing;
- various plastic containers. Such a pit will be safe and completely sealed, guarantees the absence of unpleasant odors and is durable. The downside is that such containers have a fairly small volume and require frequent cleaning and pumping;
You can see an example of a permanent pit using a plastic tank below.
Cesspool from a plastic container
Options for a permanent drainage pit can also be with or without a bottom.
A pit without a bottom can be built if the daily discharge into the sewer does not exceed one cubic meter of water.
The ability of the soil to absorb drain water also plays an important role. A pit without a bottom is suitable for sandy soil types and low groundwater levels.
You can see a diagram of a cesspool without a bottom below.
Pit made of concrete rings without a bottom
A crushed stone cushion is poured at the bottom, through which water passes into the soil.
Pits with a bottom are a more complex and expensive, but effective option. In this case, a concrete screed is made at the bottom of the pit, and it is completely isolated.
With such a device, constant pumping of water is required, but such a pit does not pollute the soil and prevents unpleasant odors due to the hatch, which is covered at the top.
Temporary cesspools include:
- tire pit. In this case, a pit is dug into which tires of different diameters are installed, and the outer walls are covered with sand. A pipe is passed through the tires and the water enters directly. This pit is not completely insulated and is short-lived, suitable for infrequent draining;
- cesspool made of wood. Its walls are lined with thick boards or other wooden materials. The pit will not crumble for some time, but it will not be able to perform its functions for a long time, since the wood quickly deteriorates from water. You can see the structure of such a pit in the figure below;
pits from scrap materials. This can be slate, stone and other materials to strengthen the walls of the pit. This will help you not have to worry about draining for a while, but is also a short-lived option.
The type of pit depends on how much time, money and effort you can spend on its arrangement, but the best option is to install a permanent insulated pit with a bottom that will last for many years.
What models can you choose?
If you are looking for an inexpensive and easy-to-maintain septic tank for your country house with a drainage pump, we recommend that you pay attention to the whole line of “Maple” models. It includes containers of various sizes; you can easily choose an option for a summer house or a house in which from 2 to 7 people live.
“Klen” septic tanks are distinguished by their unpretentiousness; they can be used even intermittently. When you come to your dacha once a month, you can be sure that the sewage system will work. This is due to the fact that the design does not contain either a compressor or bacteria that constantly need air.
By the way, you can choose a suitable “Maple” septic tank model for both high and low groundwater levels. So be sure to take a closer look at this option, especially since the price is really attractive.