After drilling and installation of wells and boreholes, measures are taken to connect submersible or surface electric pumps to them. The activities consist of the installation of engineering structures and the necessary technical equipment and are called well piping.
In many cases, these works can be done by yourself, but there are quite a few factors that need to be taken into account when making decisions and carrying out engineering work. The main measures when operating the pump and water supply system are their protection from freezing in winter and ease of maintenance of the pumping system and equipment.
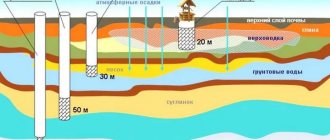
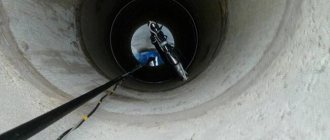
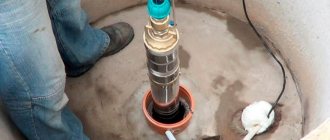
Fig. 1 Installing a submersible pump in a well - diagram
Description of the harness
For the summer version, you can leave the top outlet on the surface. It will be used only during the warm season by connecting a temporary water supply. If water is needed throughout the year, then the system must be constant. To do this, the pipeline must be laid below the freezing level. On average, the depth should be 1 meter (depending on the region). In addition to freezing, it is worth taking care that no debris gets into the system.
You should also think about free access. It is necessary to periodically audit the system and equipment. Most often, the water well piping scheme includes the following work (if it is not an industrial well):
- Making a pit, installing an adapter or caisson.
- Creating a project and laying a pipeline.
- Installation of a hydraulic accumulator, deep-well pump and filtration system.
The operation of the well will depend on the quality of the work and the equipment itself. At this stage, it is necessary to take into account all the nuances of water consumption.
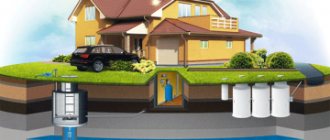
Options for water distribution in a private house
When talking about wiring options, we mean the connection diagram for water consumption sources in the house.
There are serial and parallel circuits.
With a series connection, all sources of consumption, for example, a sink in the kitchen, a washbasin in the bathroom and toilet, a shower stall and other units are connected in series.
The risk of such a connection is a decrease in pressure (you can find out about the standards for the optimal operating pressure of water in the water supply system here). The benefit of the arrangement is savings on pipes and fittings. Each unit has its own pipe outlet, and a tap for hot and cold water is installed in case of repairs.
See what are the most common mistakes made when installing water pipes in a private home:
As for parallel connection, this option is considered the most effective for constant water intake. That is, at each water intake node in the house the pressure will be fixed. The main nuance is the difficulty in distributing the pipes, since there are many of them and it is quite difficult to work with them. There is an overconsumption of material here.
Connection types
There are several ways to tie a wellhead well. Before making a decision, the costs of equipment and work, well parameters, climatic conditions and pump type are taken into account.
The open option is the cheapest way to connect a well pump. It is suitable in cases where the water point will be used only during the warm period. During the construction the following work is carried out:
- The upper part of the casing is cut so that only a small section remains above the ground.
- A head is attached to the mouth. It is on this that the electric pump, pressure pipe and power cable will be suspended.
- Using special adapters, the water supply is connected, and the power cable is also supplied. Pipes and wire are placed on the surface.
This type of connection has a large number of disadvantages, including poor protection from freezing, the risk of equipment theft, and laying the pipeline on the surface of the ground. When using a deep-well pump, most of the equipment will have to be placed in a separate building or in the house, and this is an additional inconvenience.
With the help of a pit, you can achieve higher protection and also provide better tying compared to the summer version. The arrangement includes the following stages:
- Digging a hole of the required depth, which will protect the system from winter freezing.
- Construction of walls made of brick, gas silicate, expanded clay or concrete (using formwork).
- Installation of external waterproofing made of gravel.
- Installing a concrete slab or sheet metal cover. It's better to use the first option.
It is also advisable to make the floor from a layer of sand or crushed stone. In some cases, the screed is poured. When constructing a pit, the groundwater level should be taken into account. If the waterproofing is poorly done or completely absent, then if the aquifer is high, the well will always be flooded. Because of this, it is not advisable to install an electric pump in a pit.
The pumping equipment is connected using a conventional well head. The pipeline in this arrangement option runs underground.
Head installation
A typical head has a simple structure; its body consists of two parts, which are connected to each other through studs with nuts, and between them there is a donut-shaped rubber ring. The top cover has holes for entering the power cable and pressure pipe (the latter is located in the center), a carabiner is welded at the bottom to secure the electric pump cable, and two eye bolts are screwed on top to facilitate landing on the well.
Installation of the head is carried out in the following order:
- Place the bottom cover and rubber donut over the column, pass the power cable through the head through the rubber seal and the HDPE pipe, and thread the loop of the cable tied to the pump into the carabiner.
- A pump with a head is lowered into the well channel using a cable tied to its eye bolts, after the top cover rests on the top of the column, 4 threaded rods are inserted into its holes.
- The nuts are tightened with a wrench, connecting the upper and lower halves of the head, while the ring in the middle is compressed, tightly fixing the structure to the surface of the pipe.
- Cut the HDPE pressure pipe, put a feed-through and compression fitting on it, and clamp the pipeline in the head.
Head installation
Caisson installation
The caisson pit is one of the strapping methods. It is assumed that the equipment and head will be hidden. A pit is dug in the ground where the upper part of the casing pipe is placed.
The scheme is implemented in several ways:
- Metal caisson. Steel is now a fairly expensive material, but it allows for good sealing. It is necessary to apply anti-corrosion compound on the outside. Assembly can be done independently without the use of special equipment. All you need is a welding machine.
- Reinforced concrete rings. Installation is quite fast. But such arrangement does not allow achieving good waterproofing. You only need one or two rings, which are then covered with a concrete lid with a hatch. A frame of reinforcement is laid at the bottom and filled with concrete.
- Plastic caisson. This is a lightweight and durable material that can only be destroyed by mechanical stress. The structure is completely sealed.
For proper operation of the system, the correct configuration is required. For this purpose, calculations are performed to select equipment.
Some important recommendations
A special brass fitting is used to connect the check valve to the water supply pipe. The connection must also have a special drive sleeve. This measure will prevent the pipe from shrinking in diameter and will compensate for the excess stress created by the compression fitting.
The fitting, like all connecting elements, must be of high quality, designed for increased tensile loads. Otherwise, the pipe may simply jump out of the fitting. To connect the opposite end of the HDPE pipe with the outlet at the head, use the same compression drive-in fitting made of brass.
A special electrical cable for submersible pumps is available for sale. It is this that must be used to connect to the pump. Substitutions with lower quality materials are not acceptable. The power cable is connected to the pump cable by soldering; it is better not to use twisting in such an important place. The connection point is covered with a heat-shrink sleeve.
To secure the cable and cable to the water supply pipe, you need plastic clamps. They are installed every 2-3 meters. This measure helps to avoid accidental tangling of the cable while lowering the structure down. Instead of clamps, you can use electrical tape.
To attach the cable and cable to the water supply pipe, you can use plastic clamps. A special adapter will allow you to reliably connect the pump to the pipe
For the sake of economy, a special cable is used only in the area where it will be immersed in water. The remaining distance is covered by a regular PVS cable.
In any case, the cable cross-section must comply with the manufacturer’s recommendations specified in the pump data sheet.
Soldering is performed at the junction of the power cable and the pump cable. After this, the cable is closed with a special heat-shrink sleeve. To install it you will need a hair dryer
The pump can only be suspended from a stainless steel cable. Neither regular black steel nor its galvanized version are designed to withstand continuous use in water.
When lowering the pump in narrow areas, you can supplement the rotation of the pump with a small amount of pressure. But in any case, the pump must maintain a vertical position.
During installation of the pump, the well head may move slightly. You should make sure that the weight of the pump rests on the cable and is not supported by the pipe. Only after this the position of the head can be fixed with screws.
Pump and filter system
Performance is the main indicator that should be relied on when choosing pumping equipment. This is the amount of water that the device can pump per hour of operation. There are also additional conditions:
- The maximum performance of the electric pump should be equal to the flow rate of the well.
- The power should be sufficient for normal supply of water through the system in sufficient quantities.
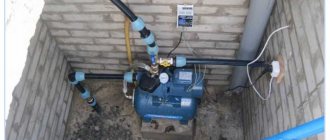
The pumping station can be mounted in a caisson. An effective method of supplying water is to install a deep-well pump, which is immersed in the casing. When choosing a pumping station, it is necessary to install a hydraulic accumulator and a filtration system.
The advantage is that all the equipment is located outside the residential building, but if maintenance is required, no access problems arise. Regular inspection of the storage tank, pump and filter is required. A check valve is installed nearby.
Water connection
As a rule, the pumping station is connected to the water supply if there is not enough pressure for the heating equipment.
In order to connect the system to the water supply you need:
- The water pipe must be disconnected at a certain point.
- The end of the pipe that comes from the central line is connected to the storage tank.
- The pipe from the tank is connected to the pump inlet, and the pipe that is connected to its outlet goes to the pipe that leads to the house.
- Laying electrical wiring.
- Equipment adjustment.
You may be interested in an article about Gilex Jumbo pumping stations.
Read the article about setting up and adjusting the pumping station yourself here.
Types of hydraulic accumulators
A hydraulic accumulator is necessary to maintain constant pressure in the water supply system. It allows you to achieve the necessary pressure.
The list of tasks to be solved is as follows:
- Saving the operating life of the electric pump due to periodic shutdowns.
- Prevention of water hammer, which can cause failure of individual elements of the system.
- Creating water reserves in case of power outage or equipment breakdown.
- Maintaining constant pressure in pipes.
When choosing, they rely on the productivity and water needs of the family. Membrane and balloon hydraulic accumulators are usually used. These two types differ in their internal structure. The membrane tank has two compartments. The first contains air, and the second contains liquid.
The balloon reservoir has a bulb installed, not a membrane . Advantages of this type:
- The liquid does not touch the walls of the storage tank. This means there is no risk of corrosion.
- The pear is easily replaced.
Hydraulic accumulators are also distinguished by their location. There are vertical and horizontal devices. An important characteristic is the storage capacity. It is necessary to understand that it will not be completely filled. About half the volume will be occupied by air.
The selection and installation of all equipment must be carried out comprehensively. It is necessary to make accurate calculations of water consumption. Correct piping will determine the quality of the system.
Typical route method
In the first case, the regularity of natural deviation in the required area of work is used. Drilling is planned on profiles constructed in advance based on collected information about the natural deviation of wells. This method is advisable to use in well-studied terrain; moreover, the curvature of the face does not need to be controlled - you just need to adapt to the passage of the natural deviation.
The negative side of the method is considered to be an increase in the cost of constructing a structure due to an increase in the volume of drilling. Based on previously prepared wells in each area, places of the greatest intensity of deviation are identified, and profiles are compiled using the information received.
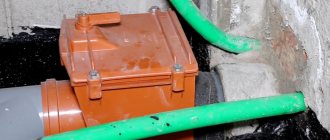
Downhole adapter
With this device, you don’t have to install an expensive caisson, but pumping and other equipment will have to be placed in a separate shed or in the house. In addition to being cheap, the advantage of using an adapter is that the casing pipe can be completely hidden underground.
Installation is carried out as follows:
- The casing pipe is cut to ground level and dug about one and a half meters deep.
- Using a crown, a hole is cut in the pipe for mounting the adapter.
- The adapter is installed externally, and the deep pump is lowered into the well using the pressure pipe on which it is attached.
- The excess part of the support pipe is cut off, and a dovetail is installed in this place (this is the name of the second element of the adapter).
- The adapter is lowered into the well on a metal tube.
- The dug hole is filled with earth.
You can do the installation yourself. It is not necessary to resort to the services of specialists. If a caisson is used, it is better to make it closed. The entire structure must be as tight as possible.
Important points when arranging
Taking into account some technical nuances, you can significantly save on the construction of a well equipped with a caisson. For example, use a factory-made caisson.
If you place the well closer to the house, then:
- the volume of earthworks will be reduced;
- fewer pipes will be required;
- you will need a pump of small power, sufficient only to raise water to the surface.
You can also save money when choosing a drilling method. To make a well for personal use, you can do the work using a hand drill. Sometimes they use electric tools and percussion devices.
Point #1 – choosing a well drilling method
When choosing a specific tool, you need to proceed from the characteristics of the soil. When manually drilling a well yourself, you will have to make a lot of effort, but under favorable conditions you can reach the aquifer lying at a depth of up to 15 m.
It is recommended to make no more than five turns of the drill in one pass, otherwise it will be difficult to remove it.
A self-made drill gives the best results. The reason is that it is made for specific conditions, so it is more convenient to work with it
A shallow well can also be drilled using an auger. Its rotation is carried out both manually and using mechanisms. In any case, a tower in the form of a tripod is built over the future well to facilitate lifting the tool. When choosing the second method, you will also need an electric motor of suitable power.
The shock-rope method is also used to cut a well. The working tool here is a pipe, the edges of which are sharply sharpened (a driving glass with a strong edge along the lower edge). Due to its considerable weight, it crashes into the ground with great force, then it is removed using a system of ropes and freed from the ground.
When using the percussion-rope drilling method, a tripod up to two meters high is used. At its top point there is a block with a rope thrown over it. A percussion instrument is attached to it
The casing (pipe) is taken with a slightly larger diameter than the pipe section called the sleeve. It should be placed strictly in vertical position. This is important for any drilling method. If this nuance is neglected, the soil may collapse.
Experts advise using PVC pipes with a cross-section of 12.5 cm. The first pipe is lowered after passing one meter. Further, the length of the casing is added as it goes deeper. The sections are connected using threads at the ends of the pipes.
Point #2 – secrets of drilling a well
You can drill a well in any season, but the labor intensity of the work will vary. The worst option is spring. During this period, groundwater is at its highest level. Under such conditions, it is difficult to determine the location of the main aquifer.
Installing a well in summer is considered the best option, because... The water level stabilizes and its location is easy to determine. In autumn, the best month for carrying out this work is September. At this time, the rainy season usually has not yet arrived; it is possible to determine the aquifer without difficulty.
Precipitation in winter does not affect the state of groundwater. Manual drilling in winter is contraindicated, because... soils freeze very much
In winter, you can drill a well as long as the temperature does not drop below -20°. Due to freezing of the soil, the walls of the well are protected from collapses. Groundwater is at a minimum level.
Point #3 – optimal material for the caisson
There are several types of caissons:
- from reinforced concrete rings;
- metal;
- plastic;
- brick.
Reinforced concrete rings and bricks . This type of caisson practically does not provide tightness for a long time. This threatens the equipment with flooding and subsequent loss of performance.
Metal . If all requirements were met during the manufacture of metal caissons, they will have good tightness.
The earth is an aggressive environment in relation to metal, so the enclosing structures of such chambers are susceptible to oxidation, which can result in depressurization.
Plastic . Caissons made from polymer materials are comfortable, light in weight, and easy to install and operate. The probability of depressurization is quite small, because the material is not subject to corrosion. Plastic caissons last much longer than metal ones.