Without a working sewer system, a country cottage instantly turns from a comfortable home into a slum shack. But in order for the drainage in the sink and toilet to function correctly and without breakdowns, the sewerage installation in a private house must be done in strict compliance with the standards of the relevant SNiPs. It is important from the very beginning to correctly assemble the riser and select the slope of the pipes to it from the plumbing fixtures. The choice of material for the pipe products themselves and the fittings for them is also important.
Do-it-yourself plumbing installation in the bathroom: features
Before laying communications in the bathrooms of a private house, it is necessary to accurately and finally decide on the choice of models of all plumbing fixtures: bathtub, shower cabin, toilet, washbasin, heated towel rail, etc.
Technik-san
Find a factory technical map with installation dimensions on the Internet, or take it from the seller, and only then start laying routes for water supply and sewerage.
Here is a striking example: this picture shows that the same toilet model can have four types of water connections (bottom, left, right or middle) - it all depends on what kind of drainage mechanism the tank is equipped with.
Here are some standard connection diagrams for installing toilets:
And photos of their implementation from Technik-san:
To successfully install corner bathtubs with a load-bearing frame, you need to take a frame diagram from the seller - it is not always possible to “untie” the bathroom drain according to the usual diagram. And only if you are 100% sure that you will definitely buy completely ordinary, run-of-the-mill plumbing fixtures, you can follow the standard sizes from our table.
| Plumbing fixture | Level of entry of a 50mm sewer pipe from the wall (from the level of the finished floor) |
| Bath or shower with tray | 60 mm (from the level of the floor tiles to the axis of this pipe). If the output of the channel is higher than this value, you will have to make a podium. |
| Wash basin | 530-550 mm. |
| Attached toilet | 180-190 mm. |
| Wall-hung toilet | 220-240 mm. |
| Washing machine | 600 – 700 mm. |
The drawing is the head of everything
A sewerage project carried out in accordance with all the rules and providing the most optimal method of drainage for a private home. But homeowners are not always eager to turn to specialists for help, but prefer to resolve the issue on their own.
Where do you need to start if you want to make a sewer with your own hands? From the drawing, of course. But in order to perform it properly, it is necessary to select a suitable scheme that corresponds to real conditions and understand how the system should function.
Sample sewerage scheme
What you need to know before designing
To design a system, you need to answer the following questions:
- Is it possible to connect to the city highway, will it only be necessary to collect sewage waste, or will it also be necessary to organize their cleaning?
- How much wastewater will be processed? This depends both on the number and seasonality of people living in the house, and on the availability and type of water points.
Figure for clarity - water consumption per day
- You should find out the depth to which the soil freezes. This is necessary for proper deepening of the sewer outlet.
- Groundwater level is the mark at which the groundwater table is located (read how engineering and geological surveys are carried out in the article). If they are located high up, a sewer system can also be built on the plot to collect storm water.
- It is necessary to assess whether the topography of the site allows wastewater to drain by gravity. Otherwise, you will have to use a fecal pump, and you must immediately determine the place where it should be installed.
How to properly install a sewer system in a private house if you have to use a pump
- When installing treatment facilities, you need to immediately decide on their type and consider the possibility of access for sewage disposal equipment (read the article on how to pump out and clean septic tanks).
- It is necessary to accurately establish the type of soil on the site, according to which a decision is made either on the construction of a drainage well, filtration trenches or fields.
- It is required to draw a diagram indicating all types of plumbing equipment. In this case, it is necessary to take into account the option of laying the pipeline: inside the floor or superficially, in order to understand whether any dismantling work will have to be carried out.
Why do you need a diagram with internal network wiring? First of all, to correctly calculate the amount of materials needed and accurately determine their location in the system.
Sequence of placement of plumbing fixtures
The toilet is installed first from the riser. A large distance between the toilet and the riser (especially when there are turns in the pipeline) provokes blockages. Shower, washbasin, etc. It is advisable to plan so that the water from them is drained through the toilet.
It is also better to make a bathtub and shower with a low drain closer to the sewer; this will help avoid many problems with slope.
And, as already mentioned, the technical documentation for plumbing fixtures must be studied before the installation of communications begins. It is good if a single-level arrangement of the pipeline and the axis of the sewer outlet is provided; but you may encounter an atypical connection, and this must be taken into account.
Having chosen the models and determined exactly where they will stand, you can begin installing the pipelines.
Underground laying of sewer pipeline
The street section of the sewer pipeline will also be laid downhill from a private country house in a dug trench. In this case, the pipe must be deepened below the ground freezing level so that it does not freeze in the winter. If it needs to be laid higher, then it is important to thermally insulate this line. The outlet is installed on a sand bed with a thickness of 0.3 meters. The top and sides of such a pipe will be sprinkled with sand so that the stones do not put pressure on it.
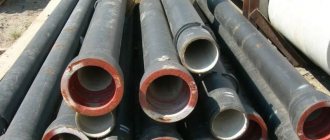
Which pipes to choose for sewerage
| Pipe type | Peculiarities |
| bays | There are no sockets, so connections are made with couplings. But there are no scraps or waste left. |
| In pieces | A piece of pipe is inserted into the socket of the previous one; fittings are used only when it is necessary to change the direction of drains, when combining horizontal lines, etc. |
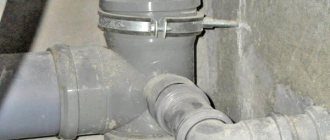
Horizontal lines are mounted from 50 mm pipes, risers - from 100 mm.
For stable operation of the system after each bath, sink, washing machine, etc. (except for the toilet and shower) you need to install a gyroscope siphon. Siphons are installed by default in toilets and showers.
On curved sections, standard fittings without threads are used. It is recommended to install assemblies from pipe fittings rather than using ready-made ones.
Choosing the appropriate installation method
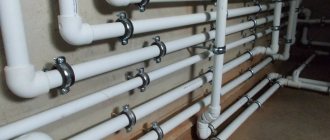
After carefully working out the sketch, where all the markings and dimensions are applied and a well-thought-out wiring diagram, you will have to think about how all this will be implemented in practice. In principle, there should not be any particular difficulties with this, since pipes can be separated in one of two ways - open or hidden.
The open method is when the communication pipelines are located outside. It is characterized by simple installation work, but the aesthetic parameters leave much to be desired. Even if all communications will pass as close to the floor surface as possible.
There is no need to talk about aesthetics - it’s definitely ugly
The hidden method means that the pipes are hidden in wall structures. Here everything is in order with visual perception - the highways simply will not be visible. But performing installation in this way is an extremely difficult undertaking. For example, gating will take a lot of effort
It is important to note that gating of walls during hidden wiring cannot be performed in load-bearing walls
Upon completion of the finishing work, the pipes will not be visible at all
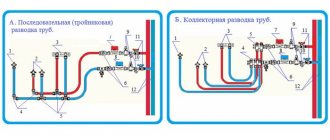
We continue to work with the wiring diagram, now we need to decide how the pipes will be physically laid: in series, manifold, with pass-through sockets. The latter is practically not used in everyday life, so we’ll leave it to the professionals. It’s better to take a closer look at the first two methods.
Consistently
The advantages of this option are that everything is extremely simple and clear: the pipeline is laid in stages, connecting one device to another. From an installation point of view, this is an excellent option.
There is only one drawback - during operation, uneven distribution of water pressure if several devices are used simultaneously.
With collector
This method involves installing a tap on each pipe leading to the device. This will ensure that repairs can be made without shutting down the entire system. Manifold wiring is the creation of a separate section of pipeline for each device. Ensures uniform distribution of water across water intake points. For a “beginner plumber,” however, this method may be too much for a “newbie plumber” - it requires a lot of patience and labor. Well, plus everything else, there is an increased consumption of materials.
This wiring is quite difficult to install - think about whether it’s worth taking on it yourself
Whatever option is preferred, in any case the following conditions must be met: the minimum possible number of connecting nodes and bends in the highways, as well as maximum integrity. Overlaps of cold and hot water lines are allowed only in exceptional cases with a complex water supply, and in general, the layout of water supply and drainage pipes should have a finished, laconic appearance.
Recommended pipe diameters for sewage drainage
| Device | Diameter |
| Wash basin | From 40 mm |
| shower drain | 50-75 mm (depending on throughput) |
| Bath and shower | From 50 mm |
| Washing machine | Separate drain route - from 32 mm (open siphon), 40 mm (hidden siphon) |
| Toilet | 110 mm. |
An air valve is installed at the top point of the vertical riser, or a drain pipe is installed - after this, the sewerage installation in the bathroom is considered complete.
Modern piping systems
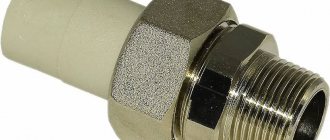
Polymer and metal-polymer pipes have practically replaced traditional steel and copper products from this area due to a number of advantages. Such pipelines are not subject to corrosion, their inner layer is resistant to abrasion and does not contribute to the accumulation of deposits. Thanks to this, the diameter of the pipe bore remains constant throughout its entire service life (at least 50 years). An important property is the high degree of hygiene of the pipes. Moreover, the installation of such pipes is simple and does not require much time.
Metal-polymer pipes
The most common type of pipes used in water supply systems is metal-polymer. They consist of an inner layer, usually made of cross-linked (PEX) or heat-resistant (PE-RT) polyethylene, an aluminum shell, an outer protective layer and bonding layers based on adhesives.
The advantages of the pipes, in addition to excellent operational properties (working pressure 10 atm at a maximum temperature of 95 degrees), include a low coefficient of thermal expansion, as well as high stability of the shape specified during installation (the pipe does not unbend spontaneously). A wide range of fittings are available for metal-polymer pipes. There are crimp, or compression, fittings and press fittings (mounted using press pliers).
Metal-polymer pipes are produced by many companies, for example OVENTROP (Germany) under the Copipe brand, VALSIR (Italy; Pexal pipeline complex), PRANDELLI (Italy; Multirama products), GEBERIT (Switzerland), ALTAIS, METALLOPOLYMER (Russia).
Ventilation arrangement
The abruptly drained volume of water contributes to the creation of rarefaction in the in-pipe space. Without oxygen, water leaves the siphons, which results in the appearance of an aroma of sewage.
Therefore, the tasks of ventilation are:
- Removing sewage odors.
- Constant pressure support.
- Noise absorption.
To create ventilation, all components of the risers are brought to the roofing, without covering their upper end, but hiding them from clogging. Or an aeration valve is installed at the top of the riser, which does not release aromas and conducts air inside.
The cross-section of the pipe for ventilation is equal to or greater than the size of the riser. Combining a hood with a chimney or ventilation is not possible. Rules for calculating hood height:
- On a flat, unused roofing – 0.3 m;
- On a pitched roof - 0.5 m;
- On the operating one - 3 m;
- The step from the prefabricated ventilation shaft is from 0.1 m.
If it is impossible to arrange ventilation, use an air vent valve on the riser above the bathroom equipment to prevent the entry of sewage.
Connecting the drain system
Laying polymer drain pipes has recently gained wide popularity. This system consists of straight sections and connecting elements with special rubber sealing rings. Its installation is not particularly difficult.
From the point of connection to the riser, at a slight angle of inclination, a sunbed is laid to the most distant point to ensure unimpeded flow of water and avoid the occurrence of traffic jams inside the main line. A slope of up to four degrees is considered optimal. You can check the angle using a level or simply calculate it. Usually it will be enough to raise the pipe by a centimeter when removing it from the riser by one meter. The vertical and horizontal lines should be fixed to the wall using clamps.
The sun lounger is laid to the most remote access point at a slight slope
Along the path of the sun lounger, at all connection points, direct connections to the device are made using tee connections
In this case, it is important to ensure that the gasket-seal is in the correct position. To make it easier to pull it onto the connecting elbow, experts recommend lubricating the ring with vegetable oil or rubbing it with soap
When purchasing connecting fittings, pay attention to the angle of articulation. The best choice would be elements with bends of at least 45 degrees.
A smaller slope will promote the formation of blockages. It is desirable that the tees have inspection holes with special plugs. This design will greatly simplify further maintenance of the drain system and will help to easily clear blockages in the pipes.
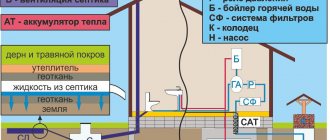
The principle of operation of an active septic tank
The operating principle of an autonomous sewage system can be divided into several stages:
- Wastewater enters the receiving chamber, where it is purified from impurities and heavy contaminants. The filling level of the chamber is regulated; after filling, the wastewater enters the aeration tank.
- An aeration process occurs, as a result of which the sewage is treated with oxygen and special bacteria.
- Treated wastewater accumulates in a settling tank, from where the sludge that settles at the bottom is subsequently pumped out.
- Process water goes into a stabilizer, from where it can be disposed of in the ground or used, for example, for irrigation.
Conclusions and useful video on the topic
To better understand the instructions described above, it is recommended that you watch the following video review:
It is not difficult to connect the toilet to the sewer system yourself. To do this, it is advisable to buy in advance a model of equipment that will fit most aesthetically into the interior of the bathroom.
With a minimum of tools, sealant and correctly selected connecting parts, you can install the toilet using the above instructions in a few minutes.
Do you have practical skills in installing and connecting a toilet to a sewer? Please share your knowledge, experience with our readers or ask questions. The comment form is located below.
Dismantling cast iron elements
To dismantle cast iron elements and cement left over from old plumbing, you will need a hammer, a pry bar and a flat-head screwdriver. The outlet of older toilets is often cemented into a cast iron elbow.
Often the only way to dismantle is to break the ceramic pipe with a hammer.
When breaking a toilet cemented into a cast iron elbow, you must wear special glasses to protect against splinters.
After removing the toilet, you need to tap the cast iron pipe on all sides and begin removing cement and deposits from its internal surface. To do this, use a hammer and a screwdriver, and large pieces are removed with a pry bar.
Old cast iron pipes cannot be hit too hard with a hammer, because they may split, and you will have to break the floor all the way to the sewer riser and insert a new outlet into it
To completely clean the pipes of rust and deposits, you can moisten them with toilet cleaner and then scrape them off with a wire brush.
Complete cleaning with a rag. These manipulations must be done wearing special protective gloves. It is important that the first 5 cm of the internal space of the cast iron pipe are smooth, as they will ensure the tightness of the future connection.
Advantages and disadvantages of different types of tanks
The final element of the system is a storage and cleaning tank. In the absence of a central collector for collecting drains, autonomous installations are used.
- Cesspool . It is easy to organize on site and is the cheapest option. But it cannot cope with large volumes of wastewater. There is a possibility of dirt getting into groundwater and causing an unpleasant odor.
- Do-it-yourself septic tank made of brick filled with concrete or ready-made reinforced concrete rings . It performs its functions well, is durable and strong. The disadvantages include long installation times and serious construction costs.
- Industrial autonomous installation . Such a septic tank is more expensive, but the costs are covered due to the speed of construction, high quality and long-term operation of the equipment.
- Biological treatment station . The most expensive option, requiring constant electricity. It features the highest degree of purification and high productivity.
Rules for operating an active septic tank Topas
Any Topas septic tank model is equipped with detailed operating instructions, but we will highlight several rules that must be followed:
- During a power outage, try to limit the flow of wastewater into the collection chamber to avoid overflow.
- Do not allow aggressive chemicals, alkalis, acids, etc. to enter the system. – they will destroy the beneficial microorganisms of the device.
- Do not throw garbage that is not intended for it into the sewer - leftover food, bags, plastic, etc. solid household waste.
- Sludge cleaning takes place twice a year.
- Some parts of the device must be replaced, for example, Air Mac compressor membranes - once every 2 years, aeration elements - once every 12 years.
Connecting the toilet with plastic elbows
Unlike corrugated pipe, plastic elbows do not have flexibility. But if the sewer line was originally planned for a specific toilet model, then rigid outlets are more preferable because of their durability and problem-free nature.
When connecting the toilet to the sewer with plastic elbows, they dictate the location of the plumbing fixtures, because the slightest displacement threatens leakage
The main steps for connecting a toilet to a sewer with plastic elbows are similar to those for installation using corrugation.
Basic rules for using rigid connection elements:
- All connecting pipes are lubricated with silicone before installation in the holes.
- Excessively long pipes can be cut with a hacksaw.
- It is necessary to exclude any distortions.
- Horizontal 90 degree bends should be avoided due to the possibility of clogging.
The disadvantage of budget plastic outlets is their gray color, which does not at all harmonize with the snow-white toilet. White models are much more expensive, but their appearance is worth it.
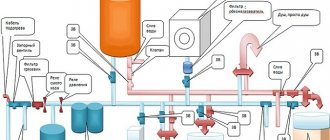
Internal water supply
The complexity of distributing water around the house is related to the number of consumers (taps and mixers) and their location. Therefore, first of all, it is necessary to develop a scheme. This is the most important stage in the installation process, which should not be neglected. There is nothing difficult in drawing up a diagram. You just need to arm yourself with a tape measure and measure the distances from consumers to the connection points of each device.
Transfer all this to paper, taking into account the size and configuration of the pipes. The diagram will show exactly how many pipes and fittings will need to be used in the installation process, where deviations from straight-line wiring will occur, and where passages through load-bearing and non-load-bearing elements of the building will be installed. And the more rooms are involved in the plumbing system, the more complex the scheme will be.
One of the plumbing diagrams
Attention! In the wiring diagram, it is necessary to take into account all the elements of the water supply system: collectors, pumps, filters, tanks and shut-off valves. It must indicate the distances between elements and changes in network configuration.