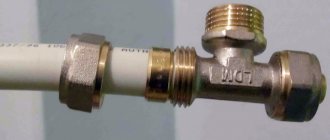
When independently installing a sewer system in an individual home, not all owners have a good idea of how to install it correctly. The sewer system is an integral part of modern homes. One of the required elements of such a system for its proper functioning is a sewer pipe. Many owners of private households do not fully understand its purpose and proper use when installing a sewer system.
Fan riser: purpose and consequences of its absence
In short, the sewer drain riser is nothing more than ventilation. Its main task is to ensure air flow inside the sewer system, which ensures its ability to quickly cope with the transportation of large volumes of water and remove unpleasant odors. Let's be honest - the relevant housing office services have a negative attitude towards the issue of removing this part of the riser, even if it is being replaced with an air valve. Why? Everything is simple here - its absence entails a lot of problems that begin to fall one after another on their heads. And although these troubles can be counted on one hand, they can make life unbearable for residents of a high-rise building. Such problems include the following.
- A foul smell spreading through the apartments located along the riser where the vent riser was cut out and plugged. This behavior of the sewer system is due to the fact that the smell has nowhere else to go and instead of freely ventilating through the ventilation pipe, it seeps through even the smallest pores in the apartment’s pipe connections. The situation is further aggravated by the fact that when flushing the toilet, a large amount of water immediately enters the sewer system, acting like a piston, drawing in air, which, in the absence of a drain pipe, has nowhere to come from. The system itself looks for where to get it and finds it in the most unexpected places for a person - it simply sucks out the water seals in the siphons of the bathtub, washbasin or kitchen sink and begins to suck in the necessary air in these places. The result, again, is unpleasant odors spreading throughout the apartment. This does not happen in just one apartment - as mentioned above, all the lower floors located along the riser will suffer.
- Problems with the operation of the sewer system. In addition to draining the water seals, the absence of a drain pipe certainly affects the operation of the sewer system - as a rule, it begins to clog more often. The lack of the same full air flow does not allow the system to quickly and effectively remove human waste. This nuance is especially true for sun loungers - if before you had no trouble with them, now you will have to clean them with enviable regularity.
Now decide for yourself whether you need a fan riser in your apartment or maybe it’s better to put up with its presence? By the way, if you are a resident of a private house, then you should not think that you will not have such problems. It should be understood that no matter the size of the sewerage system and no matter how correctly it is assembled, the drain riser is its integral part, and its full replacement simply does not exist. Think about this at your leisure, but for now I’ll tell you about one alternative that supposedly allows you to remove the ventilation of the sewer system.
See the video for the features of the fan riser and the nuances of its installation.
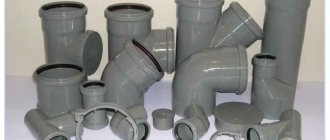
Types of products
The classification of fan pipes into types is carried out according to the materials of manufacture, according to which polymer and cast iron products are distinguished. Cast iron, by and large, is practically not used now - it is a relic of the Soviet era; such solutions can be found in multi-storey buildings in which major sewerage repairs have not been carried out.
The cast iron fan pipe has a number of serious disadvantages, the main ones being heavy weight, high cost, and labor-intensive installation. In terms of performance characteristics, it is completely inferior to plastic products; its only advantage is durability and high mechanical strength.
A plastic sewer pipe can be made from two types of polymers - low-density polyethylene (HDPE) and polypropylene (PP). We recommend using products made from HDPE - this is one of the most rigid types of plastic, which has high crack resistance and resistance to deformation.
Let's consider the advantages of plastic fan pipes:
- minimum cost;
- low weight and, as a result, ease of installation;
- durability – service life over 50 years;
- resistance to chemically aggressive substances;
- resistance to corrosion.
Note that due to the perfectly smooth inner surface of the pipe, with rare exceptions, it does not need sound insulation, since the sound of air circulating through the system is not audible.
Basic noise insulation is carried out by installing the line using damping clamps with a rubberized fixing ring that dampens vibration. If practice shows that the fan pipe produces a lot of noise, sound insulation can be made using sleeves made of foamed polyethylene or mineral wool.
Installation and replacement
The fan pipe is installed so that the lower part of the riser is placed in a heated room and the upper section is exposed to the open air. In this case, the pressure drop caused by the temperature difference will ensure effective removal of sewer gases.
When installing a drain pipe, you must follow the following rules:
- You cannot use a drain pipe whose diameter is smaller than the diameter of the sewer riser (standard – 110 mm);
- if a plastic pipe is connected to an old cast-iron riser, a rubber adapter must be installed at the junction to ensure the tightness of the entire system;
- several risers of an apartment building can be connected to one fan ventilation channel using adapters and bends; in this case, the horizontal parts of the line must be laid with a slope of 2% from the plumbing fixtures;
- the minimum distance between the roof of the building and the upper opening of the drain pipe is 30 cm; if the attic of the building is used as a living space, the distance increases to 3 meters;
- the outlet point of the waste sewer pipe should be 4 meters away from the nearest balcony;
- when installing plastic products in places where they pass through the concrete floors of a house, steel sleeves must be installed;
- It is strictly prohibited to combine fan ventilation and smoke exhaust into one channel;
- It is necessary to install a fan fungus on the outlet hole, which will prevent insects and leaves from entering the system.
Fan pipe on the roof of a house
Replacement of drain pipes in multi-storey buildings is carried out by responsible representatives of housing and communal services, since the drain part of the sewer system is located outside the residents' apartments.
You can repair the riser yourself, the cast iron parts of which can rot during operation and cause serious problems in the apartment. Repairs must be coordinated with neighbors higher up in the house, who must not use the bathrooms during the period of replacement of areas.
Sewer riser replacement technology:
- The water supply to the toilet is shut off and the toilet drain hose is removed.
- The toilet is dismantled, the room is cleared of foreign objects.
- Using a hammer, chisel and grinder, the damaged part of the riser is dismantled - this is an extremely labor-intensive process that can take more than one hour of work.
- Rubber cuffs are installed on the end parts of the old riser, secured with sealant.
- A new riser is assembled from plastic segments with a diameter of 110 mm, which is equipped with an additional socket for connecting drain pipes from the toilet, bathtub and sinks.
- Plumbing fixtures are supplied to the riser via corrugated plastic pipes installed with a slope of 5 in the direction of the drain.
Causes of ventilation malfunction
The causes of the malfunction can be attributed to a large number of factors. The main thing you need to understand is that when there is blowing from the ventilation system in an apartment, it is not the same thing if the same effect appears in a private house. That is, faults in two buildings may be different, because the traction failure in them has different causes.
For example, in an apartment this most often happens due to the installation of a fan or hood in the kitchen, which begins to press through its channel, and the air inside, moving to the riser with pressure, does not have time to pass the entire mass upward. That is, part of it ends up in the adjacent channel of the toilet or bathroom. It is in these rooms that the opposite effect occurs. The same thing happens in the opposite direction, if the fan in the kitchen is turned off and the fan in the toilet is on. This also happens with neighboring apartments located one above the other.
This suggests that you cannot thoughtlessly install additional exhaust devices without calculating their power. And the more powerful the fan, the stronger the reverse draft of the ventilation system in the apartment of a multi-story building.
For this reason, this cannot happen in a private house, because at the design stage today they try to distribute ventilation ducts to all rooms separately. That is, the kitchen has its own riser, and the toilet and bathroom have their own. But sometimes another problem arises in the house. Most often, risers are combined into one or two common channels inside the attic, and then one or two pipes are discharged through the roofing. And here horizontal sections appear in the ventilation system. The main task of the designer is to use as little of this type of air duct as possible, and to minimize the angle of inclination of horizontal sections (the reduction should be minimal). That is, the steeper this section, the better the upward air movement.
And three more reasons:
- Lack of thermal insulation. Cold air in winter enters the air ducts, where it freezes, turning into ice. This usually occurs at the mouth of the canal. The consequences are a reduction in the cross section.
- Lack of an umbrella (visor), which can lead to rain and reduced traction. This disrupts air exchange.
- The ventilation in the house is clogged with debris.
So, in order to remove backdraft, you must first understand why it appears.
Installation sequence
Installation of the drain pipe should be carried out only after familiarization with the design. The installation of this element should be considered at the design stage of internal utilities. For better ventilation performance, it is recommended to make fewer bends and slopes in the system.
Ideally, a sewer riser installed in a private house should be in a vertical position. The pipe is led out, bypassing the ceilings, straight to the roof. But, as practice shows, this is not always possible. In the case of some country houses, the use of additional elements for connection is required.
It is also practiced when several risers are connected to one air duct. Installation of such a plan is more in demand, since thanks to this, air pressure is evenly distributed throughout the system.
climate control equipment or with a carbon monoxide removal system
It happens that the air riser breaks and the drain pipe needs to be replaced. The principle of operation is similar to how other parts of the system are repaired. The main difference is the materials from which the elements were made and how they are connected.
Replacement of an element must be carried out subject to certain conditions:
- When dismantling work is carried out, the house must have good ventilation.
- When starting to replace an element, you should wear a respirator and rubber gloves.
- After completing the work, you should make sure that the system remains tight.
If different materials are combined, for example, plastic and cast iron, it is important to use a rubber adapter.
The fans are connected at angles of 45 and 135 degrees. The horizontal section should have a slope of 0.02% in the direction where the gases escape.
Causes of reverse thrust
As mentioned above, reverse draft in ventilation appears for two main reasons:
- Complete sealing of the premises.
- Installation of additional exhaust devices in ventilation ducts.
All other reasons are secondary, some of which do not create reverse draft, but simply the ventilation stops working. Ventilation in an apartment is more difficult, because the system itself is a complex set of channels, often made of concrete. Branches extend from the riser throughout all apartments, through which air from the premises must be removed to the street. And if a neighbor on the lower floor installs a powerful kitchen hood, then not only he, but also the neighbors on the floors closest to him will feel the reverse flow of air masses.
In a private house, reverse draft occurs for other reasons, because the ventilation in the apartment differs from the ventilation system of a private house. This is where installing fans can solve the problem. But you just need to determine the installation location using different risers.
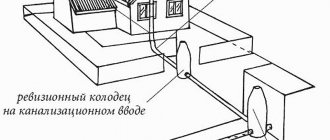
Stages of laying external sewerage
Many people, thinking about installing sewerage into their home, wonder how to lay sewer pipes? The whole process can be divided into several stages:
- Drawing up a plan for the future sewer system and calculating all the necessary materials that will be needed to install the system. Here, not only the required length of pipes is taken into account, but also all the necessary corners, transitions and branches that may be needed are calculated.
- Carrying out all earthworks.
- Installation of the entire pipeline.
- Carrying out backfilling.
This instruction will help you lay a sewer system in a country house or cottage without any unpleasant surprises, since all possible cases have already been calculated at the planning stage, and thus you have nothing to fear.
Ventilating a Cold Attic
Ventilating a cold attic can be done easily with your own hands. This will require knowledge of a little theory and some practical skills. Providing sufficient ventilation in a cold attic will not cause any particular difficulties due to the large air volume and the absence of barriers to normal air circulation. Air exchange can be carried out through the eaves, ridge and ridge of the roof, as well as gable windows and grilles.
For gable roofs, ventilation of cold attics is done either through gables or through loosely fitting wooden lining of eaves overhangs. If the gables are made of stone, then holes can be made in them for dormer windows with ventilation grilles.
Dormers should be installed on opposite sides to ensure proper ventilation of the attic.
There is an alternative, more economical option. To do this, install standard ventilation grilles (pediment vents), one of which is adjustable, and the other is turned with the vents down. To protect against insects, this grille is equipped with a protective mosquito net.
Hip roofs do not have gables due to the shape of their structure, so for them there is another option for providing ventilation in the attic - using eaves overhangs. The air flow will be through the roof lining, and its exit will be from above at the ridge. If the filing is made from wood with your own hands, then small gaps are left between the bars for the passage of air. When covering the cornice with plastic soffits, such a procedure is not necessary, due to the presence of pre-made holes on the elements - perforations.
The air exits from above, through the roof ridge. Its design features depend on the type of roofing material used. As a rule, any manufacturer of roofing materials has its own ready-made and practical solutions
!
Valleys (valleys) are one of the problematic and difficult areas of the roof. To ensure normal ventilation of the attic space, point aerators are installed along the valley. However, this method is acceptable for roofs with slope angles of 45° or more.
. On flat roofs, there is a high probability of snow accumulating in the valley area and therefore such ventilation becomes ineffective in winter. You can combat this by installing forced ventilation - inertial turbines, roofing electric fans, or using high nozzles that will not be covered with snow.
How to properly install a riser in a private house:
About riser clamps and sound insulation
A significant part of the noise from a working sewer riser is associated with the transmission of vibration to the walls through the clamps holding the pipe. This problem can be solved by using a damping clamp with a rubber insert.
Passing the sewer riser through the ceiling
As noted above, there should be no joints where the riser passes through the ceilings. For the obvious reason - a leak in the riser most often occurs through a joint, and if it ends up inside the ceiling, this is a problem.
After installing the riser, the passage through the ceiling is sealed with cement to the entire thickness of the ceiling (8.2.8). In addition, it is necessary to protect the lower part of the riser with concrete to a height of 8...10 cm. The thickness of the concrete layer is 2...3 cm.
Before sealing the riser with concrete, it is necessary to wrap the pipe with rolled waterproofing material. There should be no gaps in the waterproofing protection.
Sound insulation of sewer riser
If you are bothered by riser noise, you can use polyurethane foam or foam shell. Polyurethane foam is more expensive, but its flexibility allows you to effectively insulate curved sections of pipes. Foam shells are only suitable for straight sections, but they are noticeably cheaper. In addition, working with foam soundproofing for pipes is very simple - apply it, snap it on, and secure it with tape.
I do not recommend using foamed polyethylene as a material for sound insulation - it is cheap, but very short-lived. Polyurethane foam is completely useless - it practically does not absorb sound.
Passage of a sewer riser through the roof
The ventilation part of the riser must be brought to the roof. Standard roof penetrations can be used to penetrate the roof. The choice of passages for pipes with a diameter of 100, 110 and 150 mm is large - there will be no problems with the purchase.
In addition to the penetration, I recommend buying an insulated sewer outlet - especially if you are building a house in Moscow, the Moscow region or even further north.
The work itself is carried out in the following sequence:
- remove the thermal insulation at the site of the intended passage through the roof;
- we look for the area between the sheathing elements and mark the middle of this area;
- drill a through hole of small diameter at the location of the expected center of the output;
- we move to the roof and cut out a hole of the desired shape in the roof (use a stencil);
- We apply the sealing element of the penetration to the roof and adapt it to the topography. The element bends easily, so it can be pressed tightly even to a roof with complex terrain;
- We fix the seal using non-acetic sealant and self-tapping screws. The distance between the screws is 3.4 cm;
- if the axes of the sewer outlet and the main element of the ventilation pipe do not coincide slightly, we attach a special corrugated pipe to the sewer outlet. If the discrepancy is significant, you will have to install an inclined element;
- We attach the roof penetration to the sealing element. The method of fastening depends on the design of the penetration.
Please note: the remote elements of the ventilation pipe must be inclined. The minimum slope is 2 cm per 2 m length. This is necessary so that the condensate can freely roll down and fall into the drain.
- We insert the sewer outlet into the penetration and fix it. The output must be positioned strictly vertically;
- we return to the attic and attach the water seal seal to the waterproofing (supplied with the roof penetration);
- We connect the corrugated pipe or the outlet of the sewer riser to the waste pipe using a clamp.
What it is
When a private house is built, it is necessary to connect various communications to it. One of them is sewerage. At first glance, you might think that it is enough to equip it with only a sewer drain. In fact, this is not enough.
In order to explain the purpose of the vent riser, you need to remember how the toilet flushes in more detail. After the sewage is drained, a certain amount of water then gets there. Some of it remains in the toilet. It is actually a water seal, the role of which, in particular, is to prevent the unpleasant odor from the drains from entering the living quarters
It is important to understand that this protective layer of water is located inside the toilet bowl
If several such plumbing fixtures are installed in the house, then each of them, which is not currently in use, has such a water seal.
When one of the toilets is flushed, the pressure drops for a short period of time immediately after the sewage and drained water flows out. Since all the others are connected to this pipe, their water seals are broken and an unpleasant odor penetrates into the premises.
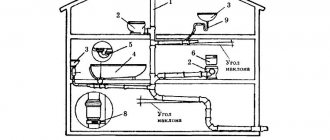
Diagram of the design and operation of the sewerage ventilation systemSource profidom.com.ua
It is important to note that this situation exists not only in relation to toilets, but to all drains that are connected to the sewer system. For example, we can talk about a water seal in a bathroom or in a sink, if they are connected in the specified way
This situation could have been avoided if the pipe had an additional outlet through which air could freely flow into it. In this case, low pressure would not arise at the drainage point and the water seals would not be broken anywhere.
Odors from the sewer could also escape through such a pipe. A sewer riser is a pipe that performs the specified functions, which is connected to the sewer system of the house and led outside it.
How necessary is it? In fact, the system in question is actively used in apartment buildings. In the sewer system, drainage from apartments occurs in a vertical pipe.
A system of vertical sewer pipes that performs the function of a drain riserSource ar.decorexpro.com
Its lower end is connected to the drainage system, and the upper end is brought out onto the roof and actually serves as a drain riser.
Is it necessary to put it on the roof?
Sometimes in apartment buildings, residents of the upper floor themselves dismantle the riser pipe leading upward.
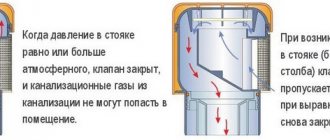
Check valve operation diagram Source ufa-santehnik.ru
The motivation for this decision is insufficient knowledge of the principles of sewerage operation and the idea of a drain riser as something superfluous and unnecessary. Soon after this, a persistent smell from the sewer pipe appears on the upper floors.
The situation can be improved. In this case, there is no need to install vent pipes on the roof. It is enough to attach a special valve to it. It will not release air outside, but when a low pressure zone forms, it will let air in, which will prevent the water seals from breaking.
There is no need to put such a riser on the roof. The valve must be installed at the top of the sewer pipe system. Although this is convenient (there is no need to install a pipe passing through the roof), such a device is not highly reliable.
Vacuum valve for installation at the top of sewer pipes Source drive2.ru
Installation
Installation of drain pipes
If you are installing a vent pipe yourself, follow the basic rules:
The fan pipe is installed by inserting a tee
- when purchasing building materials, make sure that the cross-sections of the sewer riser and the waste pipe match; the optimal diameter of the drain pipe (as well as the riser) is 110 mm;
- the outer section of the riser should be placed in such a place that the sewer “aromas” from it quickly and easily dissipate in the atmosphere;
- The starting point of the sewer system should be located in a heated room, but the final point, on the contrary, should be in a cold room. This provides the necessary difference in temperature and pressure, thanks to which unpleasant odors are removed from the outside of the house.
Appearance of tees and revisions for the fan pipe
Pro tip: The drain pipe is an actual continuation of the main sewer riser and can be made independently from a pipe intended for sewerage of the appropriate diameter.
Unpleasant odors in bathrooms appear due to the fact that siphons of insufficient volume are installed on sanitary fixtures. In small siphons, the remaining water dries out quickly (in 3-5 days, if you don’t use plumbing), which allows odors from the sewer to freely enter the room. Sometimes installing siphons with a larger capacity is not practical, then replacing the drain pipes in the apartment is required.
If the sewage system of a residential building has such a component as plastic drain pipes, the problem is solved as follows:
- the air in the sewer riser, rising up and falling outside the pipes, creates a vacuum in the sewer system;
- when siphons are dehydrated, air from the room leaks into the sewer, and not vice versa;
- the air remains fresh, without an unpleasant odor, even after prolonged non-use of the plumbing fixtures.
Ventilation pipe outlet to the roof
The tasks of domestic in-house sewerage include transporting wastewater from the building to the external sewer system. For its effective operation, good ventilation is required, which is provided by risers equipped with fan pipes.
Diagram of the exhaust pipe to the roof
Pro tip: The vertical vent riser should be led to the roof. It is strictly forbidden to place the output in the attic.
To properly install a drain pipe, you must adhere to the following principles:
- ensuring the exit of the vent pipe to the roof, an optimal height of 50 cm is provided; if the roof is used for any purpose and is actively used, the riser outlet should not be less than 3 m;
- a sewer pipe of 110 mm in diameter is connected to a sewer riser of equal cross-section;
- One drain pipe can connect several risers at once;
- it is prohibited to organize the outlet of a riser equipped with a waste pipe together with the ventilation system or stove chimneys;
- The exhaust pipe outlet, located above the roof, is made at a distance of 4 m or more in the horizontal direction from openable windows, balconies, etc.
Connecting several risers with one drain pipe: 1 – oblique tee; 2 – 45 degree elbow; 3 – straight knee; 4 – straight tee.
A sewer riser leading to the roof does not require the installation of any additional exhaust devices (for example, a deflector, a weather vane). Moreover, the use of these devices can lead to the release of condensation in the system, which, when frozen, will block the outlet openings.
It is also not recommended to route the ventilation drain pipe under the roof overhang. During the cold season, it can be damaged by snow sliding and falling from the roof.
Fan pipes are used to ventilate the sewer system: the sizes of such products vary, but the most common is the use of 110 mm pipes.
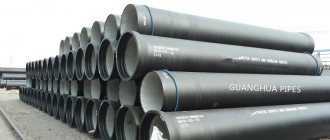
Metallurgical products
Metal devices, when arranging sewage systems in private and apartment buildings, have been used for a very long time, but have not lost their relevance today, due to the following positive characteristics:
- cast iron alloys have a high level of strength, and the rigidity and density of the metal structure allows for safe and uninterrupted operation of the drain pipe for a long time;
- increased wear resistance allows the use of metal fan pipes in regions with unfavorable climatic conditions;
- the material is very resistant to mechanical damage and can easily withstand even significant external loads;
- metal fan devices are impervious to ultraviolet rays and are suitable for installation for long-term operation in open space conditions.
The disadvantage inherent in any metal sewer drainage devices is their susceptibility to corrosive changes, to prevent which special treatment of the material is carried out.
Protective treatment can be galvanizing or spraying.
Among other things, such pipes, as a rule, have significant weight, which complicates transportation to the installation site and installation.
The main disadvantages are considered to be the high cost of metals, the need to purchase special fittings and the use of special equipment during installation.
Requirements for a ventilated valve (aerator)
The installation of ventilated valves to allow air into the system (Figure 5), which guarantees normal operation of the sewer system, is carried out on the basis of appropriate calculations. The throughput of the aerator must correspond to the specified design parameters for the throughput of the riser. In turn, the fluid flow through the riser depends on its diameter, type (ventilated/non-ventilated) and height. The calculations also take into account the diameter of the dictating floor drain (with the highest waste flow), the angle of liquid entry through it, the height of the water seals and other initial data.
Figure 5. Operating principle of an aerator - air valve for sewerage: 1. In the operating position, the valve is closed - air from the sewer does not enter the room.2. When a vacuum occurs in the sewer riser, the aerator valve opens, the missing amount of air comes from the room, preventing the water seal from breaking.
In a simplified form, you can coordinate the flow parameters of the aerator and ventilated riser using tabular selections. Initially, you should refer to Appendix “B” of SP 40-107-2003 for the installation of internal sewerage from polypropylene pipes. It is to this that SP 30.13330.2012 refers to determine the characteristics of the aerator.
Table 1. Capacity of a riser made of polypropylene pipes ∅110 mm, equipped with a ventilation valve with a clear cross-sectional area of the air flow of 3170 mm2 and 1650 mm2.
| Diameter of floor outlet, mm | Angle of liquid entry into the riser, ° | Riser capacity, l/s | |
| 1650 mm2 | 3170 mm2 | ||
| 50 | 45.0 60.0 87.5 | 5.85 5.10 3.75 | 7.7 6.8 4.54 |
| 110 | 45.0 60.0 87.5 | 4.14 3.64 2.53 | 5.44 4.8 3.2 |
Next, you should find out the flow parameters of the sewerage system with similar initial data. For ventilated risers, they can be gleaned from tables 6-9 (SP 30.13330.2012).
Table 2. Capacity of ventilated risers made of polyvinyl chloride (PVC) pipes (SP 30.13330.2012 (Table 7)).
| Outer diameter of floor bends, mm | Angle of connection of floor branches to the riser, ° | Throughput, l/s, risers with pipe diameter, mm | |
| 50 | 110 | ||
| 50 | 45 60 87.5 | 1,10 1.03 0.69 | 8.22 7.24 4.83 |
| 110 | 45 60 87.5 | 1,10 1.03 0.69 | 5,85 5.37 3.58 |
This also takes into account the diameter of the floor outlet and the angle of its connection. From the tables it becomes clear that, for example, for some of the most popular PVC pipes today, Ø 110 mm with an outlet Ø 110mm/45 (outlet for connecting a toilet), the second throughput of the riser will be 5.85 l/s. This figure turns out to be slightly higher than with similar geometric parameters of a sewer system with an air valve (5.44 l/s (Table 1)).
Installation features
Installation is carried out in the following sequence:
- They begin to collect elements at the bottom point of the contour. They are connected using a tee, one hole of which is directed upward.
- A fan pipe element is inserted into the tee hole; the joint should be located above the attic floor.
- The connection point is sealed with silicone sealant.
- Every 1.5 meters the pipeline is secured to the wall with clamps.
The vent pipe, as part of the riser, is led to the roof. On a pitched roof it should protrude 0.5 m above the ridge; if the roof is in use, the distance increases to 3 m.
Some tips
To install a fan riser, you should pay attention to the following:
- When bringing the pipe to the roof, you need to cover the hole with a grill . This is necessary to protect against birds.
- Sometimes when this system operates, a low, unpleasant noise . In order to get rid of it, you will need to wrap the pipe with a soundproofing coating.
- It is not always possible to bring from each to the roof . In this case, you can provide one pipe for several risers .
Options for exhaust pipe outlets Source td-intech.ru
Fan ventilation design principles
Project of a sewer system with a ventilated riser
When designing fan ventilation, two basic requirements should be adhered to:
- The diameter of the drain pipe should not be less than the diameter of the sewer riser.
- The outlet of the exhaust pipe is carried out in the direction from which unpleasant-smelling gases will be carried away by the wind.
As a rule, installing a vent riser involves connecting the pipe to the ventilation duct. If this is not possible, the drain pipe can be routed through the wall (also find out which bathroom is better - acrylic or cast iron).
Fan ventilation equipment
Fan pipe outlet in the roof
Fan ventilation may include the following elements:
- Fan pipes;
- Connecting pipes;
- Ventilation duct;
- Fitting.
Tips for installing fan ventilation
Installation of fan ventilation with your own hands
- The diameter of the fan pipe must be equal to the diameter of the riser from which it removes gases.
- For fan hoods, you can use both plastic and cast iron pipes. Shaped parts are selected in accordance with the pipe material.
- If you plan to use a combination of materials (for example, a plastic drain pipe will be installed on a cast iron riser), then a rubber adapter should be used.
- If you need to connect several fan pipes, tees with an angle of 45 or 135 degrees are used.
- Horizontal sections of vent pipes are laid with a slope that must be at least 0.02% and be made in the direction of gas movement.
- If there is a need to change the direction of the drain pipe, then it can only be done above the last device connected to the ventilated riser.
- Changing the direction of the pipe is carried out by installing fan outlets having an angle of 135 degrees.
The fan riser itself must meet the following requirements:
- The pipe outlet must be carried out above the roof at a distance of at least 0.3 meters from the roof covering.
- If the house has a usable attic space, then the outlet height should be increased to three meters.
- The distance from the outlet of the fan pipe to the nearest balcony or window must be at least four meters.
- The riser itself must pass through “warm” rooms or be insulated.
- When using plastic pipes, metal sleeves should be used to organize the outlet through the ceiling.
- It is prohibited to organize fan ventilation and a chimney in the same duct.
- If there are several sewer risers in the house, then the waste pipes can be combined into a single hood so that there is a single outlet on the roof.
- A lid with a mesh should be installed at the top of the drain pipe, which will protect the system from the penetration of insects and rodents.
https://youtube.com/watch?v=KHgibo7ACEY
Typical mistakes when installing fan ventilation
Fan fungus
- Some owners of private houses, not wanting to bother with organizing the connection to the pipe on the roof, consider it possible to cut off the vent pipe in the attic. Such a solution is fraught with the accumulation of gases under the ceiling and their penetration into the premises of the upper floor.
- It is not advisable to install a drain pipe on an external wall, as such a solution will lead to problems with condensation formation.
- Some homeowners, trying to improve draft in the fan pipe, install a weather vane at the outlet instead of a protective fungus. This solution does not give the desired effect and, on the contrary, can worsen the outflow of gases and the problem of sewage smell in the bathroom will arise.
Which pipes are better to use: polymer or cast iron?
Modern consumers choose polymer materials
- Cast iron pipes in plumbing are giving way to more practical and cheaper materials. Yes, risers made of cast iron are considered strong and reliable and can last for decades. But the complexity of installation, as well as susceptibility to corrosion, forces modern consumers to abandon cast iron elements.
- Plastic pipes are a broad term that includes polyethylene (PE), polypropylene (PP) and polyvinyl chloride (PVC). They have different functional qualities and prices, but have one thing in common - ease of installation and durability.
Conclusions and useful video on the topic
Thoughtlessly venting the attic is not a good idea:
Guidance for the installation of ventilation components in a gable or gable roof:
Features of the design and operation of natural ventilation in the attic:
Properly organized ventilation in the attic floor and in the unheated attic space will ensure a normal microclimate in the residential area and extend the service life of structures.
However, building codes must be followed when venting all venting components into the attic. Along with the exhaust air, condensate must be completely removed, from which elements made of wood and metal suffer almost equally. They lose their load-bearing capacity due to moisture.
Tell us about how and in what way the ventilation was removed through your own attic or attic. Share useful information on the topic of the article that will help interested site visitors. Please leave comments in the block below, post photos on the topic, and ask questions.