Here you will learn:
- How deep water pumps work
- Devices and main components of a submersible pump
- Basic malfunctions of submersible pumps
- How to diagnose a breakdown
- How to disassemble correctly
- Do-it-yourself repair of downhole equipment parts
- Revision of the motor part
- Inspection of the pump mechanism
- Typical breakdowns of pumps of different brands
- How to keep your engine for a long time
Submersible pumps are subject to various malfunctions. Some breakdowns can be corrected locally with your own hands; our instructions will help in this matter - how to disassemble a submersible pump, and methods for eliminating some faults.
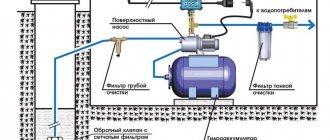
How deep water pumps work
To use reserves from underground sources, wells or boreholes, it is best to use deep-well pumps. Their operating principle is as follows:
- The unit is lowered into the liquid to a level below the surface level.
- The pressure created in the device forces water to be pushed upward, for which a hose or pipe is installed for a deep-well pump.
- Simple devices of this type can get water from a depth of up to 40 meters, more technologically advanced and expensive ones - up to 80 meters.
- There are two main categories of pumps:
Let's disassemble the Vodomet pump using the example of model 60/52
Several models of Vodomet pumps are suitable for wells: if the static water level is no more than five meters, then these are models 60/32 and 150/30, and if from five to twenty-five, then 60/52 and 150/45.
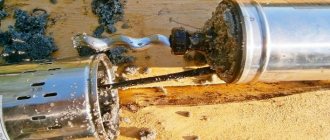
You need to disassemble the pump carefully, numbering all the parts along the way and recording the order in which they were installed
Let's look at the repair procedure using the Vodomet 60/52 pump as an example. We start by disassembling and removing all parts:
Unscrew the cap with water intake holes
If you have to clamp the case in a vice, you need to do it carefully, since it is hollow inside. It is better to put thick rubber on all sides; We disassemble the pump part (washers, “cups” with a bottom, impeller and everything else)
All parts removed from the shaft must be carefully laid out so that they can be installed later in the same order; We take out the retaining ring (white plastic) and the engine from the outer “glass”. To do this, the pump is placed vertically on a table with a hole for the shaft. You need to hit the top fitting cap lightly with a rubber mallet so that the engine moves the ring a little. There's no point in trying to pull it out through the thread; it won't go through anyway. Then place the pump horizontally, pull the cable a little and pull the motor back. Next, on one side, you need to rest against the white ring with a long screwdriver and hit it so that it moves a few degrees. We unfold it with our hands across the pipe and remove it from the body. In the same direction you need to remove the engine; Remove the cover of the compartment in which the wires are located. It is held in place by two rubber seals. We place the engine on its side and, using a wide screwdriver and a rubber mallet, carefully knock it out in a circle.
Only non-toxic oil can be poured into the pump motor so as not to poison the water in the well in the event of an accident. As a rule, glycerin is used. 0.5 liter is enough for replacement
Devices and main components of a submersible pump
Currently in Russia you can find hydraulic equipment from manufacturers in Italy, the USA, Germany, France, Denmark: ZDS, PEDROLLO, CALPEDA, WILO, Busch, GRUNDFOS, Tapflo and others; Russian companies Gilex, Ampika, Pinsky OMZ, GMS Livgidromash.
Submersible pumps are designed to pump water from wells, wells or basements of buildings and, if necessary, supply it to a collapsible water supply network. At the same time, their working area is immersed in liquid, which is why they are called that.
There are several types of these devices:
- Centrifugal, in which the main element is an impeller (impeller) or a screw. Examples of them are “Vodomet”, “Aquarius”, “Whirlwind”, “Octopus”.
- Vibrating ones, which are headed by a piston. An example of them is the “Kid” pump.
- Vortex pumps are similar to centrifugal pumps, but are distinguished by a higher circular velocity of the fluid. An example is the “Vikhr” vortex pump.
Note: centrifugal units are divided into rod-type, when the hydraulic part and the electric motor are located in different places and are connected to each other by a rod, and rodless, when the electric motor is combined with hydraulics.
The main components of centrifugal apparatuses include:
- impeller or screw/auger;
- electric motor;
- barbell;
- stuffing boxes;
- couplings;
- bearings.
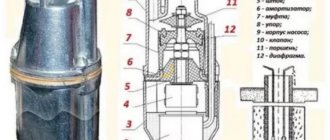
The main components of vibration devices include:
- working part body;
- drive unit;
- electric coil;
- piston;
- diaphragm;
- valve
- shock absorber;
- emphasis;
- coupling
How much will it cost
The cost of repairing a well pump, as well as parts for their repair, may be different in each city. Let's give the average cost for each of the named units and components. The cost of repairing centrifugal, vortex and screw installations will cost from 2000 rubles and more.
Cost of replacement parts
For vibration pumps:
- piston - 34 rubles;
- valve – 33.60 rub.;
- repair kit (piston + valve) – 67.20 rubles;
For centrifugal and screw units:
- oil seal - 100 rubles;
- impeller - from 100 rubles;
- screw - from 550 rub.;
- pump shaft – from 260 rubles;
- starting capacitor - from 300 rubles;
- electric motor – 3500 rub.;
- mechanical seals – 2550 rub.
Thus, we can conclude: restoring the operation of the electric pump yourself will cost much less than purchasing a new unit or using services.
Basic malfunctions of submersible pumps
If malfunctions are noticed in the operation of a submersible pump, it does not always need to be removed from the well for inspection. This recommendation only applies to pumping stations that have a pressure switch installed. It is because of this that the device may not turn on, not turn off, or create poor water pressure. Therefore, the functionality of the pressure sensor is first checked, and only after that, if necessary, the pump is removed from the well.
Important! In the case of submersible pumps operating without hydraulic accumulators, they should always be removed from the shaft at the slightest sign of failure.
It will be easier to diagnose water pump malfunctions if you first become familiar with the most common breakdowns of this unit.
Pump doesn't work
The reasons that the pump does not work may be the following.
- Electrical protection has tripped. In this case, you should disconnect the device from the network and turn on the machine again. If it knocks out again, then the problem should not be looked for in the pumping equipment. But when the machine is turned on normally, do not turn on the pump again; you must first find the reason why the protection was triggered.
- Fuses have blown. If after replacement they burn out again, then you need to look for the cause in the power cable of the unit or in the place where it is connected to the electrical network.
- The underwater cable has been damaged. You should remove the device and check the cord.
- The pump's dry start protection has tripped. Before starting the device, make sure that it is immersed in liquid to the required depth.
Also, the reason that the device does not turn on may lie in the incorrect operation of the pressure switch installed in the pumping station. It is necessary to adjust the starting pressure of the pump motor.
The pump works, but does not pump
There may also be several reasons why the device does not pump water.
- The shut-off valve is closed. You should turn off the device and slowly open the tap. In the future, you should not start the pumping equipment with the valve closed, otherwise it will fail.
- The water level in the well has dropped below the pump. It is necessary to calculate the dynamic water level and immerse the device to the required depth.
- Check valve stuck. In this case, it is necessary to disassemble the valve and clean it, if necessary, replace it with a new one.
- The inlet filter is clogged. To clean the filter, the hydraulic machine is removed and the filter mesh is cleaned and washed.
Low device performance
Advice! If the performance of pumping equipment drops, you should first check the voltage in the network. It is precisely because of its reduced value that the engine of the unit cannot gain the necessary power.
Reduced performance also causes:
- partial clogging of valves and faucets installed in the water supply system;
- partially clogged lift pipe of the device;
- pipeline depressurization;
- incorrect adjustment of the pressure switch (applies to pumping stations).
Frequently turning on and off the device
This problem occurs if a submersible pump is paired with a hydraulic accumulator. In this case, frequent starts and stops of the unit may be caused by the following factors:
- the pressure in the hydraulic tank has dropped below the minimum (by default it should be 1.5 bar);
- the rubber bulb or diaphragm in the tank has ruptured;
- The pressure switch is not working correctly.
You can hear the hum of the machine, but the water does not pump
If the pump hums and water is not pumped out of the well, there may be several reasons:
- “gluing” of the device’s impeller with its body occurred due to long-term storage of the device without water;
- the engine start capacitor is faulty;
- the voltage in the network dropped;
- The pump impeller is jammed due to dirt accumulated in the device body.
Water is supplied with pulsation
If you notice that water from the tap does not flow in a constant stream, then this is a sign that the water level in the well has decreased below the dynamic level. It is necessary to lower the pump deeper if the distance to the bottom of the shaft allows this.
The unit does not turn off
If the automation does not work, the pump will work without stopping, even if excessive pressure is created in the hydraulic tank (as can be seen from the pressure gauge readings). The culprit is a pressure switch that has failed or is incorrectly adjusted.
What is the phenomenon of cavitation
Everyone knows that a certain amount of gases is dissolved in water. When a liquid moves at a certain speed, rarefaction zones sometimes form in it. In these areas of low pressure, gas bubbles begin to emerge from the water. Once the bubbles enter the high-pressure zone, they collapse. This process occurs with the release of a large amount of energy, which destroys the impellers and volute of the pump. The following photo shows a unit impeller destroyed by cavitation.
The energy from the collapsing bubbles can create shock waves that cause vibration. It spreads throughout the entire unit and affects not only the impeller, but also the bearings, shaft and seals, causing these parts to quickly become unusable.
The cavitation effect can most often be observed in pumping stations that operate on suction . In such systems, the impeller creates a vacuum, due to which water rises through the hose from the well. But if there is a lack of liquid at the pump inlet, then excessive vacuum occurs in the impeller area, causing cavitation.
Important! The most obvious signs of cavitation are vibration of the pipes and the pump itself, as well as increased noise during its operation. If no measures are taken to eliminate this process, it can completely destroy the station.
To prevent cavitation from occurring in pumps, you should adhere to the following rule: there must be more water at the inlet than at the outlet. This can be achieved in several ways:
- you should move the device a little closer to the source;
- you can increase the diameter of the suction pipe (hose);
- to reduce resistance in the suction section, the suction pipe can be replaced with a pipe made of a smoother material;
- if there are many turns in the suction pipe, then, if possible, their number should be reduced;
- It is desirable that all bends have large turning radii.
Advice! The suction hose of the station should not be lowered into the well to a depth of more than 8 meters. Typically, the maximum immersion depth of the hose (pipe) is indicated in the equipment manual.
How to diagnose a breakdown
To get rid of a breakdown, you need to find its cause. Diagnostics consists of the following sequential stages:
- Remove the distribution panel yourself.
- Disconnect the impeller from the engine.
- Check how it rotates when there is no load. If in future you want the engine to run smoothly and quietly, attach a smoothing capacitor to the part.
- With the impeller set aside, determine whether the motor is in working order or whether it is burnt out.
- If the shaft does not turn, most likely a part has broken, causing the engine to jam. Then small and, conversely, large parts of soil enter the unit along with water.
- It is likely that the stator winding burned out due to the accumulation of dirt and untimely disposal of it.
Please note that if the shaft rotates correctly, the lower component of the motor is assembled.
Conclusions and useful video on the topic
Video #1. Repair of the “Sverchok” pump – a complete analogue of the “Rucheyok”:
Video #2. Visual demonstration of vibration pump repair:
The “Rucheek” electric pump is a simple and reliable unit. If it breaks, you can repair it yourself, saving significantly on repairs. But the best option is to prevent pump failure. This is not difficult to do; you need to carefully study the operating instructions and carry out timely maintenance and monitoring of the operation of the equipment.
Do you have any questions or want to share your experience gained using a country vibration pump? Please write comments. Post posts with your opinion and photos on the topic.
How to disassemble correctly
First, turn off the power, then dismantle, disconnect the pressure pipeline and disassemble it:
- remove the coarse filter;
- disconnect the motor part from the hydraulic part.
Disassembling the hydraulic unit:
- the hydraulic part is clamped with a vice onto the pressure pipe;
- the housing is unscrewed;
- All parts are removed from the shaft;
- if necessary, replace worn or broken ones;
- the parts are washed and then assembled onto the shaft.
Important: in order not to confuse the parts, they must be placed in the order of disassembly or put on any axis/rod without changing position.
Motor disassembly:
- it is installed with the lid facing up;
- unscrew the lid and remove the sealing gasket;
- oil is drained;
- using a press, the lower motor cover is pushed down, the locking ring is released, and then removed;
- with light blows of a mallet on the end of the shaft, the bottom cover with the rotor is knocked out;
- the engine rotor with bearings is removed;
- if replacement is necessary, remove the bearings from the shaft and the oil seal from the top cover of the motor;
- windings are checked; if necessary, the stator is sent for repair. Assembly is carried out in the reverse order.
Operating principle of the product
When the unit is connected to a power source with a mains voltage of 50 Hz, the armature is attracted to the core. Every half cycle it is thrown back by the shock absorber. Thus, during 1 period of the current wave, the attraction of the armature occurs twice. Therefore, in 1 second it is attracted a hundred times. Frequent vibration of the piston located on the rod with the armature is also observed.
Brook pump without casing
Thanks to the volume limited by the valve and piston, a hydraulic chamber is formed. The actions in it are springy due to the elasticity of the pumped medium containing dissolved air and the vibrations of the piston. While the water is pushed into the pressure pipe, and the spring expands and contracts, the valve allows the liquid to enter and exit through the suction holes.
The Rucheek pump comes complete with a nylon cable used for its fastening and installation. The cable protects the consumer from electric shock in the event of an insulation breakdown, since it does not conduct current.
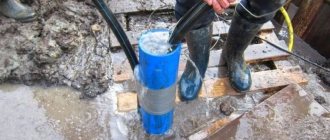
Do-it-yourself repair of downhole equipment parts
To repair downhole devices, they are first de-energized, then removed upward and disconnected from the pressure pipe.
Piston replacement:
- the tightening bolts are unscrewed;
- body is removed:
- the nuts are unscrewed from the rod;
- the valve is removed from the stem;
- a new one is installed;
- tighten the nuts securing the valve to the stem;
- the housing is put in place;
- both parts are bolted together.
Valve replacement:
- the tightening bolts are unscrewed;
- the housing of the hydraulic part is removed;
- the valve mount is unscrewed;
- the old one is removed;
- the new valve is screwed onto the body;
- the housing is installed in place;
- both parts are fastened with coupling bolts;
- The operation of the installation is checked in a container with water.
Coil replacement:
- unscrew the coupling bolts;
- remove the hydraulic housing;
- remove the piston assembly with the diaphragm, clutch, shock absorber and armature;
- heat the compound filling of the electromagnet with a burner or on a hot plate until it softens;
- remove the electromagnet from the motor housing;
- clean his nest;
- remove the coil from the core;
- disconnect the power cable;
- replace the coil;
- solder the power cable and insulate the soldering points with PVC pipes;
- install the coil on the core;
- place the coil with the core exactly in place in the engine compartment;
- fill the electromagnet with epoxy resin according to the instructions;
- after 15-30 minutes, add resin to the upper level of the core;
- Allow the resin to harden overnight;
- install the anchor assembly on the engine compartment;
- put the pump housing in place;
- install coupling bolts;
- Check the operation of the unit in a container with water.
Replacing the discharge pipe:
- to repair deep-well pumps, they need to be de-energized, raised to the surface, then disconnected the pressure pipe;
- unscrew the check valve;
- unscrew the discharge pipe;
- screw in the new discharge pipe, having previously wound the FUM tape or FUM thread onto the thread;
- screw on the check valve, winding the threads with FUM tape or FUM thread;
- connect the pressure pipe;
- lower the apparatus into the well;
- connect power supply.
Engine thermal insulation:
- to replace the thermal insulation of the engine, you need to disconnect the hydraulic and motor parts;
- remove the retaining ring;
- remove the seal and install a new one in its place;
- assemble the unit;
- connect the pressure pipeline;
- lower the unit into the well;
- connect power.
Fluid has leaked from the engine:
- disconnect the motor part;
- install the engine vertically, with the cover up, unscrew the motor cover;
- pour in environmentally friendly non-toxic oil (some experts recommend pouring Vaseline oil);
- check the integrity of the gasket; if necessary, replace;
- screw the top cover;
- connect the motor part to the hydraulic part;
- lower the device into the well;
- connect power.
Broken rod. To repair the rod yourself, you need to turn off the power to the device, lift it to the surface, disconnect the pressure pipe, then proceed to repair the submersible pump itself:
- unscrew the coupling bolts;
- remove the hydraulic part cover;
- remove the rod assembly;
- remove the piston, stop, coupling from it;
- unscrew the nuts securing the rod to the shock absorber and remove it;
- remove the armature with the rod shank from the engine compartment;
- remove the rod shank from the armature;
- insert a new rod into the armature;
- put the shock absorber on it, tighten the fastening nuts;
- put the coupling, stop, piston on the rod and tighten the fastening nut;
- lock the nut or cap the end of the rod;
- install the hydraulic part cover;
- tighten the coupling bolts;
- connect the pressure pipe;
- lower the installation into the well;
- connect power.
Blockages. Centrifugal, vortex and screw type devices can become clogged.
- To clean the installation from silt, salt deposits and adhering sand, you need to turn off the power, take it to the surface of the earth, disconnect the pressure pipe, disconnect the hydraulic part and the motor.
- Then disassemble all the pump parts from the shaft.
- Rinse all components, the coarse filter, replace worn parts if necessary, then reassemble everything in the reverse order.
- Connect the pressure pipe, lower the unit onto the workplace, and connect the power.
How to make device repair easier
There are several ways that can help make deep well pump repair easier:
- Disassembling the upper part of the electric motor must begin after installing it vertically. This will prevent oil from leaking out, which is unacceptable, since oil in most modern systems is the working fluid.
- Remove the cover where the wires supplying voltage to the electric motor fit. The starting capacitor is also clearly visible here.
- Checking the resistance of the starting and operating windings should be done using an ohmmeter, the terminals of which are connected to the winding.
- By rotating the handle, it is necessary to create a voltage of several hundred volts. If the device reading has a certain value, but not infinite, it means that all windings are working. The device reading on the working winding of infinity indicates a break in the working phase of the motor.
- A small resistance value indicates that there is a short circuit between the motor turns.
Advice: If the above breakdowns occur, it is almost impossible to fix everything yourself. In this case, it is better to send the device for repair to a specialized workshop.
- If all instruments indicate that the elements are in good condition, you will need to check the starting capacitor. It is possible that it is faulty or there is a break in the element. Such a defect can be accurately detected by the device, although outwardly everything looks fine. You can replace the capacitor yourself.
Increased service life
Motor inspection/revision
In order for the device to last longer, it needs to be inspected at least 2 times a year. To do this, check:
- oil level in motors of centrifugal and screw units;
- integrity of compound filling in vibration installations;
- degree of bearing wear;
- integrity of the power cable;
- hull integrity;
- cleanliness of the unit surface.
Pump inspection/revision
To do this, check:
- hull integrity;
- cleanliness of the unit surface;
- the amount of liquid pressure;
- filter cleanliness;
- absence of mechanical noise during operation of the installation;
- free rotation of the shaft.
Advice: do not forget to inspect the installation and electrical equipment at least 2 times a year, at the beginning of the summer season and at the end of it.
Revision of the motor part
Deep well pumps are equipped with a single-phase, mostly brushless induction motor. The connection diagram contains a starting capacitor. The stator of the electric motor has a monolithic attachment to the housing; it is often filled with epoxy compound.
In pumps of a monolithic design, the motor must be squeezed out of the glass by pressing on the connection outlet of the outgoing pipeline with the impellers removed. In rod pumps, the motor part is disconnected when the two halves are separated, in screw pumps - after removing the working screw. In all cases, the insides of the engine (capacitor, connecting terminals) can only be accessed after removing the sealed plug. It is fixed with 2-3 screws on the side surface of the sleeve and a powerful locking ring. In some types of pump, the plug may require the use of a special puller.
Well pump motor stator
All well pump motors are filled with oil, which performs lubricating, cooling and dielectric functions. The oil used is special food grade, but it is commercially available. Signs of low quality may be a cloudy color of the oil when mixed with water, darkening or the presence of mechanical impurities, as well as insufficient levels. If the oil is normal, it should be drained into a clean, dry container, leaving the motor housing for 15–20 minutes until the residue completely drains from the walls. Insufficient oil filling of the engine indicates wear of the oil seals.
In addition to spoiled oil, engine malfunctions can be caused by worn bearings, which can be determined by play and free-wheeling noise. If the pump has been operated for a long time under extreme conditions, the shaft may be bent (twisted) and the winding insulation may overheat. Burnt stators are practically beyond repair, but they are quite easy to replace.
Burning of the stator winding due to water entering the motor
Some good advice
High purity vaseline oil is used as a lubricant in Aquarius pumps. This composition is used in pharmacology for the manufacture of ointments. In this case, the manufacturer hides the name of the company supplying this product.
As stated on the lid, do not open it
If handled carelessly, oil may spill out of the engine. In total, the Aquarius pump engine contains about half a liter of Vaseline oil
But to restore the lubrication, it is better to contact the manufacturer to avoid contamination of the well with technical oils. Authorized service centers usually provide this service without any problems.
In total, the Aquarius pump engine contains about half a liter of Vaseline oil. But to restore the lubrication, it is better to contact the manufacturer to avoid contamination of the well with technical oils. Authorized service centers usually provide this service without any problems.
If the Aquarius pump is intended to be used in an automated water supply system, a check valve must be installed. The device is not equipped with this element; it will have to be purchased separately. It is recommended to give preference to a valve equipped with a brass flapper. Such devices are characterized by increased wear resistance and a longer service life.
If the pump will only be used for irrigation, there is no need to purchase and install a check valve. In this case, you can block the flow of water into the hose. In this case, the pump will operate at idle speed; the device is designed for such loads.
If there is a need to replace the capacitor, it will be useful to consider the following information. “Aquarius” pumps use devices with a capacity of 14-80 uF, designed for 400 V. This is a bipolar dry capacitor made in the Czech Republic, the dielectric component of the device is polypropylene.
Depending on the model or time of manufacture of the pump, a capacitor from TESLA, AEG, Gidra, etc. may be installed in it. Models with both wired contacts and petal contacts were used. All this allows us to conclude that similar models from any manufacturer are suitable for Aquarius pumps if their characteristics meet the specified technical requirements.
Water pipes in a self-contained water supply system usually use either half-inch or three-quarters of an inch. But the pump or pipe that connects to the pump outlet must be at least one inch in diameter. These sections of the water supply can be connected using an adapter. When using a pipe with a smaller diameter, a slight decrease in pump performance may be observed.
This diagram clearly shows the characteristics of various models of Aquarius pumps for a well. This data will help you choose the right pump for your specific situation.
Some amateur craftsmen tried to reduce the performance of an overly powerful pump by removing part of the working rings. Such actions can be fatal to the device. It is best to initially select equipment with the required performance.
Inspection of the pump mechanism
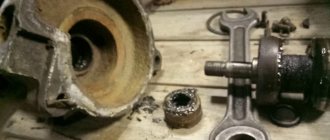
In addition to contamination, the main cause of breakdown of the pumping mechanism is long-term dry operation. Due to the lack of liquid, the centrifugal impeller blocks get very hot and sinter, so the only repair option is to replace them. The situation is similar with the auger and landing bushings. Also, with jammed impellers, the shaft can rotate in the mounting holes, and in powerful pumps, it can become deformed and even destroyed.
In screw pumps, screws and landing bushings are consumables; they are replaced every 3–5 years, depending on the intensity of use. The main reasons are the natural aging of elements and exposure to small abrasive particles.
Screw and bushing for screw pump
Let us draw your attention to the fact that the parts of the well pumps have a high precision of fit, thanks to which the cleaned mechanism is easily assembled and disassembled. If during assembly the parts do not fit into place freely, then the order of installation of the elements is incorrect. Different pump models have specific design differences, but basic recommendations for self-repair and disassembly for inspection purposes are always described in the user manual, which often includes an assembly diagram.
Why does equipment break down?
A submersible well pump provides convenience and ease of use of the well. It lifts water from great depths to the surface, where it flows through communications to water intake points.
Domestic and foreign enterprises produce household submersible pumps. And although the pumping equipment is reliable, breakdowns may occur from time to time during operation.
All elements of submersible pumps are precisely fitted and can be easily disassembled. If during the assembly process the parts do not fit into place freely, then the order of installation of the individual components is incorrect
The smooth and smooth operation of a submersible pump is often disrupted by the following reasons:
- high (more than 50%) concentration of suspended particles in water;
- “dry” operation, when the device operates without touching the water;
- voltage drops above the permissible level that regularly occur in the network;
- poorly secured cable connections;
- the unit cable is not correctly attached in the well head area;
- The submarine cable is not secured correctly.
Malfunctions are caused by the absence of a filter or its excessive contamination, an unstable pressure switch or a poorly functioning accumulator.
In the absence of grounding, electrochemical corrosion affects the metal elements of the equipment. The pump stops pumping water normally and requires immediate maintenance.
If problems arise with a new pump that is under warranty, do not fix them yourself. It is better to take the device to a company service center. There, its functionality will be restored by experienced professional technicians.
Very often, the cause of the malfunction is errors made by users during the installation of the pump and its operation. Manufacturers and service center employees recommend that customers, immediately before connecting devices, carefully read the instructions and strictly follow everything that is written there. This will avoid many problems and extend the life of the pumping equipment.
Typical breakdowns of pumps of different brands
Equipment from popular domestic and foreign brands has its own characteristic failures. Devices from the Danish manufacturer Grundfos, despite their reliability and durability, require regular replacement of the mechanical seals. If this is not done in a timely manner, water will penetrate inside and damage the winding.
It is not advisable to service the unit at home. The specific design requires that repairs be carried out by an experienced specialist, ideally an employee of a company service center.
A pronounced hum and pressure that has dropped to a minimum indicate that the impeller in the pump has worn out or has moved along the axis. The device must be disassembled, cleaned of sand, damaged elements replaced and new seals installed.
Gilex units often leak fluid from the electric motor. It can be replaced, but only with a similar composition.
Some craftsmen believe that it is not necessary to buy an expensive substance. You can get by with glycerin or transformer oil. However, this is not the best advice. The equipment does not tolerate filling with alternative means very well and can completely fail after such an operation.
It is better not to repair the device yourself, but to entrust this task to qualified specialists. They are guaranteed to fill the engine with the original composition and do so in strict accordance with the manufacturer’s wishes. After servicing it will work just as well as on the first day of purchase.
Worn seals are indicated by a low oil level in the pump motor. It is better to replace them as quickly as possible. This will protect the motor from overheating
In the “Malysh” devices of the Russian enterprise Livgidromash, coils often fail. Dry work provokes this problem. A strong noise heard when turned on without pumping out water indicates a break in the central axis to which the membranes with the anchor are attached. This breakdown is easy to detect after disassembling the unit.
Replacing an axle even at home is not difficult. But finding a part on sale is really a problem.
Aquarius pumps tend to overheat. This drawback is especially active when the equipment operates in shallow wells. Repairs are expensive and sometimes amount to about 50% of the original cost. In such cases, many users prefer to buy a new device, albeit from a different manufacturer.
The same problem is typical for the “Rucheek” models. Despite the modern design and compliance with current European standards, they do not tolerate continuous operation.
The manufacturer says that the devices can continuously pump water for no longer than 7 hours. However, almost always such a load leads to overheating. To avoid problems, it is better to take breaks and let the equipment rest every 2-3 hours. In this way, the service life of the pump can be extended.
Do not start water pumping devices with the shut-off valve closed. In the future, this will lead to breakdown of pumping equipment. Before turning on, the valve must be opened
Vodomet pumping equipment is considered to be quite reliable and operationally stable. Most breakdowns here occur due to improper use. Also, when equipment comes into contact with contaminated water, it quickly becomes clogged with silt and sand. In this case, the pump part of the unit requires replacement.
When a problem cannot be solved at home, you should seek help from the professional technicians of a certified service center. They will quickly determine what happened to the equipment and restore its functionality. Or they will recommend purchasing and installing a new pump if the old one cannot be repaired or it is not economically viable.
The inlet filter is clogged
The liquid entering the water supply system of your own home from an autonomous well is saturated with mechanical impurities. Solid particles of silt, clay, sand, freely circulating through main pipes, can damage equipment, causing premature wear of parts. To extend the life of the pumping station, a special filter is installed on the inlet pipe to block the path of debris.
The continuous operation of the pump system is caused by clogging of the screening device or a break in the supply pipeline. As a result, a sufficient amount of water stops flowing into the unit. To solve the problem, it is recommended to clean the protective device or replace the damaged section of the line.
Brief repair diagram for centrifugal type devices
The sequence of repair activities looks like this:
- the device body is washed from the outside;
- the device is disassembled;
- parts are inspected, washed and cleaned;
- parts are removed, repaired or replaced;
- spare parts are supplied;
- the apparatus is assembled;
- run-in and tested;
- body is painted.
Repair and prevention of breakdowns of centrifugal pumps
Any centrifugal pump requires care and diligence when repairing due to the complexity of the design. The basic rule for repairs is to disconnect the device from the network before starting work. The stages of repair of centrifugal pumps consist of the following points:
- Before repairing the device, it must be disassembled. Disassembly is carried out by removing the device body. After disassembling the centrifugal pump with your own hands, you need to inspect it;
- inspection and measurement of clearances of sealing parts and the rotor of the unit;
- bearing replacement;
- The shaft is checked for roughness and cracks. If detected, it is changed;
- measuring the body for any deviation from the norm;
Such measures are carried out to maintain the device in good condition, so the frequency of such repairs is once every 4500 hours.
For global repairs during operation of 26,000 hours, it is necessary to perform the following manipulations:
- shaft change;
- changing o-rings, bushings;
- replacement of sectional parts of the device;
- hydraulic test.
Repairing and maintaining centrifugal pumps is a complex task, so problems arise during its implementation. Such difficulties include:
- removing the coupling. To perform the procedure, you must use a puller;
- removing the pressure flange;
- removing liners;
- bearing disassembly;
- removal of impellers.
After repair work and replacement of necessary parts, it is necessary to assemble the device. The assembly sequence is as follows:
- Checking and preparing parts to be installed.
- Fitting parts to their locations.
- Grinding and lapping of locations for replacement parts.
- When using a diameter wrench and maintaining force, the screw fastenings are tightened.
- The impeller is assembled on the shaft, maintaining the axial clearance.
- While maintaining perpendicularity to the end side, a relief disk is installed.
After repair work, the mechanism is tested on a specialized stand. The tests consist of several points:
- short-term start and stop;
- warming up the device;
- operating test.
During a short start, lasting about three minutes, check the lubrication of the bearings, the correctness of the instrument readings and the correct rotation of the rotor.
Devices designed to work with hot liquids are warming up.
When testing the operating mode, the electric motor is turned on, the valve is opened when the full rotation speed is reached, and the device is run in for two hours.
For a long service life, your unit must be periodically sent for scheduled repairs or you can do it yourself. This event will reduce the number of breakdowns. And by making timely repairs, the device will last a long time.
Criterias of choice
There are several rules that should be followed when choosing a device: These are, first of all:
- pressure
– this value for equipment of average productivity is 7-10 meters. In some models it reaches more than 30 meters. Data regarding pump pressure depend on the distance over which the liquid is planned to be supplied; - productivity
- the choice depends on the volume of the tank. For example, for a capacity of 40 “cubes”, a device with 10 cubic meters of productivity per hour is sufficient. For industrial purposes, more efficient pumps are needed - about 100 m³ / hour or more; - immersion depth of the device
- the maximum value reaches 5 -15 meters, and the minimum - 0.3 - 0.9 meters.
In addition, you need to know what factors determine the lifespan of the pump:
- the quality of the materials from which the equipment elements are made;
- the temperature of the pumped dirty water should not be more than +50°C;
- drain passage diameter;
- presence of protection against possible overheating. Typically, a thermal relay is built into the pump (it will turn off the power if the liquid temperature becomes critical) and a float switch.
Common problems
Nature of the failure and cause of its occurrence:
- Doesn't buzz and doesn't work. The drainer is lowered into the water, the float has surfaced and is on the surface, the cable is connected to the circuit, but the engine does not work, there is no vibration. The cause of the breakdown is a discrepancy between the declared motor power and the electrical network to which the device is connected. Carefully read the characteristics of the pump, its power and efficiency. The pump is not lowered deep enough into the water and the float does not work. Remove the device and, lifting the pillow up, turn it back on.
- It works, but doesn't download. The engine is on, but no water comes to the surface. There are several reasons for this. The protective mesh blocking debris and stones at the bottom of the case is clogged. Raise the device and clean the filter. The thick fraction got into the discharge hose and a blockage occurred. If such a breakdown occurs, it may be knocked out of the base of the pump; if this does not happen, you need to disconnect it yourself and wash it. The impeller is broken. Its augers may break or the bearing may collapse; this can be found out by disassembling the pump.
- Vibrates and overheats. The electric motor braid was broken, water got into the engine compartment, and the shaft bearing was destroyed. The unit vibrates and heats up, while the water flows in jerks or stops altogether. We urgently turn off the power to the equipment and pull it to the surface. The cause of the breakdown is hidden inside. For diagnostics it is necessary to disassemble the case. Several impeller blades are broken. The rotation occurs with an eccentric and hits the body on one side.
- Low pressure with a properly running engine is a consequence of a breakdown of the mechanical part of the pump. Impeller or bearing, clogged discharge hose or suction filter. It can be eliminated by simply washing it in clean water or replacing mechanical parts.
- When the unit is connected to the network, the automatic switch is activated. The fuse cuts off the network if a short circuit occurs. Check all electronic parts of the pump. Go through the cable with a tester and find out where the short circuit occurred - replace it. The motor's copper braiding is also at risk if the unit is run dry. The braid can be replaced or a new engine installed only in a repair shop.
- The device works, but turns itself off. Connected to the network and working, pumping water properly. Suddenly it turns off on its own. The reason is a mismatch between the power of the motor and the electrical network. Voltage surges can also affect the smooth operation of the unit. The solution is simple - study the instructions and characteristics of the pump in detail, install a voltage stabilizer.