Correct installation of a bathroom drain with your own hands allows you to reduce to a minimum the possibility of overflowing the water bowl in the water treatment room. It is necessary to maintain order in this area, since water can fill the bathtub faster than it can drain. At the same time, there is not only the possibility of flooding the floor, but also flooding the neighbors. A piping or drain-overflow system allows you to organize the drainage of water from the bathtub into the sewer channel.
Installation
When you have assembled the siphon, you can start installing it.
This work is also quite accessible and understandable. Let's take a step-by-step look at how to install an assembled bath siphon yourself.
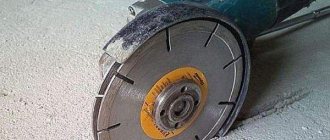
- First you need to unscrew the old siphon. Then clean the connections as thoroughly as possible, as well as the inside of the pipe.
- Now you can proceed to installing the bottom overflow. A gasket must be placed on the bottom end of this part. Now the overflow should be placed directly on the drain hole.
- At the same time, you need to attach a second pad to the hole. Next, a screw is inserted into it.
- After installing the cone gasket, you will get a not very tight connection, which will certainly lead to leaks in the future. Only after you are sure that you have performed your actions correctly, you need to hold the pipe with one hand, and with the other, tighten the screw using a screwdriver.
- Now you can begin installing the top overflow. It attaches in exactly the same way as the bottom one. To make installation work faster and easier, experts advise directing the pipe not vertically downwards, but moving it to the side (closer to you).
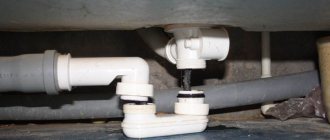
- Now you need to make the connection between the drain and overflow. In this case, the most convenient is to use a corrugated hose, which can be easily bent if necessary. Using nuts to seal existing connections, you need to put gaskets on them. They should be installed with thin ends towards the necks.
- Next you need to proceed to installing the water seal. Before connecting the water seal to the neck, you need to carefully consider the places for laying the gaskets. If there are any defects there, they must be sanded with a file.
- In any siphon model, the water seal is connected to the neck using a union nut. This part can also be supplemented with a gasket (cone-shaped or flat).
- Now you can proceed to directly connecting the siphon to the sewer system. Depending on the device model, the connection must be made directly into the socket or through the seal collar.
- All connections must be sealed as securely as possible. Since rubber gaskets cannot boast of durability, for greater reliability and durability it is recommended to seal all joints using high-quality silicone-based sealant.
After all the steps taken, you only need to make sure that the structure is assembled correctly. To do this, you need to cover the drain with a stopper, then open cold water and fill the bath with it.
Carefully inspect the connecting areas and drain. If there are no leaks anywhere, then you can safely use the plumbing. To notice a leak, the easiest way is to spread paper on the floor, on which dripping drops will immediately appear.
If you do find leaks in the structure, you can try to slightly tighten the nuts. When connecting different elements to each other, follow one simple rule: if a certain part is tensioned and the thread “does not go”, it means that a leak may appear in this place.
One of the most common causes of leaks is misalignment, which occurs when hard wiring is not properly adjusted. Sometimes proper installation is hindered by polyurethane foam, which is often used for additional insulation of the bathtub.
Pipe selection criteria
The main technical characteristic of plastic pipes is their diameter. It’s worth mentioning right away that in most cases, manufacturers mark pipes based on the size of the outer diameter.
For sewage drains, the main parameter is the internal diameter. The purchase of pipes of a certain diameter is carried out depending on the type of plumbing. In particular, the minimum pipe diameter is:
- for washing machine and dishwasher – 25 mm;
- for bidet and sink – 32 mm;
- for a shower stall or bath – 50 mm;
- for several devices connected to one outlet - 70 mm;
- for the toilet and the main riser in the apartment - 100 mm.
The second parameter that is taken into account when purchasing sewer pipes for the bathroom is the length of the products. Pipes with lengths from 1 to 6 m are available for sale. It is most convenient to work with material that is 2 or 3 m long.
When calculating the required footage of plastic pipes, you also need to take into account that they are equipped with sockets with sealing rubber bands, which are designed to tightly connect adjacent elements.
Step-by-step installation instructions
Next, we’ll look at how to install different models of siphons.
Made of plastic
Before installing a plastic drain, you must turn off the water and also check the tightness of the pipelines. Damaged, dried gaskets are replaced with new ones.
Replacing a damaged plastic siphon occurs according to the following algorithm:
- We securely fix the protective grille with the intake pipe. For high-quality sealing, careful cleaning of the contact points is necessary. Surfaces are treated with sandpaper or special chemicals.
- Apply a thin layer of sealant to the flange and install the gasket. Carefully tighten the threaded connection. The applied efforts should be enough to completely seal. Excessive clamping causes deformation or damage to the receiving pipe.
- We connect the overflow hole and the siphon with corrugation. At the fastening points we install sealing gaskets, which are clamped with special nuts.
- We connect the siphon to the sewer system. A layer of sealant is laid in places where the working parts come into contact.
- After completing the installation work and drying the sealing solution, we check the tightness of the system. To do this, just turn on and observe the passage of liquid through the pipeline. In places of leaks, tighten the nuts or change the position of the sealing gaskets.
Brass non-separable
Before installing such a siphon model, it is necessary to check the connection of the device pipe with the sewer system. The pipeline should enter the sewer at a slight angle and enter the hole at least 5 centimeters. If this is not done, the rubber gasket will not be able to provide the necessary tightness of the connection. Some time after installation, leaks will appear.
First, you need to install the overflow in the right place, lubricate the junction of the siphon with the bottom of the bathtub with sealant. After assembling the entire structure into a single unit, tighten the nuts, which allows you to fix the siphon in the desired position and achieve sealing of the connections.
Semi-automatic
During the installation of such models, certain difficulties may arise. This is due to the fact that such devices are not dismountable; the drain hole of the siphon is not always aligned with the entrance to the sewer.
Before installation, it is necessary to check the semi-automatic device for sticking of the rod; the plug must fit tightly to the seat. After installing the overflow and siphon, the outlet pipe is fixed to the sewer system. Next, install rubber gaskets and tighten the threads.
Advice! Use the services of the employees of the manufacturer of the semi-automatic siphon. Specialists will not only check the correct operation of the equipment, they are obliged to provide a guarantee for the operation of the product.
Creation of a new sewerage system
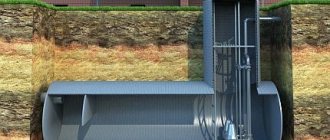
How to connect a bathtub to the sewer - this question plagues many people who want to replace the system with their own hands, which drains the drain. From numerous recommendations and videos, we have derived the sequence and tips for installation. It is correct to start the whole process with changing the riser, which must be done immediately, since it is connected to the general system. The installation proceeds in the following sequence:
- The tee is installed in the lower socket. This happens using a cuff or sealant.
- A new riser is attached to the wall with clamps;
- After this, you can begin restoring the wiring;
- Replace pipes correctly from the bottom up, placing the sockets according to the way the drain moves;
- It is necessary to maintain a pipe slope of 2 cm per meter;
- At the end of all processes, the system should be diagnosed to determine the presence of a leak.
Types and features of materials
The main condition when choosing a material is corrosion resistance. These options include:
- Ferrous metal is a reliable material. The main drawback is the appearance of the device. Currently, they are trying to choose more modern options;
- Plastic for plumbing fixtures (polypropylene). White color, laconic shape, long service life. Polypropylene is inferior to metal in terms of strength, so there is a risk of product breakage. A simple drain and overflow design may be inappropriate if the decoration of the room involves the use of expensive materials and equipment;
Bronze, brass or copper. Often these non-ferrous metals are not used without a protective layer. Parts located in the visible area can be coated with nickel or chromium (using the electroplating method). The use of nickel is preferable; this material is characterized by long-term operation. The visual difference of nickel is the blue tint of the parts;
In order to determine the type of metal, you should pay attention to the holes in the top and bottom of the bath. Copper color casts red; the strength characteristics of copper are inferior to other materials
Brass is stronger than copper and has a light yellow tint. The bronze base is the most durable in this category, comparable in stability to ferrous metal. Bronze is characterized by a dark brown tone, the main components of the alloy are zinc and copper. Non-ferrous metals are an excellent option for the production of plumbing fixtures. Due to the resistance to corrosion, the parts are easily connected by thread.
Be careful not to damage the protective coating of the base. Even a small scratch will cause the destruction of the entire layer in the shortest possible time. The reason for this effect is a chemical process between metals.
Preparing to connect
Before laying a sewer system in the bathroom, you need to prepare all the structural elements in advance, following the expert advice described below. The main element for ensuring drainage is a siphon, which makes it possible to clean the system if the drain in the bathroom is clogged. In order not to get confused in the terms when purchasing this product, you need to remember that this device has two more names, “piping” or “drain-overflow system” for the bathroom.
How to choose a siphon
The bathroom drain pipe can be made of materials such as:
- copper;
- brass;
- cast iron;
- plastic;
- textolite
When installing sewerage in the bathroom yourself, it is recommended to buy plastic products that do not have corrugated pipes and the structure is rigid. Plastic is chosen because this type of material is easy to work with and does not require special tools, while installing sewerage in a bathroom made of metal or copper requires certain work experience.
When buying a siphon model for your bathroom, you need to consider a number of features:
Installation of drain pipes in the bathroom can be carried out using siphons of two types. The universal type is suitable for all bathtubs where the distance between the drain and the overflow does not exceed 57 cm
In bathrooms with other designs, it is necessary to purchase special siphons or they can come complete with the bathtub itself from the manufacturer; Before making a sewer system in the bathroom and buying a siphon, pay attention to the thickness of the bathroom itself. There are products on sale that are designed for different bathroom wall thicknesses, but there are also universal models; installation of a sewer system in a bathroom almost always involves the presence of additional consumers in the form of a washing machine. For these purposes, there are special siphons with several outlets for connecting drains of third-party household appliances
For these purposes, there are special siphons with several outlets for connecting drains of third-party household appliances.
It is worth remembering that a siphon of any model and design needs regular maintenance, so before hiding the sewer in the bathroom or when covering the bathroom with decorative panels, you need to provide an inspection hole of sufficient size so that the sewer line in the bathroom is provided with free access. Typically, in such cases, a removable panel or opening door is provided in the place where the bathtub is connected to the sewer.
When installing a new bathroom, the required height should be maintained to ensure free drainage. The sewerage system in the bathroom provides for a difference between the lowest point of the sewer pipe and the siphon connection point. This difference should be 10-20 cm for normal functioning of the system. In the absence of such a difference, the sewerage wiring in the bathroom will fill with water or the liquid will drain very slowly.
Connecting the bathroom to the sewer
Before assembling the sewer system in the bathroom yourself, for ease of understanding, we break down the entire process into main points in the form of step-by-step instructions. The installation procedure is as follows:
- laying sewer pipes in the bathroom begins with checking the configuration of all the elements involved;
- then all the elements of the siphon are assembled into one structure and a liquid sealant is used to ensure better sealing of the connections. Typically, a diagram for connecting the bathroom to the sewer and detailed assembly instructions are contained in the attached documents for the bathroom and siphon, so that you can carry out the installation yourself;
after the siphon is completely assembled, a sewer system is installed in the bathroom, where one end of the siphon pipe is connected to the drain hole of the bathroom, and the other to the inlet pipe of the waste system; at the last stage the overflow pipe is connected
In this case, it is important to monitor the tight fit of all rubber gaskets at the joints. The sewer pipe in the bathroom should not have stressed areas, this will lead to deformation and cracking of the plastic
You can watch the video accompanying this article to learn how to properly assemble and connect the siphon.
Manufacturers of modern siphons
Regardless of the siphon design you like, it is important that it is of high quality. And for this it is necessary that it be manufactured using modern equipment and new technologies, and during its production all existing standards must be observed.
The siphon, produced by Geberit (Switzerland), is expensive, but just look how great it looks. The aesthetic pleasure that you will receive from watching such beauty every day is also worth something
There is only one way to find such a siphon on your own: choose a manufacturer whose products have already proven themselves on the market on the positive side. Companies producing plumbing fixtures well-known on the domestic market include:
- Geberit (Switzerland). The company, which has been producing plumbing fixtures since 1874, is today a market leader that many product manufacturers look up to. The reason for the popularity of its products is simple: the company’s employees never stop at the achieved milestones. The growth in the living standards of consumers requires the development and implementation of the newest and most convenient devices. The company produces expensive products, the quality of which fully corresponds to the price.
- Ani plast (Russia). This company is a leading Russian manufacturer of plumbing fixtures made of plastic. All of its products have appropriate certificates and high quality ratings. Another advantage of Ani Plast models is their price: it is quite affordable for ordinary consumers.
- Viega (Germany). This manufacturer is distinguished by truly German scrupulousness: the entire process of manufacturing plumbing fixtures, starting with the quality of raw materials, is under the vigilant control of the company’s services. It is not surprising that all the company's products are certified. The prices for these products are high, but their long service life allows them to pay for themselves.
In this video clip you will see a semi-automatic siphon produced by the German company Viega, and learn about what features it has.
Options for constructive solutions for strapping
Bath frames are classified according to two criteria: by design and material of manufacture. If we take design differences as a basis, we distinguish: universal, semi-automatic and automatic systems.
Universal
The simplest version of the piping is often used when connecting and installing bathtubs of any type: acrylic, steel, cast iron.
The main requirement for installing a universal system is that the distance from the center of the overflow to the drain hole is no more than 57.5 cm
The main elements of the system are:
- Drain neck. It is equipped with a metal plate intended for installing the cover.
- Overflow neck. It has the same design overlay.
- Siphon. An element that ensures water flow and prevents the spread of sewer “odors.” It can have a collapsible or monolithic body.
- Corrugated hose. It is designed to connect the drain and overflow necks and is mounted by pulling it onto the fitting or tightening the union nuts.
The outer part of the overflow is decorated with a grille, and the return part is connected to the receiving block. A spout tube is attached to it, connected to a pipe coming from the lower outlet.
Regulation of water release in universal piping models is carried out by manually removing the plug tied on a chain
Among the presented types, the universal harness, which includes a minimum of movable elements, is considered the most reliable and durable.
Semi-automatic
The peculiarity of the system is that it is equipped with a rotating lever, with the help of which the drain neck is blocked. This mechanism is convenient to operate even while lying in the bathroom. You just need to get used to it, learning to move the lever with your toe.
The operation of the semi-automatic bathtub harness is based on the mechanical principle. The device is driven by a rotation lever or valve installed on the siphon overflow neck. The starting lever, similar to a bicycle gearshift, is connected by a cable to another lever located in the drain neck of the device.
By turning the rotation lever in one direction or another, the cable is tightened or, on the contrary, weakened, under the action of which the plug located above the drain hole is lowered or raised.
The main advantage of such a system is ease of use: to lift the plug and drain the water, you don’t have to bend over into the bathtub
Consumers who have installed semi-automatic drainage systems in their bathrooms complain about the fragility of the design. All you have to do is press a little harder on the plastic lever and it may break.
Automatic system
Automatic systems are devoid of any cables or fragile elements. The drain neck is opened by pressing the plug.
Under the action of a spring, supplemented by a latch, the plug, when pressed, easily rises above the surface, ensuring free flow of water. When pressed again, it lowers, covering the neck of the drain hole.
External accessories for an automatic bathtub can be made in any color: white, painted bronze, gold or silver metal
The disadvantages of the system include only the small size of the hole that remains under the drain plug. Hair and small debris often accumulate in it, making it difficult to drain the water.
In low-quality products, the increased complexity of the design often leads to breakdowns, which cannot always be repaired. And the problem can be eliminated only by completely replacing the automatic system.
To protect yourself from unexpected expenses, choose equipment from trusted manufacturers. The best choice is automatic bath trims made of metal.
Automatic drain device
If your budget allows, you can buy an expensive automatic model. It will also be beneficial to purchase an inexpensive standard model. Prices for automatic structures range from $20-55. A distinctive feature of the automatic mechanism is associated with the presence of a special valve. After pressing it, the plug automatically closes the drain hole in the tank.
Drain - automatic
The provided valve retainer allows you to maintain its position. To drain the water you will need to press a button. The automatic lowering and raising of the valve occurs as a result of spring compression. The automatic drain system has the following main features:
- The drainage is controlled by feet.
- The visible part is compact in size.
- Availability of a large assortment of buttons.
Mounting location installation
After determining the location of the sink, you need to determine the height of its installation. It depends on its type.
The sink located in the bathroom can be installed on a pedestal or without additional parts. If no additional parts are attached to the sink, the average height of its location should be 85–90 cm; if the sink being installed has a support horn or other parts for support, the height of its installation should correspond to the height of the supporting parts.
The height of the sink installed in the kitchen must be the same as the height of the kitchen cabinet into which it will be installed. To fix the selected height level on the wall surface, you must draw a horizontal line.
How to clean a drain hole
There are a lot of reasons why a blockage may appear in the drain hole. It can become clogged not only with hair, but also with small debris, pellets from clothes, and the hair of four-legged pets. When all this accumulates in the drain, a lump is formed, which is the reason why the water does not drain. Moreover, this lump becomes larger and larger, and a bad smell begins to appear. Well, let's get started. To clean the drain hole, you should try the following methods:
Try clearing the blockage under the cap covering the drain hole. Even if it seems to you that the cap is clean, check it anyway. It is very likely that you will find hair there in huge quantities. Drains that have a cross plug are most susceptible to such blockages. If you have a bathroom that has a plug installed, you will need to lift the plug before cleaning. The guide plate is unscrewed, and only then can you remove the plug.
If the hair clog is deeper than you expected, then you can use:
wire hook. Take the wire hanger, untwist it and bend it into a hook. Place the hook in the drain hole and pull out the clog
Important: you need to pull out, not push, the rubbish. Otherwise, you will definitely have to call a plumber. plunger
Probably the most common method. But it will only help if the blockage is small. The plunger should be the size of the drain hole. It’s easy to clear a drain hole with a plunger, so if your drain is often clogged, it will become an indispensable assistant for you. How to make a drain hole with a plunger? Take the plug and close the drain. Lubricate the plunger with Vaseline and press it to the drain hole. Make about 10 sharp back-and-forth movements. If the water is still standing, add hot water. Fill the bathtub with enough water to cover half of the plunger. Subsequent steps are the same as described above: we try to “break through” the blockage.
cable. A cable can help with serious sewer blockages. A cable is a twisted wire with a handle at the end (it can be wooden or plastic). The advantage of this device is that it can cope with a blockage that is located at a depth of up to 9 meters. How to use the cable? Take the handle and insert the cable into the drain, hold and twist the cable with one hand, and push it deeper into the drain hole with the other. Nowadays you can find cables on the market that have interlocking hooks that help get rid of hair in the drain hole. If you feel that the cable is stuck in something, “stuck”, know that this is the place where the blockage is located. Now you need to repeat the back and forth movements several times and then you can clean the drain hole. Then you can pull out the cable.
with tape. To make a hole in the drain, you can use any adhesive tape. Cut a strip of approximately 50 cm. Place the tape in the drain hole and move it along the inner walls. Almost all the hair will remain on the tape. When you remove the tape with hair, be sure to wash away any remaining clog. chemicals. To combat blockages, you can use household chemicals. Ask the store clerk to tell you which product is better.