To achieve comfortable living conditions in a country house or in a private house, every home craftsman must take care of the availability of water supply. At the same time, more and more people today rely on their own sources. These include wells and wells. The first option is definitely more effective, but in order to dig a well yourself, you need to have an accurate understanding of all stages of the work. There are stereotypes that it is impossible to dig a well on your own plot of land. In reality, this task is achievable if everything is done correctly and consistently.
At what horizon should we dig a well?
Aquifers can occur at several levels. The topmost one is usually located close to the surface of the earth. This layer is called perchal water. It may be contaminated by agricultural chemicals, fecal bacteria from sewage, etc.
Verkhodka is not suitable for feeding a well, unless the water is planned to be used exclusively for technical purposes or for watering garden plants. It should also be taken into account that during seasonal changes the amount of water can significantly decrease or increase.
Wells are dug into the groundwater horizon. This aquifer lies below the perched water. The water in it is often free-flowing, so its level in the well is the same as in the aquifer. During the construction of hydraulic structures, groundwater is cut off from the perched water layers to protect it from pollution.
An aesthetically designed well will not only provide the site with water, but will also decorate the local area
Artesian waters lie below groundwater. Wells are not dug to this horizon, and the construction of wells is very expensive. In addition, you have to obtain a permit to use water resources.
Artesian waters are pressure waters, so the water level in the well is higher than in the horizon, and even gushing is possible.
Different zones of the same aquifer may vary. They have different chemical compositions, temperatures, and differ in degree of purity. Therefore, it is imperative to have your water analyzed, even if there are wells nearby dug to the same level and the water in them is good
Video description
We recommend studying this video describing the use of an aluminum frame to search for water:
Now about how to search for water for a well using a vine. As an indicator, you can use a section of a branch of any tree with a fork, the angle of which is approximately 150°. The branch is thoroughly dried in the sun, and then taken by hand by the two ends so that the central main part is directed forward. Then with such a “device” they walk around the site. Close occurrence of aquifers is possible in those places where the trunk tilts towards the ground.
Dowsing gives the most accurate readings at certain time intervals:
- from 6 to 7 am;
- from 16 to 17 hours;
- from 20 to 21 o'clock;
- from midnight to one in the morning.
Few people know how to correctly determine the location of an underground source using a vine. Source bastanshenas.com
Although the vine and aluminum provide fairly accurate information about the presence of water, the source may turn out to be just perched water. Therefore, in any case, immediately after discovering areas with high humidity, exploratory drilling should be carried out.
Finding a place for a water source
When building a well, it is important to correctly determine the depth of the horizon of clean drinking water, calculate and purchase the required number of concrete rings, equipment for arranging the hydraulic structure itself and the water distribution system. It is also important to choose the right place and time to dig a well.
Choosing the right location for a well depends on several factors:
- Geological exploration data . There are many ways to search for water in an area, but nothing more reliable than geological studies of the area has yet been invented.
- Information about nearby sources. It would be a good idea to ask your closest neighbors how deep their wells are built and what the quality of the water is.
- Suitability of water for drinking. It is imperative to submit a water sample for chemical and microbiological analysis to the nearest sanitary station. Experts will determine the concentration of chemicals and the presence of pathogenic bacteria.
- Soil type. The complexity of digging wells, the need to use special equipment, etc. depend on this. Ultimately, all this affects the cost of the finished well. It is most difficult to build a well on rocky soils.
- Terrain. The greatest difficulties arise when building a well on a hillside. The ideal option is a flat area.
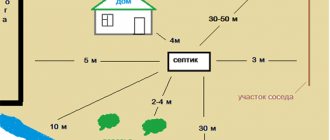
- Distance from sources of pollution . Wells are dug at a considerable distance from cesspools, septic tanks, compost heaps, and barns. It is undesirable to place them in lowlands where rain and melt water flows, as well as water mixed with agricultural fertilizers.
- Degree of distance from home. The closer the water source is to the house, the more convenient it is.
In this case, the excavation should be placed so that it does not interfere with travel or block access to outbuildings or utility rooms.
The optimal distances are shown in the diagram below.
When constructing water supply and sewerage, you should focus on SNiP 2.04.03-85. This is necessary to prevent contamination of drinking water sources, erosion of building foundations, and disruption of systems.
Features of wells of different designs
There are two types of structures – shaft and tubular. The first option is much more widespread, because Construction of such a well is usually cheaper and more convenient to use. The shaft structure is universal, and water can be raised using buckets, hand and electric pumps.
Another advantage of the shaft structure over the tubular one is the ease of construction. You can find out how to dig a mine well with your own hands by reading specialized literature and articles.
If desired, everyone can take their advice and dig and arrange a quality water source on their own.
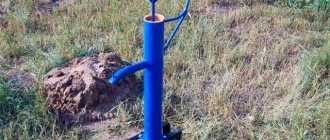
A column, or tube well, is a shallow well, the walls of which are lined with a pipe, and the water is raised using a manual or electric pump
A tube well is built if the aquifer is located shallow, and the owner can use drilling equipment. The advantage of a tubular structure is faster construction. Due to their small diameter, tubular structures are less polluted. They can be built next to residential and commercial buildings.
Both types of wells have their own advantages and disadvantages. When choosing a suitable design, you should take into account all the nuances. Since it is easier to build a mine well without the use of special equipment, in the future we will consider the issues of digging just such a source.
Open pit mine creation
Before you dig a well with your own hands, you need to find out the type of soil and decide on the appropriate method for creating a mine. Two methods are used: open and closed. Both options are significantly different and each has its own nuances.
The first method is open
. It is convenient and simple. When implementing it, you must first dig a shaft to the required depth and then install concrete rings. This technology is better suited for areas where dense soil predominates and is not prone to crumbling.
The mine continues to be excavated until the aquifer is reached. If necessary, the walls begin to be strengthened as they go deeper into the ground. The diameter of the hole being dug must exceed the design dimensions of the structure being constructed. After the shaft is ready, they begin to design its walls and bottom.
The best time to start construction
When is the best time to dig a well? If you start work in the spring, after floods, you can make a mistake with the depth of the mine. Groundwater is rising, and until its level drops, it is not advisable to dig. Otherwise, there may be a need to deepen the structure, because There will not be enough water in summer and winter.
The autumn rainy season is also not the most favorable time for building a well. But in the summer heat or winter it is quite possible to start work. During these periods, the water drains away. If you can build a working well, it is guaranteed to maintain productivity in other seasons.
Winter construction is complicated due to soil freezing, but in summer or early autumn nothing prevents excavation work from starting. However, there is one exception. If the well is built on quicksand, it is better to dig it in winter.
The first frost is not an obstacle to building a well. You can start work even if the first snow has fallen. The main thing is that the soil does not freeze too much
Digging methods
You can dig a well without hiring outside workers, with your own hands. You just need to study the step-by-step instructions.
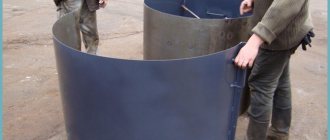
Typically, wells are constructed using concrete rings.
Before construction, it is determined by what digging methods the work will be carried out: by alternately installing the upper rings or by finding the level of the aquifer. The method is chosen based on the depth of the water.
Alternate installation of rings
The method of sequential installation of rings is as follows. The ring is placed on the surface of the earth and they begin to select the soil inside. Over time, it itself sinks into the depths. To dig a level well, it is necessary to ensure strict verticality, otherwise, if there is a strong slope, the concrete sediment will stop. You can adjust this yourself by tying a plumb line and setting a level on top of the ring.
After the top edge is level with the soil, a second one is installed on the ring. The next ones are installed as necessary until the lower one drops to the aquifer. You can immediately install gaskets to seal the seams.
This method allows you to control the height and number of rings and not be afraid of soil shedding, since the digger is inside.
When performing this option, it must be taken into account that it is inconvenient for one person to dig and remove soil. It will be necessary to involve one more employee. You will also need some extra help when installing the rings on top.
Installation of rings after reaching the aquifer
The second method is to initially excavate the well shaft and then install concrete once the aquifer is reached. This method is easier when digging, a person is not cramped inside the ring. It is possible to make deeper shafts. The rings are installed when the walls begin to crumble. Several rings are sealed against the ingress of flood and groundwater.
The disadvantages of this method are the following:
- It is possible to miss the beginning of soil collapse, then the mine will suffer.
- It is difficult to control the tightness of the structure; insulation is only possible from the outside.
- The amount of earth to be filled between the shaft and the ring is uncontrollable, as is its density. Therefore, flood and rainwater may enter.
How to dig a well yourself in practice:
Construction and arrangement of a mine well
Most often, shaft wells are built from ready-made concrete rings. This is the most convenient option. The design is strong, reliable and can last for several decades. It is better to carry out work on the construction of a well by two or three people.
Lifting mechanisms will be required. You need to install a tripod with a winch or winch. With its help, buckets with dug up soil are lifted up and concrete rings are lowered into the hole. You will also need strong ropes, cables or chains.
First of all, you need to calculate the desired diameter of the well. The optimal option is 1 m. For this design, standard rings are used. It is better to choose products of small height. This will make it easier to install them one on top of the other. At the same time, you will have to spend more time sealing the seams, because... there will be more of them.
Penetrating materials are often used to waterproof drinking wells. The compositions of the Penetron system are very popular.
How to make the walls and bottom of the structure?
To arrange the walls and bottom of the structure, you need to follow the following instructions, which are not complicated:
- Dig a hole 0.5–1 m deep. A shallower or greater depth will be inconvenient for work.
- Install the first ring. The ideal option is installation on a cutting shoe.
- Dig the bottom of the hole, removing soil evenly over the entire area of the shaft.
- When the ring is deepened, install the next one and fasten it.
- Continue working until you reach the aquifer. This usually takes several days.
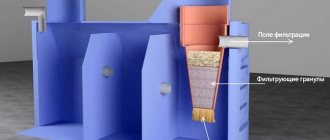
- The signal that you have reached the aquifer is water at the bottom of the shaft. It's dirty and muddy. To clean it, you will need to pump out the water and install a bottom filter.
- When the shaft is ready, remove water and dirt with buckets or a pump, go deeper another 10-15 cm, and level the bottom.
- The bottom of the well should be covered with a 25-centimeter layer of sand. It is best to choose river, coarse-grained. The next layer is fine crushed stone. Its thickness should be at least 15-20 cm. The last layer is large crushed stone. The thickness is the same.
Crushed stone should be disinfected with a weak lime solution before laying. It is not always convenient to place the bottom filter directly on the bottom of the pit. It happens that the soil is too liquefied due to too much water. In this case, first lay a boardwalk with gaps, on top of which a bottom filter is poured.
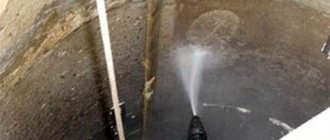
When the structure is ready, the water is pumped out. After this, you need to wait until it fills up and pump it out again. This procedure is repeated several times until the water is cleared. Now you can take a sample for laboratory analysis.
We also recommend that you read the article about the causes of cloudy water in a well and how to eliminate it.
In addition to the usual bulk materials, you can use zeolite or shungite to construct a bottom filter. This is an expensive pleasure, but the water in the well will always be clean and fresh
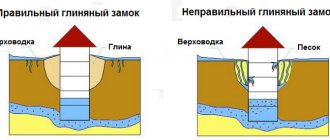
External waterproofing – clay castle
As external protection against water, the so-called clay castle. It is necessary to cut off the perched water and prevent rain and melt water from entering the well. The clay castle can hardly be called an impeccable structure. It can contribute to deformation of the well structure, because changes in volume.
To achieve good external waterproofing, roll materials are often laid, the surfaces are treated with liquid glass, and then a clay castle is made. This results in double protection from moisture. This leads to higher construction costs, but helps maintain water quality.
For the castle, choose clay with a small sand content - up to 15%. It is frozen out by leaving it outside during the winter. Then the material is mixed with lime (4 parts clay and 1 part lime), thoroughly mixed until a homogeneous plastic mass is achieved.
The “correct” clay does not crack if you make a lump out of it, does not spread, and holds its shape perfectly. It is placed in a trench dug around the well. The width of the trench must be at least 0.5 m, and the depth - 1 m. The walls of the trench are reinforced with formwork.
The clay castle is laid in layers of 15-20 cm. Each layer is well compacted. When the clay castle is ready, it is covered with geotextiles, and concrete or paving slabs are laid on top. External finishing is necessary so that the clay does not become limp during rains and does not turn into a dirty mess.
A clay castle is the cheapest way to protect a well externally. Often the material can be obtained for free or for a nominal sum.
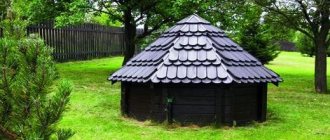
Arrangement of the well head
The above-ground part of the structure should rise by 0.7-1 m. The easiest way to arrange it is to install an additional concrete ring. The junction of the underground and above-ground parts is well sealed.
The concrete ring does not look very aesthetically pleasing. Therefore, to improve the appearance of the head, they are often trimmed with wood or stone, and houses are built that completely or partially cover the above-ground part of the structure.
Image gallery
Photo from
Mounting brackets in the well shaft
A pipeline is laid between the house and the well
Rubble stone well head
Airlift for lifting water from a well
Be sure to install a lid and canopy over the well. This is necessary to protect the water from rain, snow, debris, and insects. The tighter the lid closes, the better. Otherwise, the water can quickly become polluted and rot, becoming dangerous to human health. Also, to avoid interruptions in water supply during the cold season, the well must be insulated for the winter.
A canopy is often made in the form of a gable roof made of boards, clapboards, sheet metal or tiles. There is huge scope for imagination here. The upper part of the well can be decorated so that the structure turns into a spectacular landscape decoration.
Even if water from the well will be supplied to the house by pumps, it is advisable to install a mechanical device to raise it. This will help provide your home with water in the event of prolonged power outages.
Classic options are crane and collar. The first type of construction will look perfect on a site decorated in a “rustic” style. The collar is universal. It can be built from ordinary logs and decorated in any way you like.
A suitable piece of log can be used as a gate. It is installed on vertical posts and secured
Safety at work
Constructing a well manually is considered hard and labor-intensive work that requires compliance with safety precautions. The following rules will help preserve the life and health of workers:
- All types of work performed in the well shaft must be carried out wearing a protective helmet. This will protect your head from possible falling earth, stones, and construction equipment.
- Use only high-quality and high-quality equipment - winches, blocks, buckets with reliable handles, strong ropes and cords, carabiners with reliable fixation. Constantly monitor his condition.
- When lifting buckets of soil, do not stand under the load. You should stick to the opposite side of the shaft.
- You cannot stay in the mine for a long time due to harmful conditions - cold, dampness, the possibility of methane entering, which are detrimental to the health of the worker. When performing work, it is necessary to observe a shift schedule.
Only by following the correct work technology and safety precautions can you quickly and efficiently dig a shallow well yourself.