Back to services Well diagnostics
Team visit, water pumping, mine inspection
Conclusion of an agreement
Conclusion of a contract for the provision of a range of works
Guarantee for work performed
We give a year warranty on work performed
Building a good well is a real skill that not everyone can achieve. You need to choose the right place, dig a straight shaft of the required depth and reinforce it with concrete rings, masonry with piece materials or special large-diameter synthetic pipes. When deepening the mine, the master may stumble upon quicksand, a dense layer of limestone and similar obstacles. That is why an unprepared person will spend more time building a well, and it is not possible to guarantee a high-quality result of the work.
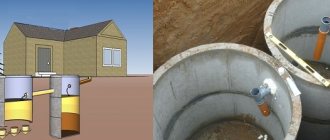
One of the main tasks is to protect the well from the ingress of high water, melted snow and storm water. The water in them does not meet sanitary and hygienic standards and is often saturated with pesticides and other harmful substances. For this purpose, a special layer is installed around the upper part of the shaft - a lock, which does not allow the upper groundwater to pass through and drains it away from the well.
Compacting the clay correctly
To achieve the best effect, you should use tampers with a small sole, but with significant mass.
This process must be carried out in several stages, after each laying of 15-20 centimeters of clay. To achieve the best effect, you should use tampers with a small sole, but with a significant mass. There have been cases where it was precisely because of a poor-quality seal that everything had to be redone.
When preparing clay for arranging a castle, pay attention to its moisture content. It has been laboratory proven that clay is most plastic at a humidity of 15 to 30 percent.
An important point: after you have dug a well, you should not immediately equip a clay castle. The soil around the mine must stand and settle. Otherwise, you simply will not seal all the cracks in the ground, which makes the clay castle useless.
You can do all the work yourself, but the best option is to turn to specialists or at least get an assistant.
Common errors
- When building a foundation, basement, cellar or well, it is not always possible to obtain clay (loams) suitable for constructing a clay castle. In this case, the material needs to be purchased, so in order to reduce the cost of construction for a clay castle, they use everything that remains in the soil dump;
- The clay poured into the castle is not crushed or compacted, but simply compacted with feet or a tamper (a piece of log with handles). With this technology, the structure of the clay does not change and it cannot become a reliable waterproof barrier. Clay must be kneaded - in the old days it was kneaded with feet;
- During construction, the dimensions (volumes) of the clay castle are not maintained. They are made significantly less than required, so the clay castle turns into a blind area made of clay.
Why do you need a clay castle?
Abyssinian well
The difference between concrete well structures is that, unlike wooden ones, reinforced concrete ones are harder to seal. And in order for the water to remain clean for years, you need to build a castle for the well made of clay. Wooden structures are mounted airtight, and the wood, after swelling, additionally seals the gaps. Things are different with concrete.
There are special reinforced concrete rings on sale, the design of which has special cavities for filling with water-resistant materials. Seams and joints are coated with mastic.
But clay remains the most popular material because it:
- retains ground and flood waters;
- durable and does not require annual maintenance;
- It is inexpensive and accessible to everyone.
Where are clay castles used?
The technology is applicable to solve a lot of problems, the main ones being:
- Sealing the walls of wells from the ingress of groundwater containing contaminants that enter the upper layers of the soil. These can be mineral fertilizers, products of the breakdown of biological compounds and other harmful impurities.
- Construction of an artificial reservoir. A different problem is solved here. Water from the reservoir does not go into the ground. If it is expected that people will walk along the bottom, then the construction of a clay castle is necessary to make walking on it pleasant.
- When backfilling the foundation. This is necessary so that flood waters do not seep through the soil into the basement and do not insulate the zero cycle of the structure. The technology involves mechanical compaction.
In order for the blind area around the source to last for decades, the work must be completed two years after the installation of the rings. But during this period, you can use soft blind area technology. It involves covering the top layer with an elastic material that serves during the natural compaction period.
Conclusion + useful video
Summarizing all of the above, we determine that all the work associated with the installation of a clay castle can be done independently. Teams that claim that this is not necessary cannot be considered professional, or are being cunning in front of the customer. The described procedure is one of the mandatory measures for the improvement of natural drinking water sources.
The only thing that needs to be taken into account is that the clay castle is installed two years after the well is put into operation.
This means that in some cases decoration will have to be postponed. And within a two-year period, sand will be installed instead of clay. Otherwise, there are no difficulties, and the water in the well will remain clean and clear for years.
Blind area options
- Fill the clay castle with sand and gravel
. - Turf.
Layers of turf can be used as a blind area, but a prerequisite is the organization of a drainage system. - Tile.
Tiles are laid on top of the clay castle along the house. Having previously filled the base layer. - Concrete blind areas.
They are more expensive than the previous one and after a few years they will begin to let moisture through, even with additional reinforcement. Consequently, it will require replacement and additional costs.
Stones for a well
To protect the foundation from destruction by groundwater and wastewater, you should organize a drainage system, build a clay castle and cover it with a blind area on top. If additional financial resources are available, it is possible to use additional waterproofing materials.
Performing a blind area
Drainage well
When the clay castle is ready, start creating the blind area. Why is it needed? The fact is that after heavy rains or melting of large volumes of snow, even the most compacted castle can begin to become limp - its top layer will either get wet, turning into mud, or dry out in lumps. This will gradually lead to depressurization of the protective structure. Some well owners do not want to bother with the blind area and simply cover the clay castle with a backfill of crushed stone and sand, but, as practice shows, this is not always enough. So, if you are interested in the durability of a clay castle, you cannot do without a blind area.
It is recommended to use either paving slabs or stone as a coating - these materials are quite strong and durable. The technology for performing the blind area is quite simple:
- Cover the clay castle with geotextiles or any other insulating material with similar functional properties.
- Place the selected finishing material on the insulating screed. Be sure to make a slight slope to ensure the removal of excess moisture from the area of the well and the castle.
Installation of blind area
If you want to make the blind area even more reliable, you can do the following: after laying the insulating material, install low formwork on it, and then fill the clay castle with concrete mortar - after it dries, lay tiles or stone.
As you can see, a clay castle has every reason to claim the title of one of the most effective protection options for wells. If done correctly, it will successfully cope with its functions for many years, so if you want to get a high-quality design, follow proven technology and do not deviate from the rules - this is the only way you will ensure reliable protection for your water source.
Tips for use
- It is not advisable to equip them immediately after installing the well. It is better to let the soil settle for a year or more.
- When installing a soft blind area, it is better to use special waterproofing films.
- It is better to make a castle and blind area in late spring, when there are no longer frosts and the soil is still filled with water. In addition, during the spring and summer it will be clear whether the work was carried out correctly and whether it copes with water.
- The slope angle for a solid blind area is 2-5 degrees. For soft - 5-10.
- To install a concrete blind area, it is better to assemble wooden or metal formwork, and not just pour raw materials into a dug ditch. This will help give shape and neatness to the final product.
- After arranging the concrete blind area, you can build any decorative structure on the surface, for example, a gazebo with a roof.
Well insulation
My upper ring rises 75 cm above the ground. Accordingly, only 15 cm of this ring is underground. In my opinion, this is too little so that even when frozen with the ground, forces sufficient to lift this ring and tear it off from the second ring from above could arise. The next seam is located at a depth of just over a meter. The second ring is more susceptible to the forces of frost heaving than others, and it was necessary to reduce this impact. The only way available to me to do this was to insulate the blind area.
Not reaching the surface by about 15 cm, I laid insulation on the clay. I had pieces of expanded polystyrene (EPS) on hand - parts of the refrigerator packaging that I had stored for a long time for such an occasion - and polyethylene foam (EPS). I cut the insulation into sectors and laid it, trying to cover the joints. I laid a plastic film on top of the slab and covered it with soil with a slight slope from the well.
It must be said that the freezing of the soil around the well is somewhat less than around the foundation of the house. This occurs due to the flow of heat from the well - the water in it usually does not freeze. To enhance this effect, I also insulated the ring above the ground level - I wrapped the ring in PPE and laid it on top of a light frame made of wooden slats.
The measures taken gave the desired result. The well survived the first winter without destruction of the upper seams, despite the fact that the snow cover last winter was small and the frosts were significant.
This year I plan to cover the blind area with turf.
Owners of summer cottages and private households, deprived of the opportunity to connect to the general water supply network, have no other alternative than to dig a well on their land. The problems of arranging life do not end there, because the water source needs care and protection.
Types of sewer wells
Varieties of inspection wells are distinguished based on two factors:
- main function and installation location;
- manufacturing material.
According to the first factor, there are linear, nodal, rotary and differential types. They apply equally to both domestic and industrial communication systems.
This means that any of the above types, if necessary, for example, due to the long length of the sewer pipeline, can be installed on your site.
Linear ones are installed on a straight pipeline. They are equipped with one pair of pipes or outlets, which are located opposite each other.
Such wells are necessary even if there are no prerequisites for an emergency, but the section is considered quite long (according to SNiP - from 35 m to 300 m).
Rotary types, as the name implies, are mounted on pipelines that turn to the side. The general rule applies: the angle of rotation should not exceed 90º, that is, it should not be sharp.
The pipes (holes) are not located on the same line, but in places depending on the angle of rotation, but at the same level in height.
Nodal models are installed at the intersections of two or more pipelines, as well as where the central line has branches.
Wells differ in design by the presence of additional pipes (holes). As a rule, all inputs/outputs are on the same level.
The differential pipes serve to increase or decrease the flow, so the pipes are located at different levels: the inlet pipe is usually higher, closer to the neck, the outlet pipe is at the bottom. The construction of differential wells is also used when it is necessary to reduce the speed of wastewater transportation.
Despite the functional and structural differences, all types of wells are very similar. They are made from various materials.
A well is a water intake structure
Often, thoughts about the good construction of wells for their future owners come down to determining the required number of concrete rings, purchasing them, finding the “right” team of diggers and choosing the design of the well house. Meanwhile, a well is a water intake structure, the structure of which is somewhat more complicated than just a hole in the ground.
Choosing a team of well masters is generally an intimate question, one might say, almost the same as choosing a marriage partner: everyone has their own views on what an ideal master should be. Therefore, let's turn to that part of the well that is above ground level - to its head.
There should only be water in the well
I won’t go into detail about what kind of well houses there actually are - the purity of the water does not depend on what color you paint this structure. However, it is necessary to ensure that nothing foreign gets inside the well, namely: debris and dust, leaves, small animals and insects.
A living frog, oddly enough, will not spoil the water in the well. They say that our grandmothers and great-grandmothers even deliberately threw a frog into milk so that it would not quickly turn sour. But an amphibian that gets into a well will most likely not be able to get out along the steep walls. A frog dying of hunger will not add purity to the water.
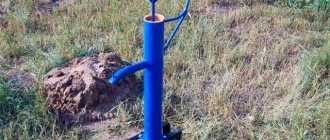
The neck of the well must be securely closed - this will protect against the entry of plant debris, prevent the death of the poor frog and protect your own children from accidents. Even if you do not plan to install a water supply system, it is advisable to install a pump, for example, a manual one, on the well. This way it’s easier to lift the water, and the hole is always closed, and you can’t splash around in the water with an unsterile bucket.
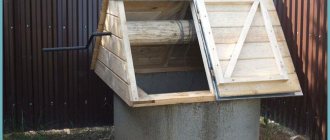
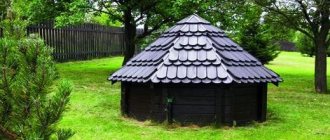
Well house
A house is often built over a well. In most cases, its function is purely decorative. But the installation of a roof over the well is also more important than just a design element of the site. The canopy should perform the same role as the roof of the house - to protect against precipitation getting inside. Therefore, it is worth making the slopes wider, so that the water flowing along them falls to the ground as far as possible from the well.
This will reduce the amount of water flowing down the walls of the well in the ground. This means that untreated water will not get into it.
About frost
A house above a well can also serve another utilitarian service - to protect it from freezing in winter. Previously, when wood was most often used to strengthen the mine, freezing was less of an issue. Concrete rings conduct the cold inside better.
If you have the desire and opportunity, you can additionally insulate the well trunk in the upper part to the freezing depth. For example, with expanded polystyrene, and before you finally fill the soil around the head or make a clay castle.
Although in most cases, just a tight lid covering the hole in the shaft is enough.
Scope of application of clay insulation in our time
As in former times, clay is used to protect basement floors and building foundations from moisture. The ideal option is the combined use of modern and. Surface insulation can be made with bituminous materials (rolled or coated) or with a polymer-cement composition. Build a clay castle outside. This solution will greatly increase the reliability of waterproofing.
Very often builders make mistakes when constructing buildings in clay soils. They dig a pit, build a basement floor, and backfill it, as is customary, with a sand-gravel mixture to neutralize the heaving effect of clay on the foundation. Builders want the best, but it turns out “as always.” Clay soil retains water, while sandy soil, like a sponge, absorbs well. After the rain, all the water goes into the sand and remains there. The backfill around the building is saturated with water for a significant part of the year, regardless of the groundwater level.
One of the options to build a dry basement. If the basement walls are concrete, the brick lining can be replaced with coating or adhesive insulation
If there is even the slightest hole in the surface insulation of the base, water will definitely find its way inside the house. This problem can be eliminated by installing a clay castle or expensive underground drainage. When building on clay soils, it is better not to use sand bedding at all. It is better to place a layer of crushed stone under the foundation cushion, put the clay removed from the pit back and compact it. This recommendation does not apply to shallow foundations built in heaving soils.
Clay is the most popular waterproofing material for the construction of ponds and reservoirs. Retains water perfectly without any additional measures. However, the use of film will only improve the properties of the pond, preventing erosion of the clay layer.
The property of clay to retain water is used in the construction of ponds
The industry produces high-tech waterproofing materials containing clay components. American products are quite well known in the West - three-layer waterproofing mats “NaBento”, made from bentonite clay in a geotextile shell. The mats expand after filling the sinuses of the pit, tightly “packing” possible cracks; they are used to isolate critical underground structures in difficult conditions. Clay-based mats are produced by a number of enterprises in the USA, Canada, European countries and China.
The construction of a clay castle when constructing a village well for drinking water is mandatory. Otherwise, dirty surface water will leak inside along the walls.
The clay castle and the well blind area must have an outward slope
Drainage system for the site
Good waterproofing will cope with a temporary increase in groundwater level, but if it is consistently high in winter and summer, you will have to come up with a larger-scale solution. For example, drainage that will remove excess moisture. The drainage system will cope with abundant surface water after rainfall and snowmelt. Moisture is collected in channels and discharged into a special well, pond or sewer. The same technology is used to drain groundwater from the foundations of buildings.
In some cases, an additional well to collect excess moisture helps solve the problem of seasonal flooding of a drinking well with groundwater. It can be pumped out and used for technical purposes. To protect wells, caissons and conductors are installed at the depth of the waterproof layer. Active substances dissolved in groundwater accelerate metal corrosion processes.
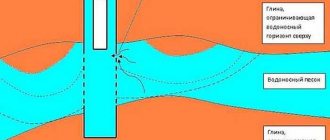
A little about accessible aquifers
Diagram: occurrence of aquifers
- Verkhovodka. It is located closest to the surface and is replenished due to precipitation, which is why its fullness is constantly changing, and during dry periods and in winter it can disappear completely. In addition, it is susceptible to pollution by wastewater treatment plants.
- Ground. They lie at a depth of 6-20 m and are located between two waterproof layers, but do not have excess pressure, so the water level in the well shaft remains practically unchanged. Only minor changes are observed at different times of the year.
- Artesian waters are located at a considerable depth, are strongly squeezed between two waterproof layers, which is why they are under pressure, and when the formation is pierced, they gush out to the surface. The quality of the water is beyond doubt, but the construction and maintenance of a well of a special design is usually not cost-effective.
Advantages and disadvantages
The water seal not only prevents contamination of the source, but also protects the walls of the shaft from moisture, extending the service life of the structure.
The advantages of the protective structure are:
- High reliability and durability.
- Possibility of independent construction.
- No influence on the composition of water.
- There is no need to maintain fixed shaft seams every year.
- Availability of material.
The main disadvantage of the design is the labor intensity during construction. The difficulty lies in the need to comply with a number of features: an effective mechanism requires high-quality material and a high density of the protective layer. Otherwise, the castle will cause more damage. Disadvantages include the ability of the structure to collapse due to non-compliance with the shrinkage process and the possibility of deformation of the shaft due to freezing of clay.
How to make a solution
To prepare the solution, you must maintain the proportion: 1 part cement, 3 parts clean sand and 4 parts crushed stone. The crushed stone to be used must be small. Less is better. The solution is mixed in a special trough or in a concrete mixer. First, mix cement with sand and gradually add a little water. The denser the solution, the better the quality of the rings.
To prepare the solution you will need cement, crushed stone and sand.
Make sure the edges of the ring are even. The formwork can be dismantled after 10 days. The ring has not yet hardened completely, so you need to be extremely careful with it. It is placed on 2 rails or other parallel strong boards and left for another 10 days.
Types of water intake, which one to choose
The water intake of a conventional mine well is of three types:
- An incomplete water intake is the most common option and means that the shaft does not reach the lower impermeable layer, and water seeps through the bottom and wall.
- The full water intake reaches the waterproof layer and water seeps only through specially prepared walls of the shaft.
- A full water receiver with an expander is a structure that not only reaches the lower water-resistant layer, but also goes deep into it, forming a niche for accumulating water reserves. Its lower part is often made expanded.
Scheme: types of wells by type of water intake
Installation technology
There is a certain technology:
- To create a castle, you need to use a material that has natural moisture. When it is extracted from the earth cover for future storage, the material should be soaked in water and then covered with something. In order to check the quality of the created material, try to mold something from this clay. If the quality is poor, then the clay should crumble in your hands. The material should slide off your hands. All this will help you understand whether the material is ready to start using. Since clay contains a huge amount of sand, twenty percent lime can be added to it.
- You can achieve the best results when compacting the material in an auxiliary structure (formworks). To install the formwork you will need wooden panels. It must be installed so that the thickness of our clay castle is two hundred millimeters. Tamping should take place in layers, the height of which should be on average 250 millimeters.
- Geotextiles need to be placed on the outside of the clay castle. This canvas will prevent erosion of the structure by groundwater.
- The process of making a clay castle is reminiscent of the process of creating a blind area for a building. The width of a clay castle can be different, it starts from one meter, the depth starts from 50 centimeters. The best thing is that all these indicators were greater. The clay is covered with a geotextile fabric, and you can put cobblestones on the fabric.
As you understand, clay is a suitable material that can be used to isolate a well from underground moisture. The cost of clay as a material is low, and maybe even non-existent, since the clay is right under your feet. Any procedure that involves clay can be performed independently. This work does not require any specific skills or effort. But at the same time, the work is quite labor-intensive.
Non-specialized information
The construction of a clay well castle is a rather labor-intensive process and requires a large amount of material to be prepared. At the end of the work, you need to clean the well from possible contamination so as not to worry about the level of water quality.
In most cases, instructions for creating a clay castle consist of 3 stages, despite the fact that it is possible to make adjustments to it:
- A trench is made along the perimeter of the well shaft with dimensions: width - 500-600 mm, depth 1500-1800 mm.
- Clay is poured into it, which must be compacted periodically.
- A small blind area is made on top of the castle, sloping away from the well, its height is 150-200 mm.
Below we will look at how to make a clay castle near a well in more detail.
Technology
- For a clay castle, you need to take material with natural moisture. When it is taken out of the ground for storage, it should be soaked in water and covered on top.
You can check the condition of the clay by trying to mold something out of it; the material should not crumble or slip between your fingers. You may have to add 10-20% lime to it in order to neutralize the increased sand content in it.
- Excellent performance will result from careful compaction of the clay in the formwork. To do this, take wooden panels and install them so that the thickness of the lock is 150-200 mm. When the foundation pit is not wide and there is enough material, in most cases its walls help with formwork. The clay needs to be compacted in layers 200-300 mm high.
- Place a geotextile fabric outside the castle, which will prevent the structure from being washed away by groundwater.
- A clay castle is made like a blind area for a house. Its width is from 1 m, it is not necessarily deep, from 0.5 m. Despite the fact that it is better for the dimensions to be larger. If a water pipe goes from a well source to a personal home, it must also be insulated with a lock, regardless of the depth of its installation. It is possible to cover the clay on top with geotextiles, placing cobblestones or paving slabs on top of it.
From the above, it became clear that clay is a classic and promising material in terms of waterproofing various structures, in particular the well shaft from ground liquid. Its price is inexpensive, since it can practically be found underfoot, and working with it does not require special qualifications, skills or complex tools, despite the fact that it is labor-intensive.
Is it possible to replace clay?
It is now possible to find quite a few companies on the market offering to replace clay with a mixture of sand and gravel or just sand. At the same time, you should understand that they are simplifying the work for themselves, but not for the consumer.
If you look at the problem logically, then you can understand whether such a lock is needed or not. The fact is that sand is not recommended for retaining water, but only passes it through itself, working on the principle of a filter. At the end of it, the liquid reaches the wall of the cement rings and, through possible cracks, rushes into the well shaft. (See also the article Filter well: highlights.)
Clay is a material that is impermeable to water, despite the fact that it can get wet on the surface. As a result, during the winter period, with severe frosts, it is possible from time to time to notice a slight movement of the well rings.
At the same time, the material does not allow surface water to penetrate and moisten the soil; therefore, despite the variety of mixtures for castles, they are not able to replace clay.
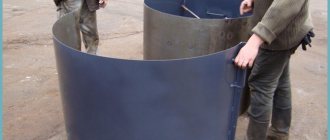
Protection of well rings from displacement
To prevent displacement of the well shaft made of cement rings, make additional fastening using stainless steel plates with anchor bolts. In addition, plastic nonwoven materials that do not rot have proven themselves well.
Start laying them from the surface of the ground, and finish 200 mm below the second seam. Thus, you will receive protection from the ingress of water and prevent clay from spilling due to unsealed seams.
How to compact clay correctly
The work should be carried out in a couple of passes, after laying 150-200 mm of clay. From time to time, precisely because of poor-quality sealing, quite often it was necessary to redo everything all over again. The finished clay for the castle should have a moisture content of 15-30%, which should not be forgotten.
Now you need to remember when to make a clay castle. It is not installed immediately after making the well; it is necessary to allow the soil around the perimeter to settle and settle.
Otherwise, cracks in the ground will make the castle unnecessary. You have the opportunity to do the work yourself or with an assistant, or you can ask specialists for help.
Clay well area
To drain surface water from the well, it is also recommended to make a blind area. In its simplest form, it can be built from clay. Taking into account the possibility of heaving, its thickness should be 10-50 cm. It is not worth making the blind area thicker, since in this case it approaches the design of a clay castle, and problems associated with it arise.
A significant disadvantage of a clay blind area is the need to organize a protective coating over it. The fact is that the clay itself, when wet, turns into “mud”, which is unpleasant to walk on. This increases the labor intensity and cost of building such a blind area.
Despite this, I still decided to make a clay blind area around my well. And to reduce heaving forces, additionally insulate the soil around the well.
The soil on our site is clayey. The fertile layer goes to a depth of 40-50 cm, and clay begins below. So I decided to select a layer of soil around the well at a distance of about a meter and fill the pit with clay. Luckily there was enough of it - next to the well there was a pile of clay taken out by the workers when digging the well. The quality of the clay suited me quite well. And there was an opportunity to partially recycle it.
When the soil layer and what the workers called the “lock” were removed, a fairly wide gap opened between the soil and the rings. It became clear that the urgent recommendation for those who are going to make a castle or other protective structures around the well is to begin this work in 1-3 years, when the soil around the rings is compacted. The Internet is replete with photographs of failed blind areas around wells, which is the result of their premature construction.
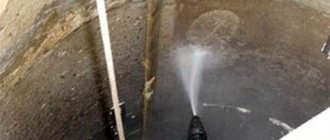
But it was not my plan to wait that long. I decided to speed up the process of silting up the gap somewhat by trying to fill it with clay. This had to be done in several stages. I placed the clay all the way to the top in the slot and compacted it. But the next day it was discovered that water had filled the pit, and the clay had settled down, and the gap opened again.
To continue the work, I pumped water out of the well (about two rings), as a result it also left the crack. And again and again I put clay in it to the top and compacted it, the water filled the pit, and the clay settled. I did this several times. At some point, the clay stopped settling - the gap remained filled for several days.
For reliability, I decided to add liquid glass to the top layer of clay filling the gap. Having made holes in it with a shovel handle about a meter deep, poured liquid glass into them and tamped the clay with it again.
After this, he began filling the pit around the well with clay. I did this in small layers, compacting them and forming a slight slope away from the well.
How to protect well rings from shifting
To reduce the coefficient of adhesion between clay and the surface of the rings, non-woven plastic materials are used that are not subject to rotting
To prevent the rings from moving, you can install additional fastenings using stainless steel plates and anchor bolts. In addition, to reduce the coefficient of adhesion between clay and the surface of the rings, non-woven plastic materials are used that are not subject to rotting. Their laying begins from the surface of the earth and ends 20 centimeters below the second seam of the well shaft. Thus, we have additional protection against the ingress of perched water, as well as against spillage of clay in case of leaky seams.
Features of the work
Installing a clay castle for a well with your own hands is not easy. To carry out the work, an impressive amount of material will be required, and after installation the well will have to be cleaned of contaminants.
The well is “closed” with clay in 3 stages, although some deviations from the instructions are possible. Typically a clay castle is installed as follows:
- A trench with a depth of about 1700 mm and a width of about 600 mm is made along the perimeter of the shaft.
- Black or blue clay is placed in the shaft and carefully compacted.
- A blind area is made on top of the castle with a slope towards the well with a height of 170 mm.
Safety Basics
Inexperienced homeowners often neglect basic rules and endanger not only themselves, but also their partners. To avoid ridiculous injuries, you need to follow at least some basic rules.
- A person in a mine must protect his head with a helmet. Anything can happen; a bucket falling down or a tool falling down is not uncommon.
- Ropes, ropes, ropes, rings - everything related to lifting is carefully checked before starting work.
- A person dripping in a shaft must be secured with a rope, and if the depth of the well is over 6 m, then with two: a working rope and a safety rope.
The construction of a well must be carried out by several people
- There are so-called gas pockets in the soil, and since the air exchange in the mine is not fast, as you descend, they periodically light a candle. Its flame should burn evenly, which indicates a sufficient amount of oxygen; if the fire goes out, the pit needs to be checked.
Advice! There are several ways to ventilate a mine. The easiest way to do this is with a thick blanket, which is lowered to the bottom several times and raised back on ropes. A fan lowered to the bottom of the shaft will also help speed up gas exchange.