You can handle the task of installing an autonomous sewer system in a suburban area on your own without any problems. To organize its storage and treatment points, a wide range of designs are produced. They need to be correctly installed in the pit and connected to the sewer pipeline.
However, for the system to operate normally, it must be built in strict accordance with the installation requirements. As a clear example, let’s look at how a Tank septic tank is installed. This is a typical non-volatile sewerage treatment facility designed for wastewater treatment.
You will learn everything about choosing a container suitable in terms of volume and the rules for installing a treatment point from the article we propose. We have outlined the steps for assembling and installing a septic tank in great detail. Taking into account our recommendations, you can build a trouble-free system.
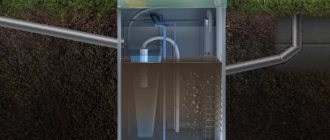
Design and principle of operation of a septic tank Tank
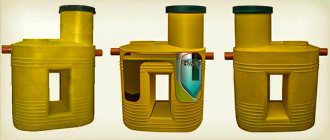
The septic tank is made in the form of a thick-walled plastic container with stiffening ribs. There are several varieties of Tank, providing different performance. In addition, the design of the septic tank allows several tanks to be connected to each other, which makes it possible, if necessary, to increase the working volume of the septic tank. In any case, the entire cleaning process taking place in the Tank is the same and does not depend on productivity.
In the septic tank itself, a three-stage wastewater treatment takes place, allowing for 75% purification of the liquid. After the Tank, it is necessary to equip a post-treatment stage, which most often consists of one or more infiltrators, which are one of the options for soil filtration.
Let us describe the purification path that water takes inside the septic tank Tank.
The principle of operation of a septic tank Tank
- First, the wastewater enters the first settling chamber. Here, large and heavy, practically non-degradable particles precipitate, and light suspensions, such as fats, rise to the surface. The overflow tray, which connects the first chamber to the second, is located in the center. Thanks to this, only settled water gets to the next stage.
- In the second compartment, the remaining contaminants are partially decomposed by microorganisms present in the water and further settled.
- As a result, the water enters a biofilter with a floating load, where the anaerobic process of decomposition of organic matter takes place.
Advantages, benefits, features
This is a modern, functional treatment facility, which is a sealed polypropylene container, equipped with 17 mm thick stiffening ribs for better strength. Despite the large wall thickness (10 mm), the body of the Tank septic tank has sufficient elasticity and flexibility, so it can withstand soil pressure well. The interior of this structure consists of three chambers connected by overflows . These are sedimentation tanks and a biological purification filter. If desired, the number of tanks in the Tank septic tank can be increased.
A septic tank has the following advantages:
- The presence of a convenient block-modular design, which allows, if necessary, to increase the productivity of the device.
- Efficiency of wastewater treatment. When combined with an infiltrator, the “Tank” cleans sewer emissions by 98-100%. That is, almost absolutely pure water comes out of the system.
- Small dimensions and compactness. The dimensions of the septic tank Tank allow it to be installed in areas with a small area.
- Complete energy independence and autonomy.
- Reliability and long service life.
Features of operation and installation of a septic tank Tank
The septic tank is a cleaning system that is easy to install and operate. But it is necessary to take into account a number of nuances.
Plot after installation of septic tank Tank
- Water moves through the septic tank by gravity. Therefore, it can be used in homes with intermittent power supply. But it is necessary to maintain an inclination angle of 5-10 mm when laying inlet and outlet pipes. If the Tank septic tank system used is designed for large volumes and therefore consists of several tanks connected to each other, then the slope must be maintained for the pipes connecting them, and each subsequent tank must be installed 20-30 cm lower than the previous one.
- You need to choose the right place to install the septic tank. If possible, vehicles should not regularly pass over the septic tank. If this cannot be observed, then during installation the tank must be covered with a reinforced concrete slab, the thickness of which must be at least 25 cm. The septic tank must be removed from the foundation of the house at least 5 meters. Within a three-meter radius of this treatment plant, trees cannot be planted, the root system of which could ultimately damage the tank. Please also take into account the fact that the wastewater from the septic tank requires additional treatment, so you need to choose a place where it is possible to arrange classic filtration fields, install an infiltrator, etc.
- When constructing a pit, take into account the level of groundwater and soil freezing. If the soil is saturated with water, then a cement base is poured into the bottom of the pit, to which the septic tank is attached using slings. If the soil frost line is low, you can either lengthen the neck of the well serving the septic tank or insulate the body of the septic tank itself.
- Since the Tank does not completely clean the wastewater, it is necessary to provide a method for additional treatment. Its option is largely determined by the type of soil.
- The septic tank is backfilled without the use of machinery to avoid deformation and damage to the walls of the tank.
- The presence of large amounts of residual chlorine or other disinfectants in wastewater can lead to the death of active microbiota, and therefore to disruption of the cleaning process, which causes an unpleasant odor near the septic tank.
- If it is necessary to mothball the septic tank in the winter, then before a significant cold snap it is necessary to empty the septic tank chambers by a third.
- Sludge must be pumped out of the septic tank at least 1-2 times a year.
- It is recommended to add biological products to the septic tank to achieve the required level of cleaning and extend the service life of the second stage filter.
Compliance with these simple conditions will ensure reliable operation of the Tank septic tank.
| Name | Dimensions (LxWxH) | Prod. l. | Volume | Weight kg | price, rub. |
| Septic Tank – 1 to 3 people. | 1200x1000x1700 | 600l./day | 1200 | 85 | 16 800 |
| Septic Tank - 2 for 3-4 people. | 1800x1200x1700 | 800l./day | 2000 | 130 | 27 500 |
| Septic Tank - 2.5 for 4-5 people. | 2030x1200x1850 | 1000l./day | 2500 | 140 | 31 500 |
| Septic Tank - 3 for 5-6 people. | 2200x1200x2000 | 1200l/day | 3000 | 150 | 34 500 |
| Septic Tank - 4 for 7-9 people. | 3800x1000x1700 | 1800l/day | 3600 | 225 | 54 480 |
| Infiltrator 400 | 1800x800x400 | 10mm | 400 | 4 500 | |
| Cover D 510 | 2100 | ||||
| Extension neck D 500 | 2900 |
You may be interested in information on the topic of what a topas septic tank is.
Rules of operation and maintenance
Septic tanks Tank do not require specific maintenance and the invitation of technical specialists, and are unpretentious in operation. They calmly tolerate almost any type of household waste - food residues (during washing dishes), toilet paper, and small amounts of cleaning and detergents are allowed to enter the sewer.
However, some handling rules should still be followed:
- Once a year, clean out solid waste that settles at the bottom of settling chambers. When using biological products with bacteria that liquefy sediment, the frequency of this procedure is reduced - pumping is carried out once every 3-5 years.
- Do not allow antibacterial detergents, alcohol, alkalis and acids, antifreeze, chemicals, or medications to enter the system. Such substances kill bacteria necessary for wastewater treatment.
- Aggressive bacteria should not enter the container. Contained in pickles, mushrooms, rotting foods and water used to wash household filters. They interfere with the proper operation of the septic tank and can cause it to completely fail.
- You cannot keep the service hatch open for a long time in winter.
- If residents live in the house only during the summer season, then the system should be mothballed for the winter. To do this, clean water should be poured into it in an amount of 50-70% of the total volume of the tank. The liquid will preserve the vital activity of the bacterial colony, compensate for the load of soil on the body and prevent the septic tank from floating.
By following these recommendations, home owners will be able to use an autonomous sewer system for many years, without the cost of repairing or replacing individual devices.
Installation of septic tank Tank
Installation of the septic tank itself includes preparing a pit, installing a reservoir in it and backfilling. Below the entire process is described step by step.
Step 1 . Having chosen a place for the septic tank, you begin to dig a pit for it. You can do this manually, or use special equipment. In the second option, by spending additional money, you will significantly reduce installation time. If the septic tank consists of several tanks, then for each subsequent pit the depth of the pit should be 0.2-0.3 m greater than for the previous one.
Note! When digging a pit, do not forget to take into account the height of the sand cushion or cement base, as well as the depth of soil freezing. In addition, on each side of the septic tank there should be 20-30 cm left to the walls of the pit for sand-cement backfill.
Step 2 . At the bottom of the pit, it is necessary to prepare a sand cushion 0.3 m thick, which is carefully compacted and leveled using a level. If the construction of a septic tank is carried out in moist soils or where the groundwater level is at least periodically increased, then instead of sand, you need to make a concrete base, which must also be strictly horizontal and level. Anchor loops must be installed into the concrete slab.
Cement pad at the bottom of the pit
Step 3. Using cables, the efforts of several people or lifting equipment, it is necessary to lower the septic tank strictly in the center of the tank.
Step 4 . Check the correct installation of the container using a building level.
Step 5 . If the installation takes place on a cement base, then the septic tank is fixed to it using mounting slings, passing them along the top of the tank, and attaching the ends of the slings to the reinforced loops of the concrete slab.
Step 6 . Connect the inlet and outlet pipes through the special pipes of the septic tank using rubber seals. Treat all connections with sealant.
Note! Since water to and from the septic tank often moves by gravity, the inlet and outlet pipes must be laid and connected maintaining a slope of 5-10 mm/m, which is checked using a building level.
Step 7 . Between the walls of the septic tank and the pit, a cement-sand mixture (1:5) should be poured as follows: every 30 cm of backfill, it must be compacted without resorting to machinery. You also need to add water to the septic tank so that its level is 15 cm higher than the backfill.
backfilling
Step 8 . If necessary, the upper part of the septic tank is insulated with foam plastic, mineral wool or other heat-insulating material. If there is a road passing next to the septic tank, you need to lay a concrete slab on it.
You may be interested in information - septic tank operating principle
The septic tank itself is ready for use, but the stage of post-treatment and disposal of wastewater needs to be prepared. Her work is based on the soil filtration method. The device depends on the geological features of the site.
Regulatory Requirements
Before installing a septic tank Tank with your own hands, you must carefully read the text of two main documents:
- SNiP 2.04.03-85, which establishes the rules for the installation of external sewerage networks;
- SanPiN 2.1.5.980-00, which sets requirements for the purity of surface waters.
The optimal distance of the septic tank from the house is no more than 6 m, but, at the same time, installation of a septic tank closer than 5 m from the foundation is not recommended due to sanitary and hygienic requirements.
The last restriction is rather advisory in nature, since the “Tank” is a modern treatment plant, during normal operation of which odors characteristic of a septic tank do not appear. At the same time, the shorter the external pipeline, the easier it is for the owner to monitor its operation and the easier it is to avoid blockages. If the pipeline is long, it is necessary to install inspection wells for every 15 m of the pipe length and at places where it turns.
In addition, the following minimum distances must be observed during installation:
- 1 m - to the foundation of any building located on the site;
- 2 m - to the boundaries of adjacent areas;
- 3 m - to the nearest trees;
- 5 m - to the side of a road with heavy traffic;
- 10 m - to the reservoir or the nearest water intake point.
Regulatory requirements for the installation site of a septic tank on the site
It should be noted that the septic tank should be located in such a way that there is free access to it for sewage disposal equipment, or taking into account the fact that the maximum length of the hose used for pumping is 50 m.
Installation of the infiltrator
Septic tank and infiltrator
Most often, after the Tank septic tank, an infiltrator is installed, which is a bottomless box. This treatment option is applicable for soils with low groundwater levels and good absorption capacity. The installation location of this type of soil filter should be 5 meters away from a residential building and 30 meters away from an open reservoir or watercourse.
The number of containers depends on the absorption capacity of the soil and the performance of the septic tank. Sandy soils require less infiltrator than loam soils. The greater the capacity of the septic tank, the more tanks need to be installed.
Series connection of infiltrators
Installing infiltrators is not a complicated process and includes the following steps.
- A pit is prepared at a distance of 1 m from the septic tank. The length and width of the pit depend on the number of containers. In addition, there should be about 0.5 meters from the infiltrators to the walls of the pit. The depth of the pit is determined by the slope of the pipe that drains wastewater from the septic tank. In addition to the size of the infiltrator itself, it is necessary to take into account the height of the sand and crushed stone filter underneath it.
- The pit is covered with geotextile, including not only the bottom, but also all the walls. In this case, it is necessary to take into account the supply of fabric that will be used to cover the infiltrator itself after installation.
- A 40-centimeter layer of filter made of fine-grained sand and medium fraction of crushed stone is poured onto the bottom. The filter is leveled using a building level.
- The infiltrator container is released onto the filtration layer.
- The infiltrator is connected using a rubber seal to a pipe extending at an angle from the septic tank. If several consecutive infiltrator tanks are used, then they are also connected by pipes.
- A fan pipe is installed at the end of the infiltrator for ventilation. If several containers are used, then the ventilation pipe is placed at the end of the last container.
- Cover the infiltrator with geofabric and backfill it: up to the top of the container with sand, and then lay insulation and fill it with soil.
Insulation on the infiltrator
The treatment plant is ready. Water from the septic tank will enter the container and gradually pass through the filter, cleared of remaining contaminants through filtration and ongoing biological decomposition, and seep into the lower layers of the soil.
Useful tips
System installed
Installation of a septic tank (and similar in design) is quite simple. Even if you made minor mistakes, the device will work fine.
Microorganisms in the biofilter cannot tolerate chlorine
Sometimes an unpleasant odor may occur. This occurs either due to lack of ventilation or due to poor performance of bacteria in the filters.
Such malfunctions are easily eliminated. If you forgot to install ventilation, it is easy to fix. It is enough to dig a pit with an infiltrator and install a ventilation duct.
Poor performance of microorganisms in biofilters is associated with undesirable elements in the effluent. Bacteria do not tolerate certain medications, detergents containing chlorine, and antibacterial additives in powders. If you use such products, it is advisable to stop for a while. After the vital activity of the colony of microorganisms is restored, the unpleasant odor will disappear. In the future, it is better to reduce the use of such substances to a minimum.
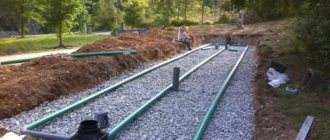
Filtration fields
Filtration field installation diagram
Under the same geological conditions as in the option described above, filtration fields can serve as a stage for post-treatment and disposal of wastewater. In them, the liquid from the septic tank flows into perforated pipes, which are also laid on a sand-crushed stone bed, which cleans the wastewater and allows the liquid to pass into the lower layers of the soil. Below are step-by-step instructions for arranging filtration fields.
Step 1 . It is necessary to dig one common or separate ditches for each pipe. The distance between individual trenches should be about two meters. The total width of the ditch should be such that there is 1.5 meters between the pipes, plus about 0.5 m remains from the outer sprinklers to the walls of the pit. The depth of the trenches is chosen so that a 30-40 cm layer of filter can be poured under the pipe, and above it is a ten-centimeter layer of rubble. In addition, you need to take into account that the pipes must pass below the freezing point of the soil and at a slope of 2-5 cm per meter.
Step 2 . They dig and prepare trenches for the outlet pipe coming from the septic tank and the distribution pipes connected to it. The depth of the ditches should be such that the pipes lie below the freezing point of the soil, and at the bottom of the trenches it is possible to make a sand cushion 15 cm thick, and lay the pipes themselves at a slope of 10 mm/m. Before laying the pipes, the sand cushion is compacted and leveled using a building level.
Step 3 . A drainage pipe coming from the septic tank is laid in a pre-prepared trench at a slope of 5-10 mm/m. Let us remind you that the connection must be treated with a special sealant to avoid moisture seepage.
Step 4 . Distribution pipes are connected to the outlet pipe using a tee or other branching adapter and rubber seals.
Step 5 . A 30 cm layer of sand and gravel is poured into a common ditch or separate trenches at the bottom. This is a filter layer.
Step 6 . Perforated pipes are laid on the filter at a slope of 5-10 mm for each linear meter of pipes. On the one hand, distributors are connected to the sprinklers using a flexible connection, on the other, a ventilation riser is installed, which should be higher than the expected level of snow cover.
Step 7. Another 100 mm of filter layer is poured on top of the pipe and covered with geotextile.
Step 8. The filtration field is covered with soil.
Ventilation device
Installation of ventilation for the autonomous energy-independent Tank complex can be done in several ways. The first, the simplest and seemingly most logical, is to make a ventilation outlet directly above the lawn and cover the outlet pipe with a deflector and a protective cover from the rain. This option is not very good because it spoils the appearance of the lawn. The second option is to conduct ventilation under the soil layer and connect it to a vent pipe leading to the roof. The pressure and removal of gases will be normalized.
Filtration field for soils with poor absorption capacity
Heavy clay soils do not drain water well. But you can also create a filtration field for them by equipping it with a drainage system as follows.
Filtration field with drainage system
Step 1 . First, it is necessary to prepare trenches with a depth designed not only for the entire system of spray pipes, but also for the filter of the drainage system, as well as a layer of sand of 0.8 m, which will separate the drains and sprayers.
Step 2. A sand cushion is placed at the bottom of the trench, which is compacted and leveled.
Step 3 . Fill up a layer of crushed stone about 20 cm.
Step 4 . The drains are laid maintaining a slope of 5-10 mm. They are perforated pipes. The drains are also covered with gravel on top.
Step 5 . On the side distant from the septic tank, the drainage pipes are connected to a drainage pipe leading to a drainage collector, which is a buried well, for example, made of plastic. A pump is installed at the bottom of the well, which discharges the collected purified water into a ravine, relief or other place provided by the project. On the other side, the drains are equipped with ventilation pipes that extend above the surface of the earth so that they are not covered by snow cover.
Step 5 . Sand of fractions no larger than 0.8 cm is poured onto the gravel. The sand is not compacted.
Step 6 . Sprayers are placed on the resulting layer of sand and the actions described above are performed.
Drainage systems can also be arranged under infiltrators according to a similar scheme.
Specifications
The Septic Tank stands out among other installations for local sewerage due to its incredibly powerful body, which even looks impressive. Such a housing can withstand ground pressure perfectly, so during installation there is no need to build a concrete “sarcophagus” for it.
The tank is available in different modifications, which differ in size, internal volume and performance. If the most compact version, Tank 1, is capable of processing 600 liters of waste per day, then Tank 4 can handle three times the volume, that is, it will be able to process 1800 liters.
The tank has three chambers through which water passes sequentially, gradually clearing itself of impurities. At the outlet, the wastewater is purified by 75% (if the installation scheme has not been violated), which is a very high figure for a septic tank.
To finally purify the water, a soil filtration unit is used - an infiltrator, which is mounted at the outlet of the septic tank. The infiltrator receives water that has undergone preliminary purification. After passing through a crushed stone filter, the water is finally purified.
Features of Tank installations
- Energy independence. The units operate autonomously and do not require connection to electrical networks.
Advice! Filter pads have a shorter service life. As a rule, it is recommended to change the crushed stone cushion in the infiltrator every 15-17 years.
- There are no elements in the septic tank design that can break. This quality ensures its long service life - more than 50 years.
- The septic tank can operate both in a uniform and intermittent mode. This allows us to recommend the Tank for installation both in dachas, which are used for periodic recreation, and in houses for permanent residence.
- The tank copes well with any type of domestic sewage.
Advice! It is prohibited to discharge gasoline, chemicals (acids, alkalis), solvents, paints, construction waste, that is, those substances that do not belong to the category of household waste, into the sewer system.
- Tank septic tanks require virtually no maintenance; they only need to be periodically cleaned of accumulated non-decomposing sediment. To do this, you need to call a sewer truck about once a year.
Advice! To speed up the process of decomposition of organic compounds and reduce the amount of insoluble sediment, it is recommended to use special biological additives for septic tanks.
Installation of a filtration well after a septic tank Tank
Filtration well after septic tank Tank
A filtration well can be used for highly absorbent soils. Recently, large-diameter plastic pipes, the strength of which is given by additional stiffening ribs, are increasingly being used as a well. There must be at least one meter from the bottom of the well to groundwater. You can build such a well yourself.
Step 1 . First you need to dig a pit, the diameter of which should be 40 cm greater than the diameter of the well shaft. The depth of the well depends on the groundwater level, usually it is about 2 m, the diameter is most often 1-1.5 m.
Step 2. A crushed stone cushion is constructed at the bottom of the shaft and leveled using a building level.
Step 3 . A pipe cut to the required height is lowered vertically and is the well shaft. A hole for the inlet pipeline is first cut in the pipe. A rubber seal is inserted into the hole. In addition, five-centimeter holes are made in the pipe wall in a checkerboard pattern at a distance of 100 mm from each other.
Step 4 . After the shaft is lowered and leveled through the prepared hole, the well is connected to a pipe running at a slope of 5 mm from the septic tank. All connections are treated with sealant.
Note! The distance from the pipe entry point to the filter layer, which will be filled in at the next stage of well installation, must be at least 150 mm.
Step 5 . Crushed stone, gravel or other material selected as a filter is poured into the well shaft. The thickness of the filter layer should be 0.3 m. The outer walls of the well are sprinkled with the same material.
Step 6 . The shaft is closed from above with a hatch, around which soil is filled.
Final works
After the Tank septic tank is installed with your own hands, the power supply cables are installed (for volatile “Tank” models) and the ventilation systems are connected, and their functionality is checked.
Having ensured that the devices are operating normally, a layer of insulation is laid, for which it is advisable to use sheet material: isofol, EPS, etc. It is undesirable to use polystyrene foam - it will flatten under the load of the soil and lose its thermal insulation characteristics. The use of hygroscopic, short-lived mineral wool is also not recommended. It also makes sense to take care of the insulation of the sewer pipe.
The soil removed when digging pits is poured on top of the insulation, level with the general level of the site, but with a small margin for shrinkage.
Photo: Tank septic tank installed on the site
Wastewater disposal for soils with high groundwater levels
If groundwater rises during certain periods, and the rest of the time the soil and groundwater allow for standard installation of infiltrates, then a storage well with a check valve is installed between the treatment field and the septic tank, which does not allow water to flow back into the septic tank.
Cleaning scheme for periodic growth of ground water
The well can be made of concrete rings or be a ready-made plastic container. In the first case, lifting equipment must be hired to lower the concrete rings, and the joints of the rings must be carefully sealed. The plastic well will need to be anchored to the bottom of the pit in the same way as was done for the septic tank. Pipes are laid to the well from the septic tank and from the well to the filtration field in compliance with the slope.
A pump is mounted inside the storage tank, which periodically pumps water in portions to the filtration fields. In addition, the well must be equipped with a hatch, allowing excess water to be pumped out and inspection carried out.
If the groundwater level is high all year round, then infiltrators can be installed higher than the septic tank, and a well with a pump can also be placed between them. To install the infiltrator tank, it is important to know the groundwater level. There should be about 0.7 m from it to the filtering sand-crushed stone layer. The infiltrator is insulated on top.
Installation of an infiltrator at high groundwater level
By correctly installing the entire septic tank Tank system, you can achieve a high level of wastewater treatment, which seeps into the ground or is discharged onto the terrain without harming the environment. At the same time, it is best to use infiltrators for soil cleaning, since they are more reliable and easier to install.
Main advantages
The main advantages of this system are as follows:
- long service life;
- system autonomy;
- economy in materials;
- modular design;
- long period between waste pumpings.
Since the main material from which the system elements are made is high-quality plastic, the system has a long service life. The developers believe that this period, with proper operation of the system, is 50 years.
The system does not require additional energy sources and is completely autonomous. For example, it does not need to be connected to the electrical network. This increases the efficiency of the system and its reliability, since in rural areas disruptions to the power grid are common. The cost-effectiveness of the system is also reflected in the fact that simple materials and filters are used. The modular design of the system allows you to increase its productivity by increasing the number of tanks. Pumping out solid waste components using vacuum trucks is done quite rarely. If you use special bacteria, then such pumping can be done once every 5 years.
It is best to entrust the installation of a septic tank treatment system to a specialized organization, but it is possible to install the system yourself.
How to install the Mauerlat? You will find out the answer by reading this article. And this article discusses corrugated sheets imitating stone, imitating wood and its other types.
Before purchasing a septic tank
Before you start choosing a septic tank, you need to determine:
EVERYTHING YOU NEED FOR THIS ARTICLE IS HERE >>>
- • you plan to use the septic tank year-round or seasonally;
- • how many people will use it constantly;
- • how often maintenance is required, whether you can do it yourself or will have to call specialists;
- • whether you want to use electricity during operation;
- • how close to the surface of the earth in your area the groundwater is located;
- • what funds you can allocate for the purchase of a septic tank and its installation.
For us, the determining factor when choosing a septic tank was ease of installation and independence from electricity during operation. The septic tank “Tank-2.5” was suitable for us (the numbers correspond to the volume in cubic meters). We purchased it with a small reserve - for 4-5 people, in case the family grows.
The septic tank we chose had dimensions of 2030 x 1200 x 1850 mm (L x III x H). For its normal operation, it was recommended to install 2-3 infiltrators.
MATERIAL OF SEPTIC TANK MANUFACTURE - WHAT?
-Modern tanks are usually made from various types of durable PLASTIC. This is a reliable, lightweight and durable material that is not affected by temperatures, microorganisms and corrosion. Due to their light weight, plastic septic tanks can be installed independently without the use of a crane. But precisely because of their low weight, unfilled plastic structures can be pushed out of the ground to the surface. To avoid this, during installation it is necessary to attach the container to the concrete base of the pit using bandage cables or anchor bolts.
METAL SEPTICS have also become widespread.
You can also independently equip a waste tank FROM REINFORCED CONCRETE, using ready-made reinforced concrete rings or monolithic pouring. This is a classic and affordable material, which was also used for arranging cesspools. It is heavy and durable, allowing you to reliably install the structure and not worry about its displacement or displacement.
They are often made independently from barrels or tanks. The metal is susceptible to corrosion, so it requires mandatory coating with special protective compounds. Using stainless steel containers helps to avoid unnecessary problems, but significantly increases the cost of the structure. The large weight of metal storage tanks allows them to be securely placed under the soil layer - they will not be pushed to the surface, but for installation you will have to resort to the services of a crane operator.
You can also independently equip a waste tank FROM REINFORCED CONCRETE, using ready-made reinforced concrete rings or monolithic pouring. This is a classic and affordable material, which was also used for arranging cesspools. It is heavy and durable, allowing you to reliably install the structure and not worry about its displacement or displacement.
Important!
The main disadvantages of concrete structures are the complexity of their installation and waterproofing. You can’t do this without a crane and special waterproofing coatings.
BRICK is also used for the construction of septic tanks. With its help, single- and multi-chamber systems with various types of cleaning are built. For settling basins, you can use any, even used, brick, which often significantly reduces the cost of the structure. It is worth remembering, however, that cheap brick has low waterproofing and requires an additional coating that protects the container from leakage, both from the inside and outside.
Expensive and durable clay clinker bricks hold water best. Its use increases the cost of installation, but at the same time guarantees a long service life. Also, the service life increases with proper care and timely repair of brickwork. Without maintenance, such a septic tank will last no more than 15-20 years.
Let's sum it up
If you want to equip a reliable, durable and high-performance autonomous sewer system, you need to determine:
- what type of soil is your site located on?
- at what depth does groundwater lie;
- how much water the septic tank will need to process;
- how much area of land are you willing to give up for sewerage installation?