Installing the head is not the most difficult part of the work when building your own well. Neither the device itself nor the procedure for its installation are particularly complex. By following certain rules, you can install a well head with your own hands without any problems.
But first it won’t hurt to get acquainted with some of the nuances of this process. We will tell you which head is best to use, and also describe the technology for its installation. Lovers of homemade products will find the instructions for self-assembling a simple device for a well useful.
What is it and what is it for?
A well cap is a device that closes the casing pipe in its upper part. Performs the following tasks:
- Sealing the inlet. The possibility of precipitation and all kinds of debris, soil and impurities penetrating into the source is eliminated. As a result, there is no need to manufacture a special protective house.
- A reliable support point is created when hanging the pump, pipe and mounting the connection unit.
- Acts as anti-vandal protection. Using special fasteners.
Some people decide not to waste money and simply wrap the hole with cellophane or rags. However, all this is only temporary protection, and during flood periods such twists are absolutely useless.
The structure consists of three main elements:
- Lid.
- Flange.
- Sealing ring.
Can be completed with:
- Mounting bolts.
- Carbine.
- Fitting.
- Cable entry.
- Eye bolts.
All this is necessary to securely secure the device.
When do you need a well head?
Is a header necessary at all? Many people simply cover the pipe with film, a plastic bottle or a piece of rubber.
In fact, this approach is unprofessional and only serves so far.
A well needs a header just like a computer needs an anti-virus program: it may be possible without it, but everyone understands that it’s better with it.
For example, melt and flood waters are a serious threat to the quality of drinking water; they should not flow into the well! It would be possible to secure the water supply by making a high pipe, but if the water goes into the house, it will freeze in winter. Therefore, on the contrary, wells are made in pits and small concrete wells below the freezing level. Such a well can be protected only by tightly closing it.
The head performs the following functions:
- The main thing is protection. Dust, sediment, dirt, melt water, insects, mice, etc. can get into drinking water, and it must be perfectly clean.
- Aesthetic. The well head looks finished and neat.
- Simplifies the mounting of pumping equipment. Everything is thought out, hermetically sealed, and done quickly and easily without the use of welding.
- Increasing the flow rate of a well (flow rate is the amount of water that a well can produce per hour).
When the pump pumped out some of the water, an empty space was created. It must be filled with something and, as a rule, it is filled with air, and water again flows from the aquifer slowly. If a sealed cap is installed, a vacuum occurs, which contributes to the “pulling out” of groundwater.
Types of well caps for water
According to their design differences, they have the following types:
- With flip-up or removable stopper. This design means a cylinder with a void inside. The upper part has a plug with a cylindrical or flat bottom.
- With coupling adapter. This design is a flanged pair. One has a collar type with a hole inside and a diameter equal to the casing. The other pair is a blind flange, where there are fittings with holes.
As for the material of manufacture, the products are:
- Plastic.
- Metal.
- Cast iron.
Plastic ones can handle weights up to 200 kg. Compared to analogues, they have a lower cost. While metal and cast iron can handle weights of up to 500 kg.
Advantages of metal/cast iron products:
- Handles greater weight.
- High load capacity.
- High strength.
- Durability.
Minuses:
- Heavy weight.
- Metal must be insulated.
- It is necessary to carry out welding work.
- Subject to corrosion.
As for plastic, it has the following advantages:
- Creates a tight connection.
- No welding required.
- Does not corrode.
- Has a lower cost.
- Easy maintenance, no painting required.
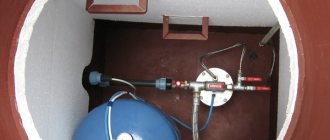
Types of caissons
For the manufacture of equipment, a material is used that will provide sufficient thermal insulation and the required sealing that must be inside.
There are the following types of caissons:
- Made of plastic. It provides a good seal. The material is lightweight, so the device is easy to transport and install. But the structure itself is not rigid enough, and to prevent it from floating up, the chamber is filled with concrete along its contour.
- Made of metal. The most commonly used is steel. This material is durable and will last a long time. If the chamber is made correctly, it will provide a seal and will not float. But the material is susceptible to corrosion, so waterproofing is required.
- Made of concrete. The container is durable, but does not withstand moisture. Therefore, as is the case with the installation of metal structures, waterproofing is required. The installation is heavy, so transporting and installing the structure is problematic.
- Made of brick. Thermal insulation characteristics are higher compared to other materials; additional insulation is not required. Only a person who is well versed can install the camera. This option is durable and economically beneficial.
- Made from polymer sand. The system itself is inexpensive, sealed and durable. In addition, it is easy to use.
All types have both advantages and disadvantages. Before choosing a structure, you need to think about what the owner wants to achieve during installation, the speed of work, the cost of the caisson, durability of operation, etc.
Most popular models
| Model | Advantages |
| "Gilex" | They are made of cast iron and plastic. The outer diameter ranges from 90 to 160 mm. |
| "Aquarius" | Due to the plastic filling, this model has certain limitations. Relevant for shallow wells. Capable of handling weights up to 200 kg. |
| Merrill | This is a representative of American production. Made from cast iron and plastic. Sold fully assembled and ready for installation immediately. |
| "Aquarobot" | Russian production. Creates a tight connection. Allows you to securely secure the pump. It is made of plastic and is designed for a weight of up to 200 kg. |
It is important to know! On sale you can find some models designed for a two-pipe or one-pipe system. The choice will depend on the features of your plumbing system.
Drainage arrangement
First of all, a site plan is made with the approximate location of drainage points. After this, you need to calculate the amount of materials needed. To construct a well you need:
- crushed stone or expanded clay with which the hole will be filled;
- casing plastic or asbestos pipes or polypropylene fabric with wooden slats.
The walls of the well must be protected from silting. Therefore, you need to decide in advance on the arrangement method. Because The cost and timing of the work depends on this.
Options:
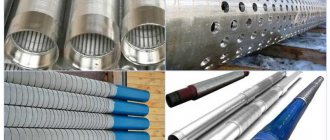
- use of casing pipes;
- hand-made protective bag made of polypropylene fabric.
Both options have their place and do their job well. The principle of operation is the same. A well is drilled to the required depth, its walls are protected with water-conducting material, and crushed stone or expanded clay is poured inside. In this case, the diameter of the point does not matter much.
Arrangement sequence:
Using a hand drill or bailer, a hole of the required depth is made. Usually it is no more than 10 meters. As drilling progresses, you need to control the composition of the soil reached by the drill. After the first waterproof layer has been passed, you need to go down another 1-2 meters
It is important not to miss the moment and not reach the aquifer. When the hole is made, you need to arrange the walls. If the option with a pipe is chosen, it is simply lowered into the well 15-20 cm below ground level. First, holes are drilled in it along the entire plane. If you choose the fabric option, it will be a little more difficult
You will need wooden slats along the length of the well. Fabric is nailed to them so as to form an improvised pipe. To make your work easier, you can make several rings from thick wire to use as guides. The resulting structure is lowered into the ground and covered with crushed stone. It performs two functions. Firstly, it prevents the walls from collapsing, and secondly, it filters all the water passing through it. After this, the well is covered with any waterproof material. You can use a piece of polyethylene or something else - it makes no difference. It is important that the top is sealed. The structure is covered with earth.
First, holes are drilled in it along the entire plane. If you choose the fabric option, it will be a little more complicated. You will need wooden slats along the length of the well. Fabric is nailed to them so as to form an improvised pipe. To make your work easier, you can make several rings from thick wire to use as guides. The resulting structure is lowered into the ground and covered with crushed stone. It performs two functions. Firstly, it prevents the walls from collapsing, and secondly, it filters all the water passing through it. After this, the well is covered with any waterproof material. You can use a piece of polyethylene or something else - it makes no difference
It is important that the top is sealed. The structure is covered with earth.
This completes the construction of the drainage well. Depending on the depth and complexity of the soil, all work takes 1-2 days.
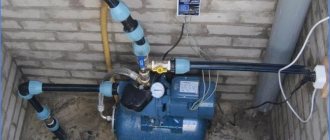
How to install and secure with your own hands
An important condition is to tighten the fasteners evenly. To make the joint airtight, it is necessary to apply sufficient effort. When pinched, the casing can become deformed, especially plastic; if it is metal, the cover itself can be damaged.
The installation process consists of several stages:
- Preparing the casing. This includes pruning it, especially when it needs to be shortened. Trimming is also necessary when the cut is not perpendicular to the location of the pipe.
- Before installing the cover, burrs, chips and other roughness are removed from the edge of the pipe, which may adversely affect the seal.
- If it is metal, it is treated with a special primer with anti-corrosion properties.
- When the paint has dried, the flange is put on. Afterwards, the sealing rubber band or ring is carefully threaded through.
- In this case, it is necessary to achieve maximum density, otherwise there will be no tightness.
- You need to take lubricant, solid oil will do.
- The next step is to attach the pump cable.
- There should be a carabiner under the cover.
- When fixing the cable, one end of the plastic pipe is connected to the pump, and the other to the head.
- It is extremely important to provide corrosion protection for steel cable.
- When choosing a device, make sure that the fasteners are made of stainless steel. This will significantly extend the performance of the product.
- During the installation process, it is necessary to supply a power cable to connect the pump. For this purpose, some models may have a terminal lock. If it is not there, then there is a special hole in the head where the cable is inserted. It should not be clamped too tightly, as this may interfere with the free passage of electrical current. That is, the installed cable should slide a little.
- At the final stage, the pump is installed.
- A pump is tied to the opposite end of the cable.
- Pre-measure the cable to the required length corresponding to the depth of the source. It is necessary to ensure that the cable has sufficient tension.
- The pump is now carefully lowered into the casing.
- Afterwards, all that remains is to install the cover itself. Make sure it fits very tightly on all sides. When closing, make sure that there are no distortions.
- The cover is aligned with the flange or coupling so that the bolt holes are completely aligned.
- Now attach all the nuts to the bolts. Before final tightening, check that the sealing rubber is positioned correctly. If everything is in place, the nuts can be tightened.
Design
The standard head is equipped with the following components:
- Lid. It is a disk with edges protruding beyond the inner ring. The edges rest on the end sides of the casing pipe. In the center of the cover there are holes for fastening a plastic pipeline, bolts and an electrical cable that powers the pump in the well.
- Flange. A ring with holes for mounting bolts that fits over the casing. Fixes tightly with the lid.
- Carbine. Secures a cable with a pump suspended on it.
- Seal. A simple round rubber ring fits under the cap, seals the joints and restrains the movement of the head on the pipe.
- Eye bolts. Fasteners with ring heads designed for the installation of large heads and pumps.
- Cable entry. In this case, a thermal coupler is used, which isolates power from the surface of the cover.
- Collet clamp. This piece of equipment is located in the center of the head and serves as a fixator for the casing pipeline.
- Terminal box. Used as an addition to the product. Electrical wiring is attached to the block, connecting it to the network electrical wire stretched from the house.
- Fastening bolts. The products clamp the lid, flange and seal for a stronger fixation.
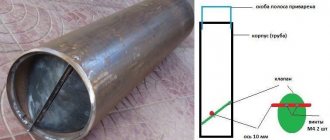
How to do it yourself
If you are used to doing everything yourself and have plumbing skills, then you can do it yourself, saving the family budget.
We suggest considering the simplest and most affordable option. The circuit is based on a piece of pipe and a small piece of sheet metal.
- First the lid is made. The size of the casing pipe is preliminarily measured.
- A corresponding square is cut from the sheet. Technological holes should be made in it through which water supply and electrical cables will pass.
- Marks for the hole are placed on the adapter flange and eye bolts. For drilling, metal drills and a drill are used. Milling cutters are also used.
- Afterwards you need to check for any burrs. The drilling site is simply ground with a special grinding wheel and grinder, and the inner diameter with a file.
- Now we measure the diameter on the plastic pipe. For the head, 2 mm more casing is used. It should be welded to the already prepared lid. It is important to ensure that the center of the pipe hole completely coincides with the water pipe.
- All seams are processed with a grinding wheel. It is also necessary to clean the entire structure by sanding. To protect the metal from corrosion, it must be coated with anti-corrosion compounds.
Now you can begin assembling and installing the pipe in place:
- An adapter is attached to connect the pipeline. When installing it, cracks may form in the cover. To achieve tightness, they are filled with silicone.
- Install eye bolts. One under the cover, for attaching the cable and pump, and 4 on top of the head for lowering/raising the pump.
- A cable connection device is also installed. The easiest option is to make a hole and run the cord directly to the pump. If this option is not suitable, you can install a terminal block.
Finally, all that remains is to put the homemade structure in its place. First, put the flange on the casing, then the sealing ring, which can be cut from soft rubber, then the cover itself. Everything is tightened with bolts.
Device installation rules
Since the design of the head as a whole is very simple, its installation should not cause any special problems. And yet there are certain rules that must be followed during installation work.
When installing a well head, the following procedure is usually followed:
- Prepare the edge of the casing pipe.
- The flange is placed on the pipe so that its side is directed downwards.
- Install the O-ring.
- Secure the pump cable.
- An electrical cable is passed into the corresponding entrance.
- A hose or part of a water supply pipe is connected to the fitting, the other end of which is attached to the pump.
- The pump is lowered into the well.
- The lid closes under the weight of the submersible pump.
- The flange and cover are connected with bolts, which are tightened evenly.
Preparing the edge of the casing pipe begins with cutting its edge strictly horizontally. This will allow the head to be placed in a plane that is perpendicular to the casing.
Once the pipe is properly cut to the desired height, its edge should be thoroughly polished. To perform these operations, a regular grinder with a set of appropriate circle attachments is quite suitable.
Before installing the head, it is recommended to additionally protect the metal casing pipe with special metal paint. The O-ring is sometimes difficult to fit onto the casing, and pushing it down is also not always easy.
To solve the problem, it is recommended to use a suitable lubricant, such as Autol or special oil.
The rubber O-ring should fit snugly against the casing. To facilitate its installation, use lubricants, for example, autol
In a hurry to get water from a finished well, some property owners immediately lower the pump into it, postponing the installation of the well head “for later.” This is the wrong procedure. First, put on the flange and o-ring, and then you can lower the pump into the well. Otherwise, to install the head, you will have to take it out and lower it again.
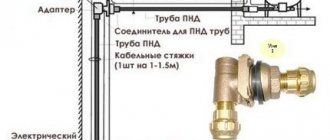
This diagram details all the steps that must be performed when installing one of the well head models (+)
This is not the best option, since the risk of damage to the column and equipment increases, and the procedure itself is quite labor-intensive. To secure the cable to the pump and head, special carabiners are used.
The length of the cable must correspond to the immersion depth of the equipment. The pump should not be lowered into the well until all other elements have been placed in the appropriate slots in the head cover.
There is a special clamp on the hole for the electrical cable. It must be slightly loosened so that the cable can slide freely. If a wire is pinched, or positioned so that it bears part of the weight of the equipment, it may break.
Before attaching a water supply pipe or hose to the head, its lower end is connected to a submersible pump.
When lowering the pump into the well, the cable should be gradually released. When the equipment is at the selected depth, the cover is closed and the weight of the pump presses it against the flange. In this case, the seal falls into a special groove and is pressed tightly against the casing pipe, which ensures reliable sealing of the structure.
If the head is installed correctly, the O-ring will be evenly pressed by the flange against the cover, and the connection holes will be opposite. If this does not happen, then you need to look for the reason; perhaps you just need to slightly change the position of the cover.
The connecting bolts should be tightened evenly so that the cover does not skew to one side. Don't try to do your best.
An excessively tight connection between the cover and the flange can cause damage to the rubber ring, which leads to a violation of the tightness of the structure. But too weak a connection is also unacceptable. If the bolts are not tightened tightly enough, the head can simply be removed from the pipe, in which case their installation becomes meaningless.
If a cable with a heavy pump is attached to the head cover, it is better to install the head with two people in order to carefully lower the pump into the well and put the cover in place
After the cover is installed and secured, there is almost always some sagging in the electrical cable. The wire should be selected in such a way that it does not sag, but is not in a tense state.
Now you can connect the water pipe to the fitting. The pump is then usually turned on to assess the correct installation of the head and its condition under operating load.
Maintenance and operation
The installed head at the dacha must be protected from the negative effects of the environment. Especially such measures should be taken when metal is used.
Important! Regardless of the material used - metal, aluminum, polymer sand, plastic, etc. - it is still necessary to protect the lid from negative external influences.
First of all, the structure is protected from sudden temperature changes. For winter operation of the well, you can build a heat-insulating box. It can be assembled from boards or plywood. It must be insulated with foam plastic or other heat-insulating material. You can put straw or dry leaves inside. They have excellent thermal insulation properties.