Acrylic bathtubs have many advantages: a large number of additional functions, a variety of shapes and dimensions, reasonable price, low weight, etc. But the main drawback of the design is the thin walls of the bowl and the fragile structure of the material, which place special demands on the installation of this type of font in the bathroom. After all, minor errors in installation can lead to the fact that the bottom and walls of the bowl begin to “play” (change shape) under the weight of the swimmer. This does not lead to anything good - the service life of plumbing equipment is sharply reduced.
The installation process itself does not seem to be such a difficult task that a home craftsman could not cope with. The main thing is to know the installation principle and pain points of the font. Let's try to understand the intricacies of the technology together. To do this, we will consider all the ways to install an acrylic bathtub with your own hands, the procedure for assembling the siphon and inserting it into the sewer. For a more convenient perception of all instructions, we will illustrate each action with appropriate photos and video materials.
Materials and tools
The technology for installing an acrylic font consists of several sequential stages and each of them requires its own materials and tools. Here is a complete list of them. If no work is carried out, then materials and tools will not be required.
To carry out a comprehensive bathroom renovation you will need:
- acrylic bath;
- bath screen;
- siphon;
- corrugated tube for connection to the riser;
- brick, silicate or foam blocks;
- dry mortar or cement M400;
- painting (reinforcement) fiberglass mesh;
- waterproofing mastic;
- ceiling profile (CD) or aluminum corner;
- ceramic floor tiles;
- wall tiles;
- tile adhesive;
- silicone sealant;
- polyurethane foam for processing the bowl body - reduces noise pollution when drawing water.
The toolkit should include:
- hammer drill - used to remove old tiles and drill holes for fasteners;
- grinder - needed if difficulties arise in the process of disassembling an old bathtub;
- hammer;
- trowel;
- chisel - needed to dismantle old tiles;
- knife or trowel for removing sealant;
- building level - needed when laying tiles and aligning the bowl horizontally;
- notched spatula;
- a screwdriver or screwdriver for mounting the frame and assembling the siphon;
- wrench for clamping coupling nuts;
- roulette;
- marker (construction pencil);
- construction square.
Siphon assembly features
It is mounted only after the legs are ready and the bowl is finally secured. The siphon has several parts.
- The receiving pipe is connected to the hole in the plumbing bowl located below, a sealant is applied to the joints, and a rubber lining is placed inside. A sealant is also applied to its surface.
- A pipe is inserted into the outer part of the bowl structure.
- A hose is installed in the outlet intended for overflow.
- There should be a lining at the other end of the hose; it is connected to the hole in the plumbing bowl located below; an overflow protective grille is used to secure it.
The optimal option for installing a bathtub is chosen taking into account the size of the family members. It is not recommended to install the sanitary bowl on the legs alone, as its service life will be shortened. Relatively cheap models of acrylic bowls include legs or are supplied without mounting parts. The frame is purchased independently. A more reliable option is to install the plumbing product on brickwork or on a metal frame.
Preparatory work
Installation of an acrylic bathtub begins with preparatory work, which is carried out in the following sequence:
- all unnecessary objects and things are removed from the premises - if they do not interfere, then there is a risk of severe contamination;
- the water supply is shut off by emergency taps (if necessary, they can be temporarily turned on);
- the screen is removed from the bathtub (you can see how to do this in the article “How to install a screen on an acrylic bathtub?”);
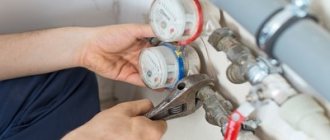
- the siphon is disconnected;
- use a hammer and chisel to knock down a corner of strips of ceramic tiles along the sides of the bowl;
- use a knife (trowel) to remove the sealant;
- the old bowl is dismantled. To do this you need to do the following:
- unscrew the screws at the corners of the font if a frame structure for installing the bowl is used;
- swing and then remove from the pedestal;
- knock down the tiles and then the plaster from the wall in the area of the built-in side of the bathtub.
- the font is removed from the premises;
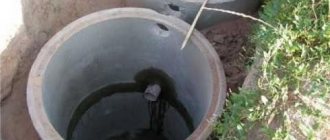
- the siphon is disconnected from the sewer riser;
- the sewer hole is closed with a stopper or a rag so that an unpleasant odor does not spread throughout the apartment;
- the area under the old bathtub is cleared of debris;
- if a corner version of the bowl is purchased, the angle in the wall is leveled to 90o. The technology is outlined here. If this requirement is ignored, the fastening strips will quickly damage the acrylic;
- waterproofing work is being carried out (instructions are given in the material “How and how to waterproof a bathroom floor?”);
- the floor is leveled with cement-sand mortar or ceramic floor tiles - differences in height should not exceed 1 cm;
- the joints of walls and floor tiles are sealed with sealant;
- The sides of the bowl are protected from damage during transfer from room to room with masking tape.
Installation of decorative legs
In addition to the support legs, which perform a strictly utilitarian function, there are decorative ones. They are made of plastic, plaster, stone and metal. Decorative overlays are used to disguise or embellish unpresentable support structures . These elements do not perform a load-bearing function, so they are purchased and installed separately.
Decorative legs
Decorative overlays for supports under an acrylic or cast iron bathtub usually have the shape of paws, vines or mythical characters, animals. To fix them with your own hands, you need to follow simple instructions:
- The surface of the main supports is degreased using gasoline, alcohol or solvent.
- Glue is carefully applied to the decorative overlay.
- The pad is pressed tightly against the main support, holding it in a static position for 1-2 minutes.
- Excess glue is removed with a clean rag until dry.
Note! Decorative overlays perform only an aesthetic function, therefore they cannot withstand the weight of even light acrylic models. Therefore, they are fixed to the bottom or main supports using glue.
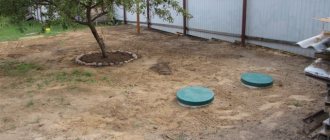
Installation instructions for bricks
A more effective method of installing an acrylic bathtub is to place it on pillars made of brick or gas silicate blocks. Step-by-step instructions on how to properly install an acrylic bathtub on bricks are more complex than the previous ones. In addition, the labor intensity of the work performed increases significantly. But, in the end, the difficulties pay off: the bowl, while maintaining its lightness, becomes more stable, stronger, and more durable.
Scheme of installing a bathtub on brick supports.
Sequencing.
Step 1. The bathtub is placed in the place where it will be used. Places where columns of bricks or blocks will be laid out are marked on the floor. For standard dimensions - 2 supports, longer ones - 3 (one in the middle of the font). It is best to make marks opposite the bottom-reinforcing plates, although many experts consider the option of placing the supports as close as possible to the bend that forms the transition of the bottom to the walls to be the best.
Step 2. Prepare a cement-sand mortar in a ratio of 1:3. You don’t need very much of it, so you can mix it in a bucket with a trowel without using mixing attachments on a hammer drill or electric drill. After all, there are only 8-12 bricks to be laid on the mortar.
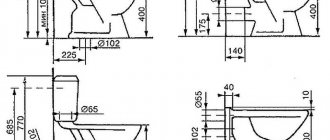
Step 3. Columns are laid one brick wide, 2 brick long with a distance from the wall of 10-15 cm or 2.5 without a space. The height of the masonry is about 170 mm - it makes it possible to obtain a side height above the floor of 60 cm. Many craftsmen do not take this point into account and lay 3 rows of bricks. If the design of the font does not include a slope for draining water, which is difficult to find recently, the rear support rises by 20 mm. This can be achieved either by a thicker layer of solution or a lining made of metal or plastic.
Columns made of three bricks.
Important: when determining the height of the column, the calculation is carried out as follows: 10 mm (mortar layer under the bottom bricks) + 65 mm (brick thickness) + 10 mm (mortar between bricks) + 65 mm (second brick) + 20 mm (covering the brickwork layer of plaster).
Step 4. The bricks are wrapped in painting mesh and plastered. The top of the fiberglass is folded over the support and also plastered. Here you can not spare the solution and increase the layer thickness to 20 mm.
The posts are wrapped in painting mesh.
The mesh is folded onto posts and plastered.
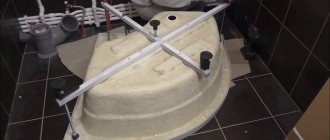
Step 5. The bottom of the bowl is greased with silicone sealant (so that the solution does not stick) and installed on supports. After this, the horizontal plane is checked in length, width and diagonal. If necessary, adjustments are made - the solution allows you to do this easily: just apply a little pressure on the protruding corner. Upon completion of the procedure, the bathtub is removed from the brickwork.
Step 6. The solution is allowed to set. Some experts believe that 12-14 hours is enough. But it’s better to play it safe and continue work after 2 days.
Step 7. The bowl is installed on the masonry close to the walls. The upper or lower edge of the sides is marked. The upper one, if the bathtub will additionally be mounted on plates or hooks, the lower one, if using an aluminum corner or metal profile.
Step 7. The bathtub is removed from the supports. Plates or a corner are attached to the wall.
Step 8. The bowl is installed on the supports so that the sides go behind the plates (hooks) or lie on the corner to which the sealant is previously applied.
Attention: sometimes, to better fix the bathtub, a little foam is applied to the supports. This solution has a right to life, but before the glue polymerizes, the bowl should be properly secured to the posts - pressing firmly against them so that almost all the foam is squeezed out. To do this, you can carefully walk along the bottom of the bath. The second method: the installed bathtub is connected to the sewer system. It is filled with water and then lifted with a car jack. Foam is blown into the gap between the posts and the bottom and the bathtub is lowered.
Bowl on pillars.
Step 9. The siphon is assembled. The bath is connected to the sewer.
Step 10. The water is turned on. The quality of connections of siphon elements is checked. When leaks appear, repair work is carried out.
Step 11. The joint between the sides and the wall is sealed.
Step 12. The screen is installed.
Methods for exterior finishing of an acrylic bathtub
If you purchased an acrylic bathtub without a decorative screen, then you can make this part yourself.
Image gallery
Photo from
Brick walls to stabilize the position
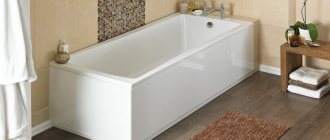
The standard way to close a bathtub is a decorative screen
External brick wall with tile trim
Front panel for decorating an acrylic bathtub
When performing finishing work, you must follow some rules:
- use only moisture-resistant materials that are resistant to temperature changes and are not susceptible to the formation of mold and mildew;
- provide quick and easy access to communications located under the structure.
If the bathtub is installed on bricks, you can also lay out a half-brick thick brick wall on the front part, and then line it with ceramic tiles or mosaics. The top row of bricks is made 2-3 cm below the side of the bathtub, and then blown with foam to seal.
It is also necessary to leave a technological hole, and then use canopies to make a door.
When building a brick wall, you cannot use it as a support for a bathtub. Be sure to leave at least 2 cm of empty space between the side and the top of the brickwork
Finishing an acrylic bathtub with plastic, MDF or moisture-resistant plasterboard is very popular. An original solution is to create a mirror screen. Plastic panels allow you to quickly and inexpensively finish the finishing of the bathtub. In addition, if the panel becomes unusable, it can be very easily replaced.
As for drywall, after installation, it can be finished with different materials: tiles, waterproof wallpaper, covered with film or applied with decorative plaster.
In both cases, it is first necessary to make a frame from a metal profile or wooden beam. In this case, the metal must be treated with an anti-corrosion compound, and the wood must be treated with a moisture-resistant primer.
Panels made of plastic or MDF can be laid on a wooden frame, as well as plasterboard can be attached and then covered with various finishing materials.
To make a wooden frame, install boards around the entire perimeter of the bath that will serve as a base and screw them to the floor with self-tapping screws. Make vertical posts in the corners, attach the top horizontal board to them using metal corners and install additional vertical posts in increments of 50-60 cm.
Interesting options for creating a screen for a bathtub are proposed in this article.
Pedestal Installation Guidelines
Another effective way to install bathtubs is to lay a solid base of brick under the bottom of the bowl. Builders call this installation “pedestal installation.” All work is carried out in the same order and sequence as when installing on brick columns. There is only one difference: the bathtub is installed on two metal plates about 1 cm thick. This is done in order to blow foam between the brick base and the bottom, which will firmly connect the font to the pedestal.
Scheme of installation on a pedestal.
If the bathtub has legs, then the plates do not fit. The required gap under the foam can be obtained by adjusting the height of the support.
Is it worth making a combined foundation?
If for some reason the strength of the factory foundation is in doubt, or the bathroom owner simply wants to ensure maximum reliability of the structure, use a combined support option. Usually, the bathtub is first installed on legs and adjusted in height.
The combined support of the frame (or legs) and brickwork can significantly strengthen the base and increase its service life
After this, measure the distance from the floor to the bottom of the bath to determine the height of the brickwork. A place for a brick base is marked on the floor. Then the bath is removed and masonry work begins. An important point when creating such a design: the height of the legs and the brick frame must exactly match so that the weight of the bath is distributed evenly across both supports.
Undoubtedly, this option is more thorough than using a conventional factory frame. At the same time, if there is a need for dismantling, you will have to work hard.
Final work
The process of installing the bathtub is completed by assembling the siphon and connecting the drain to the sewer. After this, the joints of the bathtub with the walls are sealed and a screen is installed.
Siphon installation
Assembling the siphon from the technical side is not difficult. But the slightest mistake in the connection diagram of the parts of the device can lead to either a leak or the appearance of unpleasant odors from the collector - this element of the acrylic bathtub acts as a barrier between the bathtub bowl and the sewer.
In this regard, we will consider in more detail the process of installing a siphon and connecting it to the sewer. But first, let's pay attention to a few nuances.
- The factory kit cannot contain unnecessary parts. If something remains, the siphon is disassembled and reassembled, but more responsibly.
- There is only one O-ring per connection. An attempt to improve sealing by increasing the number of seals gives the opposite result.
- All trim nuts must be tightened by hand. This way you can feel the clamping force better. You can tighten it with a wrench, breaking the thread.
- All cone gaskets are placed with the wide side facing the nut.
- Recently, a water seal with three holes has become increasingly common on sale: 2 on top and one on the side, through which settled dirt is removed. The side one is suppressed with a special nut.
To make the assembly instructions more clear, we present a drawing of the siphon in a disassembled state with a digital designation of each part.
Siphon in disassembled condition. 1 - plug; 2 — protective grille; 2с - protective gasket; 3 - flat gasket; 4 — outlet pipe; 5 - connecting screw; 6 - threaded hole for the screw - located in the middle of the pipe (in the photo the arrow is drawn a little differently); 7 — water seal (can be different in design); 8 - plastic coupling nut; 9 — conical rubber seal; 10 — adapter; 11 - flat gasket; 13 - outlet for overflow; 14 - corrugated hose; 15 — gasket; 16 - coupling nut; 17 — overflow pipe; 18 — gasket; 19 — overflow protective grille; 20 — fixing screw.
Assembly is carried out in the following sequence:
- the siphon is unpacked;
- the quality of threads and gaskets is checked - chips and burrs are unacceptable;
- the parts are laid out in the order in which the assembly will be carried out;
- a plug (1) is attached to the overflow protective grille (19) by a chain;
- a flat gasket (2c) and a protective grill (2) are placed sequentially into the drain hole at the bottom of the bath;
- on the reverse side, a flat gasket (3) and a drain pipe (4) are pressed against the drain hole with force. You need to make an effort to ensure that the rubber gasket finds its position;
- From the top of the bathtub, a connecting screw (5) is screwed into the threaded hole (6) of the outlet pipe (4) using a wide slotted screwdriver;
- A plastic coupling nut (8) is placed on the pipe (4) from below. A cone seal (9) is installed under it;
- the pipe is inserted into the hole in the water seal (7) and the nut is tightened;
- according to the same scheme, an adapter (10) is attached to the water seal;
- a smaller corrugated tube (14) is attached to the overflow pipe (17) using a plastic nut (16) and a flat gasket (15);
- The overflow pipe (17) and the rubber gasket (18) are pressed firmly against the overflow hole from the outside. A protective grille (19) is attached to the inside. Everything is secured with a tightening screw (20);
- The corrugated overflow hose is connected to the outlet of the drain pipe.
The siphon is assembled.
Assembled siphon.
Connection to sewerage
The last stage of assembling the siphon is connecting the bathtub to the sewer. To do this, take a larger corrugated hose with connecting tubes of different sizes.
Connecting the corrugated pipe to the water seal.
The smaller diameter corrugated tube is connected to the adapter (10) using a nut (8) and a conical gasket (11). After this, the second end of the corrugated pipe is connected to the sewer pipe. The entry point is carefully sealed with sealant. The connection principle is clearly visible in the photo.
Connecting the siphon to the sewer.
The most common mistakes when assembling a siphon are:
- connecting the drain pipe to the side hole of the water seal, as a result of which sewer odors easily penetrate into the apartment;
The thicker corrugation (2) is mistakenly connected to the wrong hole in the water seal.
- the location of the bathtub drain hole below the sewer pipe receiver.
The drain hole must be higher than the sewer inlet.
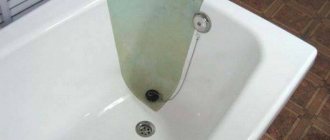
Sealing joints
During water procedures, drops of water fall on the walls of the bathtub. Under the influence of gravity, they flow behind the bowl, causing rapid growth of mold there. This can be avoided in one way: to seal the junction of the edges of the font with the wall. This operation can be done in several ways:
- silicone sealant is the most common method of sealing joints. Works great on metal and cast iron bathtubs. It didn't work out with acrylic. The reason is that the walls of the bathtub, and with them the sides, “play” under the influence of loads (water and a person washing), i.e. slightly deformed. This is enough for a thin layer of silicone sealant to begin to let water through.
- silicone tape. Sold in roll form, which is enough to seal the joints of standard-sized bowls. It has shelves 2 and 3 cm wide. Advantages over sealant:
- quick and easy to stick - the work can be done by a housewife;
- easily removed for replacement;
- lower price.
Sealing joints with sealant.
Some experts suggest filling the bathtub with water before applying sealant to compensate for subsidence of the side. It is believed that polymerization of silicone will occur at maximum load on the walls of the font, after which deformation changes will not affect the sealing seam. It helps, but not much. All the same, after 3-4 years the sealant needs to be changed: mold develops under it and behind it;
Gluing silicone tape.
The disadvantage is the same - it needs to be changed often, because... Silicone glue does not have enough elasticity to withstand the deformation of the sides of the bowl. As a result, water gets under the tape, causing mold growth;
This is what the wall looks like under the silicone tape after 4-5 years.
- plastic plinth (corner). When installing, its leg is inserted into the gap between the bowl and the wall. Thanks to the soft rubber applied to the edges, the plinth fits tightly to the tiles and acrylic, preventing water from passing through. Movements of the side under loads do not affect the joint density. Difficulties arise only when passing corners. Many home craftsmen do not know how to cut the connecting joint at the baseboard, especially if the corner of the wall is obtuse or sharp. You can see how to perform this operation correctly here.
The junction of the bathtub with the wall is sealed with a plinth.
Screen installation
The space under the bathroom is covered with special screens. You can make them yourself or buy them ready-made. The material can be brick, foam blocks and gypsum plasterboard, followed by gluing tiles on them (used by home craftsmen) or plastic, acrylic, MDF, glass - a factory-made version of protection. There are also many installation methods. All this is described in detail in the work “How to install a screen on an acrylic bathtub?”
Homemade screen made of blocks.
In conclusion, we note that none of the instructions for installing an acrylic bathtub contain any difficult-to-follow items. All work can be done independently, significantly saving the family budget.
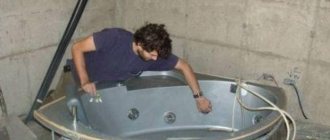
Safety precautions
You can install an acrylic product alone, because the weight of such plumbing fixtures is relatively low. But this feature of acrylic also conceals its disadvantage. Acrylic is a relatively fragile material that must be handled with great care. A small drop may cause chips or cracks.
The same result is possible if you drop a heavy tool into the bathtub bowl. In addition, the acrylic surface can be easily scratched if handled carelessly.
Before installation, you must study the recommendations provided by the manufacturer on how to properly install an acrylic bathtub. They are usually included with each product. The bottom should rest on the frame or legs exactly in those places specified by the manufacturer. Changing the position of the bath over time can lead to its deformation and even breakage.
From the very beginning, you should choose a bath of sufficiently high quality. If, when pressed by hand, the walls of the bathtub bend, or the product emits a pungent odor, or its walls allow light to pass through when illuminated by a flashlight, then it is made of low-quality acrylic; you should not buy such a bathtub.
A high-quality bathtub should include everything necessary for its installation, as well as detailed instructions and a product data sheet. The fewer supports required for installation, the stronger the bathtub. The quality of fittings and fasteners that come with the bath should also be checked in advance.
We take care of the tightness of joints
After installing the acrylic bathtub, open joints remain between the collar and the wall along the perimeter of the adjacent area. They are sealed with moisture-resistant sealant. To do this, the surfaces are thoroughly cleaned of dust and degreased with alcohol. Painting tape is applied along the edge of the future seam to the wall and bathtub. A layer of silicone is applied to the joint and leveled with a damp rubber spatula. The tape is immediately removed, and the silicone is left to dry.
A more aesthetic and reliable way is to close the gap with a special tape or a plastic profile with corner elements. Silicone is also used for their installation. The look will be attractive and complete.
How to attach to the wall?
If your frame provides additional supports for mounting to the wall, you must use the following instructions:
STEP 1. Place marks on the wall with a marker on the underside of the sides.
STEP 2. We remove the structure and, using a building level and a marker, draw a line for the side of the bathtub.
STEP 3. Place the side supports as shown in the picture and mark the drilling locations.
STEP 4. Using a hammer drill and an 8mm drill (depending on the size of the dowels, but usually used, we drill holes to the depth specified in the instructions.
STEP 5. Attach the side supports to the wall using dowels and self-tapping screws.
STEP 6. For a better fastening effect, coat the support areas of the bathtub sides with sealant.
STEP 7. Place the bathtub and frame on supports. Press well, fill with water and coat the joint with the wall with sealant or cover it with a corner.
Now you can work on sewerage and screen installation.