A summer resident who decides to start developing his plot inevitably faces a lot of issues that definitely need to be resolved. One of these issues is the construction of a latrine, without which a comfortable stay at the dacha is simply impossible.
Biotoilets using peat are becoming increasingly popular among summer residents, which not only do not require connection to a sewer system, but also transform waste from the human body into a very convenient organic fertilizer.
Compost toilet
Another undeniable advantage of a composting toilet is that there is no need to flush waste with large amounts of water. By the way, it does not require water at all, because all functions are performed by special peat mixed with sawdust and active bacteria.
Of course, you can purchase such a miracle of modern technology by purchasing it in a store or ordering it online, but this pleasure significantly impacts the family budget. Fortunately, such a device as a peat dry closet has a fairly simple design, so you can try to build it yourself. How? We will talk about this in the article.
The principle of operation of toilets using peat components
Ordinary peat is used as a filler for dry toilets.
The active substance in the form of peat filler has excellent absorption. It is capable of absorbing large amounts of waste. Moreover, this ability is expressed in specific proportions - just one kilogram of peat easily absorbs 10 liters of waste! In the process of processing liquid waste with the participation of peat, compost is formed that is beneficial for soil fertility. This kind of home compost production is very important for summer residents, especially since it almost completely eliminates the smell from processed products and preserves useful components. Externally, the Finnish peat toilet for a summer residence resembles a regular toilet, however, its formats can be arbitrary. Also, the dimensions of the dry closet also vary.
What designs of toilets for summer cottages exist?
Such buildings can be divided into several varieties suitable for a summer residence:
- toilet house with cesspool;
- standard powder closet;
- factory biotool.
Toilet house with cesspool
For such a structure, a foundation pit is first dug. Then they build a cesspool by strengthening the walls with concrete rings, bricks, monolithic concrete, or installing a plastic container in the pit.
A toilet house made from scrap material is installed above the pit, in which a pedestal or toilet seat is placed. Such a toilet design for a summer house involves the accumulation of waste in a cesspool.
To eliminate the smell spreading from the cesspool, install a ventilation pipe
If the structure is not sealed, liquid waste partially seeps into the soil or evaporates.
Filling a sealed pit occurs faster. When sewage reaches a certain level, it has to be removed. Cleaning is carried out either independently using a pump, or by calling a sewer truck.
Powder closet - a house without a cesspool
A house is also built for a powder closet, but without a cesspool. In this version of the country toilet, waste is collected in a container located under the toilet seat.
For greater convenience, two “different-sized” tanks are installed. Small holes are made in the smaller one and inserted into the larger one, on the side of which a round outlet is made and a drainage hose is installed. It will drain excess liquid into the ground or into the drainage system.
A container for the filler is placed next to the toilet seat. This could be sawdust, peat or dry soil.
Despite the fact that the filler partially suppresses odors, the powder closet requires the installation of a ventilation pipe
After visiting the toilet, the waste is sprinkled with litter. This reduces unpleasant odors and promotes the decomposition of sewage. As the tank fills, it is taken to the compost heap.
The scheme for constructing a powder-closet-type toilet in a country house should take into account the method of obtaining the container. Basically there are only two of them. In the first case, the reservoir is removed from the toilet seat by lifting the seat.
In the second, a small door is built at the back of the building, by opening which you can remove the drive.
If you don’t want the hassle, buy a dry closet
For those who do not have the desire or time to build a toilet, there are ready-made products. Manufacturers of dry closets have already taken care of everything. All you have to do is choose the appropriate option and install it in your room or house. If funds allow, you can buy a toilet along with a stall.
Whatever type of toilet is chosen, it is advisable to begin its construction by drawing up a diagram. It is necessary to indicate the dimensions of the structure and the location of all components. For example, the construction plan for a country toilet with a cesspool should be drawn up taking into account the width and depth of the pit.
Garden crafts made from cement
One of the simplest and most affordable ways to decorate a summer cottage is to use all kinds of cement crafts.
In the countryside, such products can be found very often. Firstly, because they are easy to make with your own hands. Secondly, they are durable and look beautiful, especially if painted.
You can make a lot out of cement in your dacha. For example, these could be some unusual decorative figures or flower beds or pots.
Flower beds for flowers and plants in the country can be made both large and small, stationary and portable, and even hanging: on chains or ropes.
All these ideas will certainly come in handy if you are planning to arrange a garden with your own hands.
Various decorative cement decorations can be made using drawings downloaded from the Internet as a basis. As you can see, creating a beautiful environment at your dacha is not so difficult.
Paths on the site
Cement is a universal material. From it you can not only create various crafts for decorating a summer cottage and flower beds, but also paths for the garden.
There are a lot of options. For example, you can make a path out of cement that will imitate decorative stone.
Even though the process is quite labor-intensive, all the effort is worth it. This path looks very cool, and you can’t immediately tell it from natural stone.
You can also make a path from cement mortar and bricks. This option is a little simpler in terms of labor costs, but it also looks original.
Well, and most importantly, this is one of the budget options, especially if you have stocks of old bricks on the site. In this case, you only need to buy sand and cement.
Country decorative paths can be very different - and on our website you will find only the best ideas. Be sure to check it out.
We design flower beds and flower beds
Various flowers and garden plants can be grown not only in pots, but also planted in open ground. In such cases, you can make decorative fences.
To make fences for flower beds and flower beds at your dacha with your own hands, you can use a variety of materials.
For example, decorative fences can be made from cement and plastic boxes for vegetables and fruits. The texture can be different: in the form of bricks or tree bark.
With the help of such fences you can limit the territory of small gardens and at the same time decorate your summer cottage.
And from the same cement mortar and plastic bottles you can make very beautiful decorative figurines in the form of mushrooms with your own hands, which are ideal for decorating flower beds on the site.
Installation of a dry toilet
The simplest option is to purchase a portable chemical toilet with replaceable cassettes. You will need to insert the cassette or fill the reservoir with concentrate and select a suitable location for the toilet.
The location can be chosen based on personal preference, since there is no need to be tied to a cesspool. In addition, you don’t have to worry about groundwater contamination (with the exception of portable toilet models with chemical filler). The smell will be present, but not strong, but barely perceptible - this is a completely natural process. If you do everything according to the rules, then you can install a dry closet at home, only then you need to take care of the ventilation and drainage system. Taking into account all these nuances, you can choose a suitable location and begin installation.
How to install a dry closet at your dacha:
- If you have chosen a portable toilet with cassettes (cleaning with chemicals), then you need to remove the protective film from the toilet and assemble the structure.
- You need to insert a cassette with liquid or pour liquid concentrate into a special compartment, snap the lid on and place the upper bowl with the lid.
- Don't forget to check how the toilet works in action.
- If you are satisfied with everything, you can install the portable toilet in a permanent place.
- Do a test rinse. The waste should move to the lower storage tank.
- When the tank is full, you need to remove it and press the reset button (the pressure will drop and the tank will be empty of its contents).
- Then you need to wash the container and fill it with water again, add the biological product.
- If you bought a dry toilet with a volume of 12 liters, it means that after approximately 35 visits (for 1 person this is a week of visits), you need to clean the tank; a tank volume of 21 liters is enough for 70 visits (2 weeks of use).
- There are models equipped with a tank full indicator and a pump for convenient operation.
If you want to tinker a little, you can make a peat biotoilet yourself. You need to prepare all the materials and you can start working.
What you will need:
- plastic or metal container for peat;
- seat (toilet, container or bucket);
- dry peat;
- compost pit.
To make it more convenient to use the toilet, you can place a bucket of peat next to the toilet and add a new portion of the filler after each visit. Before using the toilet for the first time, you need to pour a little peat into the bottom of the container, then the feces will be cleaned well and quickly.
The design of the dry closet is simple: you need to install a bucket or other suitable container, pour a little peat mixture into it, install a toilet seat on top and attach a lid. Now you can use the dry closet. As soon as the bucket is full, the mixture should be poured into the compost pit.
Dry toilet for a summer residence. Video:
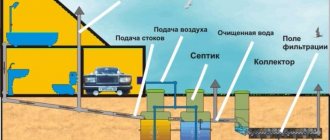
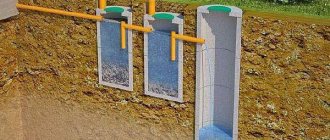
A complete sewage system in a summer cottage: mini-septic tanks
Agree that during the cold season or at night, no one particularly wants to get up and go somewhere outside to go to the toilet. Dry toilets and powder closets won’t help much either: after a while you’ll have to clean them and waste time on it. The most suitable option in such a situation would be to install a mini-septic tank on the site.
Types of mini-septic tanks
There are several types of mini-septic tanks, including both autonomous ones and those requiring a constant supply of electricity. Such septic tanks will be more environmentally friendly and safer for groundwater, since the filtration in them is much more thorough. The disadvantage of such a septic tank is the constant supply of electricity, which can lead to exceeding the limits when paying for electricity. Otherwise there are only positives. A mini-septic tank of this type will purify wastewater by 80-90%, which will allow it to be located near wells. You will also be pleased with the absence of an unpleasant odor.
An autonomous mini-septic tank will require pumping, so it will have to be located near the road so that the sewer truck can reach it with a 15-meter hose. Such a septic tank should not be located next to wells: there is a high probability of groundwater contamination.
Do-it-yourself autonomous mini-septic tank
Each summer resident can make an autonomous mini-septic tank with his own hands. To do this, you will need to buy 2-3 large barrels in the store (200-300 liters each, more is possible), as well as medium-diameter pipes. After this, you will need to make holes in the barrels for the barrels, as well as drill small holes in the bottom and in the walls so that the wastewater drains out faster. You can make holes only if there are no water wells nearby, and also if the groundwater lies at a depth of more than 5 meters. Then you should dig a hole for these barrels (tanks), at the bottom of which you will need to pour large pebbles and crushed stone to improve filtration. The next step is connecting the barrels together with pipes and burying them in the ground.
It is almost impossible to make an electric mini-septic tank yourself without specialized education. Therefore, it is better not to risk yourself and your loved ones - buy an electric mini-septic tank in a specialized store if it suits you better.
It is worth noting that a mini-septic tank is the most expensive option of all presented. You will also have to spend money on equipping the bathroom inside the house, as well as on bringing the pipes outside.
DIY outdoor toilet made of corrugated sheets and wood
Even at the dacha you cannot deny yourself comfort. This is especially true for the toilet
This is the most important room for creating convenience in the country. You need to worry about its arrangement even before the start of the gardening season.
Most often, far from the city there is no local sewerage system. Therefore, we have to be as sophisticated as we can.
There is a large selection of materials from which you can build a toilet.
And there are enough varieties of such buildings to choose a suitable design. Having decided on the material from which the structure will be constructed, you need to draw up a drawing of the country toilet. Thanks to it, you can calculate the amount of building materials needed. So before you start construction, draw up a work plan.
Construction of a country powder-closet
The arrangement of this type of country toilets, such as a powder closet, can be done anywhere on the site.
Its design does not imply the presence of a cesspool - instead, a sealed container is installed, which is emptied as it is filled with sewage. For this reason, there is no danger of soil and groundwater contamination. This means that when constructing a toilet there is no need to maintain a 25-meter distance from a source of drinking water.
Powder closet can have different sizes.
In the back of the frame, holes are created for cleaning work and ventilation (more details: “Ventilation of a country toilet, do it yourself”). A box with filling, which can be peat, ash, sawdust, is placed in the booth. They are used to powder sewage every time after visiting the toilet.
Tires are a popular garden material
You can even make various useful things for your garden with your own hands from old car tires.
From car tires you can make not only classic fences for enclosing an area, but also a lot of other things. For example, garden paths between the beds.
They are good because weeds will never grow under them. It’s also convenient to walk on such rubber paths between the beds after heavy rain - you don’t have to get stuck in the mud.
You can also make large flower beds from car tires that will serve you faithfully for many years.
Therefore, we take all these ideas into account and design our summer cottage. It will be both beautiful and convenient. Car tires are cheap material, and getting it is not a problem.
How to build a seat with capacity
The simplest dry toilet is a seat with a container installed in a separate structure.
It will require a storage container of 20 liters, made of non-corrosive material. It is desirable that it be in the shape of a bucket. In addition to the container you will need:
- square block (5:5 cm);
- plywood or chipboard 1.5 cm thick.
And also tools:
First, the necessary blanks are cut out. 4 legs with a height of 35 cm are made from a block. The following are prepared from plywood:
- 2 rectangles – 52:30 cm, for the side walls;
- 2 rectangles – 45:30 cm, for the front and back walls;
- 1 rectangle – 45:48 cm, for the lid;
- 1 strip – 45:7, for loops.
When everything is prepared, you can assemble.
The legs are screwed to the short side of the side parts. They will protrude 5 cm on one side.
Then the back and front walls are screwed to the legs, ultimately forming a box.
A bar is screwed to the back side, over the legs.
The lid is hung on it using hinges.
Now you need to make a hole.
To ensure that it strictly corresponds to the size of the container, the bucket is turned upside down, placed on the lid in the middle and a circle of the required diameter is drawn.
The hole is cut with a jigsaw strictly according to the mark.
After this, the wooden surface is sanded and coated with an antiseptic.
To give the product a more attractive look, you can paint it, varnish it, or cover it with linoleum. It's up to you.
What types of dry toilet designs are there?
The simplest dry closet consists of two combined containers. The upper one is a reception area and the lower one is for waste collection and disposal. To make the decomposition of human waste products faster, various filler compositions are used.
In addition to speeding up the recycling process, they destroy odors. Dry toilets are:
Now let's figure out which one you can build yourself.
The design of an electric dry closet is very complex, and it also requires power to operate.
Why do you need extra expenses?
Liquid composting toilets require a lot of water to use. You will have to think about how to drain excess liquid, and there will be a lot of it. The price of biological products that are used as fillers is also steep.
Using a liquid dry toilet results in high water consumption.
In addition, it needs to drain excess fluid
What do you need for a peat dry closet? The idea of installing such toilets is not new. Previously, something similar was called a powder closet. What was he like? The main part of this design was a container for collecting waste. After the need was relieved, it was necessary to “mask” everything with powder.
Sawdust, dry earth or ash were used for it.
Similar technology is still used today. Peat acts only as a powder or filler. Industrially manufactured structures have two combined containers. One is storage for waste, the other is for storing filler.
For homemade dry closets, two separate containers are often used. In addition to the simplicity of design, the peat dry closet has other advantages:
- does not pollute the environment;
- works without water;
- low price for consumables;
- obtaining high-quality natural fertilizer.
So, we decided: we’ll build a peat dry closet ourselves.
Final conclusions
In real life, dry toilets without a house are rarely used. It is more comfortable to place it in an equipped booth. A waste disposal system is installed inside the house.
It’s easy to make a booth yourself; you will need boards with bars and fasteners. In the house you can connect the light and carry out ventilation. The design can also be improved, if desired, by using a homemade seat on a seat cover made at the factory. The process of adding peat admixture can also be automated using dispenser systems.
How to make a peat toilet with your own hands
And be sure to mention to keep the seat cover closed at all times.
Is drainage required for this design?
In order for the liquid entering the dry closet container to be completely adsorbed, a lot of peat is needed. This is expensive and inconvenient, because waste will have to be removed more often. When using the usual rate of filler, the liquid partially evaporates, partly is absorbed by peat, and it is advisable to remove the rest through drainage.
What is needed for this?
Two containers of different sizes, so that one fits tightly into the other, and there is a little space between them at the bottom. The bottom of the smaller container should have small holes to allow liquid to seep into the larger container. To remove it, a hole is made on the side, into which a drainage hose is inserted and brought out. A small collector can be built for the liquid obtained at the outlet.
Proper waste disposal
You need to be able to properly dispose of waste so that the result is good fertilizer.
As the storage tank fills, it must be cleaned. But this does not mean that you need to wait until it is filled to the brim. Not only is it not aesthetically pleasing, but a full bucket is physically difficult to carry. The more often cleaning is done, the better.
The contents of the dry closet are disposed of on a compost heap.
But don't expect there to be no smell at all. Bacteria need time to completely process waste. Therefore, it is advisable to make a compost heap away from the house, and sprinkle “fresh” waste with dry soil or leaves.
It’s even better if you use a container with a lid for it. After emptying the container of the dry closet, it is advisable to wash and dry it. So it doesn't hurt to have another one for rotation.
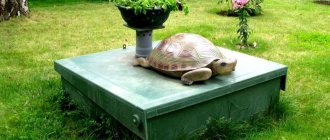
What is a thermal toilet
Now on the market you can find such a design as a thermal toilet from the manufacturer Kekkila. The design functions due to the insulated body. Peat waste is processed inside a large chamber with a capacity of 230 liters. The output is finished compost. The thermal toilet does not require connection to water supply, sewerage, or electricity.
The manufacturer of the thermal toilet guarantees that even food waste will be recycled, but bones and other solid objects should not be thrown. It is important to monitor the tightness of the lid, otherwise bad odors may appear in the room and the composting process will be disrupted. The thermal toilet is able to function in the country even in winter. However, with the onset of frost, the drainage hose is disconnected from the lower container to prevent the liquid from freezing.
Installation and operation
Installing peat toilets in your summer cottage is a very simple process, you can handle it yourself. Before you start assembling the structure, you should decide on the location of its installation. For full functioning of the dry closet, install it on a flat surface strictly horizontally.
You will probably be interested in reading about whether it is possible to fertilize your garden with feces.
Next comes the installation of the ventilation pipeline. To prevent unpleasant odors from accumulating in the toilet stall, it is best to route the pipeline up to the roof.
It is desirable that the ventilation pipe be installed without bends, which during operation will create obstacles to air flow.
The next stage of installation of a dry closet will be the installation of a liquid waste removal system. The drainage hose must exit the storage tank into the cesspool without kinks or bends. Instead of a pit, you can use a canister or other convenient container into which liquid fractions will flow freely.
The final stage of installing peat toilets will be filling the peat tank - manufacturers recommend pouring the mixture into no more than a third of the tank’s volume. The main rule of operation is to cover the waste with a small layer of peat after each visit to the dry closet.
Cabin for a homemade dry closet
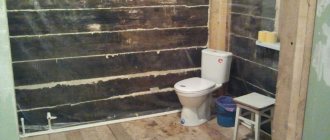
Of course, if you wish, you can install a dry closet in your home with your own hands. But for this you will need a separate room with ventilation.
If more than one person uses the toilet, a drainage hose must be installed.
Those who cannot afford this will have to build a toilet on the street.
The house for it can be made of brick, wood or any material left over after the construction of the house. Instead of a wooden box for a seat, you can build a whole pedestal with two holes. And at the back or side of the house, attach a small door for removing the container.
More information on the topic: https://aqua-rmnt.com
Where is the best place to install it?
Having decided to make a peat dry closet with your own hands, the first step is to find out where it can be built. Since the cesspool is not included in its design, groundwater contamination is excluded. The presence of odor is insignificant. Especially if the toilet is built according to the rules.
It is also not worth constructing such a structure in plain sight. Of course, if you know how to make a dry closet according to all the rules, you can install it in your home. The main thing is not to forget about ventilation and drainage. So, before choosing a mounting location, you need to take all these points into account.
An article dedicated to the implementation of the project for a country toilet with a shower is located here:
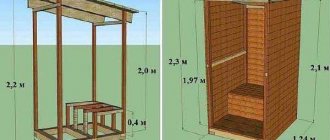
Project of a country toilet and shower under one roof
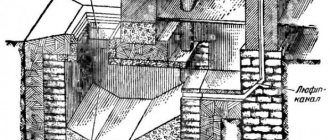
A toilet is good, but a toilet with a shower is even better. Both of these buildings create the comfort necessary in a dacha setting. By combining these designs you can save a little on material. Let's consider the project of a country toilet with a shower and its execution.
The toilet and shower have a common wall: this will help save on building materials
The proposed diagram shows that the toilet and shower have a common wall. This is the saving of building materials. This project is designed for the installation of a dry closet.
If a cesspool is used, the design is slightly modified.
To build such a structure, they first dig a foundation pit and strengthen its walls, and only then begin the construction of the building itself
Preparing the foundation for construction
First of all, a square pit with a side of 4 meters and 0.3 cm in depth is dug for the construction and covered with gravel to about 0.2 m.
After thoroughly compacting the base, formwork from wooden panels is knocked down for a foundation 0.3 m wide and 0.5 m high.
To make the foundation more durable, it is necessary to reinforce it
A sand-cement mortar is prepared and poured into the formwork.
Crushed stone is used as filler. When the concrete has set, remove the boards and cover the defects with mortar.
After removing the formwork, defective areas are sealed with mortar.
At the next stage, sewer pipes are installed.
Foundation or supports
A simple house can be assembled as soon as the pit for the remains is completely ready. There is nothing extra natural in the installation process if there is a project:
- The building has a small specific gravity, and therefore it will be enough to deepen 4 supports made of metal pipes. If it is not there, then it is allowed to make pillars from brick. Existing options for arranging a foundation for an outdoor toilet
- A skeleton is built from 5x5 cm bars. First, put together two rectangles the size of the toilet, and then connect them together with 4 vertical bars, the two rear posts should be lower than the front ones, by the amount of the roof slope.
- The supports are secured by mounting a gusset made of timber to give strength to the structure.
- A toilet seat is mounted at a height of 50 cm; it is worth nailing two bars across the frame. The process of assembling the frame of the toiletFinal finishing of the outdoor toilet
- A sheathing is made on top, the pitch of which will depend on the choice of roofing material. When it is planned to cover the roof with a sheet of slate, then auxiliary lathing is not required. The process of covering the toilet frame with boards
- If you have, say, soft tiles left over from building a house, then you first need to lay a sheet of OSB, then waterproof it, and only after that install the tiles. The process of tiling a toilet frame
- Place two supports, auxiliary in the place where the wooden carved door is attached.
- Place the prepared frame on the frame placed on the base and proceed to the sheathing.
Watch the video on how to quickly make a foundation for a country toilet.
We save the environment with a peat dry toilet for our summer cottage
Then the base under the floor is covered with sand and compacted thoroughly.
For sewage use pipes with a diameter of 50 mm
To keep the room warm enough, foam is laid on top of the sand.
The base is reinforced and filled with mortar.
Polyfoam makes the room warmer, which allows it to be used even in cool weather
When pouring the solution under the shower, do not forget to make a slight slope
Construction of walls and roof of the structure
A beam is fixed on top of the foundation around the perimeter.
To do this, use long pins with a diameter of 1 cm, or reinforcement.
Roofing material is laid under the timber for waterproofing
Then they build a frame for the walls and a roof sheathing from edged boards (0.5 × 1 m).
During the construction of walls you need to use a level
When making the roof sheathing, extend it beyond the gables by at least 0.3 m
The roof is sheathed with edged boards.
Frontal boards are attached to the end parts of the sheathing.
For the strength of the lathing, metal corners are used
After which they begin laying the roof.
For the roof, you can use soft bitumen tiles, slate or other covering
After finishing work on the roof, wind protection and wall sheathing are installed.
The sheathing of the structure is necessary to ensure ventilation
The outside of the building is sheathed with edged boards (0.22×1 m).
Doors are made from it (2.1×0.9 cm). Windows are inserted and trims are sewn on.
The sheathing will be sheathed with edged boards. Wooden elements must be treated with an antiseptic
A large container is dug under the sewer drain and a pipe is connected.
The sewage container should protrude slightly above ground level.
This will prevent rainwater from entering it.
Drawing up drawings
There are several tips:
- Do not make a wooden toilet too low. A tall, mature person should not touch the ceiling with his head while inside. This rule applies not only to the ceiling, but also to the front door - it should not be too low.
- The ceiling is made (approximately) half a meter higher than the door level. One might say that such an entry would be overpriced, but it is not.
- The “standard” can be the size of the entrance door to an apartment or house - such an opening is convenient to pass through. The door should be upholstered with a seal - protection from wind, cold and noise. Isolate noise - bring comfort!
- A wooden toilet should be made well; you should not skimp on material.
- Trivial advice, however, is that a dug hole (if unnecessary) can be covered with earth, and the structure can be moved to another place.
An experienced summer resident understands that winter brings not only New Year and joy, but also a lot of snow. It will put pressure on the roof, and the fall of snow can “tear down” the walls and turn into disrepair a place that people visit several times a day. When making a drawing, it is worth planning it, taking into account the temporary weather conditions!
We hope these tips will help and your holiday at the dacha will become even more comfortable and inspiring! Good luck!