The toilets that were installed in private houses during the Soviet era were rooms that did not have the usual amenities. In most cases they had cold water and sewerage. The latter was intended only for the discharge of liquid waste. There was no toilet as such on the list of amenities. There wasn't much else either.
The process of installing a toilet is a fairly simple task. However, neither the toilet room itself nor the communications laid in it were included in the house design. Therefore, creating a toilet in a private house becomes a difficult task. The main problem is finding a suitable place to place the toilet. Another difficulty is the correct supply of sewerage , ventilation and water to the bathroom. We will talk in more detail later about how to arrange a toilet in a private house.
Toilet space
The finished room is an ideal option for a future toilet. A small room similar to a storage room is perfect for its installation. It will be great if it is located as close as possible to the drain well. If there is free space only on the opposite side of the house, then these are already certain difficulties. But in this case, installing a toilet in a free room is also possible. By installing a toilet on the other side of the house, the cost of the work and its complexity increases. However, from a technical point of view, everything is quite solvable. As an option, you can consider arranging a combined bathroom , in which you can install:
- toilet;
- sink;
- washing machine.
Creating a toilet room is a difficult task if there is no suitable room. In this case, the owner will have to look for a free place where a bathroom can be placed. There is nothing to worry about if you managed to find a free corner in the kitchen. To locate the toilet next to the room in which food is prepared, the restroom is surrounded by a solid partition. To create an entrance, an opening is made in the adjacent wall . Lining can be used as the main building material. Others can also be used:
- chipboard;
- drywall.
Types of structures
Varieties according to the nature of the drain
Plumbing fixtures are monotonous and indistinguishable from each other only at first glance. In fact, the design options for the product are numerous and, depending on the shape, there are:
- funnel-shaped
- with shelf (canopy or dish-shaped)
- with sloped rear wall
Based on the nature of water movement, products with horizontal and circular drainage are distinguished, and according to size - adults and children (with different sole heights). The shelf in the toilet can be solid cast or attached.
Depending on the design features of key components, devices are produced with the following drains:
- Horizontal
- Vertical
- Obliquely
Sewerage in a private house
Based on this parameter, the method of transporting waste, there are two types of sewage systems:
- pressure;
- non-pressure.
In the first, used water and sewage move thanks to a fecal pump installed in the system. The second version of the system involves the use of automatic drainage , which occurs naturally into the sewer pipes. Both options can be arranged in a private household. Which one is preferable depends on the specific conditions.
Gravity sewer
The effective operation of such a system is possible only if the slope parameters are fully observed during its construction. It must be constant and uniform throughout the entire length of the pipe. In this case, the horizontal section can be quite long.
When installing a gravity sewer system, many owners make one mistake - they make the pipe slope too steep. By doing this, many believe that the steeper it is, the better the waste flow will be. However, everything turns out the other way around. If the sources move too quickly, the pipe does not fill with water, which is why there is poor washing of the inner walls.
If the slope is less than permissible, then in this case the flow moves at a low speed , which also negatively affects the operation of the sewerage system. When installing a gravity sewer, it is necessary to ensure a balance so that the sewer can self-clean. If there is no balance, this can lead to a situation where plaque will form on the inner surface of the pipe when using sewage. And it will lead to a situation where blockages begin to form in the pipes.
Pressure sewer
, creating a gravity sewer is quite a big problem . For example, in order to maintain the required slope, it is necessary to lay the pipe below the floor level, or it becomes necessary to raise the upper end to a sufficiently high height. In the first case, large-scale destruction will have to be carried out, and in the second, the construction of a pedestal will be required at a fairly high altitude. In addition, great difficulties arise when pipes of this diameter are laid through walls and partitions installed in the house.
To avoid such problems, install a pressure sewer for the toilet. The main element in it is the fecal pump. The use of this equipment ensures drainage from the bottom up. Thanks to it, pipes of a smaller cross-section can be used to create a sewer system. The main advantages of fecal pumps for domestic use are as follows:
- have compact dimensions;
- differ in aesthetic appearance;
- is able to pump wastewater several meters vertically, and horizontally several tens of meters.
In addition, when arranging a toilet in a private house, you can purchase a toilet model that already has a built-in pump.
Best answers
Clara Bitchy:
Only with cement mortar, and let it sit. Gypsum is afraid of moisture - a solution with the addition of gypsum is good only in a dry place; moisture will crumble after a while. And to speed up the solution, you can add liquid glass, which will give it waterproofing properties, but it hardens so quickly that you may not have time to lay it :-)
about 100 Yanina:
no need to reinvent the wheel - make it with cement... although my husband put it just like that... didn't fill anything...
Grandfather Au:
yes, fill it with solution
Cat's smile:
Fill it with cement mortar - cement with sand (1:4), put a wooden board on top, and temporarily connect the toilet. , Leave it like that for a couple of days, then you’ll put it firmly in place.
Starr Grandfather:
3 parts cement + 1 part gypsum (alabaster) will set in 2 hours. The more gypsum, the faster. If 1:1 then it will set in 20-30 minutes Sand by itself! It will turn out something like this: 1 part cement: 2 parts sand: 1 part gypsum
Barabas:
Fill it with tile adhesive; it does not need to be diluted with sand, it will harden faster and will not crack.
Online magazine Tips for owners:
The faster the deader. This is the law. You can't think of anything other than a cement mixture. There are quick-hardening cements (dental fillings were made from these in the old days), but they are prohibitively expensive and rarely come across on wide sale.
The solution may be the following composition - mix dry cement with gypsum, 2 hours of cement - 1 hour of gypsum, add 2 parts of sand, for all this water, half of the total amount, even take a little less, add during the mixing process if it turns out too thick. Dissolve PVA in water, 10-15% of the volume of water. Pour the pre-mixed ingredients into the water, mix them thoroughly for about a minute. We wait a couple of minutes, mix again and fill the niche with the resulting solution using a spatula and smooth its surface.
It will set in about an hour. The toilet can be installed and connected to the sewer system in three hours, and it can be used (carefully!). But drill and install the fasteners the next day, or even better, at least let it sit for a day.
For reference, cement mixtures, as well as mixtures with other binders, do not dry out, they set (plastics polymerize).
Drying, a process that has practically nothing to do with setting, and sometimes has a negative effect. For example, if you decide to speed up the “drying” process with a stream of hot air, you will only get cracking. But the strength and speed of setting can be accelerated by steaming, i.e. by being in a humid, hot environment (but this is not for home use, this is how concrete products are made in factories)
As a rule, the setting speed can be accelerated only at the cost of strength or moisture resistance, as in our case... Therefore, filling with the above mixture may begin to deteriorate after just a few years.
Elena Anikina:
you can use rotband or alabaster, they harden faster than all the others
Chuck Kazemierczak:
Indeed, there is no need to rush. Carefully and slowly pour good cement. Place a board on top (through newspaper to prevent it from drying out). Place the toilet and attach it with corrugation. Tell everyone to sit down carefully. After a couple of days, when it hardens, calmly drill and fasten.
Stas Shabanov:
buy a bag of self-leveling floor. It will dry out in 3 hours.
Alexei:
you will also have to screw the toilet into your filled miracle with dowels or screws.
That’s why they put a board, a mortgage, into it, it’s easier to attach screws, ordinary ones, for wood.
They just hammered a hundred nails into the sides of the board, made a hedgehog out of it, and poured it with mortar, the mortar grabbed the nails, and the board didn’t jump out after drying.
In conditions of quick repairs, plumbers simply fitted a new board tightly, dipped it into molten bitumen, ran with it to the floor, and while it was still warm, pressed it into place.
Run:
Cement
Lyudmila Bogoslovskaya:
Regular cement takes a long time to dry. High-speed hydraulic seals are best for such things. For example, PCI Polyfix 5 minutes, which hardens within 5 minutes. And after this time, you can already veneer it on top and fill it with water
Do-it-yourself sewerage installation in a house
When installing a sewerage system in a private house, one of the important points is the choice of material. An excellent solution would be to use polypropylene pipes. These tubular products have certain advantages:
- ease;
- strength;
- ability to withstand temperatures up to 95 degrees.
The latter quality of these pipes is especially important if a washing machine is connected or someone uses the system to drain boiling water.
There are no problems with assembling PVC sewers, since this work is similar to assembling a construction set. Its installation begins from the bottom point; a new element of the PVC sewer system is inserted into the socket of the previous one. Before connecting the elements to each other, sealing material should be applied to the end of the pipe. This procedure is performed not only to eliminate the occurrence of leaks. The use of sealant helps facilitate the process of connecting elements in the sewer.
With a small diameter of pipes when installing a pressure sewer system, joining the elements together requires considerable effort. The use of lubricant makes this work easy. When installing pressure sewer systems, you should avoid using right-angle bends. To make a 90 degree turn, it is best to use two 45 degree bends. Their use even when using the sewer system will reduce the flow inhibition. Cutting PVC pipes into pieces of the required length is quite simple. To do this, you only need a hacksaw for metal. This is another advantage of the polypropylene system.
In order to ensure reliable fastening of structures, it is necessary to use clamps with studs or clips. Inspections must be installed at the bottom of the risers, and also placed before each turn and do not forget to arrange inspections at the exit from the sewer of a private household. If this is necessary, then you can join a plastic pipe with a cast iron pipe. To seal the connections between them, use a special rubber cuff.
If there is a basement , and the aesthetics of its appearance comes first for you, then you can lay a horizontal section under the ceiling. This solution has many advantages:
- there is no need to go around corners, which will save materials and time;
- pipes laid in this way will not take up space in the lower part of the room.
To connect pressure sewer elements, a welding method or flanges are used. To install such a system, pipes with a diameter of 20-40 mm are used. Which one to choose depends largely on the characteristics of the pump. Laying can be done not only from the outside, but also into walls, and pipes can also be laid under the floor.
Carrying out interior work
When organizing an internal sewerage system, many prefer to use independent frames. Communications are laid directly in the frame base.
When making such a design, you should consider:
- To secure the frame material, special profiles (U-shaped) are required;
- Parts of the structure should be attached to the main walls using brackets with grooves, but there should be no strong tightening in screw connections;
- Communications and electrical wiring are laid in the resulting gaps;
- You can assemble the frame structure yourself, because there are many options for this product.
Before finishing finishing work, you need to level the walls and floor.
Experienced craftsmen advise using polypropylene products to install water supply and sewer systems. Such materials are lightweight and highly durable. You can easily assemble the chosen scheme, because the individual parts fit perfectly together and are easily connected.
When organizing pipe turns, care should be taken to install an inspection designed to clean the pipeline. To increase the strength of the internal network, all seams and joints of the structure must be sealed.
Do-it-yourself installation of external sewerage
It is necessary to lay the external sewerage network in the trench. As for its depth, it is best to consult with specialists on this issue, since the choice of deepening the trench largely depends on the climatic conditions of a particular region. If you use thermal insulation, the depth of the trench can be made small.
For external sewerage pipes are used from a variety of materials:
- cement;
- asbestos;
- ceramics;
- PVC.
The most popular currently are products made from the latest material. If an external non-pressure sewer is installed, then a prerequisite is to create a slope of 2% in the direction of the drain. It is necessary to pour a cushion of sand 20 cm thick into the trench, then level it well.
Project
It indicates the material from which the building will be constructed. One-story and two-story houses made of timber are very popular today. The advantages of natural wood are undeniable. In addition, it is very convenient for constructing buildings with your own hands: it can be easily processed and does not require special lifting equipment during construction.
Project of a bathroom in a house made of timber
Thanks to wood, both the internal and external decoration of the building is very comfortable. This is an excellent soundproofing material and retains heat very well.
Installing a toilet for a toilet
In most private homes, the floors are made of wood. Therefore, the work of installing a toilet bowl for a toilet begins with preparation: it is strengthened, leveled, and then linoleum is laid. If the pipe neck is located above the toilet outlet, then in this case you will have to think about raising it.
To create a podium, you can use a wide board and several pieces of timber as the main materials. When a podium is created on a concrete floor , the main materials for the work are brick and cement. When using wood, you need to cover it with drying oil and paint it. In this case, the structure will serve for a long time.
In most cases, when creating a sewerage system in a private house, its connection can be made directly: a regular cuff with an o-ring is inserted into the pipe, and the toilet outlet is installed into it. If this is not possible, then you should use a corrugated cuff or use a plastic eccentric. It is easier to connect to a local pump, since its inlet is located at a standard height. Everything necessary for docking is already available.
When the toilet is installed in its intended place, it is necessary to check the reliability of its connection to the sewer. After this, you should mark the holes . Next you need to remove it, and then drill the floor. The mounting kit usually comes with the plumbing product. It includes self-tapping screws, and in addition plastic dowels, washers with decorative caps.
Next, you need to install the toilet in place, using a level, and check the evenness of the entire location. If this is necessary, then it is worth leveling the product by placing some solid object under the base. When the work is completed, it is necessary to seal the resulting gap with cement. In the event that the installation is carried out on a podium, then the alignment is carried out already at the stage of creating the structure.
Then you can secure the toilet using self-tapping screws. During this work, you must remember to place soft washers under the caps. Be sure to syringe the connection between the pipe and the cuff using silicone sealant. The same must be done with the base of the toilet to prevent water from flowing under it. Now all that remains is to connect the water to the drain tank. To do this, use a coaxial hose , in front of which a tap is usually installed.
Required tools and materials
For the sewer option, gray pipes for internal work with a cross-section of 50 mm, orange for external work with a cross-section of 110 mm and connecting fittings are required.
To build outdoor amenities you will need:
- beams for the frame base;
- sheet plywood;
- batten;
- roofing;
- door block.
If you don’t want to build a seat manually, you can install a plastic toilet without a tank.
Tools that may be useful are a level and a tape measure, a screwdriver or drill, a jigsaw or a hacksaw, a tape measure, a hammer and a shovel.
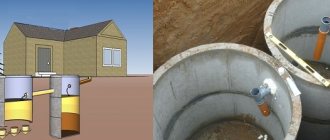
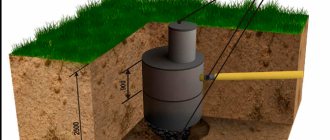
Cesspool - a simple method of waste disposal ↑
The simplest, and therefore most common way to equip a bathroom on your own is to use a cesspool. Naturally, the most convenient way to remove sewage is considered to be a full-fledged sewer system, but not everyone has the opportunity to do this. The pit, on the contrary, is very affordable and within the capabilities of every owner.
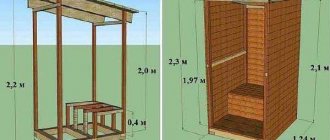
Free-standing toilet for a summer residence
First of all, you need to decide on the location of the future bathroom where it will be located. On the street or directly at home. It will be necessary to equip the pit in both cases. More often, the dacha is equipped with a backlash-closet-shaped bathroom. Its design is similar to the toilet of the last century, only the appearance is more aesthetic.
Brick container
When choosing a location, it is necessary to evaluate not only personal preferences. First, calculate the distance between the drainage area and the source of drinking water. To prevent toilet waste from contaminating clean water, it is necessary to locate it as far as possible from the well or borehole. The minimum distance is 20 meters.
Provide quality drains. They should not pollute the land with housing, so everything that ends up in the cesspool must pass through the sewer drains without spreading underground.
Optimal location of the pit on the site
You should definitely pay attention to the direction of the wind; it is better to build a waste collection facility so that the wind carries all unpleasant odors away from the house. The easiest way is to make a powder closet. Instead of a sewer pit, there is a container there, which is emptied as needed. It is more suitable for a dacha where residents rarely visit.
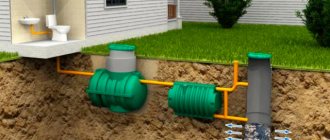
Instead of a pit, you can use a septic tank, but it is more expensive
Making a cesspool ↑
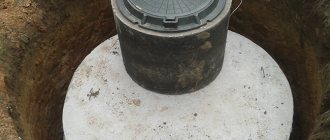
If you constantly use a full-fledged toilet, equip a high-quality, reliable container for collecting waste. It can be arranged using large rings of reinforced concrete; this is the best way, as they retain wastewater.
If you do not have the opportunity to purchase these materials, then you can equip the pit using another method. To do this, follow the sequence of actions:
- Having determined the location, dig a hole 1.5-3 meters deep.
- The bottom must be made at a slope so that heavy particles of debris settle there.
- Provide high-quality waterproofing of the entire surface.
- Bottom. cover the walls with bricks, blocks or fill them with concrete.
- Treat the surface with a primer to reduce hygroscopicity.
- Finish with waterproof plaster.
- Install the double cover. Its inner part must be made of wood, and the outer part of galvanized metal sheet.
- Fill the space between these two covers with insulation (mineral or glass wool, peat, sawdust).
- Lay the pipeline at such a slope that wastewater can flow into the container.
Installation of reinforced concrete ring
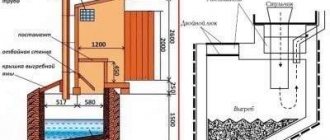
Water supply system for suburban housing ↑
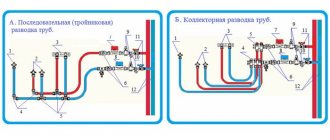
When equipping a house with a water supply system, you can use any popular materials: copper, polypropylene, metal-plastic. Conclusions for each type should be located in certain places. Most often these are couplings with threads inside.
To install the mixer, use a special installation kit, or two threaded couplings. The distance between these couplings should be 15 cm, this standard is determined by the axes. They are placed horizontally on the bathroom wall; the accuracy determines whether the faucet will stand level.
Plumbing system layout
Cold water for the toilet cistern is supplied from either side - from above or from below; a coupling is inserted at a distance of about 20 cm from the floor.
The bathroom is equipped with shut-off valves, which are installed at a convenient height, so that all unsightly parts of the structure and the main wiring can be hidden behind the sink cabinet.
Mixer installation
Bathroom ventilation device ↑
The bathroom is a room with high humidity, so ventilation is required here. The easiest way would be to equip the house with natural exhaust, through a slot in the ceiling covering, covering it with a ventilation grill. Moist air will flow out through it.
But such a primitive system is not always enough to cope with humidity and unpleasant odors; it becomes necessary to install a forced ventilation system powered by electricity. Turning on the hood can be linked to the light switch - as soon as someone enters, the fan will turn on.
Ceiling ventilation kit