Roof drainage is a mandatory system when constructing buildings. Its main responsibility is to collect and remove rain and melt water flowing from the roof slopes away from the foundation. Typically, the drainage system begins to be assembled during the construction of the roof structure before the sheathing is assembled. Although situations often occur when the roof is already covered with roofing, but the drainage has not been assembled. As an example, you can replace an old drainage system with a new one.
Before moving on to the topic of the article, let’s consider what the elements of a drain are and what materials they are made from today.
- Dimensions of drainage system elements
- Installation of the grooved structure
What does a roof drainage system consist of?
The diagram shows:
- The gutter of a drainage system is an element that collects and directs water.
- The gutter plug is designed to cover the ends and prevent water from overflowing through them.
- Angles are universal. Direct the flow.
- Gutter angle.
- Gutter holder. One edge is attached to the building, on the other there is a curved bed.
- Gutter connector (coupling). Connects parts of a structure.
- Outlet funnel. Connects the gutter to the drainpipe.
- Pipe elbow.
- Connecting pipe (coupling).
- Drainpipe.
- Drain elbow.
- Pipe clamp with pin.
- Pipe clamp with claws.
What is a gutter
The system consists of two main elements:
- Gutters (trays), which are mounted under the overhang of the eaves.
- Pipes that are attached to the walls of a building in a vertical position.
An example of a house roof drainage system.
Additionally, it includes:
- brackets supporting gutters;
- clamps – fastening for pipes;
- funnels are an intermediate element between gutters and pipes;
- drains - the lower part of the drainpipe, which gives direction to the drainage of water;
- various fittings (plugs, bends, tees).
Roof drainage diagram
How to choose the right drainage system
Before purchasing, it is important to decide on the parameters. Depending on the collection area and the location of the drain pipe, different throughput capacities are required. It is determined by the diameter of the pipes and gutters.
The main values that you need to know for installing a roof drain are given in the table.
| S slope, m² | Gutter diameter, mm | Pipe diameter, mm |
| up to 50 | 100 | 75 |
| 50-100 | 125 | 100 |
| 100+ | 150 | 120 |
Typically one drain pipe is installed per gutter. If the length of the slope is more than 12 meters, an additional pipe is installed in the middle.
How to secure vertical drainage elements
It is best to provide for the fastening of drain pipes at the stage of laying the walls. But even after completion of the work, no one forbids installing fasteners.
When performing installation, observe the following rules:
- Start installing drain elements from the bottom.
- Drill holes in the walls to install clamps.
- On the lowest clamp, install an elbow with a cut edge, and if the drain is carried out into a storm drain, then use a regular drain element.
- Fasten subsequent elements using a separate clamp in increments of no more than 1.8 m. If the length of the element exceeds 2 m, then it is necessary to install another clamp.
By following the installation rules, you can ensure the strength and tightness of the structure. In this case, the drainage will be reliable and will last a long time. Good luck to you in your construction activities.
Selecting a drainage system by material
Before installing a drain, you should think about the materials of its constituent elements. There are two main types of roof drainage systems: plastic and metal.
Visual difference is not noticeable
Metal
Such roof gutters are strong and durable - any part made of metal is much larger than a part made of good plastic. Installation of a metal drainage system is suitable for multi-story buildings.
However, in some cases you should not install metal roof drains:
- The sea or an area with developed industry is located nearby. In these places there are a lot of salts and aggressive substances in the air, which, dissolving in water, spoil the protective coating and cause corrosion;
- Installation of metal gutters is not recommended if silence is required. When it rains, such a system will create a lot of noise.
Plastic
A more popular solution is based on PVC (polyvinyl chloride). By adding various modifiers, we obtain a material with a long service life - from 10 to 30 years.
Polymer systems have advantages over metal ones:
- low weight of the structure, which makes installation on old buildings possible;
- can be used at temperatures from -50°C to +75°C;
- low cost of installing a plastic drainage system.
Installing plastic gutters also has its disadvantages:
- fastenings are placed at small intervals from each other;
- thermal expansion and contraction, which can cause gutters to fall out of their fasteners or cause the plastic to burst;
- fading of flowers under the influence of the sun;
- low resistance to loads and mechanical damage.
Ice accumulation in winter or an accidental impact can crack the plastic. It is necessary to clean the drainage device in a timely manner during the cold season.
Pitched roof drainage system configuration
The shape of the pitched roof is of decisive importance for the complexity of the drainage system. For example, for a simple country house or country house with a gable roof and perfectly straight eaves overhang lines, the easiest way would be to install a standard drainage system with a minimum number of gutters and downspouts.
But if the pitched roof of your house has a lot of creases, overhang jumps, gables or insets, then the entire drainage system will be quite complex. For example, creases in the edge of a pitched roof are most often located where the façade needed to be made more beautiful. And you cannot cross the roof in this place with a simple gutter - it is customary to think about its more aesthetic location. We'll have to tinker!
Closed drainage system
The architectural configuration of the roof directly determines the design of the drainage system and its appearance:
The hip roof and similar architectural elements are arranged as a closed system. Such a drain always goes around the building or its individual architectural element along the entire perimeter. A plug for the gutters is not even installed here, because in this design all the drainage elements are connected to each other and there are simply no blind branches.
Also, as for the hip roof, rain and melt water coming from the slopes must be drained simultaneously in both directions. The drainpipes here are also located in the corners:
In closed systems, drainage pipes must be calculated so that they rest on the total area of the roof and roundings are made upward, not downward.
Open drainage system
Thus, a standard gable roof provides two separate lines of gutters, each with its own drain. That is, in simple terms, a gable roof drainage system is two open systems.
If we are talking about gable, multi-slope and multi-slope roofs, then water is drained through gutters to pipes, which by all standards are located after the corners of the walls, and to pipes that are placed exactly in the middle of these walls:
Types of mounting brackets
Depending on the stage of construction, the condition of the sheathing, the front board and the type of construction, gutters are attached in different ways: to the sheathing, to the rafters, to the front board and in other ways.
Attaching the bracket to the sheathing
This type of gutter fastening is suitable for those who have a fairly strong sheathing (the building is not old, the sheathing is made of strong wood) and the roof has not yet been laid.
It uses brackets with a long leg. Self-tapping screws are attached to the sheathing through special holes and the hook is bent to the required level.
Important! The distance from the edge of the roof to the center of the hook should be left 30-40 mm, otherwise water may overflow over the edge and splash.
Attaching to rafter legs
If the roof has already been laid, then drainage from the roof should be made using this method. The brackets have the same structure as when attached to the sheathing, with the exception of the legs being rotated 90 degrees. This makes it more convenient to work.
The disadvantage is the limited choice of distances between the brackets. If the rafter legs are located closer than 0.5-0.6 meters from each other, this will not create problems. If they are located at a greater distance, it will not be possible to maintain the recommended distance between the brackets.
Fastening to the front board
This type of fastening of the drainage system is also suitable for those who have a roof installed. A special stand with a full-length cutout, similar to a rail, is installed on the frontal (wind) board. Brackets are inserted into the grooves inside the cutout and fixed.
The advantage of this technology is easy adjustment of the distance between the fasteners. However, it is not possible to easily adjust the height and distance from the edge of the roof.
Other options
If the roof is already covered, it is possible to install suspended gutters. In this case, the brackets are attached to the roof sheathing. In this case, long legs are used, which can be adjusted both in length and angle.
Suspended drainage is not inferior to other types of fastening in efficiency and ease of maintenance and does not require the removal of part of the roof for installation.
When to start installing the system
The drainage system is of great importance for preventing damage to the load-bearing structures of the building, so its development should occur at the design stage of the house. And in accordance with regulatory construction documentation, installation of the system is carried out before laying the roofing material. But practice shows that these requirements are rarely met. It is also important to decide on the method of attaching the gutters: to the cornice, to the front board or to the sheathing. The most common is fastening to the frontal board; other methods of installing gutters are almost never used in individual construction.
How to install a gutter if the roof is already covered
Very often the roofer hopes that when the job is complete he will be able to tear off a few sheets of roofing in order to install the gutter brackets on the rafters. But usually this cannot be done without removing the roofing material fasteners. If the fasteners are removed, then patches will have to be installed in their place.
Of course, there are ways to avoid these problems. One is to install softwood strips underneath the roofing material to remove the fasteners without denting them. If the roof is covered with slate, then the procedure is simpler. A piece of wooden beam is inserted into the wave, and the brackets for the gutters are attached directly through the slate and the inserted beam.
If the roofing material is already laid, you have to use any available places to attach brackets under the gutters
Currently, there are brackets on sale to which the gutter is attached from below, so such a bracket is not visible. They are installed every 40–70 cm in order to ensure sufficient strength under excessive snow and ice loads.
The brackets that are installed on the sheathing or rafters must first be bent to ensure the correct position of the gutter relative to the roof slope.
Video: installing gutters on a finished roof
https://youtube.com/watch?v=WWfcnf2sxS4
Material design and calculation
The following are the main elements for installing gutters and their descriptions.
Brackets
The drainpipe is secured to the wall using brackets that are installed on the sheathing or to the eaves beam. The first type is considered obsolete and is installed before the start of roofing work. The second type is much more common and is easy to use. There are models with precise adjustment of the gutter position after installation on the board.
Gutters
They collect water from the roof and direct it to the drainpipes. They are installed along the entire length of the slopes with some slope. They have any shape, the possibility of self-production is allowed.
Gutter turns
Direct the water flow at an angle of 90° or 135°. The joints of these elements are subject to high loads; a powerful suspension is required.
Funnels
Connect gutters and downpipes. Funnels can be pass-through or plugged on the right or left. Pass-throughs are installed anywhere, while plugged ones are installed only at the edges of the gutter.
Pipe elbows
They change the direction of flow and use it to place a vertical pipe as close as possible to the walls of the structure.
Clamps
Fix drainpipes.
Drainpipes
Drain water from gutters. Standard length is 2 m.
To calculate the exact number of elements required to properly install the drain, you need to consider the following points:
- the minimum number of drainage gutters per slope should be equal to the length of the slope divided by the length of the gutter (standard - 2 meters) and rounded up. To calculate the total quantity, you need to add up the results for each slope;
- drainpipes are placed one per gutter, usually at the corners of the building. If the length of the slope is more than 12 m, another one is installed in the middle. Their size is determined by the height of the walls. The standard length of galvanized pipe is 2 m, plastic pipe can reach 3-4 m;
- Brackets for fastening gutters are placed every half a meter around the perimeter of the gutter. 2 brackets are installed on turns and funnels for greater structural rigidity;
- one funnel and pipe bend for each drainpipe;
- plugs along the edges of gutters;
- connecting element for each joint.
As an example, we will make a full calculation of materials.
For one slope 10 meters long with a wall height of 2.5 meters you will need:
- 5 gutters;
- 4 connecting elements;
- 1 funnel;
- 22 brackets (when using a corner element +1 for each);
- 2 plugs;
- 1 drainpipe;
- 1 pipe elbow;
- 1 drain;
- 2 pipe clamps.
For a four-slope, subject to the use of rotating elements:
- 20 gutters;
- 16 connections;
- 4 funnels;
- 4 rotating elements;
- 88 + 8 (at corners) = 96 brackets;
- no plugs required;
- 4 drainpipes;
- 4 knees;
- 4 plums;
- 8 clamps.
Installation of drainage from pitched roofs
A building that is not provided with high-quality drainage during construction will, in a very short time, acquire a rather unpresentable appearance under the influence of precipitation. And most importantly, the general condition of the structure will also be negatively affected, which is why mold and an unpleasant odor may appear in many places.
A drain is needed to prevent water from accumulating on the roof and falling on the walls and foundation
And if this problem is not approached with all seriousness, the following problems will arise that will require constant financial expenses:
- high humidity will cause weakening and gradual destruction of the foundation and base of the house;
- undiverted water will penetrate into the basement and constantly fill it;
- mold and high humidity will affect the health of residents;
- the noise from flowing water will interfere with a comfortable rest.
The drainage system is used everywhere to remove precipitation from the surface of roofs: flowing water from the roof enters a special gutter and then flows through drainpipes to the ground away from the building. The purpose of the gutter is precisely to collect water from the roof surface. The drainpipe provides water drainage to a specially designated place. But to install a drain, you will need not only a pipeline and a gutter, but also elbows, clamps, fasteners and other elements.
The drain consists of horizontal gutters and vertical pipes
Gutter system configurations: closed and open
The type of roof determines the design of the drainage system. For example, for a house in a suburban area that has an ordinary gable roof with a straight eaves, a simple system with two gutters and a small number of drainpipes is best suited.
But when the roof slopes have a complex configuration, the design of the drainage system becomes more complicated. In this case, to ensure the aesthetic appearance of the building, you have to resort to various tricks to ensure reliable drainage.
Closed drainage system
A closed drain is installed if the house has a hip roof. The gutters are of a single design located along the perimeter of the slopes and do not have any plugs. It is worth paying attention to the fact that water drainage from a hip roof occurs in all directions, so drainpipes are best placed in the corners of the house.
Calculation of drainpipes in a closed system is carried out taking into account the entire roof area with values rounded up.
The choice of gutter type depends on the shape and configuration of the roof
Open drainage system
An ordinary roof with two slopes will have its own gutter with drainpipes for each slope, which means the presence of two open systems.
Drainage pipes in open systems must be installed at the corners of the building and exactly in the center of the wall.
Drainage system for pitched roofs
The simplest drainage design has a pitched roof. Sediment will flow from it in one direction, so it will not be difficult to collect it.
A pitched roof gutter consists of a small line of gutters and a downspout
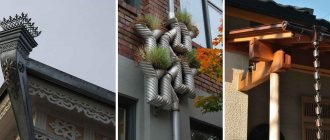
In houses with only one floor, a fairly common solution is to use a rain chain instead of pipes, which is less noticeable.
The chain as a drain has become very popular on the Japanese islands, as it is also an element of facade decoration. It is often made from copper. Alas, currently manufacturers of drainage system elements for the Russian market do not produce decorative elements for drainage chains.
But if you want to make such a system yourself, be sure to comply with the following requirements:
- The chain must be tensioned to prevent it from oscillating from side to side, for which purpose the lower end must be secured in any possible way.
- To avoid water getting on the finishing materials of the building, the chain must be installed at a distance of at least 0.5 meters from the wall.
The implementation of such an idea is quite simple, the main thing is to have the desire.
The drainage chain is an excellent decorative element of the building facade
Drainage system for gable roofs
A standard gable roof has gutters that are located at the corners of the house. This arrangement is most appropriate from both an aesthetic and a technical point of view.
The installation location of gutters is directly influenced by the roof structure.
The location of the drains must be selected based on the roof plan. The installation must ensure the aesthetics and reliability of the drain, but the priority is still reliability. The length of the drain pipes is determined taking into account the distance from the gutter to the drain point (plinth area or sewer well).
The installation location of the drain pipe is also determined by the length of the roof slopes. With a length of less than 12 meters, the pipe can be located at any point on the wall, except in cases where there is a window, balcony or bay window nearby. With a length of more than 12 meters - near the center of the cornice. The main thing is that there should be no more than 24 meters between the pipes.
On gable roofs with small slopes, drainpipes can be installed in any convenient places
Gutters on roofs of complex shapes
It is difficult to design drainage for a multi-slope roof, since each slope requires its own drainage system. It is these difficulties that will be discussed in detail.
The influence of the number of slopes on the design of the drainage system
In the case where the roof has a large number of slopes, and the drainage system is built at minimal cost, a large volume of water entering the gutter sharply reduces its flow rate due to the insufficient volume of the gutter itself. This causes a large load on the system design and leads to rapid freezing of water at subzero temperatures. Therefore, when designing a drainage system, it is imperative to take into account the increase in load associated with a large area of roof slopes.
Superstructures and hatches
The next difficulty is to ensure drainage on towers or balconies, since it is in these places that moisture is most likely to penetrate into the structure and freeze. That is why building minimalism is currently fashionable.
Ensuring drainage from the tower is a non-trivial task, since it is necessary to install a gutter in the form of a circle. It is almost impossible to make a metal gutter of the required diameter by bending a single piece of material. Such a gutter is made from small segments soldered together and painted in the color of the roof to hide the junctions of the segments.
And for a roof window and skylight, a gutter is not required. The main thing is to know the direction of water flow and the place of its accumulation. In the case of lucarnes, a gutter is installed only when it has a large area and multidirectional slopes.
It is not necessary to install a drain to drain water from the hatch
Video: DIY drainage system installation
Step-by-step instructions for installing a drainage system
Step 1. Attaching the brackets
Metal elements are suitable if fastening to rafters is required. The outer parts are installed 15 cm from the end. There is a space of 2 cm between the front board and the bracket.
A cord is stretched between the parts and shifted to create a slope (4 mm per 1 meter). The remaining brackets are attached along the cord every 0.5 meters.
Plastic parts are used when attaching the gutter to the board. Before work, check the board for curvature in a vertical position. If it is uneven or at an angle, it will not be possible to do everything efficiently.
Further actions are the same as with metal brackets: secure 2 elements at the edges, pull the cord, create a slope and install the rest. Check the slope with a level.
The brackets must be fastened so that the distance between the edge of the future gutter and the roof line is 20-25 mm, while water will flow well into the gutter, and sudden snow melting in winter will not damage the structure.
Step 2. Installation of gutters.
The gutter design involves special recesses for fastening, and there are something like hooks on the brackets. The gutter is installed in the brackets and pressed until it clicks. A click means that the brackets have taken their place and fallen into the recesses.
Step 3. Installation of connecting elements of gutter couplings
The edge clings to the two edges of the gutter and is fixed until it clicks. To strengthen the structure, the couplings are sealed with brackets.
Step 4. Attaching the funnel
The funnel is applied to the pipe and outlined with a pencil.
Next you need to cut a hole; for this you can use a crown or a saw blade at low speeds.
After removing the burrs (for example, using a file), the funnel is snapped onto the gutter and secured on both sides with brackets. The connection can be treated with glue.
There are also connecting funnels that are installed between gutters as connecting elements.
Step 5. Installation of metal mesh
The mesh serves to protect the drainage system from leaves and other debris getting into it. It is built into the gutter and, thanks to the elastic material, expands. For reliability, it is secured with clamps.
Step 6. Installation of the gutter corner
To begin with, install one bracket on each side of the corner, at a distance of 10-20 cm from it. Then the edges of the gutters are fixed in the corner element until it clicks.
If you use elements with an adjustable angle, the procedure is the same. The main thing is not to exceed the maximum deviation allowed by the corner element (indicated by the stop mark).
Step 7. Attaching the plug
Caps are installed at the ends of the gutter to prevent water from overflowing outside the system. Attached using tight fixing tendrils.
Step 8. Installation of the pipe elbow
The elbow is installed in the outlet funnel. It is mounted so that the corner is directed towards the wall. On a metal funnel it is secured with clamps; on a plastic funnel, rubber seals are used for joining.
Step 9. Installation of pipe, clamps and coupling
One of the edges is inserted into the knee. The pipe is attached to the wall with clamps at a distance of 1.5 m from each other. Also, the brackets must be vertical, otherwise the pipe may not stand straight.
Only the bottom of the pipe can move away from the vertical in the direction opposite to the wall of the house. If the pipe length is not enough, an additional pipe is installed using a coupling.
Step 10: Installing the drain
It is enough to secure the drain to the pipe with a coupling and direct it away from the house.
This completes the work.
Rules for installing external and internal gutters
If you do not follow the rules for installing a drainage system, you can end up with flooded walls, foundations and basements. To avoid this, you need to follow the simplest instructions:
- The external gutter is installed with a slope of 1%.
- The outer chute should be interrupted no more than three times. If this rule cannot be fulfilled due to the complex geometry of the roof, it is necessary to install another drainpipe. But it is better to install it on the outer corners of the walls.
The main thing in a drainage system is the correct organization of the direction of water flow. It should not drain at the locations of the entrance doors and near the main paths, as in winter this will lead to the formation of a decent layer of ice, which can lead to serious injuries.
It is also important to ensure the required slope of the external gutters, which depends on the size of the slope. If the length of the roof slope is more than 12 meters, then the slope must be made in both directions and two drainage systems must be installed.
It often happens that the cornice is not located in a horizontal plane, and the slope of the gutter must be done taking this fact into account.
Compared to a flat roof, a pitched roof has another weak point - the so-called valley. This is the internal joint of the roof slopes, which is most susceptible to the pressure of water flow, which increases the likelihood of its penetration under the roof in this place. Therefore, it is necessary to pay special attention to drainage from valleys and install internal gutters there that will retain moisture, remove it outside, and therefore prevent water from getting under the roof. It is attached to the boardwalk (which should protrude 40 cm beyond the axis of the internal gutter) or sheathing. The process itself occurs in several stages:
- Two bars need to be nailed onto the sheathing or plank flooring in increments of 5–10 cm. There should be a small gap between the bars and the sheathing to ensure ventilation.
- Nail the sheathing, bring the ends of the wooden blocks to the axes of the gutter.
- Strengthen the main sheathing in the valley area by nailing a few more bars.
- Drive two wooden blocks between the sheathing in the place where there is free space.
The bend angle of the inner gutter must be greater than the bend angle of the valley - Bring the ends of the bars into the middle of the inner groove and clamp them.
- Bend the gutter so that the bend angle is slightly greater than the bend angle of the valley.
To secure the internal gutter it is necessary to install additional bars - Lay the gutter from the eaves overhang from top to bottom.
- Secure using metal staples.
Methods for attaching gutters
To attach gutters, you can use brackets that are combined with clamps.
Bracket mounting methods:
- Fastening to a front board is the simplest method, used when the roof is already laid. This type of bracket is used for plastic drainage. And to ensure strength, the brackets are equipped with power ribs.
- Fastening to rafters - this method is used for large areas of slopes to the roof deck with a rafter pitch of no more than 60 cm. In this case, brackets with an extension are used, with which the bracket is attached to the rafters.
- Wall mounting - in the absence of a frontal board and access to the rafters, the gutters are attached to the walls using crutches and studs.
If it is not possible to secure the brackets in a standard way, they are screwed to the wall - Fastening to the sheathing - when the rafter pitch exceeds 60 cm, the gutter is fastened using long brackets if the roof is made of metal tiles or ondulin. Or use combined brackets in the case of using bitumen tiles.
Basic mistakes in installing roof gutters
- Incorrect gutter slope. Usually the slope is 3-5 mm per meter. If this standard is not observed, the entire drainage system may stop working. With a greater slope, the gutter may move away from the roof, and water simply will not flow into it. If it is less, areas with stagnant water are formed, dirt and vegetation accumulate. It is not always possible to correct the error; cleaning the drain (which will have to be done regularly) is a long and difficult task.
- Small number of brackets. The brackets distribute the load along the entire perimeter. If there are not enough of them (the distance between adjacent brackets is more than 0.5-0.6 meters), the structure will begin to deform and crack.
- Incorrect coupling connection. It is important to use seals and join elements with good force. If the connection is incorrect, leaks appear in these places.
- Incorrect gutter placement. The gutter is installed so that the distance between the edge and the roof line is 20-25 mm. This distance ensures safety for the structure in case of sudden snow melting and at the same time collects rainwater. If it is less, there is a risk of damage to the system from snow melting. If it is more, rainwater from the roof will not fall into the gutter.
To avoid mistakes in installation, you should watch this video
Installation sequence
Everything is ready, you can proceed to installation work. The drain is a gravity-flow system, so it is important to correctly position the gutters at a certain angle. Its value is 3–5 mm per meter of length of the gutter structure. For understanding, let’s denote that one end of a tray 1 m long should be 3–5 mm lower than the other. For example, the length of the roof slope is 10 m, one edge of the gutter structure relative to the other should be 3–5 cm lower.
Gutter slope options
Based on this, marks are made at the corners of the slope, where the locations of the two outer brackets are determined. Self-tapping screws are screwed into the front board or nails are driven in, between which a strong cord is pulled. This will be the hook installation line.
How to do it correctly to accurately determine the installation locations of the two outer hooks.
- The first top one is installed from the bottom edge of the roofing material at a distance of 4–5 cm.
- The exact distance is measured from the nail driven into the designated point to the edge of the roofing material.
- The resulting size is transferred to the other edge of the slope with the addition of a slope based on the length of the overhang.
Experienced craftsmen do not always use nails or screws to install the cord. They immediately attach the brackets, avoiding unnecessary operations. If both outer brackets are screwed to the supporting base, you can proceed to installing other hooks. It is important to install the latter so that they are oriented relative to the cord with the same parts as the first two installed devices .
There is one more point that must be taken into account when installing brackets. The result should be such that the edges of the roofing material overlap the gutter by a maximum of one third of its width. It is this arrangement that can guarantee that the flowing water will accurately enter the tray without overflowing.
So, the brackets are installed exactly level, you can remove the cord and proceed to laying the gutters.
Installation of the grooved structure
In principle, you can start laying gutters from any side. It is recommended to start from the location of the downspouts. At this point, connections will be made between two systems: horizontal and vertical. The element connecting them is a funnel. Therefore, first the gutter is adjusted to the funnel and the place where the hole will be made in the tray is determined.
It is done with a hacksaw for metal. You just need to make an angle cut on both sides, taking into account the distance between the cuts, equal to the diameter of the pipe. It is recommended to process the cut edges to avoid any unevenness or burrs.
Sawing the hole for the funnel and installing it
A plug is placed on the outer gutter. This can be done on an already installed structure. But it’s more convenient to do this before installation. The edge of the grooved part is inserted into the groove of the plug, where a rubber cuff is located inside, ensuring the tightness of the joint. Now the gutters can be laid alternately with the edges of each joint overlapping. The overlap size is 5–10 cm. Many manufacturers of plastic trays today offer connecting elements, which are gutters 25 cm long complete with rubber cuffs, like plugs. By inserting two gutters from different sides of the connecting device, you get a sealed joint.
Exactly the same designs are made for funnels. Using them, there is no need to cut holes in the gutters. The latter are simply connected by a funnel to each other. Simple and convenient.
Regarding the attachment of gutters to brackets. There are different fastening technologies. Two types are most often used:
- clamps with throwing the element through the gutter; previously they used ordinary wire;
- The clamps that hold the edges of the gutters together are flexible and hook-like.
Installation of drainage risers
The process can be described as follows: the risers are strictly aligned vertically and attached to the wall of the house with clamps. First, clamps are installed. From the center of the funnel pipe, you need to lower a vertical line along the wall with a plumb line. It is better to beat it on the wall surface. It is optimal to install fasteners of this type at the junction of two pipes, a pipe and a drain.
The process of attaching drain risers using clamps
The first clamp is attached to the wall at a distance of 30–50 cm from the ground, taking into account the distance from the drain to the ground and the size of the drain pipe itself. Fastening is done with self-tapping screws into plastic dowels, so holes are made in the wall at the installation points, into which the latter are driven with a hammer.
Please note that the clamp should be located below any joint at a distance of approximately 10 cm.
Before installing gutters, it is recommended to prepare them, that is, connect them into one riser if the height of the building is small. In any case, the two pipes must be joined on the ground, and only then raised in tandem for installation.
The riser assembly itself involves installing pipes into clamps and connecting them together using sealant or special connecting pipe elements with rubber cuffs (double-sided couplings). In the first case, this is a socket connection, which is often used when assembling a sewerage system.
The process of installing couplings
If the riser is located far from the wall, then it is connected to the funnel with two bends (elbows). Therefore, first, bends are installed on the funnel up to the wall, on which a vertical line is then drawn with its exact passage through the center of the section of the lower bend.
Sometimes two elbows do not connect to each other with pipes. The reason is the wide overhang of the roof. Between them you need to install a piece of pipe, which is cut from the pipe element of the riser. The distance between the branch pipes is measured, and 3–4 cm on each side is added to the obtained value. The allowances are the joining edges for fitting into the bends. Important - you need to correctly connect both outlets through the cut pipe to each other . First, the pipe section is put on the upper branch, that is, the elbow pipe should be inside it. Then the second elbow pipe is put on the second free end of the pipe section. The first one should be inside the second one. Both joints are treated with sealant.
Device for transition from gutter to drain riser
Video instructions for DIY installation
Heating cable in a drainage system
During the cold season, ice forms inside the gutters and a large amount of snow accumulates. As a result, water begins to overflow and icicles appear. The risk of the entire drain collapsing increases.
A solution to this problem can be a heating cable - a special wire that generates heat when electricity is supplied.
They install it after installing the drain, simply laying it inside the gutter and vertical pipes, securing it with special clamps. Along with the cable, installation of a thermostat and sensors is provided.
The thermostat determines the required current for a given temperature. For example, at zero temperature the cable may heat up little and consume less electricity; in severe frost, stronger heating is required, which means electricity consumption increases.
The thermostat knows nothing about the temperature around it and can be installed inside a building. So that it can set the temperature depending on the weather, special sensors are attached to it (may not be included in the kit and must be purchased separately).
In some cases, the cable only in the drainage system is not enough, and it is laid in a snake on corrugated sheeting. The cable is secured using special clamps.
To calculate the power consumed by heating, the total cable length is multiplied by 25 watts.
The cable on the roof and in the gutter is one system. They are controlled by the same regulator and connected to the same sensors.
Important technical points
The drainage of rain and melt water from the pitched roof is designed to significantly improve the finishing of the facade and the general condition of the external walls. After all, over time, water can damage even the foundation of a house. That is why there are special regulatory documents SNiP 2.04.01-85, which are responsible for the rules and regulations for drainage construction.
If you want to purchase a ready-made drainage system, then the calculations will be easy for you: almost all modern manufacturers publish special tables on their websites that help determine the relationship between the catchment area and the required parameters of the drainage system. If you are making a gutter for a pitched roof with your own hands, then the graphs and illustrations that we have prepared for you below will help you.
How to correctly calculate the system?
The catchment area is the area of the slopes or their projection on a horizontal plane. And the following formulas will help you calculate it:
It’s simple: when calculating a drainage system, you need to focus on the need for pipes for every 100 square meters of roof. Those. within one slope, the pipe diameter must be at least 150 millimeters. But it is advisable to place drainpipes so that they do not spoil the facade of the building. Just like gutters, it is important to put them in the right places, and not install them wherever possible. If there are chimneys, shafts and parapets on a pitched roof, then you need to add to the area of the slope 30% of the area of the walls that is still above the roof.
Now count the number of angles for the gutter: usually their value is equal to the number of angles on the roof itself, including external and internal. Further, the length of the gutter is usually three meters, and therefore the number of gutters is easy to calculate: determine the perimeter of the roof and divide by 3. Round the result to a larger integer, and you will know how many gutters you will need and whether one of them will need to be cut if the number was not an integer initially.
The next step is to count the number of plugs and gutter connectors. To do this, let's figure out what type of drainage system we are dealing with - closed and open. If the drainage system is closed, there will be as many connectors in it as there are all elements. If it is not closed, there is only one less. You will need to install the plugs themselves on the edges of the gutter:
It is also important to calculate the correct weight of the drainage system when pressure is applied to it by water and snow. For example, a standard gutter holder is designed to support a weight of about 75 kilograms. But here you need to count not only on these indicators, but also on the support area.
That is, if you install fewer holders than necessary, then the entire weight of the liquid and snow will be concentrated at a specific point, and not distributed along the entire length. This is how gutters break! Surely you logically understand that one heavy log, for example, cannot be held by two or three people, but it will not be difficult for ten, because the pressure force is deconcentrated. It’s the same here.
Here is a good example of the correct design of the drainage system of a country house:
How to Install External Gutters
If you ignore the technical requirements for installing gutters on pitched roofs, then water will not only splash the walls, but also flood the basement. So remember a few simple rules:
- Gutters should be equipped with a slope of about 1%, i.e. over a distance of more than 10 meters they should decrease by 10 centimeters.
- It is also desirable that the gutters do not interrupt each other more than 3 times. This means that if the roof of the house has a rather complex shape, you will need additional drainpipes. But at the same time, avoid placing them in internal connections to the wall.
Why? The fact is that this arrangement increases the likelihood of leakage and the rainwater inlet may become clogged. Your main task when designing drainpipes is to ensure that water does not flood those areas near the house where the most trafficked areas are: near the front door, at the entrance to the house and on the main path. After all, here the water quickly freezes on a frosty night and turns into ice, and this is already dangerous. That's why you need to attach the gutters from the bottom outer bracket. In this case, it is important that the outer bracket is 30-50 mm below the edge of the eaves overhang.
Please also note that it is important to correctly organize the direction of the water and the slope of the gutter, which also depends on the configuration of the pitched roof:
The angle of inclination of the gutter also depends on the length of the slope and the cross-section of the gutter itself. Typically it ranges from 5 to 20 mm per meter. If the length of the roof slope or eaves light is more than 12 meters, then the angle must be formed in two directions: to the left and to the right of the middle of the roof. When the drainpipe is located on both edges of the roof, then it is also important to disperse the flow of water and halve its pressure on the drainage system.
They also often forget about such an important point that the eaves overhang itself may in fact be far from horizontal. To do this, it is necessary to check it with a level and already calculate the angle of inclination of the drainage system, plus or minus the existing angle of inclination of the overhang itself, no matter what it turns out to be. Or, if possible, correct this construction jamb.
The distance between drains should be from 40 to 70 centimeters, depending on the drainage system itself. If you do more now because you want to save money, the gutters may become deformed under the pressure of snow or ice. And therefore the ideal step for the Russian climate is 50-60 centimeters:
Here are two great master classes that will help you understand the process:
It will be easiest for you to work with a frontal board, because it is easy to correctly determine the direction of the slope of the gutter and secure the first and last brackets at different levels. Install the drain so that it is mounted at a distance of 25 centimeters from the ground and 15 from the blind area.
How to Install an Inner Gutter
Pitched roofs differ in terms of water drainage from flat roofs primarily in that they have weak points - valleys. We are talking about those internal gutters that must be equipped with the joints of the slopes, because... It is on these elements that the greatest pressure is exerted by the liquid. And the greater the water flow, the easier it is for moisture to penetrate into the inner roofing pie, whereas with flat and inverted roofs everything is distributed more evenly.
Let's look at how to secure a gutter. It can be mounted on a boardwalk, or on a denser, thicker sheathing. The main rule: the width of the flooring from the board should protrude at least 40 centimeters from the axis of the gutter. These boards should be installed directly on the rafter legs:
- Step 1. Nail two bars onto the thickened sheathing at a distance of 5-10 centimeters. Leave a small gap of about 5 centimeters for ventilation between the bars and the valley counter-lattice.
- Step 2: Now nail the sheathing. Bring the ends of the bars to the axes.
- Step 3. The next step is to slightly strengthen the main sheathing with short bars in the valley area.
- Step 4. Now drive one or two bars into the space between the sheathing.
- Step 5. As a result, you should have a length of bars of at least 30 centimeters. At this stage we move on to the inner gutter.
- Step 6. Bring the end of the bars inside the gutter and clamp its side edges at an angle of 90 degrees.
- Step 7. Then bend the gutter along the central axis at such an angle that it is slightly larger than the valley angle.
- Step 8. Start laying the gutter from the eaves overhang, namely from the bottom up.
- Step 9. Place the gutter on the deck and trim it along the contour to leave 3-4 cm.
- Step 10: Secure the gutter with metal staples or galvanized roofing nails.
Each stage of this process is well illustrated in this illustration:
The main thing to remember is: if you are installing an internal gutter on a thick sheathing, then nail the staples into an additional block so that they do not interfere with the even laying of the tiles. We only nail the top edge of the gutter, not the entire length of the gutter.
Now remove the protective strip and glue self-adhesive foam rubber strips with a special water-repellent impregnation along the edges, which will protect the valley from dirt, snow and water.
How to secure vertical drainage elements
And the vertical parts of the drain on a pitched roof need to be secured as follows:
By the way, unlike metal products, in plastic drainage systems you can use both regular connectors and compensation ones. It is customary to install compensation roofs on roofs longer than 8 linear meters. From the name you already understand that glue is not used here. The main task of such a connector is to compensate for the linear expansion of the gutter as the temperature changes.
Here's what it looks like in practice:
And finally, check whether the gutter was installed correctly. To do this, you will need the simplest building level (or hydraulic level), or even better, a leveling level. Plug all drain holes, pour water into the gutters and see if any leaks appear in any places.
Also notice how quickly and easily the water flows when the holes are open. The easiest way to do this is with a regular watering hose with medium pressure.
Homemade drain
Due to the fairly high prices for gutters, many people decide to make them themselves. There are a lot of options for both metal and polymer solutions.
Drains from sewer pipes
Sewer pipes are designed for use in areas where there is no sun. This means that they can decompose when exposed to ultraviolet rays. However, many note that gray and orange pipes can last even longer than the original systems.
Gray pipes are suitable for residents of the southern regions, as they can withstand high temperatures, but do not tolerate severe frosts.
Brown pipes hold up well in the cold, have thick walls, but are afraid of high temperatures. They do not tolerate long-term exposure to sunlight and deteriorate over time.
The rules for selecting sizes are the same as for a regular drain. The process differs only in that you need to cut the pipe lengthwise (you get two gutters at once).
It's more difficult with brackets. You can buy ready-made brackets and adjust them to the desired size. This takes a long time and such fastenings are not always suitable. Therefore, many people use regular mounting tape for fastening, simply hanging the gutters on it.
The remaining elements of drains (corners, caps, mesh, funnels) are also easy to make from sewer pipes. There are many ways and everyone does exactly what is convenient for him.
It is worth noting possible analogues of drainpipes. Ordinary chains are taken directly from the gutter and fixed to the ground. This solution is not striking, and it can also be disguised as a decorative element.
Gutters made from plastic bottles
Craftsmen assemble gutters and vertical pipes from ordinary bottles. Take dark bottles and cut them in half, removing the necks and bottoms. These parts are fastened together to form a kind of gutter. The drainpipe is made from bottles with the necks and bottoms cut off, but not cut in half. They are simply inserted into each other.
Galvanized steel gutters
The desired shape of the gutter is selected, markings are applied to the sheets of metal (keeping a small margin for folds), they are cut with scissors. To give the shape, cover a pipe of the required diameter with a sheet and punch it with a hammer. The folds are made using a hammer and a ruler. Funnels are made independently by cutting metal with scissors.
All about internal drainage
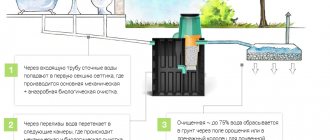
So, let's move on to the topic - the internal drainage of a flat roof. It is called so because the vertical pipe through which rainwater moves from the roof slope down into the sewer system is located inside the building. And on top of the roof itself a funnel of a special design is installed. It is covered with a mesh filter to prevent debris from getting inside the drain pipe.
There are some requirements for internal drainage:
- For every 150-200 m² of slope area, one funnel is installed
- the slope towards the funnel is laid at an angle of at least 4°;
- the diameter of the pipe is chosen at the rate of 1-1.5 cm² of its cross-section per 1 m² of roof area;
- the soft roof is laid on the sides of the funnel ;
- the riser must be located in a heated room;
On a note! The riser is connected to a drain pipe, which is laid at a slope of 2-5° towards the storm drain under the house, and the pipe crashes into it.
- You cannot install a funnel near the wall of a building.
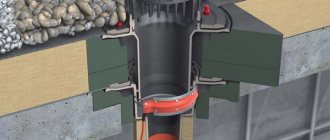
Arrangement of the water intake funnel of the internal drainage Source stranapap.ru
Construction of the internal drainage system begins before laying the foundation. That is, they lay a drain pipe. If the foundation has already been poured, then a hole is made in it with a hammer drill to the diameter of this pipe, where the latter is inserted. Today, the horizontal drainage section of the drainage system is often laid under the floor of a house on the first floor or in the basement under the ceiling. This greatly simplifies the installation process. But here you will have to make a hole in the foundation anyway. To avoid this in the foundation structure at the stage of its construction, it is better to leave a hole by inserting a piece of pipe of a larger diameter when pouring.
The riser is laid inside the service premises. Therefore, the location of its passage through the floors is determined in advance in the project, in which through holes are left or made. Subsequently, after installing the drain, they are sealed and insulated. The main task of the work manufacturer is to carry out installation with complete sealing of the joints. Therefore, the places where pipes connect to each other, as well as to fittings, must be treated with silicone sealant. At least one revision must be left in the riser. This is in case the drain pipe becomes clogged.
The most important stage in the construction of an internal drain is the installation of a water intake funnel. Here, 100% sealing is required so that precipitation does not penetrate under the roofing material.
Where to drain water from drainpipes next?
During installation, water is diverted from drainpipes to various places, at a distance of at least 5 meters from the foundation. If there is a place on the site below the level of the house, then you can lay the pipe there. The main thing is that water does not flow under the foundation of the house and does not disturb the neighbors.
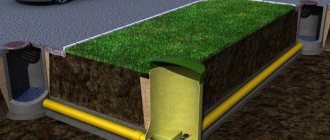
If there is nowhere to drain the water, a drainage system with a well or block is constructed. The essence of the drainage system is that, being underground, it collects all the wastewater. After some time, this water is absorbed into the soil.
If you are lucky and there is a rain drain nearby, then all the water flow is diverted into it; it is even possible to install a storm drain on the roof. Of course, for this you need to coordinate the installation of drainpipes with the relevant regulatory authorities.
That's all. Now you can install metal or plastic roof gutters with your own hands. If you liked the article, share it on social networks.
Installation of roof drainage
Before installation, you need to calculate the parameters and select a drain that matches the type of roof. Next, a complex of installation work is carried out. To attach a PVC drain, you need to do the following:
- Fastening brackets in the form of hooks for fixing gutters and funnels.
To connect the units of the drainage system to each other, special connectors are used that are installed on the sealant. - Installation of gutters. The gutters are cut into pieces of the required length, and then installed and connected to the funnel. All joints are made using special connectors, which are coated with a special sealant.
- Installation of drainpipes. First, the first section of pipe is attached to the outlet head of the funnel. Next, the drain is extended to the required level by connecting pipes through special grooves. A special drain tip is placed on the bottom of the drainpipe. The pipes are attached to the surface of the building using clamps.
The drain pipe ends with a special bend, which drains water from the foundation into the receiving well
Roof gutters come in different forms, but they are always necessary to ensure the safety of the roof and load-bearing elements of the building. The effectiveness of the drain depends on the quality, parameters and correct installation of the drain, so it is important to first master the technology of fastening the elements and choose the appropriate material.
Advantages of Krovelson gutters
The Krovelson company offers to buy plastic and metal drainage systems, both of its own production and those manufactured by the world's leading concerns. The range includes drains:
- Krovelson. There are 25 colors in the catalog. There are no size restrictions.
- Grand Line®. The range includes two lines - 125/90 and 150/100. You can choose an option for both a private and apartment building. All parts come with a 25 year warranty.
- Grand Line Optima. These systems are ideal for small homes.
- Aquasystem. Within this line, the buyer can choose a system made of galvanized steel with a polymer coating, copper or zinc-titanium. All options are designed for many years of use without repair or replacement.
- Dock. All drainage elements are made of PVC. The color range is practically unlimited.
All drainage systems presented in the catalog are designed for operation in the harsh conditions of the Ural winter. They are not afraid of temperature changes, snowfalls and heavy downpours.
The company’s specialists will help you calculate the required number of elements and decide on the color scheme. We also accept applications for the installation of gutters on sites of any complexity. You can get additional information directly on the website, in the office or by calling the specified phone numbers.
Design and types of drains. Photo
Even at the stage of designing a house, you should choose a suitable drainage system for the roof, choose its design wisely and calculate all the nuances.
Regardless of the type, all drainage systems have the same design:
- pipes;
- funnels;
- gutters;
- fitting;
- plugs;
- brackets.
In this design, gutters may vary in shape. They come in semicircular, trapezoidal and square. Gutters are installed in places where water drains, which flows through them directly into the drainage structure. Their parts are connected by adapters and couplings. To prevent water from spilling out, a plug is installed at the beginning of the gutter.
Some roof structures can be supplemented with special elements:
- Baskets or nets to prevent various debris and leaves from entering the system.
- Droppers , with the help of which water drainage is improved.
- Storm inlets that connect pipes to a special storm sewer.
All drainage systems at the installation site are divided into suspended and internal structures.
- The most popular are hinged gutters , which do not require special construction skills during manufacture and installation and are easy to maintain.
- Internal gutters are most often used in multi-story buildings. They are installed directly under the roof and for greater efficiency are located with a slight slope. Such systems are an excellent option for a private house equipped with a flat roof.
Depending on the manufacturing method, roof drainage structures can be industrial or homemade.
- Factory-produced structures are manufactured in strict compliance with all parameters and standards. Therefore, if necessary, you can easily assemble a drainage system from various components from different supplies from one manufacturer.
- Homemade designs are quite inexpensive. They can be manufactured and installed according to a user-friendly scheme. In addition, you can make an unusual and beautiful individual drain. The disadvantage of a do-it-yourself system will be its constant maintenance and fairly frequent repairs. This is due to the fact that they are made of galvanized material, which heats up quickly enough. Also, when installing such a structure, it can sometimes be difficult to join individual elements.
Gutter designs also differ in the material they are made of . Most often, metal and plastic are used for this, since wood has poor resistance to water.
Plastic gutters for roofs. Photo examples
Using components made of polypropylene, polyethylene or polyvinyl chloride, you can create a drainage system of any configuration. This allows you to install such structures on any roof.
Plastic gutters also have other advantages:
- operating temperature range from -40C to +70C;
- light weight;
- strength;
- corrosion resistance;
- immunity to ultraviolet radiation;
- availability of different colors;
- ease of installation.
When assembling a PVC structure, the “cold welding” method is used, as a result of which no special care is required during operation.
The disadvantages of plastic gutters include:
- High coefficient of linear expansion;
- The need for frequent replacement of sealing rubber bands, so the structure must be periodically disassembled and reassembled.
- Unsuitable for repair. Broken or destroyed items cannot be repaired.
- Instability to mechanical stress. Therefore, it is recommended to install plastic drainage systems only in private houses.
It is undesirable to use plastic products in regions where there are large daily differences and heavy precipitation.
Drainage systems for metal roofs
Such structures can be made of steel, copper, aluminum, zinc-titanium. Examples of various metal gutters can be seen in the photo.
The advantages of such systems include:
- operating temperature range from -60C to +130C;
- non-flammability;
- good resistance to various loads;
- reliability;
- strength;
- dimensional stability.
Disadvantages of metal systems:
- Difficult to install.
- Considerable weight.
- High price.
- Small variety of colors.
- Possibility of installation only on roofs with angles of 90 degrees.
- The appearance of rust, which is possible after the integrity of the protective layer is damaged. The only exception is the structure made of copper.
Galvanized steel structures are the most popular due to their availability and low price. However, they are short-lived and have an ugly appearance. Gutters made of galvanized steel with a polymer coating are stronger, more practical and more durable. They can be brown or white and can be custom painted.
The most beautiful and durable material is copper . Products made from this material are less susceptible to corrosion, but are much more expensive than steel and plastic ones.
A lightweight alloy with a shiny surface is zinc-titanium . It can be used even in regions with any extreme temperatures. Gutter structures made of this material are reliable and durable. However, during their assembly and installation, it is necessary to ensure that the zinc-titanium does not come into contact with roofing felt, vapor barrier membranes and PVC. The material is quite expensive. It is better to entrust working with it to professionals.
Aluminum structures after production will be light and durable. Their service life is about fifty years. Aluminum products can be painted in any color.
Location of funnels and gutters
How to install a drain correctly? In order for water from the roof to fall into the gutters, the edge of the overhang must “enter” the tray by 1/3 - ½ of its diameter.
Now it remains to figure out at what height to mount them. Here a lot depends on two factors:
- volume of snow falling;
- roof pitch angle.
If winters are not characterized by special snowfalls, and the roof has a slope of 45° or more, gutters can be placed at any height. This is not of fundamental importance. The more snow falls, the lower the gutters are attached. If this is not possible, snow guards are installed on the roof. Special curbs will prevent avalanches of snow and damage to the trays.
The placement of the funnels depends entirely on where the gutters are located. From the edge, as mentioned earlier, you need to retreat approximately 20 cm.
Let's sum it up
Internal drainage is a system for draining water from the roof, which is located in the building itself. The internal drainage system is made on flat roofs of buildings and structures whose height is more than 10 m.
Internal drainage avoids the discharge of water from a great height; prevents the formation of large icicles; provides effective drainage of water from large roof areas; protects the foundation of the building from erosion. But the internal drainage system is much more expensive and more complex to construct than the external one.
The drain can be gravity or vacuum-siphon. The last option is more expensive, but more effective. Internal drainage pipes are made of plastic (PVC, polybutylene, polyethylene, polypropylene or fiberglass), steel and copper. Among plastic pipes, polybutylene pipes have the best characteristics, but they are still rare in Russia.
The internal drainage system consists of funnels, discharge pipes, risers and revisions. Also part of it can be considered the slope and channels that are made on the roof to ensure water flow to the funnels.
Types of roof drainage
Based on their design features, house drainage systems are of two types:
- Internal drainage is used mainly with flat roofs. It is installed either in the grooves of load-bearing walls or behind a curtain wall. The key advantage of this system is that it does not freeze in winter and has a more aesthetic appearance;
- External (external) drainage is used with all types of roofs. It is installed directly on the outside of the walls. And the main advantage is the easy replacement of outdated parts.
The choice of drainage system should be made according to the design of the house, so as not to disturb its appearance. The material from which parts of the drain are made can be very different:
- metal, galvanized or non-ferrous;
- polyvinyl chloride (PVC);
- stainless steel.
Today, plastic structures are in greatest demand. This is due to their low price, quick assembly, low weight and easy replacement of parts.