You should remember when planning to build a toilet for your dacha with your own hands - step-by-step instructions will be specific for each of the options, of which there are quite a few. Structures can work according to different principles, and materials for construction are selected taking into account their cost, durability and aesthetic appeal. Experts recommend that before purchasing materials and building a toilet, not only carefully consider the chosen option, but also make the necessary calculations, find the optimal location for installation, and draw a diagram or drawing.
Types of toilets for summer cottages
When choosing a design to build a toilet in a country house with your own hands, they focus, first of all, on the comfort of using the building. Moreover, not only visiting the toilet should be convenient, but also servicing it. In order to make the right choice, you should familiarize yourself with the operating features of each of the toilet options.
Pit toilets
The easiest option for waste disposal is a do-it-yourself toilet pit in the country. A house is installed above it, often called in everyday life, depending on its appearance, a “birdhouse” or “hut”, the degree of comfort of which depends on the capabilities of the master. The pit is cleaned using a sewer truck. Such designs are not the most advanced , but due to the simplicity of the device and cost-effectiveness, they remain popular and in demand when it comes to suburban areas where owners do not appear often. Toilets with cesspools are also suitable for dachas where a small number of people live.
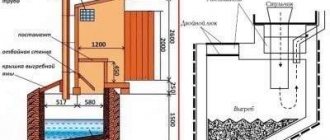
The photo shows a diagram of a toilet above a cesspool
Backlash closets
The backlash closet is an improved design of a toilet with a cesspool; its distinctive feature is the complete sealing of the storage tank. A backlash closet can be arranged in such a way that the toilet is located in a heated room (house), and the storage tank is located outside it (as a rule, against the wall adjacent to the toilet). The toilet is connected to the storage tank by an inclined or vertical pipe, through which waste flows by gravity into the tank. Due to the tightness, cleaning of the backlash closet storage can only be done with the help of vacuum trucks. A backlash closet is more convenient and hygienic than a regular toilet in a country house with a cesspool.
When arranging a backlash closet, the toilet is located in the room, which is an advantage of this type of design
Powder closets
Powder closets are excellent in cases where there is groundwater in the area close to the surface . This feature may cause trouble when installing other structures, but will not affect the operation of the powder closet. A significant advantage of this option for a country toilet is the ability to convert waste into environmentally friendly organic fertilizer . The powder closet gets its name from the principle of operation - the waste in the storage tank is sprinkled (“powdered”) with a dry composition (peat or peat-sawdust mixture). As a result, the occurrence of putrefactive processes is prevented and the likelihood of unpleasant odors is minimized. As the toilet tank fills, waste mixed with peat is dumped into a compost pit, where it is turned into compost.
An example of a homemade country powder closet
Powder closets can be stationary with large storage units or compact portable ones. In the second case, a small-sized structure can be brought into the house at night or during rain.
For the convenience of transporting waste to the compost heap, the container can be additionally equipped with wheels and handles
Dry toilets
The dry closets, which are a ready-made compact toilet, have become popular and have proven themselves really well in use. Their operating principle may be similar to the operation of a peat powder closet. Processing and decomposition of waste in such peat dry closets occurs using a peat mixture.
In other models, biological products can be used for processing. Dry or liquid fillers contain cultures of certain types of bacteria.
A peat dry closet is suitable for both a country house and a private home.
In chemical models, the active substances for waste decomposition are chemicals. When choosing, you should take into account that safe and effective fillers are more expensive than others, and some substances used by uninformed summer residents (bleach, formaldehyde, etc.) are prohibited due to toxicity.
Read in a separate article: How to choose a home dry closet.
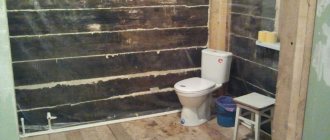
How to make insulation
The choice of a suitable insulation option must be determined in advance. Much depends on whether you plan to insulate the internal or external parts of the structure.
When planning work on the interior, remember that space is limited. Choose a material that will not take up much space during installation. It is important that it reliably protects against frost, cold and wind. Another thing that speaks in favor of insulation from the inside is that this type of installation of material will require less money. However, each case is individual.
When choosing external insulation, be prepared for more painstaking work. Due to limited space, buy thermal insulation materials whose width does not exceed 75 mm . The ideal option would be to install mineral wool sheets. To attach it, buy rectangular metal slats.
Due to limited space, buy thermal insulation materials whose width does not exceed 75 mm.
- For waterproofing you will need a film, and for cladding - plasterboard. It is best to opt for moisture-resistant sheets.
- Buy screws and profiles. They will be needed in order to make a high-quality fastening.
- To putty the joints between the sheets, buy putty.
To select the right amount of material, it is necessary to take into account the dimensions of the building. Installation of insulation consists of the following stages:
- Take wooden slats. Make the lathing by placing it on the walls in increments of 50 cm .
- Lay down sheets of insulation . Secure them with self-tapping screws and attach them to the sheathing. The material should be placed on the walls, do not forget about the ceiling.
- Place a film on the insulation ; it is required to protect the mineral wool from moisture. Secure the film with tape.
- Cover the insulation with moisture-resistant plasterboard . They are attached to self-tapping screws and mounted on a metal profile.
- the joints between the sheets with putty .
If you want, you can stick wallpaper or tiles onto the drywall.
You can build a toilet by hiring a construction team, or you can buy a ready-made one.
- The cost of a “Hut” or “Birdhouse” starts from 6,500 rubles .
- A utility block with a toilet - from 12 to 18 thousand rubles .
- Delivery is possible, its cost depends on the destination and region.
How to choose an autonomous sewer system in a private house, we’ll figure it out here.
Everything about connecting to the city water supply network in a private house: documentation, work, prices, sample documents.
Choosing a place to build a toilet
When telling how to make a toilet in a country house with your own hands, experts usually place special emphasis on where it is best to place the structure. In this regard, there are absolute requirements that must be met in any case . They determine the minimum distances from the toilet to residential and outbuildings, water sources and other objects:
- to a house that has a cellar or basement, as well as to a garage or barn with similar underground structures - 12 meters,
- to the source of drinking water – 25 meters,
- to a barn without a cellar, bathhouse, garage or sauna - 8 meters,
- to the fence - 1 meter.
There are also recommendations regarding finding the optimal location for a country toilet, taking into account the individual characteristics of the site.
- Placing the building according to the wind rose will allow the structure to be installed so that the unpleasant smell does not cause inconvenience to the owners or disturb the neighbors.
- If the site has complex terrain, it is recommended to choose a level place for the toilet, and if there is a source of water in the country, the toilet is located below it in level.
- If you need to use the services of a cesspool truck to pump out a toilet, you need to provide for the possibility of its access to the cesspool, taking into account the length of the equipment hose.
Application of bioactive liquids
In order to save storage space for biowaste, increase the time between cleaning cesspools, and eliminate unpleasant odors, various substances are now often used. All of them can be divided into three conditional groups:
- Chemical;
- Composting;
- Microorganic.
Chemical additives in a septic tank
Quite a long time ago, various chemical mixtures began to be actively used to activate the decomposition process and eliminate the odors released during this process. The most famous are:
- Ammonium salts and their mixtures;
- Formulations with formaldehyde, which corrode almost any organic matter; unfortunately, they are very toxic;
- Nitrate-based preparations; oxidize feces and are practically safe for the environment.
Selection of materials
Building a toilet in a country house with your own hands is possible from various materials. The choice is determined by the cost and availability of various options. For example, if an outdoor toilet is being installed as a temporary structure during the construction of a full-fledged sewer system, you can choose cheaper materials. If the dacha is visited only in the summer and an outdoor toilet is the only option, it is better to choose reliability and durability, even if additional costs are required.
Wooden models
Wooden outdoor toilets are probably the most common option. It combines economy and practicality, however, it should be borne in mind that wood is susceptible to moisture. To protect the material, special impregnations can be used. You can significantly increase the service life of the material by priming and painting the boards . Lovers of the natural texture of wood often coat structures with a transparent moisture-proof varnish.
Wooden country toilet in different variations
Brick toilet
A brick toilet is a permanent structure that will stand for decades without requiring repairs. The cost of materials for such a structure is higher, but if you have some bricks left after building a house or garage, you should take advantage of this opportunity. If you are planning to build a brick toilet in your country house with your own hands, do not forget that the massive structure requires installation on a foundation. Experts recommend choosing a strip foundation for a country toilet. It requires less excavation work, reduces the consumption of cement for pouring, but ensures the reliability and safety of structures on almost any soil. Although for structures made of lighter materials it is also possible to use a columnar foundation.
Brick toilet on site
Using corrugated sheets
A country toilet made of corrugated sheets is a frame structure covered with sheet metal material. The corrugated sheeting has a coating that protects it from moisture, so it can be used for outdoor buildings without any risk. The frame of the building is optionally made of wood or metal. The use of corrugated sheets can significantly reduce the construction time of a toilet.
Outdoor toilet made of corrugated sheets
Lighting
The lighting options in the toilet are as follows:
- air line;
- underground cable;
- solar-powered lanterns.
An overhead line is not the best solution if you do not want wires running over the area from the house to the toilet. Laying the cable underground is more beneficial from an aesthetic point of view, but few people would like to spend so much money and time to install lighting in the toilet.
- You can use LED lights that are designed for garden lighting. There are products on sale in different shapes and weights. They are inexpensive and every gardener can buy them.
- Since bright light is not needed, installing one lantern will be enough for illumination. Buy a product, separate its upper part. Take a knife and cut off the fasteners, then they will not interfere with you.
- Measure the protruding part of the flashlight - the one equipped with the LED and battery. If necessary, you can easily replace the battery.
- Make a hole of the appropriate size in the wall of the building . Insert the lantern and secure it with glue. Silicone sealant is best suited for this purpose.
Construction of a toilet with a cesspool
If you are building such a toilet for your dacha with your own hands, the step-by-step instructions begin with the storage device.
- Digging a pit . Its volume is usually calculated based on the conditions of use (number of people, frequency and duration of visits to a summer cottage, etc.). Usually a pit 2 meters deep is quite sufficient. The cross-section of such a pit is a square with sides of 1 meter or a circle with a diameter of one meter. These parameters can be increased slightly taking into account the need to strengthen the walls of the pit.
- Execution of the bottom . The easiest way would be to fill the bottom with crushed stone or gravel. However, this method does not exclude partial penetration of waste from the toilet into the soil. If groundwater is located in an area close to the surface of the earth, it is better to make the bottom impenetrable, for example, by filling it with concrete mortar.
- Strengthening walls . You can strengthen the walls of a cesspool for a toilet in a country house with your own hands using brickwork, concrete rings or concrete mortar using poured construction technology (the mortar is gradually poured into the formwork, no more than 50 cm in height at a time). In all cases, it is important to ensure the tightness of the structure (fill the seams between the rings, avoid gaps when making brickwork). To protect surface water in the area from sewage entering it, the walls can be plastered or covered with a waterproofing layer for greater reliability.
Important: If the groundwater level in your area is higher than 2.5 meters, then the cesspool must be made completely sealed, including the bottom.
After this, the selected house structure is erected over the pit. Most often in such cases a wooden structure is installed.
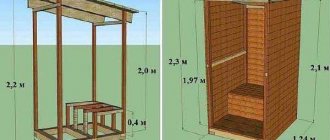
Scheme of a wooden toilet
Construction of a wooden house step by step
- Marking the rectangle of the future house on the ground and arranging a columnar foundation. To do this, support pillars are built from brick in the marked corners, which are subsequently covered with waterproofing material (for example, roofing felt).
- Preparation of wooden beams for the frame: cutting, priming (possibly with preliminary impregnation with anti-rot compounds), painting. Careful preparation of wooden structural elements will protect them from moisture and extend the life of the building.
Important: when cutting vertical supports, make one pair slightly shorter than the second. This will allow you to install the roof at an angle so that water and snow do not linger on it.
- Assembling the frame and installing it on the foundation pillars.
- Installation on the frame using metal plates and vertical support bolts. The position of each of them must be checked with a level before making a rigid fastening.
- Installation of door vertical posts with level checking.
- Installation of roof beams.
- Installation of additional vertical beams between the supports for ease of covering (if necessary).
Installing a wooden frame for a toilet over a cesspool - Arranging the roof of the toilet - laying roofing felt and installing slate, corrugated sheets or other roofing covering.
- External cladding of the frame (boards or lining can serve as material for these purposes). The optimal step when covering with boards is 15 cm.
- Frame lining from the inside.
- Installation of a seating podium with a cut hole. For these purposes, another frame structure of the appropriate shape is assembled inside the house above the pit.
- Assembling and hanging the door.
- Connecting electrical wiring and installing a lamp and switch for the convenience of visiting the toilet at dusk or at night.
- Making a hole above the door leaf for natural light during the day.
- Installing a seat with a tight-fitting lid on the podium. A closed lid will reduce the likelihood of unpleasant odors.
When building a toilet in a country house, the cesspool can extend beyond it from the rear side and be equipped with a lid for easy cleaning
Toilet ventilation
Despite the fact that the correct installation of a country toilet with your own hands allows you to minimize the appearance of an unpleasant odor, and many models eliminate the occurrence of putrefactive processes in the mass of waste, a toilet in the country, made with a cesspool, or another structure must be provided with ventilation.
The ventilation pipe is inserted into the storage tank at least 15 cm deep. Light and durable plastic sewer pipes with a diameter of 100 mm are well suited for these purposes. For stability, they are attached from the outside to the wall of the building using metal clamps. The ventilation pipe should rise approximately 50 cm above the roof. The ventilation pipe is protected from rain and debris using a deflector installed at the end of the pipe.
If you need to choose a toilet for your country toilet, we recommend reading our review article. It describes possible options, both ready-made and homemade.
Read about where and how a vacuum pump is used to pump out sewerage in a separate article.
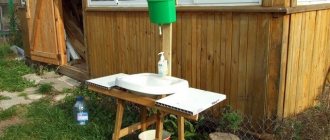
We told you how to build an outdoor shower yourself here.
Exhaust ventilation
Exhaust ventilation in a country toilet is a pipe that removes odors from the cesspool. Its lower edge is inserted into the hole, and the upper edge should rise above the roof by at least 20 cm.
A plastic pipe with a diameter of 100 millimeters is suitable for arranging ventilation. It is pulled to the rear wall from the inside or outside of the building and secured with iron clamps. To increase traction, a deflector attachment is installed on the head.
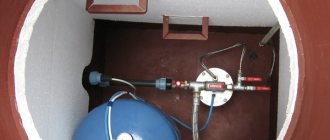
Construction of a backlash closet
If you are deciding how to build a toilet at your dacha yourself, a backlash closet should be considered as one of the best options. It is very simple to implement and does not require significant expenses. At the same time, such structures are more comfortable than ordinary “birdhouses” with holes.
First of all, it is important to choose a location for excavation work. The waste pit, unlike many other structures, is made directly next to the house , since the toilet from which the waste will flow will be located inside the house. So, you need to designate a place for the toilet inside the room and a place for the storage tank near the adjacent wall. The depth of the pit must be at least 1 meter, and its walls must be completely waterproofed . Experts recommend making the bottom and walls of the tank from poured concrete, followed by covering the strengthened structure with a waterproofing layer (for example, bitumen). You can increase the reliability of waterproofing using a clay castle (the thickness of the layer is at least 0.5 m).
The upper part of the toilet pit is closed with a double lid - a layer of heat insulation is installed between the layers of cast iron and wood. Gravity flow of waste can be ensured by the inclination of the pipe that leads from the toilet to the storage tank (in this case, at the construction stage it is necessary to provide an inlet for it, and after entering it, seal the seam) or by the design of the tank itself (an expanding pit that goes under the house in the direction from the toilet to the street with a sloping floor). Ventilation is necessary for the backlash closet. In the cold season, the efficiency of the hood can be ensured by the temperature difference, and in the summer it is better to use an exhaust fan.
Backlash closet diagram
Building the foundation
The foundation is built not only for a new wooden toilet - often a dry closet is also placed on the foundation in order to securely fix it in one place. It is also important to build houses for other types of toilets with foundations - the wooden structure will not touch the ground and will last longer. The foundation can be strip or columnar.
Columnar base
- To build a strip foundation, you will have to dig a trench around the perimeter, the bottom of which must be filled with sand. It is advisable to cover the sand layer with a vibrating rammer or try to compact it as much as possible by hand. After the trench has been dug, it is necessary to assemble the formwork - it is made from whatever is convenient and what is at hand. It is also advisable to insert reinforcement into the foundation to strengthen the structure. The reinforcing mesh is assembled from special rods, and then it is filled with concrete.
- A columnar foundation involves the installation of special supports at the corners of houses. Pillars can be cast from reinforced concrete using the same technology described above. Or lay it out of brick or cinder block. Asbestos pipes filled with concrete are also relevant.
Powder closet device
If you are building such a country toilet with your own hands step by step, the instructions will be quite concise. The simplicity of the device is explained, among other things, by the fact that the powder closet does not require the construction of a pit. For compact structures, excavation work is not needed at all, but for stationary ones, a recess in the ground may be required in which a storage container (bucket or tank) will be placed. The construction of a powder closet boils down to installing a container under the toilet seat for collecting sewage and supplying the toilet with a box with backfill (peat, sawdust, etc.) and a scoop. You should fill up waste after each visit to the restroom.
The country powder closet is the easiest option to install and maintain.
Composting human waste
An outdoor toilet with cesspool reduces pressure on the environment. It saves water and electricity for its supply. A complete ecological cycle is possible with a composting or dry toilet. It turns not only waste products, but also all unnecessary organic matter into valuable, safe fertilizer.
A toilet for a summer house without smell and pumping is real. It does not depend on groundwater or the presence of a sewage disposal truck.
Here's how it works. Pay attention to the words about smells.
Not only peat is suitable.
Composting materials
Organics make up 40% of what we take to the trash cans. If composting is being considered, this is the first thing to think about. It is not at all difficult to create a good supply of carbon-rich organic matter. Here's what you can use.
- Sawdust (from wood that has not been chemically treated).
- Peat with neutral pH.
- Deciduous and coniferous litter.
- Mown grass.
- Straw.
- Shredded paper.
- Food waste.
- Finely chopped cotton and wool fabric.
- Used pet litter.
- Ash.
These are materials rich in carbon, which is ideal for controlling odors and flies, the basis for the rapid and efficient decomposition of waste.
A composting toilet will not smell if you have used enough bulk material. If you smell it, add more. Each time you visit, be sure to cover it with a layer of loose material (cats really know what they're doing). Never leave waste exposed. Make this a firm house rule.
Together or separately?
A composting toilet can mix solid and liquid waste. Moisture is absolutely necessary for decomposition. You can separate them, which will make the process a little more difficult, but will provide another resource to enrich your garden. Here's a Guide to Safe Disposal of Urine and Feces in Green Sanitation Systems for the Innovative Use of Urine (page 40).
What's the result? Safe concentrated natural fertilizer.
Now that you know the design principles and operating rules for all types of waste disposal, and have decided on the appropriate method, it’s time to build a house.
Toilet in the country photo
Here we have selected several photographs on the topic of our article “How to make a toilet in the country with your own hands.”