Building a country toilet with your own hands does not require serious construction experience or professional equipment.
It is recommended that before starting the procedure, you carefully study all the information provided about the design and installation of the toilet, as well as understand the drawings and diagrams of the future design.
This article will help you decide on the appropriate material for making a cubicle, learn about the main differences between a sewer system with and without a cesspool, and also provide complete instructions for building a country toilet.
Sanitary and hygienic standards for country toilets
Before starting installation work on the independent construction of a toilet in the country, you should carefully study the regulations that govern the construction procedure. There are certain requirements that must be met:
- check that the toilet does not disturb the neighbors. Otherwise, they have the right to complain to the appropriate authority and there is a possibility that the building will need to be moved;
- choose a location, taking into account all the standards and regulations for placement. If this is not done, the result will be a serious deterioration of the ecological situation in the area, contamination of the soil and nearby reservoirs and water sources. The owner of the site will have to pay fines, and health may also be affected due to environmental pollution;
- when designing, you need to take care of the issue of removing waste from the cesspool;
- When selecting a suitable design, it is important to take into account the characteristics of the site, in particular the water horizon. If groundwater is located close to the surface, you need to opt for a completely sealed system.
Following these requirements will help prevent a variety of operational problems in the future.
Choosing the location of the toilet
The main factor that you need to focus on when choosing a location is the type of building used. It is especially important whether there is a storage pit for waste, and whether the container where it will be stored will be completely sealed.
To make a toilet in the country with your own hands, it is important to know about some features of finding a suitable place:
- It is imperative to take into account the depth of the groundwater of the land plot. If the groundwater level is more than 2.5-3 meters, then the construction of a cesspool cannot be carried out. In such a situation, as a rule, a powder room is erected. This type involves the treatment of toilet waste with a special composition in the form of a powder;
- it is necessary to take into account the convenience of neighbors and residents of the house. In most cases, a toilet in a country house is built away from other structures;
- It is imperative to take into account sanitary and hygienic standards. For example, installation cannot be carried out closer than 12 meters from the house, 20 meters from drinking wells and other water sources, 1.5 meters from the fence separating the plots;
- when constructing a latrine with a drainage pit, it is important to immediately provide access to special sewage disposal equipment;
- It is advisable to take into account the terrain of the area. During operation, at the lowest point of the site, the building will be flooded in spring and autumn. When constructing a country wooden toilet at the highest point, the person using the structure will be disturbed by constant winds and drafts.
How to make a cesspool
Stages of manufacturing a septic tank
How to make a country toilet correctly? When installing a restroom, certain sanitary and hygienic requirements must be observed:
- The distance from the well is at least 20 meters;
- The toilet is not installed in the center of the yard;
- The distance from the border of the neighboring property is at least one meter;
- The structure is installed taking into account the wind rose (to avoid the spread of odor);
- Provide access for a sewer truck.
To ensure that the septic tank meets all hygiene standards, consider the following:
- The depth of the pit should be from two meters
- The shape of the waste pit is a square with sides of 1 meter or a round pit with an internal diameter of 2 meters (for reinforced concrete rings)
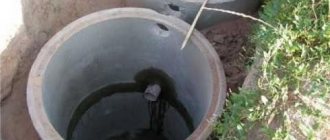
The most reliable type of sealing a cesspool is the installation of concrete rings. Firstly, it will save groundwater from contamination. And secondly, it will protect your harvest from impurities. With the help of reinforced concrete rings, a completely sealed sewage system is obtained.
Watch the video on how to properly make a cesspool:
Reinforcing the sewer pit with wooden boards or bricks is a thing of the past. Now waste is isolated using concrete rings and covering the bottom with a concrete screed. The only drawback of such a system is cleaning using a sewer machine. But if you do not appear at the dacha all the time, then the costs of cleaning will be insignificant.
The drainage system remains a popular method of installing a septic tank. But it can be installed if the family’s water consumption is low. Because with high water consumption, waste disposal will be difficult. The disadvantage of the drainage system is the constant smell in the yard due to constant contamination of groundwater.
Let's watch a video tutorial on how to arrange a shambo:
The installation of the drainage system is similar to the method described above, but a reinforced concrete slab (or concrete screed) is not installed on the bottom, but sand and gravel (crushed stone) are poured:
- Approximately 10 cm of coarse sand
- 5 cm small granite crushed stone
A covering made of thermally bonded geotextile is mounted on top. Keep in mind that the environmental police do not welcome such structures.
Material selection
Another important point is to determine the material that will be used for the exterior, as well as the type of cabin itself. A do-it-yourself toilet in the country can be made from:
- metal profile. The base is made of wood or profile metal pipes, which are connected to each other by welding. Then the base is covered with sheets of metal. This material is also coated with a special compound that protects the country toilet from the negative effects of high humidity. The main advantage of using corrugated sheets is the possibility of quick construction;
- brick. Such toilets can be used for a long period, but require quite labor-intensive and expensive installation. The structure has a large mass and can only be installed on a foundation, so you will need to make a strip or columnar base.
- boards are the most common option for a toilet in the country. The main advantages are accessibility and low cost, the ability to implement various types of design, and mobility. The only disadvantage is the exposure of the boards to the negative effects of moisture, but today there are many ways to reduce this disadvantage to a minimum. For example, the service life can be significantly increased by applying a primer and painting. If the owner does not want to spoil the natural appearance of the wood, then there are numerous transparent compounds that repel moisture.
Choosing a house for a toilet in the country
The next step is to select the desired shape of the booth. The main types include:
- “Birdhouse” has a pitched roof, is simple in design and economical. Best suited if the toilet is visited only in the summer;
- “Izbushka” has a complicated structure. It has the ability to retain heat even in winter, but requires greater consumption of materials;
- “Hut” - distinguished by the presence of protection from the winds, has a roof with two slopes;
- “House” - this variety is highly durable and can retain heat.
There are also sophisticated cubicles with a second shower compartment or additional space for other needs. Separately, we can distinguish dry toilets of the electric or chemical type, as well as those in which waste is processed using peat.
Dry toilets are built when it is impossible to equip a waste pit or septic tank. The most suitable option in terms of economic accessibility and practicality is a wooden toilet with a cesspool and a Birdhouse type cubicle .
DIY country toilet
Ideas for design and decor
You can build a standard, unremarkable cabin - or you can decorate the handles and roof with carvings or paintings. The original shape and decorations will turn an ordinary country toilet into a fairy-tale hut.
- A toilet in the shape of a hut on the site of a country house in the forest;
Simple design and assembles quickly, the main thing is to fasten everything well Source perfectforhome.com
- The Christmas tree toilet does not look so unusual - but it is also very interesting;
A peculiar little house can even become a decoration for the yard Source serhio.amohost.ru
- A toilet with a utility block is a convenient and practical model;
This design will save space on the site and time for the construction of individual structures Source fishki.net
- A restroom with a shower is a great option for those who are not satisfied with simply hosing down.
The restroom can be equipped with a shower stall, where after work on the site you can freshen up. Source yandex.ru
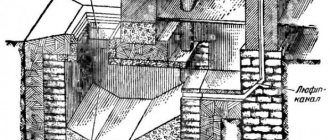
Cabin drawings with dimensions
In order to correctly carry out the installation procedure, it is important to find and first study the correct drawings with the dimensions of the future toilet in the country. The simplest type is the “Birdhouse”; even a complete beginner in construction can build it, so we will explain the installation process using this type as an example.
The following elements are numbered in the drawing above:
- Strapping (to connect several components).
- Rack.
- Door.
- Door knob.
- Door crossbar.
- Front wall.
- Roof truss system.
- Roofing covering.
- Ventilation.
- Deflector.
- Side wall.
- Top cover covering the drainage hole.
- Support system (most often made of brick).
- Back wall.
If the person making a toilet in a dacha is experienced enough and has engineering knowledge, then he can draw up a drawing of a toilet for a dacha with his own hands. Otherwise, it is better for the master to use ready-made options.
Schemes and drawings
Creating a schematic drawing of the building is one of the most important stages, allowing not only to build the structure correctly, but also to calculate as competently as possible the amount of all the building material needed for the manufacture of a country toilet.
Drawing of a country toilet Teremok
Scheme of a rectangular outdoor toilet
The main task of the created drawing-project of a country street toilet is to detail the design, indicating the size, shape and type of the building being built.
You can develop a schematic drawing of the building yourself or take as a basis a ready-made detailed design of an outdoor toilet from the Internet.
It is impossible to live in a dacha without a restroom. Warm toilet in the country - construction technologies are described in the article.
You will find options for country toilets and a comparison of different types of models in this review.
You will find everything about the pros and cons of electric dry closets in this publication.
Building a wooden toilet with a cesspool - step-by-step instructions
When the owner of the summer cottage has decided on the choice of a suitable place that meets all the requirements and rules, and has also chosen the necessary shape of the cabin, you can begin building the country toilet. This process includes several stages; first you need to prepare all the necessary materials.
To build a toilet we will need the following tools and materials:
- 2 square meters of roofing material (for roofing and waterproofing);
- sand;
- cement block (4 pieces) or concrete curb (2 pieces, 2 meters long);
- 40 pieces of lining;
- electric jigsaw;
- door with necessary components;
- 4 things. edged board;
- galvanized metal profile;
- wooden beam;
- nails, screws and other fastening elements;
- building level;
- varnish or paint for finishing.
For additional insulation of the toilet, foam plastic may be needed. Also, the list does not include materials for beautiful interior cladding.
DIY COUNTRY TOILET and SHOWER.
Digging a pit for a hole
The depth of the cesspool should not be less than 2 meters. It can be constructed from various materials. The most popular are:
- plastic;
- brick;
- concrete rings;
- monolithic concrete.
Each variety has its own characteristics, as well as advantages and disadvantages. One of the most common options is a brick pit. It can last for a long time and is not subject to negative environmental influences. For this, red brick is most often used; it is better not to use the silicate variety.
What a country toilet is installed on: the depth of the cesspool must be at least 2 meters. The most popular types for constructing a pit are: brick, plastic, concrete rings, and monolithic concrete.
Instructions on how to make a brick pit for a country toilet yourself:
- Digging a square or rectangular hole using special equipment or yourself. When designing dimensions, it is important to take into account not only the width of the walls, but also the additional space between them and the pit. This gap will be required for additional waterproofing.
- A layer of sand (150 mm thick) is poured and firmly compacted.
- The bottom is laid with bricks, and a reinforcing mesh is placed on top (you can make it yourself by fastening several reinforcing rods together using wire).
- Crushed stone is poured and a concrete screed is made (width 150 mm).
- To build perimeter walls, a small foundation of cement and reinforcement is implemented.
- After 10 days, when the concrete has completely hardened, brick walls are laid out.
- On both sides of the walls, all connections must be treated with a special sealant and plastered.
- All this is covered with a concrete slab with a special hole for the hatch.
See the article which describes a step-by-step algorithm for the construction of cesspools of various modifications.
Building a toilet frame
The next stage of constructing a country toilet with your own hands is the installation of a ceiling made of concrete curb. It is installed no further than 20 cm from the boundaries of the cesspool. To do this, you need to dig 40-centimeter holes in the corners and cover the bottom with crushed stone and sand.
Then the curb will need to be dug in; the base should be about 15 cm above the surface, no more. Sometimes cement blocks are used to create a floor, which are placed in the corners.
When installing the foundation, it is important to ensure that the elements are level; the easiest way to do this is to use a building level. Then you need to lay roofing felt on the created floor. This must be done in 3-5 layers to ensure the most reliable waterproofing.
Frame assembly
It is worth noting that before starting assembly, the wooden elements should be treated with a special compound, which will prevent rotting of the material and significantly increase its service life.
Step-by-step construction of a country toilet frame:
- We build a base in the shape of a rectangle from timber. The connection can be made either end-to-end or “into the floor of the tree”. Be sure to strengthen the corners with self-tapping screws.
- We install vertical elements in the corners. They are also strengthened with screws or braces.
- We are building a foundation for the roof; for this, the upper part of the vertical posts is tied together.
- The front part of the country toilet is equipped with a door frame: 2 racks and a cross member are mounted on top.
- Let's make a window box that will be located in the side or back wall of the toilet. To do this, fix 2 crossbars and mount 2 racks between them. It should be taken into account that the distance between the vertical elements assumes the window width, and between the crossbars - the height.
Sheathing and roofing
Basically, the cladding is carried out using boards or lining, which gives the building a more aesthetic appearance.
The lining can be positioned vertically or horizontally, depending on the preference and convenience of the owner of the summer cottage, who is constructing a wooden toilet on his own.
The elements are attached to the frame base with nails, screws or other fasteners.
Thick planks of wood, which is highly durable, are used as flooring. The permissible thickness must be at least 4 cm.
After completing the cladding, you can begin equipping the roof:
- A sheathing of boards or slats of wood is placed on the top trim made at the previous stage. If flexible tiles were used, then instead of the sheathing it is necessary to fasten sheets of plywood, which have increased resistance to moisture.
- A special film intended for waterproofing is installed on the sheathing. It is fixed using slats or nails.
- The roof is being laid.
Roofing material can be anything, depending on financial capabilities and required properties. In most cases, ceramic tiles are used.
It can be used for 75-100 years and is resistant to negative environmental influences. Another advantage of ceramic tiles is the ease of installation and dismantling, as well as a wide variety of colors and shades.
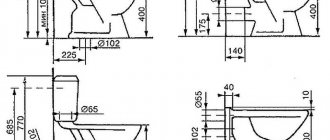
Installing doors
The size of the door is determined according to the drawing of the wooden toilet at the design stage. After installing and assembling the frame, you can begin installing the door block.
The procedure is quite simple. First of all, a rectangular frame is made from timber based on the dimensions of the door frame. Then the door must be covered with clapboard or boards. In general, the process is no different from framing the frame. The door is mounted on the awnings.
Sometimes owners want a small window in the door through which sunlight can penetrate into the room. This must be done before installing the door.
Quite often this window is additionally glazed. To do this, you need to order or cut glass of the required size, then install it in the door and secure it with slats (narrow glazing beads), which are located on both sides of the window.
Making a toilet seat
The last mandatory step in the step-by-step construction of a country toilet is the construction of a toilet seat. This procedure is carried out quite quickly and does not require professional construction tools and equipment, except for a jigsaw.
How to make a toilet seat in a country toilet:
- To construct the frame, it is necessary to place 2 crossbars on the left and right sides. The length from the floor covering to the horizontal elements is the height of the future toilet seat.
- The racks are attached from below to the base and from above to the crossbars installed in the previous stage.
- In the upper plane, the racks must be connected by a crossbar, which should be located at right angles to the horizontal side racks.
- The constructed frame is covered with boards.
- A toilet board is placed in the center of the upper surface; the dimensions of the toilet should be marked with a pencil.
- A small hole is drilled into which the jigsaw can fit. Then, using a jigsaw, a full hole is created using the circled marks.
- The toilet board is secured with screws or nails.
We suggest you read the article on how to make a toilet seat for an outdoor toilet or what types of ready-made toilet models to choose and install.
After completing all work, it is recommended to coat the toilet with varnish or paint.
Country toilet without odor and pumping using the old-fashioned method Country jack of all trades
Exhaust ventilation
The final step to ensure the most comfortable operation of a self-built toilet is the arrangement of a ventilation system. This is necessary to prevent the stench from toilet waste from spreading throughout the entire area.
There are natural and forced types of ventilation. Natural depends on the direction of air flow, internal and external pressure, as well as the location of the cabin.
Such ventilation is provided by an unglazed window with a small visor to prevent leaves and other debris from getting inside. The forced option certainly requires the installation of a specialized system. Some of them work from the mains, so you should plan in advance how to provide power.
In most cases, dacha owners, when constructing a wooden toilet on their own, provide for ventilation. Its installation is a fairly simple procedure: you need to place one end of the pipe inside the room, and the other outside, placing it a meter above the roof of the house.
How to make an outdoor toilet that will last for a long time!
Construction step by step
For an example of the stage-by-stage implementation of construction work, we chose a “birdhouse”. This toilet scheme for a summer house is the easiest to implement.
Before starting work, the location of the future structure on the ground is marked.
1. The foundation is being completed. Strip structures are often recommended for installing a house, but many experts call a columnar foundation more practical for lightweight buildings. The simplest way to install it is to install asbestos pipes into the ground, into which the solution is poured and before it hardens, vertical wooden supports are installed. It is important to control the position of the latter in terms of level, to ensure that no displacement occurs during the process of concrete gaining strength.
The construction of the foundation according to this scheme has its own nuances:
- Asbestos pipes are covered with a waterproofing layer before installation.
- The installation of vertical supports is carried out after filling the pipes with concrete to a third of the height and gaining strength with this portion of the solution.
- The immersion depth of the support pipes depends on the type of soil and averages 0.5-0.7 m, but for unstable sandy soils it is advisable to increase the depth.
2. The frame of the future toilet structure is being built. The easiest way for this purpose is to use 100x100 (50) mm timber and wood hardware. To protect against moisture and rotting, the timber can be treated with impregnation or primed and painted. The solidity of the structure will be ensured by a metal frame, however, special equipment (welding machine) will be required for its construction.
The main elements of a reliable frame:
- load-bearing vertical supports (the front pair is longer than the rear pair to ensure the slope of the roof),
- two horizontal frames - for installing the roof and at the level of the toilet seat,
- diagonal beams on the sides of the structure to give the structure rigidity,
- supports and horizontal part of the doorway.
3. The toilet frame is covered from the outside and inside. The material you can choose from is:
- boards (optimal width – 30 cm),
- plywood,
- corrugated sheets, etc.
4. The waterproofing layer and the main roof material are installed. 5. A door is hung, which is pre-equipped with a latch and a small window to allow light into the room (or a window can be made in the space above the door). 6. Lighting is installed. 7. The equipment of the toilet includes the installation of a seat and lid, shelves for accessories, a washbasin, etc.
Wooden toilet without cesspool
Arranging a cesspool with your own hands is the simplest and most effective way to implement a sewer system. However, this cannot be done if the following conditions are met:
- shale or limestone type soil;
- The water level in the ground is more than 3 meters;
- The dacha is visited by a large number of people, therefore, a significant workload is planned.
In such a situation, the only way out would be to build an outdoor country toilet without a drainage pit. There are the following varieties of this type:
- powder-closet;
- backlash-closet;
- dry closet
In most cases, a powder closet is installed when there is a high groundwater level on the site. As a rule, the tank is located under the toilet and has a small volume (up to 18-20 l).
The basic principle of operation: the wastewater is coated with a powdery composition (most often with peat mass), which prevents the appearance and spread of an unpleasant odor. After such treatment, the sewage is transferred to the compost.
The main advantage of this type of outdoor toilet without a cesspool is its simplicity of structure and low construction costs.
- Viewing window.
- Seat cover.
- toilet seat
- Storage capacity.
- Entrance door
- Lining for support joists
- cesspool
- Ventilation window
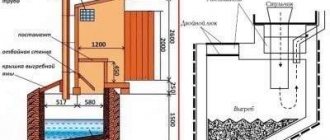
The backlash closet is characterized by a completely sealed container where sewage and waste water are located. The wastewater in such a toilet does not enter the soil, and therefore is not capable of polluting the environment.
It will be necessary to ensure periodic cleaning by calling in special sewer equipment. The structure of the backlash closet suggests that the main storage tank can be located at some distance from the upper cabin, so such a toilet is often placed in the building.
The disadvantage is the inability to use the building in winter, because... The drains freeze and are difficult to pump out. The solution is to install a special heating system.
Dry toilets are often installed in the countryside. Their principle of operation is similar to the work of powders - a closet; waste treatment is also carried out with peat. In some cases, biological preparations containing microorganisms that speed up processing or chemical agents are used.
When using a chemical toilet, it is important to use only safe products.
Types of toilets
The easiest way to build a toilet for a summer house with your own hands is a wooden one - drawings of such structures are not difficult to find, and in some cases, step-by-step instructions without illustrations are sufficient. However, a beautiful and reliable house is not enough to ensure comfort. It is important to take care of waste disposal. From this point of view, there are several options for a country toilet.
Backlash closet
The backlash closet is designed in such a way that waste from the toilet moves by gravity, collecting in the receiver, which is cleaned as it is filled. Typically, the movement of waste is facilitated by the inclined floor of the tank, which has a shape that expands in the direction from the toilet. The advantage of this design is the ability to install a toilet in a warm room in the house without building a full-fledged sewer system , and move the tank outside to avoid odor. The part of the backlash closet located outside is equipped with a lid through which cleaning is carried out using a sewer machine. To ensure thermal insulation, it is made hermetically sealed and multi-layered (for example, made of metal and wood with a “layer” of thermal insulation material). The disadvantage of a backlash closet is that it is built into a load-bearing wall, which means that its arrangement is best done during the construction of the house.
The photo shows a diagram of the backlash toilet
Powder closet
The powder closet has a storage tank in which waste alternates with layers of backfill (“powdered”). Sawdust, peat, ash or a mixture of these components are used as such backfill. Backfilling is performed after each visit to the toilet. For purchased models, a special distributor is responsible for the distribution of the bulk mixture. Homemade ones use a regular bucket or other container with a scoop, which is installed in the toilet.
The advantages of the powder closet are:
- the ability to use the contents of the country toilet storage tank to obtain organic, safe fertilizer (for this, when the tank is filled, it is unloaded into a compost pit for ripening),
- solving the disposal issue (no need to call a sewer truck),
- minimum excavation work (they will only be required to construct the foundation of the building, the tank is placed on the surface),
- the possibility of constructing compact portable toilet models that can be brought into the house (for example, based on a regular bucket).
Drawing of a wooden powder closet with dimensions according to the “hut” type
Drawing of a country toilet like a powder-closet made of corrugated board, “birdhouse” type
Dry toilet
Dry toilets are structures in which waste is processed . During the decomposition process, the contents of the tanks turn into sludge that is uniform in consistency, safe, takes up less space (and therefore requires less frequent emptying of the tank) and is convenient for pumping. In order to ensure the decomposition reaction, factory dry toilets use fillers, which can be:
- peat mixture
- chemically active reagents,
- biological products (dry or in liquid form), which are colonies of bacteria of a certain type.
The dry toilet can be used both in a separate street house and in a house
Pit toilets
A country toilet with a cesspool is a kind of classic. Not the most convenient, but the simplest and cheapest option. All waste is collected in a storage tank, which is periodically cleaned using vacuum trucks . In some cases, the filled cesspool is covered with earth, moving the house to another place. In such a filled hole, after some time, compost is formed, which can be used to fertilize the soil. The most common (albeit least environmentally friendly) is the toilet option in which the cesspool has no bottom. It is only sometimes covered with crushed stone, gravel or other material through which filtration is carried out with partial drainage of the contents into the soil.
Important: If the groundwater level is high, it is advisable to replace such pit models with sealed storage tanks.
The drawing shows the dimensions of a country toilet with a cesspool