Neither a large private house nor a small bathhouse can do without sewerage. Moreover, if it is not possible to set up a full-fledged central system, you need to organize at least a local one. For example, a drain pit made of tires. Do not think that this version of the sump is too primitive and non-functional - reviews from the owners confirm that even such a unique sewage system copes well with its particular tasks. In addition, we do not miss another plus - you can make a cesspool with your own hands. This is exactly what we will talk about further - for your attention step-by-step instructions for constructing a sewerage system from tires with detailed photos and videos.
Stage 1: Choosing a place for the drainage pit
The location of the drainage pit on the site should not be random - here several important rules and recommendations should be taken into account:
- In relation to residential buildings, the cesspool should be located no closer than 5 m.
- A distance of at least 2 m must be maintained between the fence and the pit. This also applies to the border with neighboring areas.
- The minimum distance from the septic tank to the nearest open natural source of drinking water should be 30 m.
- It is not recommended to place the drainage hole either at the highest or lowest point of the site. Be sure to consider the groundwater level.
Advice. It is advisable to install local sewerage at a level slightly lower than the well in order to minimize the likelihood of water contamination.
Also, do not forget about such a simple but important factor as the aesthetics of the site: of course, the drainage hole should not be conspicuous and spoil the landscape appearance of your yard.
Choose a place for the drainage pit that is remote from other buildings
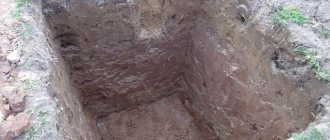
Excavation
A pit for a cesspool can easily be dug by one person without resorting to the help of equipment. The width of the hole should not greatly exceed the diameter of the tire, so that you do not have to spend a lot of crushed stone for backfilling.
At the initial stage, the pit is prepared
When working, you should use two shovels with different configurations. A bayonet will allow you to loosen the soil, and a shovel-scoop will be very convenient for picking it out. The second type can be done independently by taking a shovel and bending it 80° relative to the handle. The handles of these shovels should be no shorter than 2.5 meters in order to reach great depths well.
So, let's get to work. First you need to outline the outline of the future hole. To do this, place a tire on the ground and circle it with a peg, retreating the width of the length of the matchbox. The gap is needed to facilitate the insertion of tires into the finished pit. At first you can get by with ordinary short shovels, but as you go deeper you will still need long-handled ones.
Important: If you are tempted to lower yourself into a hole to simplify the work, then you should take all measures for your own safety, because the soil can collapse at any moment.
During digging, the pit may gradually narrow. To prevent this from happening, you need to periodically measure the diameter of the hole.
Stage 2: Determine the volume of the drainage pit
Once the location for the cesspool has been selected, it is necessary to calculate the volume of the future wastewater tank. There are three individual parameters to consider here:
- frequency of pit cleaning;
- number of residents;
- the volume of water consumed by residents during the period between cleaning the sump.
Advice.
If the house and bathhouse for which the cesspool is installed are used year-round, it is recommended to pump out the sewer every two weeks. About 10-15% should be added to the resulting volume - this is a reserve in case of an unexpected delay in cleaning the pit.
What are the consequences of incorrect calculation of tank volume? Despite the fact that the drainage pit is a local sewer, it can provoke very serious, by no means private, problems: due to the rapid overflow of the septic tank, the need to pump out and remove wastewater will regularly arise, which will entail high costs for sewerage services. If you neglect the need to clean the tank in a timely manner, the wastewater will simply pollute the area.
Also, do not forget that the dimensions of the pit will depend on the calculated volume of the tank: depth, length and width. Here it should be taken into account that the level of filling the pit with wastewater should be at least 1 m below ground level.
Volume calculation
The volume for the cesspool must be selected based on the number of people who will discharge wastewater into the sewer. There are many calculation options, but it is better to take the simplest one - each person produces from 300 to 500 liters of waste per day, of course, provided that the house has all the standard plumbing fixtures. That is, the maximum amount of 500 liters multiplied by the number of people who will systematically stay in the house. The result is a minimum volume of the pit.
Important! If the cesspool is used as a toilet in the country, then its volume can be made much smaller, because only fecal matter enters its reservoir.
Stage 3: Construction of the pit and well
Now we proceed directly to the construction of the pit. We start with the arrangement of the pit:
- On the selected site, outline the outline of the sump: the diameter of the pit should be 15-20 cm larger than the diameter of the working tires.
Construction of the pit
- Prepare two shovels: a shovel and a bayonet with an extended handle.
- Dig a pit of the required dimensions: use a bayonet shovel to loosen the soil, and use a shovel to remove it from the hole. The standard depth of the local settling tank is up to 7 tires. Make sure that when digging the pit, its original dimensions are maintained.
Next, take care of the drainage well - it will help increase the area of absorption of liquid waste into the soil:
- Using a garden drill, make a hole of maximum depth in the center of the pit.
- Install a drainage pipe with special holes for water into the resulting well - it should be 1 m above the bottom of the pit.
- Cover the top of the pipe with polymer mesh.
- Place a 10 cm layer of crushed stone on the bottom of the sump.
Pit design
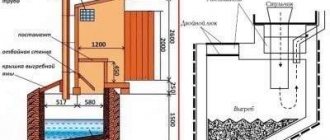
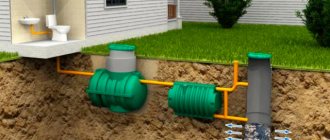
Schematically, such a pit is a reinforced hole in the ground, the walls of which are reinforced with tires. A sand and crushed stone cushion is additionally installed under the bottom of the system, which acts as a filter. There are sewer pipes located in the walls at different levels. There may be several of them (if a shower room and toilet are connected), or all of them (exclusively for the toilet). To prevent the spread of unpleasant odors, the pit is covered with a lid.
Design: cesspool option
This is an open pit, so the bottom is not blocked by anything. Additionally, a drainage pipe passes through the sand and crushed stone bed.
The size of the pit (and tires) depends on the estimated volume of wastewater. In order to calculate the required drainage size, it is necessary to be guided by the requirements of SNIP 2.04.03-85 dated 01/01/1986. There are from 150 to 500 liters per adult per day. This indicator depends on numerous factors, including household appliances. If they are connected separately, then the average value is taken, say 200.
In a family of three people, the pit will drain 0.6 cubic meters per day. The volume of the septic tank must exceed the daily sewage rate by three or more times. Accordingly, for a family of three people, the cesspool should be at least 1.8 cubic meters in size.
Stage 4: Laying tires
Before lowering the tires into the prepared pit, you need to do some preparatory work:
- use a jigsaw to cut the inner parts of the rim on one side of the tires;
- Make a hole in one of the tires for the inlet sewer pipe.
Laying tires and drainage
Then you can begin to form a drainage hole: lay the tires on top of each other, fastening them together using plastic mounting clamps. To prevent the structure from leaking, treat the seams between the tires with any sealant. Also, as you lay, fill the gaps between the tires and the pit with crushed stone or previously dug soil, compacting each layer.
Important! The last tire should rise slightly above the ground level.
When the hole is ready, cover it with a plastic or metal lid. It is recommended to install a small homemade ventilation pipe into the lid to prevent toxic gases from accumulating in the pit. Protect the structure from rainwater around the perimeter - a small mound of crushed stone will do the trick.
A tire drainage pit is a good solution for a site where it is not possible to organize a widespread central sewer system. As you can see, arranging a tank will not take a lot of effort, time and money, but you will get a completely functional cesspool design that will make your life much more comfortable.
Pros and cons of a tire cesspool
pros
- Simple and easy installation that anyone can do.
- Construction cost is very low
- Suitable for all tires with a diameter of one meter or more
Disadvantages of a tire septic tank
- Service life maximum 15 years
- Possible seal failure
- After a certain time, a sewer smell appears
- It is quite difficult to repair a pit or disassemble it. In the overwhelming majority, at the end of its service life, it is simply abandoned and a new pit is built.
- Design features greatly complicate the pumping process.
How to pump out a “rubber” pit?
All cesspools require periodic cleaning. The contents of a tire drain container are cleaned using several methods:
- Scooping out drains using a bucket on a rope. Quite labor-intensive and unpleasant work, but it does not require anyone’s help or financial costs. The main problem is the removal of waste abroad where people live.
- Pumping out using a drainage pump. The operation of the pump requires constant monitoring and the problem of removing wastewater also remains.
- Calling a sewer truck. This method is the fastest, most effective and aesthetic. True, you will have to spend money, and this method also requires providing passage for a car of sufficiently large dimensions.
- Use of biological drugs. They can be found over the counter in gardening stores. The product must be poured or poured into the drainage pit. Live bacteria will quickly process the contents, separating dirt from water. With this method, although less often, you will nevertheless have to call the sewer trucks.
This design is an economical option for organizing comfort in the country.
Competent operation
The durability of the tire cesspool is influenced by its proper operation, which consists mainly of timely cleaning. There are several proven methods that have worked well in practice:
Scheme for cleaning a cesspool with biological products
- selecting the contents with a bucket tied to a rope and then transferring it to the nearest sewer;
- inviting vacuum cleaners with specialized equipment;
- using the pump yourself;
- use of biological products.
The latter method helps make the cleaning process more comfortable, since the breakdown of waste begins due to the activity of bacteria found in biological products.
Through the drainage system, the liquid fraction flows out, and the dry residue remains in minimal quantities, which makes cleaning the pit quite rare.
How to determine the required tank volume
The volume of the drainage pit is calculated based on daily water consumption. This takes into account what equipment is in the house, how much there is, and with what intensity it is used. It is important to know the number of permanent residents. It is necessary to provide a reserve if the number of residents increases, or if the owner plans a drainage pit for a bathhouse with his own hands.
Healthy! To simplify the calculations, we proceed from the average volume of water consumption per resident. An indicator of 1.2 cubic meters is taken. Let’s say if a family of five lives in a house, then the volume of the pit should be 6 cubic meters.
Sanitary standards are mandatory for all organizers and users of drains.
- If there is a well thirty meters from the planned arrangement of the septic tank, then draining is prohibited.
- Autonomous sewerage involves the installation of a septic tank with natural wastewater treatment.
- The drainage device includes several chambers. Large and solid suspensions settle to the bottom of the first. In others, wastewater is bioprocessed.
Every man can make a sewer sump with his own hands.
How to choose a place?
The wastewater tank should not be located next to the source of water supply: well, borehole, deep-well pump.
Infection from it will seep into groundwater and contaminate the drinking source with pathogenic bacteria .
It is also prohibited to equip it in the immediate vicinity of the foundation of a house, bathhouse, or barn.
The soil will settle, the foundation will sink and lead to the destruction of the structure.
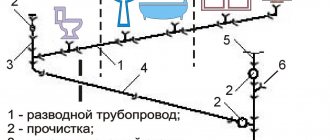
It is also not a good idea to place the pit too far from the house. This will lead to a significant increase in the cost of the entire system. Along the entire length of the sewer pipe, it will be necessary to install at least two inspection wells with hatches . Laying too long a pipeline from the house to the septic tank is fraught with blockages.
The optimal length of the drain pipe should be considered 5-10 meters. The slope should be 0.5 meters per 10 meters of pipeline length.
This position will allow any liquid to flow by gravity from the riser of the house system into the septic tank pit in the yard without any problems.
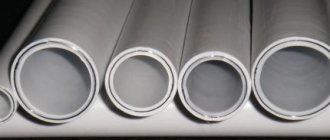
The diameter of the pipe, preferably made of plastic, should be at least 50 cm.
When connecting a drain pipe to a house sewer, you should not lay it under the foundation . It is best to use a crowbar, hammer drill, or jackhammer to punch out a special niche in the upper part of the foundation into which to insert the pipeline, sealing the cracks with cement mortar.
There are three design options for a septic tank:
- with a filtration system;
- with settling tank and absorption well;
- with filter system and drainage pipeline.
We choose a budget option - with a filter system.