Thanks to the abundance of available construction information on the World Wide Web, many believe that installing drainage from pitched roofs is a fairly simple task: install hooks, hang gutters and correctly continue the system to the foundation. But in fact, you still need to be able to drain water from the roof technically correctly. And then neither destroyed drains in the winter, nor sagging gutters in the hot summer, nor a damp and wet attic are scary.
Not to mention, the gutter system significantly impacts the home's exterior. These are those important details that are not always shown in the visualization of a house project, but which, ultimately, serve as its finishing touch, capable of either perfectly fitting into the designer’s or architect’s idea or hopelessly ruining the entire appearance. Therefore, let's approach this issue with all responsibility!
How to choose the right drainage system
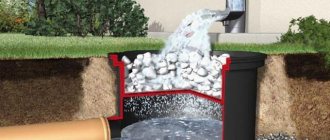
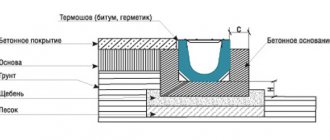
The roof drainage system is designed to collect water from the roof surface and drain it into the storm drain, in order to prevent it from entering the facade, foundation and blind area of the building.
There are two main types of roof drainage systems:
- internal drain;
- external drain.
Inner east is used mainly for flat roofs or in industrial buildings. Therefore, it is almost never used in a private home.
External roof drainage can be organized or unorganized. An unorganized drain in a private house has one extremely attractive feature - it does not require any financial investment. Everything else is pure shortcomings, mainly associated with the almost inevitable need for quick repairs of either the facade, or the blind area and foundation. It is difficult to imagine an owner who would prefer minor cost savings with a simultaneous threat to the strength and reliability of the house, rather than investing quite reasonable amounts of money to install a properly functioning drainage system.
An organized external roof drain, which is chosen by the majority of customers, which is undoubtedly correct, in most cases can be made from the following materials:
- Cink Steel. Ferrous metal can also be used, but this happens quite rarely. One of the options that can easily be not only installed on your own, but also manufactured;
- plastic. PVC roof drains are one of the most popular systems. They can either be purchased ready-made and installed independently, or made with your own hands from ordinary PVC sewer pipes. Features of the material - low weight, ease of processing and installation, accessibility, as well as the availability of ready-made components and additional accessories - all this has led to the widespread distribution of this particular drainage option. If the future owner is determined to save money on a drainage system, but at the same time wants to get a reliable and durable design, making and installing roof gutters from PVC pipes is the best solution. An example of installing a drain made of PVC plastic is shown in the video:;
- metal-plastic. It is impossible to make systems from this material yourself, but it is quite easy to install ready-made ones. The installation technology is subject to the same basic rules as for any other drainage system. It is necessary to take into account that gutters made of metal-plastic are somewhat more expensive than systems made of galvanized metal and plastic, although in some respects they have higher performance properties;
- copper. The most expensive and at the same time high-quality material for installing gutters in a private home. In addition to durability, reliability, and the highest performance characteristics, copper gutters also look great, giving the house a solid and aesthetic appearance. Working with such an expensive material requires high qualifications, so making it yourself is not realistic. At the same time, it is quite possible to install a drainage system from ready-made elements, although this work also requires some skill. As an example of installing a copper drain, you can see the following video:
Based on the above, we can unequivocally state that each of the described options has its own pros and cons; it is incorrect to say that this or that choice is right or, conversely, wrong. In practice, systems made of galvanized steel and plastic are used much more often in the construction of private houses. Moreover, if they want to save money and do the maximum amount of work with their own hands, future owners prefer the second option, that is, making drains from ordinary PVC sewer pipes.
Organized drainage - like a May Day demonstration
With such an organization of drainage communications, everything is clear, measured and symmetrical.
Water flows in uniform, laminated streams through gutters, funnels and pipes of the system - into receiving wells. From them - into the treatment tank and, depending on its functionality, into the storm sewer or personal reservoir. Organized collection of water is an important positive feature of such organization of roof drainage.
The presence of a large amount of free water makes it possible to use it for both economic and domestic purposes.
External drainage system
In this case, all drainage elements of the system are located on the outside of the buildings. They are easy to install and maintain during operation and repair. All details of such a system for draining water from the roof and their dimensions are specified by SNiP RK under number 4, provided that the building is no higher than 5 floors.
This organization of water drainage from the roof is characterized by:
- excellent protective qualities: cases of roof leaks are excluded;
- there is no chance of water getting on the walls, corners, base and blind area of the building;
Important! The weight of frozen water in gutters, pipes and drains can cause your exterior drain to fail.
Internal drainage system
Such systems, installed on flat roofs of houses and industrial buildings, are not very popular. First of all, due to the complexity of operating such a roof. The complexity associated with both creating the tightness of such a roof and various connections to it, as well as its maintenance, makes one think about switching to a pitched roof structure.
SNiP also stipulates the need for such drainage if the building has more than 6 floors.
The characteristics of internal drainage are:
- its good protective qualities: cases of freezing of pipes are excluded;
- there is no chance of water getting on the external sides of the building - walls, corners, basement and blind area;
- Irregular cleaning of pipes and funnels can lead to stagnation of water, both on the roof and in the internal pipework;
Important! In case of possible leaks, replacement of sewer pipes involves additional construction work in the premises where they pass. The passage of pipes through the thickness of walls is prohibited by SNiP of the Republic of Kazakhstan, on roofs and roofs, with the known number 3.
This is interesting: Organized drainage from a flat roof: we consider it in detail
Some operating features
Clogging is the most common drain problem. To avoid this, external systems require annual inspection and, if necessary, manual cleaning. For internal drainage, it is better to leave inspection tees with plugs.
Crater destruction by ice is a problem in outdoor systems. Sometimes, because of this, it is necessary to change the funnel, or even the parts of the gutter adjacent to it. A modern means of combating ice is the installation of heating cables operating from the network and located in gutters. They even sell special fasteners for such cables.
It is advisable to place the internal drainage pipe in a sleeve made of extruded polystyrene foam or polyethylene foam. You can also use cotton wool, but the latter also requires a foil wrap. The fact is that cold water flowing through the pipe can cause condensation on nearby walls and mold growth. Waterproof insulation solves this problem.
Rules for installing external and internal gutters
If you do not follow the rules for installing a drainage system, you can end up with flooded walls, foundations and basements. To avoid this, you need to follow the simplest instructions:
- The external gutter is installed with a slope of 1%.
- The outer chute should be interrupted no more than three times. If this rule cannot be fulfilled due to the complex geometry of the roof, it is necessary to install another drainpipe. But it is better to install it on the outer corners of the walls.
The main thing in a drainage system is the correct organization of the direction of water flow. It should not drain at the locations of the entrance doors and near the main paths, as in winter this will lead to the formation of a decent layer of ice, which can lead to serious injuries.
It is also important to ensure the required slope of the external gutters, which depends on the size of the slope. If the length of the roof slope is more than 12 meters, then the slope must be made in both directions and two drainage systems must be installed
It often happens that the cornice is not located in a horizontal plane, and the slope of the gutter must be done taking this fact into account.
Compared to a flat roof, a pitched roof has another weak point - the so-called valley. This is the internal joint of the roof slopes, which is most susceptible to the pressure of water flow, which increases the likelihood of its penetration under the roof in this place
Therefore, it is necessary to pay special attention to drainage from valleys and install internal gutters there that will retain moisture, remove it outside, and therefore prevent water from getting under the roof. It is attached to the boardwalk (which should protrude 40 cm beyond the axis of the internal gutter) or sheathing
The process itself occurs in several stages:
- Two bars need to be nailed onto the sheathing or plank flooring in increments of 5–10 cm. There should be a small gap between the bars and the sheathing to ensure ventilation.
- Nail the sheathing, bring the ends of the wooden blocks to the axes of the gutter.
- Strengthen the main sheathing in the valley area by nailing a few more bars.
- Drive two wooden blocks between the sheathing in the place where there is free space.
The bend angle of the inner gutter must be greater than the bend angle of the valley - Bring the ends of the bars into the middle of the inner groove and clamp them.
- Bend the gutter so that the bend angle is slightly greater than the bend angle of the valley.
To secure the internal gutter it is necessary to install additional bars - Lay the gutter from the eaves overhang from top to bottom.
- Secure using metal staples.
Methods for attaching gutters
To attach gutters, you can use brackets that are combined with clamps.
Bracket mounting methods:
- Fastening to a front board is the simplest method, used when the roof is already laid. This type of bracket is used for plastic drainage. And to ensure strength, the brackets are equipped with power ribs.
- Fastening to rafters - this method is used for large areas of slopes to the roof deck with a rafter pitch of no more than 60 cm. In this case, brackets with an extension are used, with which the bracket is attached to the rafters.
- Wall mounting - in the absence of a frontal board and access to the rafters, the gutters are attached to the walls using crutches and studs.
If it is not possible to secure the brackets in a standard way, they are screwed to the wall - Fastening to the sheathing - when the rafter pitch exceeds 60 cm, the gutter is fastened using long brackets if the roof is made of metal tiles or ondulin. Or use combined brackets in the case of using bitumen tiles.
When to install roof drainage
Depending on the type of drain, it is installed either before laying the roof covering of the house, or after this work has been carried out.
The metal system, mounted to the bottom deck board or to the rafters, is attached to long hooks before roofing work begins.
Professional builders use this method with large areas of slopes and/or with significant throughput of the installed system.
If the roofing work has already been completed, then the best option would be a plastic system, the hooks for which can be attached at any stage.
This method is also optimal for large slope areas and high system throughput.
Hooks for the plastic system can be attached to the front board after laying the covering.
As a rule, storm drainage systems from the roof, their type and material, are determined at the design stage of the house. In this case, the customer can make adjustments until the roofing work begins.
Storm drains rest on special hooksSource atdomnsk.ru
Determining the number of funnels
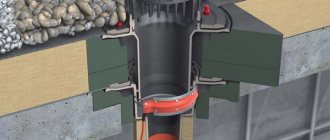
The purpose of internal drainage structures is to remove water from the roof surface at any outside temperature, regardless of the volume of precipitation. Next, the liquid must be redirected to the rain or municipal sewer system.
The number of drainage funnels per roof area is calculated as follows: 1 product should be installed per 0.75 m². For internal systems, these elements are placed along the longitudinal axis of the roof. Both funnels and risers are not installed in external walls, since they can freeze in winter.
When determining the number of funnels, a number of conditions are taken into account:
- When there are no obstacles for the linear expansion of a gutter whose length does not exceed 12 meters, install 1 funnel;
- If the gutter is more than 12 meters long and there are obstacles, a compensating funnel is placed at the end of the slope;
- If the gutter is laid around the perimeter of the building, joint installation of both expansion joints and funnels is carried out.
Funnels are calculated based on passport data regarding their size, method of fixation and throughput. It must be remembered that the number of these elements always corresponds to the number of pipes in the drainage system.
Forms of designs
The easiest way to make a gutter with your own hands is from painted or galvanized metal sheets. You can give it a rectangular or semicircular shape.
You can make a semicircular shape using a rolling tool by cutting a piece of galvanized pipe. First you need to cut the metal sheet to the required size. To impart sufficient rigidity and strength to the structure, its edges should be bent and connected with strips.
In a similar way, you can make round pipes with your own hands. The edges of the sheet should be folded (folded). Then connect and then bend with a mallet. A rectangular pipe can be made using a bending machine or a simple rail. Professionally made elements of the drainage system look beautiful. You can purchase them and install the water supply system yourself.
The resulting gutters with a slight slope are mounted around the perimeter of the roof and secured. At the junction points of the gutters, connectors cut from steel sheet are used.
Types of drains based on material of manufacture
Before purchasing and installing gutters, you need to decide on the material of manufacture, since the installation method also depends on this. All systems can be divided into two large groups: plastic and metal.
Polymer element sets
Polymer products are produced on the basis of vinyl with the addition of plasticizers, stabilizers and other components that increase the strength and wear resistance of the elements. Plastic systems last from 10 to 25 years.
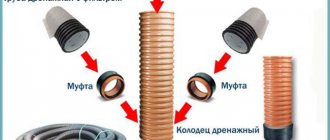
In addition to the main parts - pipes and gutters - the polymer kits include connecting and sealing elements, thanks to which assembly is carried out without welding, soldering, or fitting corner parts
Due to the large number of advantages, construction organizations and homeowners are increasingly inclined to install plastic structures, which:
- much lighter than metal ones, therefore they are recommended for installation on old buildings and houses, where it is better not to load the rafter system and facade;
- do not lose their performance properties at temperatures from -50 °C to +75 °C;
- are not destroyed by corrosion, unlike metal analogues;
- resistant to aggressive substances that may be in the air or water;
- easy to install - do not require additional skills, suitable for self-assembly;
- varied in design, you can choose a system to match the color of the roof or facade;
- have a moderate cost, which is lower than that of metal products.
However, plastic systems have their weaknesses. For example, they are more flexible than metal ones, so brackets and clamps are installed at short intervals.
When exposed to cold or heat, plastic contracts/expands, so compensators and rubber seals are mandatory elements for assembly.
The color, especially of inexpensive products, may change over time - fade, fade. And another drawback is low resistance to loads and all kinds of mechanical damage. It is necessary to ensure that snow and ice do not accumulate in the gutters and to clean them on time.
Metal drainage systems
Metal systems are considered more durable, solid and durable. This is explained by the technical characteristics of the material, which lasts several times longer than the best plastic.
Let's look at the most popular solutions:
In addition to the listed materials, alloys of zinc with titanium and aluminum with zinc are used in the manufacture of drainage systems.
The first option is expensive and wear-resistant, but is afraid of contact with copper and iron. The second one is more economical, and also has good reflectivity, heat resistance and a beautiful silver tint.
The advantages of metal products relate to strength and durability - in these indicators they go far ahead of their polymer analogues. However, there are also disadvantages: heavy weight, thermal conductivity, noise. If the protective coating is damaged, the steel part will begin to rust.
When choosing a material, you need to take into account both the aesthetic side and technical characteristics. It is also necessary to focus on the service life of the roofing - it is much more convenient to carry out complex repair work.
Comparative characteristics of plastic and metal gutters can be found in this material.
Unorganized drainage - cheap at first glance
The use of unorganized drainage is possible only as a necessary measure on temporary buildings or lack of finances. Although SNiP allows the organization of such drainage from the roof even for buildings with 2 floors. But he is discussing the construction of various canopies over the entrances and the organization of blind areas. In all other cases, it does not bring anything except additional hassle and serious costs in the future.
Unorganized roof drainage is:
- on a corrugated roof - symmetrical jets of water along the entire slope of the roof, falling on the blind area;
- on a smooth roof made of folded metal or soft materials - various streams of water falling into one place on the blind area and destroying it:
- in the off-season, splashes falling on the base part defrost it;
- with oblique wind - both options lead to wetness of the walls and corners of the building. This is especially bad at periodic subzero temperatures;
- with unorganized drainage, the roof overhang, according to SNiP, should be more than 600 mm, which will improve the situation somewhat, but not significantly.
Important! Garden paths, organized passages and fences must be made at a distance of at least one and a half meters from the building with such water flow from the roof
Heating cable in a drainage system
Ice and snow inside the drainage system create a blockage (plugs) that prevent melted water from draining. As a result, it overflows over the edges of the trays, forming icicles. Everyone knows how dangerous they are. In addition, a large amount of ice and snow inside the trays means there is a high probability of collapse of the entire structure or deformation of its elements. To prevent this from happening, a heating cable is installed in the drain. It is a conductor of electric current that releases thermal energy.
Heating cable inside the gutter of the drainage systemSource rooms-styling.com
The heating cable is installed after installing the roof drain. It is simply laid inside the gutters (along) and lowered inside the pipe risers. It is secured in trays with special clamps made either of stainless steel, or galvanized, or plastic.
In addition to the cable itself, the kit includes a power supply and a thermostat. The first supplies the current of the required voltage and strength, the second regulates the temperature of the cable depending on weather conditions. For example, if the temperature outside is -5C, then the cable does not heat up much. If the temperature drops below, the current inside the conductor increases, which increases heat transfer. This is what the thermostat controls.
It should be added that the thermostat itself does not determine the temperature. To do this, sensors are added to the system: either temperature or humidity.
Most often, the heating cable is installed not only inside trays and pipes. They cover part of the roof, or rather the overhang area. Here the conductor is laid in a snake pattern and secured to the roofing material with special clamps. This is clearly visible in the photo below. It should be noted that the heating cable both inside the drain and on the overhang is a single system with one power supply and thermostat.
Heating cable on the roof overhangSource tiu.ru
Calculation of components
Based on the size and shape of the roof, you can independently calculate how many pipes, gutters, brackets and other parts of the drainage system you will need.
Based on the size of the roof, we select the diameter of the gutters:
- If the roof area is less than 50 m2, gutters 100 mm wide and pipes 75 mm in diameter are used.
- Up to 100 m2, 125 mm gutters and 87 mm pipes are used.
- More than 100 m2 - gutters 150 mm and pipes 100 mm (the use of gutters 190 mm and pipes 120 mm is allowed).
In the case of a complex roof structure, gutters and pipes are determined by the largest projection size of the roof part.
The roof area, consisting of parts, is 160 m2. Considering that one drain pipe is enough to service 100 m2 of roofing in projection, for the roof in the example you will need 2 drain pipes located at the corners of the house. The number of funnels corresponds to the number of pipes, i.e. - 2 pieces.
The number of vertical pipes is determined depending on the distance from the cornice to the blind area. Subtract 30 cm from this distance - the height of the drain elbow above ground level.
For example, the height to the cornice is 7.5 m. Then 7.5 m -0.3 m = 7.2 m.
We will need 3 pipes of 3 m each on each side, which means 6 pipes on both sides.
The number of clamps will be 5 for each side (between the elbow and the pipe, between the pipe and the ebb, and between the pipes) and, accordingly, 10 pieces for the entire roof.
Calculation of the number of gutters
The most commonly used gutter size is 3 meters. The length of cornice A and cornice B is 10.3 m. This means we need:
- There are 4 gutters on cornice A (3m + 3m + 3m + 1.3m). This will leave us with another 1.7 m of unused gutter.
- On cornice B there are 3 gutters and the remainder (1.7 m) from cornice A.
- For eaves C and D we use 2 gutters each, that is 4 pieces on both sides.
- In total, 11 gutters of 3 m each for the entire roof.
The number of gutter corners corresponds to the number of roof corners, in our example there are 4.
Calculation of the number of brackets and gutter locks
The brackets are installed at the rate of 1 piece per approximately 50-60 cm. We take 50 cm and carry out the calculations.
Having summed up the numbers in the last column, we find out that in order to attach the gutters, we will need 58 brackets.
The number of locks between the gutters is equal to the number of joints. In our case, this is 16 pcs.
The number of ebbs (marks) is equal to the number of funnels. In this case, you need 2 times more knees for each funnel. Then for 2 funnels you need:
- 4 knees;
- Low tide 2.
If the facade is not level, but has protrusions, you need to purchase elbows to go around it. The figure below will help you determine their number.
List of required items
In total for this drainage system you will need:
- Gutter (3 m) – 8 pcs.
- Gutter (2.5 m) – 2 pcs.
- Gutter (1.3 m) – 2 pcs.
- Gutter lock – 16 pcs.
- Gutter angle – 4 pcs.
- Bracket – 58 pcs.
- Knee – 4 pcs.
- Drain elbow (mark) – 2 pcs.
- Pipe (3m) – 6 pcs.
- Funnel – 2 pcs.
- Clamp (with pin) – 10 pcs.
Pro tip:
Aesthetics or practicality?
A standard drainage system performs a utilitarian function - it removes water from the pitched roof of a house away from its walls and foundation. Usually its aesthetic function is not given much importance, but this does not mean that it is unimportant.
That is why the modern market offers fully equipped gutter systems, the elements of which can be easily connected to each other. Such gutters and pipes are available in semicircular, trapezoidal, semi-elliptical, box-shaped (also called rectangular) or square, and even imitating the shape of a cornice.
The most popular in Russia are semicircular gutters, turned inward or outward. Moreover, such edges also serve as stiffening ribs, which increases the mechanical ability of the elements to withstand loads. But the elliptical shape has good throughput, and is indispensable for large roofs. In any case, it is quite difficult to make a mistake with the profile of the drain, but do not forget that the correctly selected shape of the gutters in its own way complements the aesthetic appeal of the house.
This video will tell you how to choose a drain for a pitched roof that is not only aesthetic and pleasing to the eye, but also as practical as possible:
Gutter installation
Before starting work, you need to calculate how much water needs to be drained from the roof
Please note that this indicator does not affect the installation process itself, but is necessary when choosing a specific ready-made drainage system (Hunter, Galeco and others)
Step-by-step instructions on how to install a storm drainage system with your own hands:
The brackets are installed first. The fasteners are installed on the front board. To ensure that all hooks are located at the desired level, we recommend stretching the thread after installing the first one. According to SNiP rules, the minimum distance from the lowest rail should be no more than 25 mm; The technology for installing fasteners necessarily includes taking into account the slope of the entire system. For every 10 meters you need to tilt up to 5 cm. It turns out that after installing the bracket, you determine the installation location of the next part and mount it 5 cm lower than the previous one; Recommendations from experts installing brackets: It is imperative to observe the average selected distance
During the rainy or thaw season, a large amount of water will pass through the drain, so it is important that it is secured as rigidly as possible; On average, the pitch of the hooks is no more than half a meter; The general slope should be done gradually, without sudden transitions.
Next, in the places where the pipes are installed, you need to install water inlet funnels. They come in rectangular and round sections
There are different ways to install them. For example, for a plastic structure, special glue is used, and for a metal structure, clamps are used;
It is imperative to install a grate in the receiving gutters, which will help protect the drains from dirt, fallen leaves and other debris; All that remains is to connect the gutters and brackets. The pipes are threaded into the fasteners using grooved holes. These are available in TechnoNIKOL systems. You need to clamp the pipe until it clicks;
For galvanized steel and PVC siding (Plastmo, Murol), rubber plugs must be used. These parts will help ensure the system operates as expected. They are put on the very end of the gutter;
The manual for builders states that it is necessary to secure the gutters together after installation. To do this, you will need special couplings and seals that will increase the efficiency and rigidity of the system;
Afterwards, drainage elbows are attached to the panels. These drainage parts will help ensure that water drains from the roof at a certain angle and connect the different parts of the system to each other. The rules for their installation state that the distance between the pipe and the wall should be no more than 35 mm;
Next, the circuit is assigned as a constructor. To the very bottom of the system, the knees are threaded into each other and strengthened with clamps. If you use a metal profile (Ruflex, Alta-Profile or Rainway), then you must additionally install brackets to increase the rigidity of the drain; It should be noted that the clamps for installing the drain on the wall of the house differ from the standard ones. They can be attached to bricks or foam blocks using dowels and screws; The last step for installing a drainage system for a slate or tile roof is installing the drip line. It represents the knee turned in the other direction. To avoid having to dismantle it later, you need to calculate in advance the distance of the edge of the drain to the drain. 30–35 cm is considered optimal.
Tips from professionals on gutter installation:
- Before starting work, you must prepare the surface. Treat the boards with antiseptics and varnishes to extend their durability;
- If the roof requires repairs, then it must be completed before installing the drainage system. Otherwise, a leaking roof will negatively affect the efficiency of the drain;
- If you cannot cope with the task yourself, then you can turn to specialists for help. Calling a brigade will cost about 10,000 rubles per object.
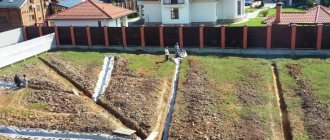
Collection and drainage of water from pitched roofs
After finishing the roofing work, the first priority is still draining rain and melt water from the roof, only this time also from the house. According to research, the most water falls onto the ground from pitched roofs. Moreover, this task cannot be delayed: at the very first serious rain, dampness already threatens both the foundation and the walls. So try organizing something like this in your area:
By the way, due to the fact that it is from the pitched roof that the most rainwater flows, it is profitable to collect it on a country farm: