This article will be of interest to novice designers.
When carrying out a project on external sewer networks, the project includes a mandatory sheet “Table of sewer wells”.
This table, depending on the construction area, is carried out in two options:
- for the entire territory of Russia (except Moscow) it can be performed in accordance with TP 902-09-22.84 Album 2.
- for Moscow it is carried out according to SK 2201-88 or PP 16-8.
Let's consider both options in order.
An example of a sewer table is shown below:
Column 1 shows the designations of sewer wells in free form according to your profiles.
Column 2 shows the brand of the well according to soil conditions in accordance with TP 902-09-22.84 (I - for dry, non-subsiding soils, II - for wet soils, III - for subsiding soils). Note: As a rule, on the territory of Russia there is type II soil. Sometimes III occurs. In my extensive practice, I have never encountered type I soil. Even if you do not have groundwater, there is always perched water. Those. soil type must be taken - II (for high water or groundwater in the area where sewerage networks are laid.
Column 4 shows the total depth of the well. This indicator is calculated as follows:
“Full depth of the well” = “depth of the bottom of the pipe along the profile” + “height of the hatch relative to the ground.”
The “height of the hatch relative to the ground” is accepted as 0mm for hatches located on asphalt (pavement, etc.), 50-70mm is accepted for hatches located in a green urban area, 500mm is accepted for hatches located in a green, undeveloped area.
Column 6 shows the depth of the tray. It is determined according to TP 902-09-22.84, depending on the type of well and the diameter of the largest pipeline. As a rule, the tray is 100 mm higher than the largest pipeline in the well.
Column 3 shows the brand of the well. We take it according to TP 902-09-22.84, column 1, table 1, 2, 3, 4. To select the brand of well, you need to follow several steps:
- We decide on the type of well according to the route plan. Wells are divided into linear “KML-...” (one pipe entered the well and one came out of the well in the same direction) - the selection is carried out according to Table 1, TP 902-09-22.84. Rotary well “KMP-...” (one pipe entered the well and one pipe came out of the well, but changed direction) - selection is carried out according to table 2, TP 902-09-22.84. A well with one connection “KMU1-...” (when two pipes entered the well and one pipe came out of the well) - we select according to Table 3, TP 902-09-22.84. A well with two connections “KMU2-...” (when three pipes entered the well and one pipe came out of the well) - we select according to Table 4, TP 902-09-22.84.
- We decided on the table. Now we need to determine the diameter of our well (column 5) . Typical well diameters are 700mm, 1000mm, 1500mm, 2000mm. The diameter depends on the depth of the pipe tray, the number of connections, and the diameter of the pipelines. Those. in table 1,...4 you select the diameter of the well according to the diameters of your pipelines. But do not forget that if the tray lies more than 3.0 m (inclusive), then the minimum diameter of the well must be at least 1500 mm. Even if in the standard design for this well diameter, the pipeline diameters do not correspond to your option.
- We select the height of the working part (this is the distance from the top of the concrete tray of the well to the bottom of the ceiling) - column 7. Basically, the height of the working part depends on the depth of the well. And it is selected almost entirely at the discretion of the designer. When choosing the height of the working part, several rules must be taken into account: 1) The comfortable height of the working part for servicing the well is 1800 mm . 2) The height of the working part is always a multiple of 300mm . 3) If the well is very deep, then the height of the working part must be selected so that the neck is not more than 1000 mm (since it is not comfortable for a person to go down into a well with a high neck). 4) If the well is shallow, then when choosing the height of the working part, you must not forget that the minimum height of the neck is 350mm (due to design features).
- All unknown parameters for well selection have been determined. You can choose the brand of sewer well in accordance with TP 902-09-22.84.
Column 8 is the neck height value. It is defined:
“Height of the neck” = “Full depth of the well (column 4)” - “height of the tray (column 6)” - “height of the working part (column 7)”.
Column 9 shows the volume of the main structures. It can be calculated according to TP 902-09-22.84. In my projects, I never waste time calculating this value. No one ever needed this figure. If you have time, you can count it for the completeness of the project.
Column 10 shows the height of the difference. This figure is shown for differential wells (when the elevations of the inlet and outlet pipelines are different).
Column 11 shows the volume of concrete per tray. If the diameters of all pipelines in the well correspond to the selected brand of well, then we take the volume of concrete per tray according to tables 1...4 TP902-09-22.84. For other wells, you will calculate the volume of concrete per tray manually, using your knowledge of geometry.
Column 12 shows the type of hatch. Depends on where the hatch is located (under the roadway or in the lawn area). We select according to TP 902-09-22.84.
Column 13 shows the type of stepladder. The brand depends on the height of the working part of the well. Selected according to TP 902-0922.84.
In column 14 we indicate the presence of waterproofing. It is required for the construction of wells in wet soils or in the presence of high water. It is done with bitumen in two layers outside and inside the well.
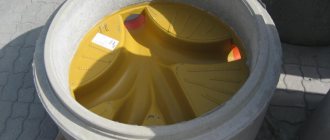
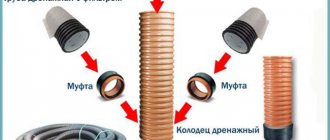
Polymer wells
Construction of a polymer well for sewerage
Being a fairly new alternative replacement for stone wells, plastic structures are successfully used to create structures, although so far only in private households.
Installation is not regulated by SNiP, but only in accordance with the specifications, therefore the installation does not require functional features
An important difference between the simplest wells in yard networks is their simplicity, large volume of water flow and strength of the material. In addition to other advantages, polymer structures can reduce their size, for example, a 1 m concrete well can be replaced with a plastic well with a diameter of only 30 cm
Despite the small volumes, maintenance will be even much easier than a stone well.
There are also plenty of other advantages:
- Easy installation;
- Low costs for digging ditches and pits - smaller sizes do not require large excavations;
- The outlets and tray design are clearly defined by standards, are factory cast, and therefore there is no need for additional equipment or manufacturing;
- The materials for making wells are indicated above; polymer structures can be combined with any pipes made of plastic, cement, or asbestos.
That is why it is worth paying attention once again to the choice before starting the installation of a sewer hatch. All installation diagrams are simple, SNiP clearly indicates installation requirements, tray sizes, recommended volumes
But at the same time, the owner will be able to save on related work, the purchase of equipment and time costs.
Summer cottages, where there is no need to equip many wells and build a tray for each, are more practical to equip with polymer structures. Modest in size, they do not lose their functionality and practicality.
VENTILATION NETWORKS
4.56. Exhaust ventilation of domestic and general sewerage networks should be provided through the risers of the internal sewerage systems of buildings.
4.57. Special exhaust devices should be provided in the inlet chambers of siphons, in inspection wells (in places where water flow rates sharply decrease in pipes with a diameter of over 400 mm) and in drop-off wells with a drop height of over 1 m and a wastewater flow rate of over 50 l/s.
4.58. In some cases, with appropriate justification, it is possible to design artificial exhaust ventilation for networks.
4.59. For natural exhaust ventilation of external networks that discharge wastewater. containing volatile toxic and explosive substances, exhaust risers with a diameter of at least 200 mm should be provided at each outlet from the building, located in the heated part of the building, and they must have communication with the external chamber of the hydraulic seal and must be installed above the roof ridge by at least 0.7 m.
In sections of the network to which outlets are not connected, exhaust risers must be provided at least every 250 m. In the absence of buildings, risers with a diameter of 300 mm and a height of at least 5 m should be provided.
4.60. Ventilation of sewer collectors laid by the panel or mining method should be provided through ventilation kiosks, usually installed above mine shafts.
It is allowed to install ventilation kiosks above inspection wells.
Alternative to plastic insert
First, it is necessary to empty the storage tank or septic tank to be repaired by pumping out the contents with the involvement of a team of vacuum cleaners. The service of pumping out a septic tank and removing its contents is provided by utility services and private companies. It is cheaper to negotiate directly with the municipal services sewer man.
Sewage transport will need an access area to the work site. Moreover, the shorter the transport arm of the vehicle, the shorter the access distance will be. Its permissible length is up to 180 meters and even more - up to 500 m, if it is a high-pressure polyethylene hose.
Pumping out a septic tank should be carried out by trained specialists; amateurs will not be able to do it. Work on cleaning a septic tank is carried out with a special pump - a sewer (fecal) pump.
Waterproofing concrete septic tank joints
To seal the gaps between the concrete rings of the well, you need to reach them from outside the structure. It is necessary to dig a ditch around the septic tank to a depth that allows you to work with the joints between the reinforced concrete sections.
Accordingly, the more rings there are in the tank structure, the deeper the ditch will have to be dug. The width of the ditch is at least a meter. It will be difficult to work in a narrow ditch.
Having dug up the walls of the septic tank, you need to dry them. By the time waterproofing work begins, there should be no dark spots on the concrete walls. The seams must be cleared of accumulated debris and soil, exposing a cavity at least 70 mm deep.
If rain is expected, the well and the ditch dug around it should be covered with moisture-proof material (plastic film, tarpaulin, etc.).
If you dig out a septic tank with a narrow trench, there will not be enough space for waterproofing work
To fill the seams, you need well-punched clay and a plaster float. The clay should be kneaded with your feet in a basin or other similar container. Packing joints between concrete rings with unpressed clay is ineffective - its structure will be uneven and include voids that allow water to pass through.
The external seams between the concrete sections of the septic tank can be sealed with a cement-sand mortar mixed with liquid glass. Composition of the mixture: liquid glass, cement and sifted fine sand in a ratio of 1:1:3.
The mixture should be prepared in small portions - when liquid glass is added, the solution quickly hardens. The seams are filled with this solution using a spatula.
The joint mortar is also prepared from a mixture of cement and PVA construction adhesive. Proportion: 5 parts cement to 1 part PVA. After filling the joints with mortar, two or three layers of liquid glass can be applied on top. This will enhance waterproofing.
Before filling the joints with cement mortar, it is necessary to treat them with a primer. Technical priming materials are used for septic tanks. For example, this is one part bitumen to three parts gasoline.
There are pores in the structure of the concrete stone, so septic tanks assembled from reinforced concrete rings allow water to pass through, albeit in small quantities. When freezing, the water in the pores will crystallize, increase in volume and ultimately destroy the monolithic compound.
To avoid destruction of concrete by crystallizing water, it is necessary to impregnate the concrete from the outside with bitumen mastic at least 0.5 m below the depth of seasonal freezing in the region
Installation of roll waterproofing
Having completed the work on the seams of the concrete rings, we begin to form the surface layer to protect the tank from moisture. If clay was used for the joints, then roll materials cannot be applied over them - the clay plaster will be broken when the adhesive mastic hardens.
The outer surface of the concrete well must be completely covered with a primer, for example, bitumen-gasoline. This will improve the bonding of rolled waterproofing with concrete rings. Then the walls are coated with heated tar mastic, and the rolled bitumen material is glued in two or three layers.
Note that bitumen mastic is not suitable for waterproofing the walls of a septic tank with rolled materials - it cracks when it cools.
If there is a high groundwater table in the region where the septic tank is installed, then it is recommended to carry out waterproofing to the entire height of the sewer well shaft
To reduce or eliminate the likelihood of soil heaving around a concrete shaft, sand and crushed stone backfill is used (40% sand, 60% crushed stone). It fills a ditch previously dug around an underground reservoir to repair the seams between well rings.
If there is sand without clay inclusions, gravel or crushed stone deposits under the soil layer on the site, then backfilling can be done with soil from a dump formed during the development of a pit around the septic tank.
How to make a filtration well
Absorption wells can be built from baked bricks or rubble stones, but their construction requires considerable effort. Therefore, more often the walls of the well are made of reinforced concrete rings. Today, plastic structures are also widespread. You can make them yourself from plastic pipes or buy ready-made ones.
Option No. 1 - brick structure
The brick structure can be either round or square. Usually round wells are built, which are most convenient to use. The structure for filtering sewage should be buried 2.5 meters into the ground, with a diameter of no more than 2 x 2 meters.
The pit is dug in such a way that between the ground and the outer walls of the well there will be a layer of crushed stone, gravel or broken brick up to 40 cm thick. The height of the backfill is one meter. The walls at the filter level must be water permeable.
To do this, the masonry to a height of one meter is not made solid, but with small holes ranging in size from 2 to 5 cm. They must be placed in a checkerboard pattern. After the structure is erected, crushed stone or gravel is poured into the cracks.
When building a well, it is necessary to make cracks in the masonry to allow purified water to exit into the ground.
At the bottom of the structure, a filter layer of crushed stone or gravel is backfilled to a height of one meter. In this case, large fractions of the material are placed at the bottom, small ones at the top. The hole for the pipe through which drainage from the septic tank will flow is made in such a way that water flows in a stream from a height of 40-60 cm.
A plastic sheet must be placed in the area where the water flows to prevent the filter from being washed away. The structure is closed from above with a lid or hatch with a diameter of 70 cm. It is also necessary to make a ventilation pipe in the well with a cross-section of 10 cm. It should rise above the ground by 50-70 cm.
You will find step-by-step instructions for constructing a brick drainage pit in this material.
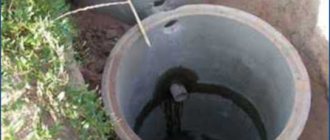
Option No. 2 - construction of concrete rings
To construct a filtration well, you will need three reinforced concrete rings. One of them should have holes with a diameter of about 5 cm. You can buy a perforated ring or make holes using a concrete crown. You also need to make a hole for the inlet pipe.
The photo shows and describes in detail the process of installing concrete rings for constructing a well.
It is necessary to dig a pit, the width of which is 40 cm greater than the diameter of the ring. A perforated ring is installed at the bottom of the structure. You don’t have to dig a hole, but only slightly deepen the area where you plan to make a well.
Place the first ring on the ground and select the ground from the inside. Gradually it will fall down under the weight of its own weight. The two upper rings are installed in the same way.
After this, you need to make a bottom filter from crushed stone or gravel up to one meter high and fill the outer walls of the well with the same material to the level of the filter layer. The hatch and ventilation pipe are installed in the same way as in a brick well.
Another option for arranging a septic tank made of concrete rings can be read here.
Option No. 3 – a well made from old tires
The most inexpensive way to make a filter well is to make one from used tires. This design can provide filtration of sewage for a family of three. Basically, such a well is made in summer cottages, since in winter the rubber freezes and the activity of bacteria slows down, and at very low temperatures it stops altogether.
The well is made very simply - the tires are installed one on top of the other and fastened together with plastic clamps. The joints are coated with sealant. All other structural elements are made in the same order as in wells made of other materials.
Option No. 4 - plastic filter containers
For example, the Russian company POLEX-FC, whose products received good consumer ratings. Filter wells are produced in different volumes (from 1200x1500 to 2000x3000 mm), which allows you to select a product based on the daily water consumption of an individual household.
The containers are made of corrosion-resistant durable plastic, the walls of the shaft are made of primary polyethylene. The lower compartment of the tank is covered with biofilm and filled with a filter layer of crushed stone, gravel and slag.
A plastic filter well with a three-stage filtration system ensures effective purification of water from impurities
Table of sewer wells: table items, regulatory documents, overview
When drawing up a project for an external drainage network, it must include a sheet “table of sewer wells”. It displays all the wells, grouped into groups. They are listed indicating the operating parameters, in increasing order of the diameter of the pipes or trays.
For each unit, the main operating parameters, dimensions, depth of immersion in the ground, volume of the working part, and the amount of material spent on manufacturing are displayed. As a result, a complete list of containers accepted for a given system appears and are grouped by purpose and type.
Determining the location of the cleaning system
Any construction, including those that involve the installation of cleaning equipment, requires the need to carry out preliminary engineering calculations. If you have not yet started building a house, then this should be done in parallel with the layout of the main building. This will avoid problems, because sewerage in a dacha with your own hands can only be installed at a distance equal to or greater than 5 m from the house. If there is a well or other source of water on the site, then the distance from it should not be less than 30 m.
Before you make a sewer system in your dacha with your own hands, you should choose a hill, which is required to eliminate the possibility of natural water runoff. Installation of sewerage system elements must be done with a certain slope. But it is not recommended to use pipes that have bends, as this will certainly, sooner or later, cause a blockage.
Preparatory stage of installation
The work includes preparatory activities:
Sewage installation diagram
- breakdown of the territory;
- clearing the area of plantings;
- demolition of buildings;
- arrangement of storage area;
- laying temporary roads.
For all these works, a construction organization project is being developed. It clearly states all the actions taken, and this greatly facilitates the work of the builders. For his own suburban areas, the owner will also stock up on a ready-made diagram indicating in all details the installation of water treatment systems.
Distance from underground utilities to foundations
SNiP 2.07.01-89 allows for the laying of underground communications within the boundaries of support foundations and pipeline overpasses, subject to the provision of protective measures in the event of settlement of the foundation base and accidents in the line.
Construction acts SNiP 2.07.01-89 establish the following distance limits to the supporting foundations of houses:
- water supply – 5 m;
- individual and storm (rain) gravity sewerage – 3 m;
- pressure sewer – 5 m;
- drainage pipeline – 3 m, accompanying drainage – 0.4 m;
- gas pipelines of low, medium and high pressure - 2, 4, 7 or 10 m, respectively;
- heating networks - from the tunnel wall 2 m, from the protective shell of pipes for channelless installation - 5 m;
- electrical cable lines and communication cables – 0.6 m;
- switching channels and tunnels – 2 m.
Fig. 4 Construction standards for distances between communications and underground networks
DIY drainage well
It is unlikely that anyone would think of building housing on sandy terrain. Places with groundwater are selected for construction so that there are no problems with drinking water in the future. But this advantage of the area can result in waterlogging of the soil and destruction of the foundation of the building. To protect yourself from this problem you need to build a drainage well. This design serves to drain groundwater from the site.
Materials and operating principle
The operation of the well is simple. A trench is dug at the site to collect and drain water - a drain. One or more drains are connected to it, which drain the liquid into a reservoir located nearby the site or into a special tank.
Types of drainage systems
Drainage wells are divided into four types according to the type of soil and the movement of groundwater. The principle of operation of each is different, and before making a drainage well, decide what kind of system you will need.
Collector well
This version of the drainage system is capable of collecting and accumulating moisture, which can later be discharged into a ditch or used for watering plants. Its construction is appropriate in the lowest part of the terrain.
Rotary wells
Mounted at drainage bends or in places where several sewer pipes are connected. In such places there is a high probability of contamination of internal cavities.
Absorption well
Such a well must be installed in places where laying pipes to drain liquid is impossible due to the lack of a reservoir for discharge or sewerage. This is the deepest type of drainage system, and the minimum depth must be at least 3 m. The bottom of the well is made of crushed stone or sand, this will allow liquid to be discharged into groundwater.
Inspection well
This option is used for access to the drainage system and possible repairs. For convenience, its width should be at least 1 m. In principle, such wells can be made in other systems, because repairs and preventive cleaning will not be superfluous.
Construction order
When choosing the size of a future well, the area of the site is taken into account, namely the part that needs to be drained.
When all the materials are ready, you can begin work. We dig a hole at least 2 meters deep, depending on the type of drainage system. At the bottom you need to arrange a special pillow. Coarse sand is best suited for this. The bedding should be from 30 to 40 cm thick; during the arrangement it must be thoroughly compacted.
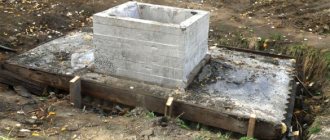
On the backfill you need to make a square formwork to arrange the foundation, which will serve as the bottom of the well. A reinforcement mesh should be placed in it, preferably a fine one. This structure is filled with concrete mortar.
After the concrete has set, internal and external formwork is installed on the base. The walls on top need to be connected with wooden planks. Concreting the walls of the well is carried out according to the level. After 2 - 3 weeks, when the concrete is completely dry, we remove the formwork and backfill the base. It is better to use fine gravel or expanded clay for this.
Digging a trench
To drain liquid from the well, polyethylene or asbestos pipes are used. Simply digging a trench and laying pipes towards the discharge point will not be enough. In order for the reset to occur correctly, you need to perform the following steps.
- Cover the bottom of the trench with sand.
- Place a layer of fine gravel on top of it.
- A drain pipe is laid on such a cushion, which is also covered with sand and gravel.
Together, the layer of sand and gravel should be half the depth of the trench. The remaining depth is filled with loam, and a fertile layer of soil is laid on top.
When installing drainage on an already built-up area, work should be carried out in small sections of 15–20 meters. During operation, the soil removed from the section being dug out is poured into the previous section of the trench. It is better to start work in late July - early August. At this time, the soil water level is lowest.
Features of various types of designs
Requirements for reinforced concrete prefabricated structures are set out in regulatory documents GOST 2080-90 , which detail the technical requirements for products, give their characteristics, markings and provide links to related GOST articles.
The advantages of prefabricated structures over monolithic ones lie in the installation possibilities. Reinforced concrete parts are heavy, so they have to be transported and installed using special equipment. It is much more convenient to ensure the delivery of individual parts than the entire structure in finished form.
During installation, additional measures are sometimes required - for example, installing a waterproof lock. By assembling the structure in parts, it is much easier to carry out specific excavation work.
Diagram of a linear type inspection well, which is installed as an inspection or drainage point on straight sections of a sewer pipeline
So, the lower part of the structure is a durable concrete slab, which is placed on a pre-prepared foundation. To give the structure stability and at the same time ensure the outflow of groundwater, crushed stone is poured into the pit before installation. The bottom slab is laid strictly horizontally on a crushed stone base.
The lower part is called the tray part; it is equipped with holes or pipes for installing the pipeline. The location of the inlet holes depends on the purpose of the well. Let's assume that in linear structures they are on opposite sides, in rotary ones - depending on the angle of rotation.
The main working chamber is larger in size than the others - it is into it that you should go down to check the shut-off valves, tightness of connections or wear of parts. For ease of descent, one wall is equipped with a ladder made of metal brackets.
The top of the working chamber is covered by a floor slab, to which another element is attached - the neck. It is narrower in diameter than the main part.
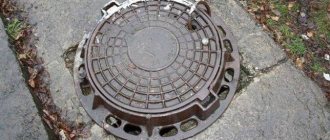
The neck is covered with a hatch, which performs two functions - it protects the well from the entry of unwanted guests and protects it from street debris and precipitation. To make it more difficult to get into the chamber, the hatch is made of heavy material - cast iron.
When installing inspection cameras in a suburban area, it is not necessary to use cast iron parts. Nowadays many types of polymer lids are produced that are more convenient and aesthetically attractive.
The hatches have a round shape and standard sizes (600 mm, 690 mm, 700 mm). They should be selected based on the dimensions of the inspection well
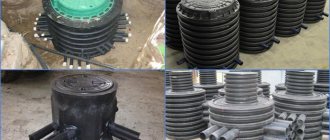
Requirements for the designs of polymer products are set out in GOST-R No. 0260760 . One of the common manufacturing materials is polyethylene. The reliability of the design is ensured by the production technology - the extrusion welding method.
The products are resistant to chemicals present in the soil and are wear-resistant, environmentally friendly and airtight.
Outwardly, they resemble large capsules with a hole in the neck. Unlike concrete analogues, plastic cameras are purchased and installed ready-made.
The products are adapted for quick installation and connection of pipes. Due to easy installation, many country home owners prefer plastic cameras.
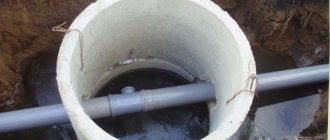
Laying the pipe and connecting it to the septic tank
The installation of an external sewerage pipe must be carried out taking into account certain technological features. The pit must be equipped at an angle towards the septic tank with a recess of 1 cm per 1 m of pipe. The septic tank must be installed so that the hole for installing the pipe is flush with the bottom of the connected trench. The correct location of containers should always be checked before installing communications. The tank is always placed in the ground only in a horizontal position.
After the location of the pipe is checked by level, special means of rigid fixation and waterproofing are used to allow the containers to move in the pit.
The connection method is always determined by the height of the external sewer pipe located near the house itself. It is recommended to equip the wiring in such a way that the hole in the foundation and at the point of insertion into the concrete septic tank are located only at one level.
If changing the point of wastewater discharge may be difficult, then the septic tank is mounted to a residential building with access to the surface. A pipe fragment located on the ground will have to be insulated with obligatory observance of the slope in those places where the bend is installed. This is necessary to prevent blockages from forming in the pipe.
Regulations
The table of sewer wells is compiled on the basis of current standards and rules (SNiP, SP). These are basic documents that list all the requirements for the design of containers, their sizes and other parameters. Any inconsistencies discovered during the defense are regarded as grounds for project rejection.
However, if you use only basic regulatory documents, the risk of making mistakes increases. For each tank you will have to select parameters separately, which will significantly slow down the preparation of the project. The structure of SNiP or SP is designed to list rules, requirements and standards. It is inconvenient for carrying out design work, so a special database has been created to help compilers - the Standard Project (TP). Currently, a more modern edition is used - TPR (Typical Design Solutions), which is a revised version of the database.
Sewer wells, Standard Project is a set of tables for different groups of containers. They are united by purpose, size, and features. The designer’s job is to select the desired option based on the values given in the columns.
Construction and operation of a septic tank made of rings
That is, in three days one person consumes approximately 600 liters of water, which means that if a family consists of three people, then a septic tank with a volume of 1800 liters will be required.
Wastewater flows through a pipe that runs from a private house into the first tank, settles, and splits into ordinary liquid and sediment, which in turn must be removed every couple of years if the treatment plant is done correctly.
The second tank is also sealed (if there are only three of them), so liquid from the first tank flows here when it reaches the level of the overflow pipe.
In the second tank, the decomposition process occurs; for this, a ventilation hole is built into it, through which methane evaporates, the remaining part precipitates in the form of sludge.
From the third reservoir, the purified liquid enters the ground if the treatment facility made of concrete rings is equipped with a drainage bottom, or is pumped out if it is an ordinary well.
Septic tank location
It is also necessary to carefully consider the location of the septic tank.
The following recommendations should be considered:
- the septic tank should be located at a distance of 5-20 m from the house;
- it is necessary to be able to drive up to the septic tank with a pumping machine or special equipment during its installation;
- you should figure out what the level of groundwater is in the selected area, check seasonal fluctuations;
- if there is a well with clean water on the site, then there should be at least 30 m from the well to the septic tank.
In order for the concrete rings to fit tightly together, you should buy them with locks.
Installation of a septic tank made of concrete rings
Let's consider the process of installing a septic tank made of concrete rings.
- First, you need to dig a pit using an excavator, but take into account the fact that when digging a septic tank, its size must be calculated in such a way that people can work freely between the pit wall and the concrete rings during the installation process.
- Sand should be poured into a layer of about 20 cm at the bottom of the septic tank.
- If rings without a bottom were purchased, then you need to concrete the place in the pit where they will be located.
- Next, using a crane, the concrete rings are installed, and the top is covered with a lid.
- Be sure to waterproof the joints between the concrete rings and between the lower ring and the concrete base. If concrete rings with a bottom are installed, waterproofing is carried out only between the joints.
- Then the pipes are laid. The septic tank is also waterproofed between the pipe and the wall of the tank.
- The septic tank is waterproofed along the outside of the installation, then the pit is filled up.
In this case, they roll it without the help of special equipment to the selected area and dig up the ground underneath it so that in the future it will lower itself into the dug pit.
What types of septic tanks are there?
Today there is a wide variety of septic tanks, but a septic tank made of concrete rings has the advantage of affordable cost. There are several types of septic tanks made of concrete rings on the market:
1) single-chamber septic tank made of concrete rings. They install only one camera 5 meters from a country house. In the future, such a septic tank will require regular pumping of liquid, so it is necessary to provide convenient access for the car to the installation;
2) two-chamber septic tank for a bathhouse. Such a septic tank consists of several tanks, since wastewater that has undergone effective treatment can be used for irrigation;
3) overflow septic tank. Its distinctive feature is that each container is installed at a level lower than the previous one. This type of septic tank is the most effective and will last for many years.
You should take into account the fact that the work of a single-chamber septic tank is not of sufficient quality and durability, so it is better to install at least a two-chamber septic tank made of concrete rings, from which the liquid can be used for economic purposes (for example, watering a garden).
For projects completed in Moscow, the table of wells is as follows:
The table is carried out according to PP16-8.
Note! The height of the well includes the tray part. And does not include: hatch, neck and base plate.
Example 1: Well K1 (from the table) has a depth to the pipe tray of 2320 mm. The hatch is 50mm above the ground. Those. the total depth of the well is 2320+50=2370mm.
The height of the well according to KK-15.20 is 2040 mm (without floor slab, neck and hatch). The distance from the bottom of the well to the pipe tray is 120mm (according to PP16-8).
Floor slab -120mm. Hatch design + support plate UOP-6 - 330mm.
2040-120=1920mm. It is also necessary to install a floor slab, a UOP-6 base plate and a hatch on top of the working part.
Example 2: Well K2 (from the table) has a depth to the pipe tray of 2940 mm. The hatch is 80mm above the ground. Those. the total depth of the well is 2940+80=3020mm.
Types of autonomous sewerage
In order to consciously and correctly choose the type of sewage system for your dacha, you need to at least in general terms imagine the advantages and disadvantages of each of the possible options. There are not so many of them:
- Cesspool. The most primitive and far from the best way to dispose of wastewater. Let's start with the fact that it is very difficult to ensure complete tightness. Even with high-quality treatment, some part of the wastewater ends up in the ground. If the source of water is a well or borehole, then sooner or later bacteria will be found in them that live in sewage pits. Other disadvantages are the corresponding smell, which is problematic to combat due to leaks, and the need for regular pumping. Therefore, such sewage systems are being built less and less often in the country.
- Storage capacity. The essence of this type of sewage system is the same: wastewater is collected in containers and periodically pumped out. Only these containers are completely sealed, as they are usually made of plastic. The disadvantage is the relatively high price.
- Septic tanks. A system of several interconnected containers (two - three, rarely more). Wastewater enters the first, where it settles and is processed by bacteria. Insoluble residues settle to the bottom, water rises to the top. The next time wastewater arrives, the level rises and the settled water is poured into the next container. Other bacteria “live” here and complete the cleaning (up to 98%). From the second compartment of the septic tank, the liquid can be removed for further filtration into the ground. It's almost clean now. The design is simple, there is nothing to break. The disadvantage is that the device itself is bulky, plus it requires a filtration field (where the water will be discharged), once a year or two the septic tank is cleaned of insoluble sediment.
- VOC or AC - local treatment stations or automatic installations. The principle of operation of a septic tank, but in a more compact size, with electronic filling for control. This type of sewer only works when there is electricity. The maximum battery life is up to 4 hours. The small size of VOCs impose restrictions on one-time discharge of wastewater: if you flush the bathtub, you should not flush the toilet. And the main disadvantage is the price.
With more active use of the dacha plot, a more serious sewage system is needed for the dacha. A smart choice is to install a septic tank, make filtration fields according to the instructions, or install an absorption well. It is better to take a factory septic tank, if possible - fiberglass. It, of course, costs quite a lot of money, but homemade septic tanks, although they are cheaper to build, require constant repairs during operation, and besides everything, most of them suffer from leaks. This is a dacha, after all, and everything that gets into the ground ends up on your table - in the form of water, if the water supply is from a well or borehole, and then in the form of the crops that you water with this water.
If you definitely decide to make a septic tank with your own hands, there are several options:
- Monolithic concrete. It is possible to achieve a high level of sealing, but the amount of work is large and requires a lot of time.
- Brick. Not the best option, as it can be destroyed on heaving soils. Can be used provided that the walls are plastered. Tightness can be achieved using modern waterproofing coating materials.
- Septic tank made of concrete rings. When properly executed, it works well, but can be used without problems on soils that are not prone to heaving. On clays and loams, the rings often move out of place and the tightness is broken. Repair is a complex and unpleasant undertaking.
- Made of metal. The tightness is at a high level, but until the metal corrodes, and this will happen quite soon.
The easiest way is to make a septic tank at your dacha from concrete rings. Its volume should be large enough - it is believed that such a device should have room to accumulate a three-day supply of wastewater. Consumption per day is assumed to be 200-250 liters per person, the total consumption is calculated according to the number of people in the dacha at a time, with some reserve in case of guests arriving. For a family of 3-4 people, the usual volume of a septic tank is 2.5-3 cubic meters.
What it is
The sewer well table is an appendix to the sewerage system design. It consists of several tables compiled for wells of different types and purposes. All capacities that are available in the network profile are grouped by type:
- linear (KSL, Linear Observation Well);
- rotary (KSP);
- nodal (KSU), etc.
If the number of containers is small, you can create one table in which the parameters of all groups, listed in ascending order, are indicated one by one. As a rule, this is the tank number, depth and diameter of the pipes. Example of a finished table:
A typical sewer well is a structure with standard dimensions. They vary depending on the number and size of incoming (and outgoing) pipes, purpose, availability of additional devices and equipment. Using this concept allows you to speed up the process of drawing up a project, since the task of separately calculating each structure is removed. For each type of structure there is its own table, compiled separately for plastic, reinforced concrete, brick (stone) containers.
How do you know when to stop digging?
According to the technology, soil is removed inside and below the ring. Because of this, it settles under its own weight. The soil that is removed will serve as a guide. Usually the water is between two waterproof layers. This is often clay or limestone.
The aquifer is usually sand. It can be small, like sea water, or large with interspersed small pebbles. Most often there are several such layers. As soon as the sand begins to flow, it means that we should expect water soon. As soon as it appears at the bottom, you need to dig for some more time, removing the already wet soil.
If there is a strong influx of water, you can stop. The aquifer is not very large, since there is a chance to go through it. In this case, you will have to dig until the next one. The deeper, the cleaner the water will be, but how much deeper, no one can say for sure.
After this, the well is pumped - a submersible pump is installed and the water is pumped out. Thus, it is cleaned, deepening it a little, and in addition its flow rate is determined. If you are happy with the speed at which the water is rising, you can stop there. If not, you need to quickly go through this layer. The soil continues to be washed out with a running pump until this layer is passed. Then they dig to the next aquifer.
If you are satisfied with the incoming water and its quality, you can build a bottom filter. It consists of three layers of stones of different fractions, which are laid on the bottom. This is necessary to ensure that as little silt and sand enters the water as possible. For this filter to work, you need to place the stones correctly:
- The largest stones are placed at the very bottom. These are quite large cobblestones. But in order not to greatly reduce the height of the water column, it is better to use the flattest stones. They need to be laid out in two layers, and they do not need to be laid closely, but with small gaps.
- The middle fraction is poured in a layer of 10-20 cm. Their dimensions should be such that pebbles or stones do not fall into the gaps of the lower layer.
- The topmost shallowest layer. Pebbles and small stones in a layer of 10-15 cm. They are necessary for the settling of sand.
With such a mound of fractions, the water will be cleaner: first, the largest inclusions settle on large stones, and as you move upward, smaller ones become smaller.
What safety measures are required when digging a well?
The work of digging a well is very specific and dangerous, requiring special precautions
- First of all, the area should be fenced off and strangers, and especially children, should not be allowed into the work area.
- You cannot store the selected soil closer than 3 meters from the mine, or even better, immediately take it to a safe distance. Within the same radius there should be no foreign objects or unused tools at all near the shaft.
- All lifting mechanisms - construction structures, tripods, winches installed on them, gates, hoists, etc. must be checked daily before starting work. The condition of ropes, slings, and rigging hooks is also carefully monitored. All lifting devices must have a reliable brake and locking system.
- Buckets (tubs) for extracting soil must be tightly tied to ropes, and when working at a depth of more than 6 meters, they must also have a safety end.
- Working at depth may be accompanied by the accumulation of gases in the mine, which can cause suffocation for the excavator. Before lowering it into the mine, the air quality must be checked - a burning candle is lowered into it. If it goes out, forced ventilation must be carried out, and then the test is repeated.
- If there is a lack of oxygen during work, it is necessary to create conditions for forced ventilation. For these purposes, you can use a compressor, fan or other air blower (sometimes even a powerful vacuum cleaner), or install a metal furnace near the shaft, the vent of which is connected to a pipe lowered to the very bottom of the shaft.
- It is imperative to warn the excavator by voice about objects being lowered or raised. A worker in a mine must wear a safety helmet, and the possibility of emergency evacuation must be provided.
- When working using the ring deposition method, the upper unclosed edge of the shaft should not be more than 1 meter. If there are signs of instability of the shaft walls, work is immediately stopped until the cause is determined and the possibility of eliminating it is determined.
Typically, work on high-quality digging of wells is carried out by teams of experienced professionals who have their own specialized equipment. It is almost impossible for a beginner to cope with such a task - there are too many nuances familiar only to masters, and the work is fraught with too many dangers.