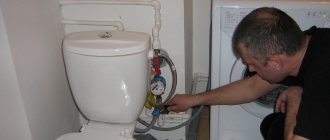
Connecting a washing machine to the sewer can be done in different ways. You need to think about where to install the equipment, since there must be a power source, inlet and outlet communications nearby. The height of the hose connection is also important, which can affect the intensity of the water flow in the future. The scheme is selected taking into account the configuration of sewer pipes and the location of plumbing fixtures.
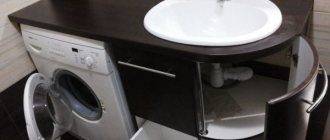
On the left is the drain into the sewer, on the right is the drain from the washing machine into the sink.
Draining methods
There are several methods for connecting the washing machine to the wastewater disposal system:
- installing a hose on any of the plumbing fixtures: bathtub, toilet, sink;
- connecting the drain hose to the siphon;
- connection to the drain in the bathroom.
When choosing a connection method, take into account the size of the room. If it is not possible to install the machine near a sewer system pipe, consider increasing the length of the device’s outlet communications. However, it is not always possible to hide the hose. When it is in plain sight, the risk of damage increases.
Such difficulties do not arise if the room is small. All plumbing fixtures are installed nearby. In most cases, you can choose any connection method. Installation of a flexible tube that drains water from the machine is impossible only if there is no access to a sewer pipe.
For example, when it passes under the bathtub. It is also impossible to approach the pipe because of the installed household appliances.
In this case, 2 options are considered:
- dismantling of household devices
- using a clamp to install a hose on the sides of a plumbing fixture.
In the first case, you need to open access to the tube or siphon if it is covered by a dryer, washing machine or other large appliance installed under the sink. After this, a standard connection is made to the sewerage system at any of its sections: to a siphon or pipe.
If there is no additional pipe under the sink on the drainage lines, consider the option of tapping into the pipe. An alternative option is to purchase a new siphon with 2 outlets for connecting a washing machine.
To install a drain in a bathtub, sink or toilet, use a special holder.
Recommendations from professionals
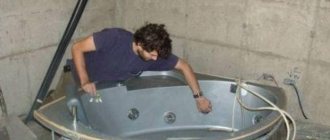
In a private house, the drain is done directly into the septic tank. In houses where there are many apartments and a common sewer drain, such a supply is simply not feasible, but in rural areas, it is quite practical and convenient.
If you use soap and not powder when washing, then draining is possible anywhere. But Nelya allows water to seep under the foundation.
However, if people live in the house all year round, then the washing machine must be drained in accordance with all rules and regulations.
When working, you must carefully follow the instructions. The fastening points must be securely connected to avoid leaks.
- If a malfunction is identified during the test wash, it must be corrected immediately.
- The gasket is installed in this place and the joint must be securely fastened.
- If everything is done correctly, the equipment will serve its owner for many years.
Since a lot depends on the quality of the connection of the unit to the drain system.
Draining water into the bathtub and toilet
Possible options for fixing the hose:
- on the side of the bathroom;
- on the sink;
- on the side of the toilet.
In the first and last cases, a special plastic holder is used. It is installed on the edge of a plumbing fixture. This fastening element is distinguished by a significant radius of curvature and the presence of a groove for laying the hose.
Such work can be easily done with your own hands. The holder can be moved from one plumbing fixture to another. If this method of organizing the drain is chosen, rigid fixation of the fastening element is not required.
When, for various reasons, it is not possible to install the holder on a sink or bathtub (for example, due to the remoteness of these plumbing fixtures), consider the possibility of fixing the hose on the side of the toilet. In most cases, it is fixed with a lid.
However, a standard holder can also be used. This method is used less frequently due to the higher risk of flooding the room, since the hose is secured by the lid of the plumbing fixture not rigidly.
Advantages of this option for organizing drainage:
- ease of hose installation;
- no need to use tools or change the configuration of sewer communications;
- the outlet hose is installed at a sufficient height;
- there is no need to dismantle household appliances and plumbing fixtures to connect the machine drain.
Disadvantages of draining plumbing
The main problem with plumbing drains is the impossibility of firmly fixing the holder on the edge of the bathtub, sink or toilet.
There are many more disadvantages to this method:
- high probability of flooding of the room, since the hose in this case cannot be firmly fixed;
- damage to the fastening of the flexible tube: if you touch it often, the corrugated walls will be damaged and will have to be replaced;
- dirty water gets into plumbing fixtures, which is why they need to be washed more often;
- if the length of the hose is not long enough (the machine is located at some distance from the bathtub or sink), the water will splash and fall on the walls, furniture, and floor;
- while the liquid is being drained into the plumbing fixture, there is no way to use it;
- it is necessary to constantly monitor the holder or hose, because the machine vibrates strongly in spin mode and can move;
- you will have to regularly fix the flexible tube, and after finishing the machine, remove it each time so as not to touch it.
Tips for work
The drain hose should not be positioned too low or too high. Since this directly affects the operation of the equipment. If you make a mistake, it can cause a breakdown.
- Be sure to make sure that all fasteners are firmly connected. When the drum is running, the machine shakes a little, and if the hose is not securely fastened, it can become disconnected and all the water will flow onto the floor.
- The length of the corrugation should not exceed 2 m; if this condition is violated, then a large load is placed on the machine pump. She cannot work constantly in this mode.
Upon completion of all procedures, you must turn on the automatic machine empty; there is no need to pour in powder or put clothes inside. The test mode is necessary to ensure that there are no leaks.
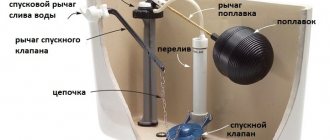
Connection to the sewer system using a siphon
If you plan to connect the hose to the sewer system, take into account the diameter of the supply lines. It is recommended to consider siphon models with an additional outlet. Its design allows for connection to the flexible tube of a washing machine. For this purpose, a protruding element located on the pipe is used. It is important that a sealing element, such as a coupling, be installed at the pipe joint.
The drainage lines of the washing machine are flexible. This is important because during installation the tube is installed in areas of varying complexity. This means it must be flexible. However, there is no shut-off valve or cuff at the free end. This makes it difficult to connect the tube to the siphon. When installing a drain, it is necessary to use a coupling. It will allow you to fix the flexible tube and additionally seal the seam.
When the siphon is connected to the sewer, the design also provides for corrugation. However, on both sides it has smooth end sections (cuffs) for installation in the outlet of a plumbing fixture and a sewer system pipe. Thanks to this feature, pipe joining is simplified. In addition, tightness increases due to the smoothness of communication surfaces.
You can try to connect the drain corrugation of the machine without a cuff directly to the pipe. However, even if the tubes match each other in diameter, due to the embossed surface, the risk of leakage increases, since the cone-shaped gasket that is included in the siphon kit does not ensure the tightness of the seam, but only temporarily closes the corrugation.
An example of connecting a washing machine drain to a siphon.
How to install a siphon
To do this, it is possible to simultaneously combine the flexible drain of the machine, the corrugation that connects to the sewer system and the siphon flask, as well as the pipe coming from the sink. Such requirements apply to models of plumbing fixtures equipped with an additional outlet on the pipe (located above the flask).
The installation process does not take much time and does not require any effort: the main structural elements included in the siphon kit are assembled. Then connect the drain hose of the machine and the corrugation to drain the wastewater into the sewer system from the sink. No auxiliary materials are used; rubber seals and plastic nuts are included in the kit.
The pipe is fixed to the sink with a metal screw. After assembly is completed, the siphon is connected to it using a plastic nut. At the same time, the flexible drain pipe of the machine is connected to the free outlet.
An example of a direct connection of a drain to a sewer pipe.
Removing the shipping bolts
Before performing the main work, the transportation bolts are removed - fasteners that ensure the safe movement of washing equipment to its destination. Their main function is to protect the equipment tank from damage during transportation.
In standard models there are only four of them. They are located at the back at an equidistant distance from each other.
To remove the fasteners you will need a wrench for unscrewing 10, 14 mm nuts and pliers. Each bolt has a pin. He comes out first. Afterwards, pliers are used to remove the entire bolt using the tack-and-turn method. These steps will help you quickly remove the shipping bolts. The remaining holes are plugged with plastic plugs.
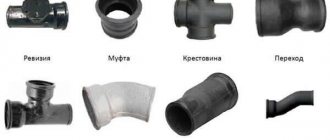
Direct connection to the sewer system
The easiest way is to install a tee. It can be inserted into the sewer pipe directly or through an adapter, provided that the communications and the fitting do not match each other in diameter. Sometimes the tee is immediately installed at the end of the sewer system pipe. This is done in case in the future it is planned to connect household appliances that require drainage. One of the outlets is closed with a plug.
In this section of the sewerage system, it is not necessary to use complex sealing methods (soldering, etc.). This is due to the fact that the fitting and drainage pipe are already equipped with rubber gaskets that are inserted into the grooves. As a result, all other elements of the sewerage system are installed without the use of tools.
This possibility is also due to the fact that the drainage pipe is located at a slight slope. This means that the drains are directed away from the tee with which the machine is connected.
Stage #3 – leveling the washing machine
In order for the automatic machine to serve with maximum efficiency, the installation and connection of the washing machine should be approached with the utmost care.
The floor base requires special attention, which must meet a number of criteria:
- strictly horizontal surface;
- durable structure;
- sustainability;
- protection from vibration and other influences inevitable during operation of the unit.
If the foundation does not meet these criteria, it is better to take measures to meet them.
In addition to levelness and reliability, the base for installing the washing machine must also have anti-vibration properties. If you are going to install it on a tiled or wooden floor, then it is better to carry out the whole process using devices that dampen vibration:
Image gallery
Photo from
Felt pieces against vibration
Anti-vibration stand for washing machine
Round anti-vibration device
Invisible anti-vibration pads
On fragile surfaces, it is advisable to make a cement-sand screed or strengthen the existing floors in the place where the washing device is supposed to be installed.
Adjustment of the position of the washing unit is achieved by changing the height of the support legs: to increase the distance from the floor they can be unscrewed, and to decrease they can be screwed in
After making sure that the base meets all the previously mentioned requirements, you can begin installation. The fully unpacked machine with the fasteners removed is placed in the selected location.
The horizontal installation is determined by the top panel, while the angle of deviation, which is checked by the top cover, should not exceed two degrees. Exceeding this indicator leads to a sharp increase in vibration, which has a very negative effect on the condition of the components and significantly reduces the service life of the machine.
Image gallery
Photo from
Step 1: Screwing all legs to minimum height
Step 2: Adjust the rear support to the required level
Step 3: Checking the horizontal alignment of the legs
Step 4: Fine Adjustment of Support Heights
Placing improvised materials under them that could slip out from under the supports during work is strictly prohibited. This may lead to an emergency situation. At the same time, it is allowed (and even recommended) to place a thin rubber mat on the sliding tiled surface.
As soon as the body of the machine is in a perfectly horizontal position, you should tighten the locknuts counterclockwise, fixing the optimal height of the support legs.
When leveling the machine, it is recommended to consider the following factors:
- The greatest degree of stability of the unit is achieved with the adjusting supports screwed in as much as possible, but this option is only permissible on a perfectly flat surface.
- When installing the machine on an inclined floor, it is advisable to use fixing parts to secure the supporting structures.
- To check whether the unit is installed correctly, you need to try to swing it diagonally. If the process is done correctly, there is no free play or its amplitude is the same for different diagonals.
Once you are sure that the unit is in the correct position, you can proceed to the next steps.
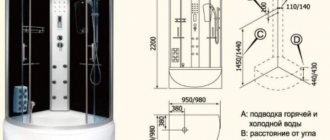
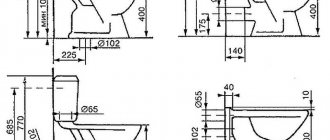
Connection height
60-100 cm is the regulated height for installing the washing machine drain.
Considering that sewer pipes often run close to the floor, sometimes there is a desire to connect the corrugation at the same level. This solution will lead to the penetration of an unpleasant odor from the sewer into the room. This problem is solved by installing a check valve.
However, you can avoid additional expenses and install an elbow at the junction of the sewer system pipe and the corrugation (machine drain hose). Thanks to this, some of the liquid will remain in the pipe, preventing the release of unpleasant odors into the room.
There are 2 possibilities for this:
- creating an elbow using fittings connected to a sewer pipe;
- forming a bend in the washing machine drain hose.
The first option is preferable. The corrugation is exposed to vibrations, so in the spin mode it is mobile, which can lead to the removal of all the liquid from the tube. It is better to install 2 elbows: a corrugated pipe and a rigid polymer pipe of the sewage system. To obtain the required result, the knees are placed at a certain height from the floor level: 60-100 cm. This measure also solves another problem - reducing wear on the main components of the device: the engine and the pump.
It is considered sufficient to install the hose drain hole at a height of 60-80 cm. The maximum height is 100 cm; it is not recommended to exceed it. This will complicate the movement of water. The location of the drain is selected taking into account the installation distance of the flexible tube. The closer it is to the washing machine, the higher the corrugation hole should be.
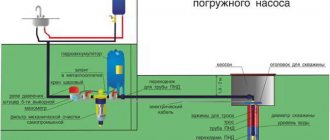
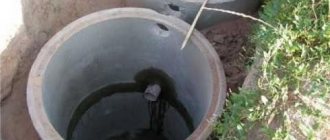
How to connect a drain in a private house without a sewer system
In this case, instead of drainage communications, a volumetric tank is used. The drain pipe of the machine is lowered into it. The result is sufficient height to create acceptable operating conditions for the pump.
It is important to study the characteristics of the machine: you need to find information about the amount of water that is used in the selected washing mode. Based on this, a container of the required volume is selected.
To increase the efficiency of the machine, it is necessary to increase the pressure in the system. For this purpose, use a pumping station or install another tank on a hill. It is important to maintain sufficient pressure in the system, otherwise the machine will quickly fail.
First start
To check the functionality of the installed washing machine, it is necessary to carry out a test wash. This is done in the following order:
- Connect the machine to the network.
- Select the desired washing mode and set it on the display.
- Enable work mode. When pouring water into the tank, monitor its filling time in comparison with the passport data. If the machine fills slowly, it is necessary to check the pressure in the water supply and, if necessary, take measures to increase it in accordance with the passport recommendations.
- Check the water heating time for the selected mode.
- When filling the tank with water, check for leaks; if there are any, eliminate the cause and repeat the tests.
The program and rules for conducting a trial run are described in detail in the relevant technical documentation. Recommendations for different models may differ, but these should be used as a guide.