As a result of installing a shower cabin instead of a bathtub, there is more free space in the bathroom. At the same time, the functionality of this room is not reduced. Connecting a shower stall yourself should not cause any difficulties even for a novice home DIYer.
You just need to follow the simple rules for connecting it to the water supply and sewerage system, which are listed in the article we presented. We suggest that you familiarize yourself with the connection technology described in detail. Here you will find valuable advice shared by experienced plumbers.
To make it easier to understand, the information is supplemented by photo collections, diagrams and video instructions.
What can a shower stall be connected to?
Depending on the functionality of the purchased model, the shower cabin can be connected to several communication systems. The standard version without additional functions requires only water supply and sewerage.
- Water pipes
Hot and cold water is supplied to the plumbing after connecting to the central water supply. It is recommended to additionally use special filters: this will help improve water quality and extend the operating life of the equipment.
- Sewerage
To dispose of dirty water or detergents, any shower stall must be connected to sewer pipes. During installation work, it is worth considering the throughput of the pipes.
- Circuit
Only certain models equipped with additional functions require power supply. The backlight and audio player are powered by electricity. Before making connections, you need to take care of waterproofing and proper grounding.
Important! It is better to entrust electrical work to a professional, but you can install a water supply and install a drain into the sewer yourself.
General information
Some models include radios, steam generators, and aromatherapy devices.
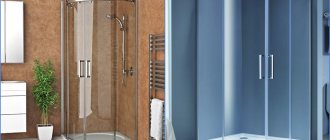
Open cabin type . The open-type plumbing fixtures are made in an angular shape so that they can be easily installed in a convenient corner of the room. The device consists of a corner tray in the form of an arc, a frame with doors in front, the box does not have a side wall, instead the wall of the bathroom protrudes.
Glass doors are made from quartz or organic material. The frame material is aluminum with a metal profile coated with a special anti-corrosion lubricant; the tray is made of acrylic material, or from earthenware intended for plumbing, rarely from metal coated with enamel.
The side walls with which the cabin interacts are laid with tiles or stone on a natural or artificial basis. These models do not have a roof; a watering can with a tap is attached to the side wall of the room. The water goes straight into the hole in the floor; if desired, you can build a tray with your own hands.
The model is considered the cheapest compared to other types of plumbing fixtures; they do not require a power connection.
Design Features:
1. booths are made in the shape of an arc or a rectangle, which are installed in the corner of the room or in a special niche.
2.inexpensive plumbing option. Cabins cost from 6 thousand to 15 thousand rubles.
3. have a simple connection diagram, all installation work can be done independently.
4. booths add noise and humidity to the room, because the device does not have a roof.
5. The cabins do not have modern functions, for example, a steam generator or ozonation.
6.The facing of the room must be done with very high quality, since the metal profile is attached to the walls using self-tapping screws.
Closed cabin type . This type looks like an independent structure, having a ceiling with walls and a tray. The booths do not disturb the cladding of the walls of the room; they are placed in any rooms where there is a supply to water supply and sewerage.
The materials from which the device parts are made are the same as those of open models.
The metal profile frame, assembled by hand, has walls on three sides. It is placed on a pallet and covered with a lid, which is equipped with a ventilation system and lighting.
Model features:
1. the price varies from 15 thousand to 30 thousand rubles, depending on the number of additional functions.
2. do not affect the microclimate of the room where they are installed, because they have an insulated design. They can be installed in a convenient place and in a room with a special supply line and equipped with drainage.
3.reduce the level of noise produced, so they are widely used in a wide variety of rooms.
Additional functions provided by closed boxes:
1. hydromassage, which can be horizontal, carried out in a bathtub, or vertical, which allows you to control the strength and angle of water supply. Its nozzles are located on the sides of the frame.
2. Turkish bath. The box is equipped with a steam generator that creates a sauna effect. The steam is distributed evenly in the cabin using a fan.
3. tropical shower. The watering can has a unique nozzle through which thin streams of water are supplied, very similar to tropical rain.
4.cascade shower. A lot of water is poured onto a person with great pressure.
5.aromatherapy. The function goes in tandem with steam generation. The steam passes through a reservoir filled with tasty liquid, thereby giving the room a pleasant smell.
6. chorotherapy. It is based on the properties of UV rays, as well as light capabilities, which are combined with the supply of water. The function has a beneficial effect on human health and strengthens the nervous system.
7.ozone therapy. The human skin is exposed to active oxygen.
8.voice control. Control, adjustment of functions and water pressure are carried out using a person’s voice.
9.telephony. Modern devices in their design have a built-in radio, remote control, and the ability to talk on the phone in loud mode.
10.special paraphernalia inside the booth. The boxes are equipped with mirrors, shelves, a seat, and various dispensers for hygiene products.
Combined cabin type. The shower fixtures have a Jacuzzi-shaped base instead of a regular tray. Combined The combined cabin is a box in which, instead of a base, a deep tray in the shape of a Jacuzzi is installed. A special deep tray looks like a bathtub, to which a metal frame with doors and walls is attached. They are open and closed.
Tools for connecting a shower stall
To connect the shower stall to the water supply and sewerage system, you need to stock up on tools and consumables. The instructions that accompany each model are also useful: they are needed to know the parameters important during the installation process.
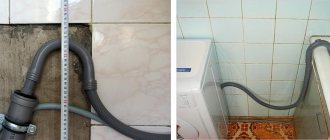
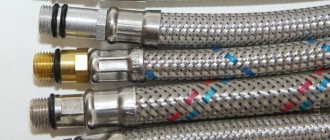
- Flexible or corrugated connecting hoses. These options are best suited for installation: they are easy to work with. Typically, such materials are supplied complete with the booth; if they are not available, then they are purchased separately, of suitable length and diameter.
- Compression fittings. They are needed to connect or separate certain areas on the hose.
- Screwdrivers, knives, adjustable wrenches. Their function is to adjust the length of the hose and fix it at the required point.
- Seals (FUM tape and rubber), sealant. The use of these materials is necessary to prevent leaks.
- Filters. Parts are needed to pre-clean water before entering the sprayer. Cleaners help extend the operating life of equipment and prevent possible breakdowns.
Important! If the plumbing fixtures are additionally equipped with a hydromassage function, you must purchase a special pump. It allows you to create the necessary water pressure.
When purchasing consumables yourself, you should make sure that they fit exactly in diameter and length. Incorrect installation leads to leaks and rapid wear of plumbing fixtures.
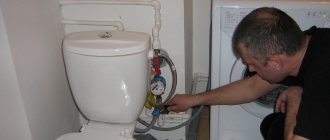
Checking work
Checking the correct operation of the shower cabin is the last stage of installation, which shows whether the work was done correctly. Even experienced plumbers do not neglect checking the shower, because this allows them to avoid leaks and problems during the operation of the equipment. To test the cabin, you need to restore the water supply, turn on the taps and carefully look at the operation of the device. This may cause the following problems:
- Water does not drain well. If water accumulates in the pan and does not go down the drain for a long time, then the drain is not connected correctly.
- Water is dripping in. Water often drips into the joints between pipes and hoses. This indicates that the joints are not tight enough. This problem can be eliminated using fum tape or rubber seals.
- The hydromassage does not work. Often there is not enough pressure for the hydromassage to work; in order to increase it, a pump is needed.
Please note that connecting hoses, corrugations and seals are consumables, that is, over time they become clogged and become unusable. Therefore, once every 1-2 years it is necessary to carry out preventive maintenance of the booths by cleaning or replacing them.
Preparing to connect the shower stall
Before installing the shower stall and connecting all the necessary systems, it is necessary to prepare the workplace.
- Turn off the water. You can turn off the water supply not throughout the entire apartment or house, but only in the bathroom.
- Open the cold and hot water taps. This is done in order to normalize the pressure in the pipeline.
- Install a pan, which will later need to be connected to the sewer drain.
It is important to choose the right place to install the shower. It is necessary to locate the plumbing fixtures close to the ventilation system - this is necessary for the drainage system to function correctly.
On a note
After connecting the shower to the water supply, sewerage and electricity, we try to start it up and make all the adjustments. The completed installation is checked in one simple way. A paper sheet is placed in the space between the booth and the floor, the tray is filled with water, and then drained. A completely dry sheet of paper will be proof of quality work done.
Do not forget the fact that all metal structures of the device connected to electricity must be grounded.
It is advisable to equip the room where the shower is installed with ventilation.
How to install a pallet
Most models of shower cabins require a special tray. In shape and design, it resembles a bathtub into which water flows during a shower. At the bottom there are special supports with the ability to adjust the height - thanks to this, the plane can be set exactly level.
During work, you should pay attention to ensuring that the bath is positioned exclusively horizontally. This is necessary to ensure that all the water flows into the drain and no puddles appear on the floor. The bottom of the pan is designed in such a way that there is a special recess in it where moisture is disposed of.
Some booth models do not require a special tray. In this case, you need to equip it yourself: make a raised platform out of concrete, and then lay it out with tiles and equip it with a drain.
You can construct a bath yourself using the following algorithm.
- Lay out the perimeter of the future pallet from ceramic bricks.
- Install a drain drain inside and connect to the sewer system.
- Fill the area of the pedestal with a concrete screed and make a slope towards the drain. To prevent the concrete from becoming soggy and deformed during operation, it is recommended to add liquid glass to the solution.
- To improve waterproofing properties, all seams are treated with sanitary sealant.
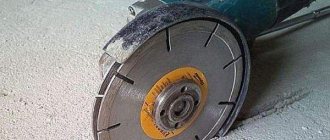
- For sewer drain equipment, it is better to choose corrugated pipes with a standard diameter of 4 cm.
Important! If the pipe leading to the sewer system is too narrow, there is a possibility of frequent blockages.
Closed type
They have four walls or a rounded wall along the entire contour. The ceiling closes the closed shower stall at the top. Such cabins can be placed not only in the corner of the bathroom, but anywhere, even in the middle of the living room. You just need to take care of the sewerage outlets and the water supply.
Shapes and sizes of standard shower cabins
The sizes of shower cabins start from compact 70/70 cm, to fairly large boxes with a wall of more than 2 meters.
Shower boxes often contain all sorts of additions, such as a sauna or hammam, tropical shower, aromatherapy devices, and multimedia functions.
Now let's take a closer look at how to install a shower stall?
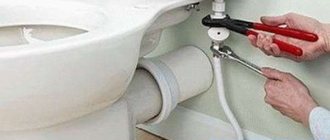
Connecting the shower cabin to the sewer
After installing the pallet or constructing the pedestal yourself, you can begin to connect the cabin to the sewer outlet.
- First you need to remove all the parts of the apron and lift the tray by the back.
- At the bottom of the structure there is a drain elbow, where you need to attach the end of a flexible tube.
- The second end of the hose is fixed to the drain hole located on the bathroom floor.
- The end of the microfiber-lined hose is inserted into the side nipple on the drain elbow.
- After completion of the work, the pallet is installed horizontally in the selected location, and the cabin is mounted further according to the instructions.
In order for the water to flow strictly to the designated place, the bottom of the bath must be installed horizontally and without deviation to the side. To check the evenness of the structure, you can use a long level. To adjust the position of the pallet, special supports are provided, the height of which is adjusted using locknuts.
When installing the drainage system, it is recommended to use flexible pipes slightly longer than indicated in the instructions. This will allow you to move the structure if necessary without additional installation work. If the pan is located far from the sewer drain, you need to install a special pump with magnetic valves, which will speed up the discharge of water.
To equip the drainage system, plumbers recommend using a flat siphon. It is necessary to form a water seal that blocks the penetration of unpleasant odors into the room. It is additionally treated with sealant and a rubber seal is laid to avoid leakage.
Before assembling the entire equipment body, you need to check whether moisture is draining correctly. If leaks occur and water drains slowly, you should immediately eliminate possible problems.
Fortune Cookie #3: Bad Smell from the Drain
An unpleasant sewer smell from the shower can spread as a result of improper operation of the water seal, which in turn is part of the siphon.
Operating principle of the water seal
Thus, to ensure the effective functioning of the water lock, you should select the right siphon and carry out its timely maintenance. Let's see what models the current market offers us:
Bottle
Bottle siphon device
It has the shape of a bottle, the “neck” of which is connected to the drain hole, and the side is equipped with a waste pipe leading to the sewer line. Pros:
- Easy to install and maintain. It is enough to unscrew the “bottle”, clean it and screw it back on;
This is how to clean a bottle siphon
- High reliability and durability.
The disadvantage is the need for a sufficiently large space under the pallet to accommodate a siphon of the described design, which is not always convenient or even possible.
I also recommend that you immediately take care of open and convenient access to the “bottle” so that in the future you will not have any difficulties in carrying out its maintenance.
Examples:
- Plastic bottle siphon from . Technical description:
| Parameter | Meaning |
| Connection | Hard |
| Material | White plastic |
| Drainage diameter | 3.2 cm |
| Inlet diameter | 3.2 cm |
| Country of manufacture | Germany |
| Length | 20 cm |
| Height | 11 cm |
| Width | 6.5 cm |
| Price | 155 rubles |
Sample of products offered by the VIEGA brand
- Metal bottle siphon from. Technical description:
| Parameter | Meaning |
| Connection | Hard |
| Material | Chrome plated brass |
| Drainage diameter | 3.2 cm |
| Inlet diameter | 3.2 cm |
| Country of manufacture | Germany |
| Length | 20 cm |
| Height | 18 cm |
| Width | 11 cm |
| Price | 1250 rubles |
Metal model of bottle siphon “VIEGA”
Knee
Knee siphon device
This option is a U or S curved pipe.
Pros:
- Low cost. For the sake of austerity, you can even take a piece of corrugated pipe and secure it with clamps, bending it into the desired shape;
- More compact sizes. It is much easier to place a pipe siphon under a tray than a bottle siphon.
Minuses:
- If corrugated material is used, then due to its uneven surface, expect frequent formation of garbage jams;
- If a rigid “elbow” is used as a material, then difficulties will arise when cleaning the pipe, since such a structure will not be easy to disassemble.
Corrugated models can be bought for less than a hundred rubles. The parameters of the metal “elbow” can be considered using the example of VIEGA products:
| Parameter | Meaning |
| Connection | Hard |
| Material | Chrome plated brass |
| Drainage diameter | 3.2 cm |
| Inlet diameter | 3.2 cm |
| Country of manufacture | Germany |
| Length | 16 cm |
| Height | 11 cm |
| Width | 6.5 cm |
| Price | 970 rubles |
Sample of a metal “elbow” of the “VIEGA” brand
Drain drains
Classic drain
But here a “dry” system of protection against the penetration of sewer odors is already used, which looks like a rubber membrane on a spring. With a slight water pressure, such a device lowers, allowing liquid to pass through, and then returns to place, tightly closing the hole.
The special advantages of such a system are:
- Compactness. Installation is carried out directly into the floor or a special niche, due to which the rise of the pallet is not observed at all;
A complete set of elements involved in creating an effective drainage system using a drain drain
| Designation in the figure | Item name |
| 1 | Channel |
| 2 | Siphon |
| 3 | Concrete pad |
| 4 | Concrete screed |
| 5 | Waterproofing layer |
| 6 | Waterproofing tape |
| 7 | Glue |
| 8 | Ceramic tile |
| 9 | Elastic filler |
| 10 | Anchor |
- Autonomy. In this case, there is no need for regular cleaning. Of course, over time, the membrane requires replacement, but this happens infrequently and the process itself is easy to carry out.
Thus, this option is ideal for arranging a shower drainage system. You will only have to spend money once and work on its implementation, which is somewhat labor-intensive due to the presence of concrete work, but then for a long time there will be no need to remember such a problem at all, and the cabin itself will stand flush with the floor level of the rest of the room.
Let's look at the technical indicators and price of such products using the example of a siphon from the Czech trap-drain system:
| Parameter | Meaning |
| Material | Plastic |
| Drainage diameter | 5.2 cm |
| Inlet diameter | 5 cm |
| Country of manufacture | Czech |
| Length | 7.2 cm |
| Height | 6.5 cm |
| Price | 672 rubles |
A visual example of an AlcaPlast drain drain
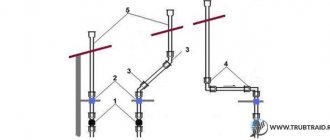
Connecting the shower cabin to the water supply
Plumbers recommend supplying water to the shower stall from the washbasin - for this you need to use long hoses and plastic outlets. You can equip the resulting system with separate valves for the passage of cold and hot water, so that in case of repairs, block access to the resource only to the shower.
If the water is hard and of poor quality, it is worth installing an additional filter. This will prevent the sprayer from clogging.
Some models of shower stalls require the use of wall-mounted faucets. In this case, the connections must be made rigid - with iron or hard plastic pipes.
The cabin is connected to the water supply system according to the following algorithm.
- Turn off the water supply, if there is a connected faucet, you need to open the tap for hot and cold water. This will help relieve pressure in the pipes.
- Dismantle old taps and showers.
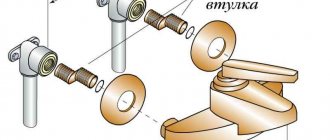
- Place adapters (bushings) on the ends of the water supply connections. They need to be adjusted so that their axis coincides with the mixer outlets.
- It is necessary to additionally wrap FUM tape onto threaded connections. The last step is to tighten the washers on the fittings well.
The water supply system supplied to the shower stall is constructed from plastic and metal-plastic pipes. They are connected to each other by welding or special sleeves. To connect the shower, it is recommended to use only threaded fittings. If necessary, they can be dismantled at any time and repair work carried out.
If the plumbing is additionally equipped with hydromassage, then there is no need to supply additional water to it. The built-in pump for forming the jet takes resource from the pan. The same applies to shower systems with steam bath capabilities.
When installing the cabin in a private house with an autonomous water supply, hot water must be connected through a boiler.
Some important tips for connecting a shower stall
You can connect the shower stall to the water supply and sewerage system yourself - the complexity of this process is the same as in the case of a classic bathtub. To ensure that the system functions without failures and does not cause discomfort, you should pay attention to a few tips from plumbers.
- All connections and fittings must be additionally tightened with a wrench. The external reliability of a structure can be deceiving, so such a measure will not be superfluous.
- Check the tightness of all connections and waterproofing. If necessary, all joints must be treated with sanitary sealant. If this point is ignored, there may be a risk of leaks.
- If the drain hole in the pan is located far from the sewer drain, it is necessary to additionally install a pump. This device will allow you to quickly recycle water.
- Sewer and water pipes should be located at an angle. This is necessary so that if the riser is blocked, the water will drain completely.
- Before purchasing a cabin, it is recommended to pay attention to what material the tube for discharging waste water into the sewer is made of. Silumin alloy has a short service life, so it is better to immediately install analogues made of stainless steel.
- If the water is of poor quality, it is necessary to install filters to purify it. Thanks to this part, you can protect the spray nozzles from contamination.
With proper installation of all components, the shower stall will function without interruption. One of the main tasks in the process of connecting water supply and equipment for draining water into the sewer system is selecting suitable parts.
DIY installation technology
It is customary to start assembling the cabin structure from the pallet. You can install it with a frame or do without it.
Assembling the pallet
The material for making the pallet frame is metal. The main thing in the frame is high-quality fastening of the elements. A frame is a frame structure made of beams installed crosswise.
We act according to the following plan:
- We screw the studs into the holes of the pallet.
- Screw the nuts onto the studs. We attach one from below, and the second for support.
- We put the frame support on the studs.
- We place the central leg and fix it.
- We fix the fastening beams.
- We use brackets to support the screen.
- We put the pallet in place.
When installing a pan, it is important to drain correctly. Installing a siphon
An important detail is to check the joints for leaks. If there are leaks, they must be repaired with sealant.
Small pallets do not require a frame. The main thing here is to install the siphon correctly. Disconnect the hose from the clamp. We connect the siphon to the pan - before doing this we treat the joints with sealant. We wait for the sealant to harden. Then we put the hose and clamp back.
After fixing, check the tightness. After pouring water, see if any leaks are visible.
This is very important, it is better to fix everything at this stage rather than disassemble the entire structure if something goes wrong
Communications
An important point in installation is the connection to the sewerage system.
We proceed according to this scenario:
- There is a film around the contour of the drain hole; it should be removed.
- We will replace the installed rubber gasket with silicone.
- Installing a siphon.
- Lubricate the threaded connection and the lower part with sealant.
- We connect a siphon to the sewer system. We treat the joints with silicone.
Walls, doors and roof
Despite the fact that this is the easiest stage of installation, it would be better to enlist the help of a partner. This will greatly simplify the entire procedure. When installing the structure, follow the manufacturer’s advice, because the devices, although similar to each other, each cabin has its own differences. The walls are fixed with bolts.
Sequence of work:
- Remove the film from the top of the pallet, leaving it only on the bottom.
- Moving the pallet away from the wall, we install the wall.
- We connect it to the corner of the hole in the pallet and fix it. The main thing is not to overdo it. Screws must be screwed in without overtightening.
- We mark the corners with holes with a marker.
- Remove the partition and apply sealant.
- We put the partition back and remove the excess sealant.
- We place a tray with a partition against the wall and try on the central part.
- We apply sealant to the joints of the side panels.
- We connect the walls and the central part.
- We fasten the remaining walls, like the first.
- We treat the profile with sealant and install partitions.
- We place the profile at the top and bottom. We treat the bottom one with sealant.
Assembling the roof:
- We unscrew the ventilation grilles and remove the film.
- We treat the watering can with silicone. This will make the connection tighter.
- We're putting up a ceiling. We tighten it from the bottom with self-tapping screws.
- We secure the hoses to the slats with clips.
- Based on the color marking, we connect the wiring.
- We connect the device, check the supply of water and electricity.
- We seal the central part and along the lower perimeter.
Putting up the doors
After completing the assembly, we install the doors. Usually this doesn't raise any questions.
We proceed this way:
- We fix the limiters using self-tapping screws;
- We put handles on the doors;
- we attach moldings with magnets to the door, install rollers with the wheels facing out;
- We place the door on the upper rollers.
This completes the installation. Don’t forget to check how smoothly the doors move and how tightly they close.