How to install a toilet with your own hands? How much installation space is required? How to connect a toilet to the sewer with your own hands? Read about this and other questions in this article.
Toilet is a technical device (sanitaryware) installed in toilets and equipped with an automatic or semi-automatic flushing system. Installing a toilet is a complex procedure, but you can do the installation yourself.
Anyone can install a toilet with their own hands
Installation methods
The toilet itself consists of a plumbing bowl and a flush cistern. The bowl can be floor-mounted or suspended. If the bowl is suspended, then the tank is hidden - built into the wall. In the case of a floor-standing bowl, there are three options for mounting the tank: on a special shelf on the bowl (compact), separate, connected using a flexible hose, in an installation (hidden in the wall of the frame).
Typical sizes of toilets of different designs
The advantage of a floor-standing toilet with a regular flush cistern is its ease of installation. It can be installed without starting repairs. The disadvantage is that compared to a suspended one, it takes up more space and looks heavier. Accordingly, installation of wall-hung models is complicated—it is necessary to secure the supporting structure—the installation—in the wall. Perhaps this is only during renovation.
Release to sewer
The choice of toilet for discharge into the sewer depends on the location of the sewer pipe. They happen:
- with horizontal outlet;
- oblique release;
- vertical.
Types of toilet outlets
If the pipe is in the floor, a vertical outlet will be optimal. If the outlet is in the floor, but is close to the wall, it is most convenient to have an oblique toilet. The horizontal version is universal. Using a corrugated pipe, it can be connected to both the wall and the floor.
Prepare materials and tools
You will need:
The Lifehacker Telegram channel contains only the best texts about technology, relationships, sports, cinema and much more. Subscribe!
Our Pinterest contains only the best texts about relationships, sports, cinema, health and much more. Subscribe!
- toilet with tank and fittings;
- fastening kit and flexible hose;
- eccentric cuff or corrugation;
- transition collar 123 × 110 mm (for connection to a cast iron socket);
- gas burner or hair dryer (for disconnecting a cast iron pipe);
- tile adhesive or repair compound (for filling a hole in the floor);
- hammer drill or impact drill;
- concrete drill with a diameter of 8 or 10 mm;
- tile drill 8 or 10 mm;
- a set of wrenches and a hacksaw;
- hammer and dowels;
- tape measure and marker;
- screwdrivers and knife;
- silicone sealant and rags;
- bucket and sponge;
- universal lubricant WD‑40 or equivalent (if necessary).
Briefly about the main thing
Having asked the question of how to install a toilet in a private house, the average person should first think about the location of the future bathroom, its insulation and the connection of the necessary sewer lines to it. After equipping the place, it is important to choose the correct and most convenient model of plumbing fixture, taking into account the peculiarities of connecting to the sewer system - with a vertical, horizontal or oblique drain for sewage. Then the toilet itself is installed directly, with fasteners, gaskets, connection to the sewerage system, installation of a water storage tank and connection to the water supply system. All actions must be carried out in exactly this sequence.
Ratings 0
Remove the old toilet
If you are installing a new toilet and not replacing it, move on to the next point.
YouTube channel “Na da4e”
Turn off the tap at the entrance to the tank or (if there is none) the tap at the entrance to the apartment. Remove the flexible line and then press the drain button. Fill a bucket of water and quickly pour it into the toilet to flush any remaining waste inside the siphon down the drain. Use a sponge to remove water from the bowl.
YouTube channel Nytro Piter
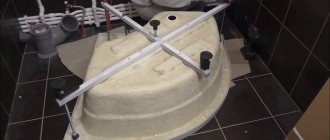
Unscrew the toilet mounting screws that secure it to the floor. Using a sharp knife, trim the caulk around the base of the bowl. Remove the corrugation from the siphon outlet and move the toilet. Cover the sewer pipe with a bag or rag so that the smell does not penetrate the room.
YouTube channel “Good-natured Plumber”
If the plumbing is very old, the dismantling process will be more difficult. First, unscrew the mounting bolts, spraying them with WD‑40 if necessary. Then, using a screwdriver, crumble the cement caulking around the perimeter of the cast-iron sewer pipe, having previously heated it with a torch or a hair dryer, and remove the toilet.
Sometimes it's easier to split ancient plumbing fixtures with a hammer or hammer drill, and then remove the fragments from the sewer pipe. If you decide to take drastic measures, do not forget to wear safety glasses.
Use a hammer to knock out the wooden stand and remove all debris. Using repair compound or tile adhesive, fill the resulting depression and wait 6-12 hours until it hardens completely.
The toilet in the house should be warm
You should start by identifying a suitable room for arrangement. It should be small (3x2 m is enough), allowing you to place all the planned plumbing elements and accessories inside.
The best solution would be to choose a room that has at least one external wall in order to minimize the work on organizing waste disposal. Otherwise, you need to plan to lay sewer pipes inside the basement, which will complicate the connection process and make it more expensive.
Sometimes they fence off part of a large room and the bathroom equipment there with all the necessary communications connected. The strength of this solution is the ability to choose the location and allocate the required number of square meters for high-quality arrangement of the toilet room. The disadvantage will be the loss of living space.
When choosing the location of the bathroom in the house, you need to consider the following:
- sewage was discharged through pipes along the minimum path;
- the room was sufficiently distant from the bedrooms, kitchen or dining room;
- the room must be accessible for water supply pipes and sewage disposal, and the issue of ventilation must also be considered.
An example of installing an electric heated floor in a bathroom Source greempol.ru
Assemble the tank fittings
YouTube channel “The Good-Natured Plumber”
Unpack the toilet and carefully read the instructions. Lay out all the parts on cardboard from the box to avoid scratching the tiles on the floor. Place conical gaskets onto the threads of the drain and fill valves with the narrow part towards the holes.
YouTube channel Cersanit
Place the valves in place and tighten the plastic nuts by hand, and then another quarter turn using a wrench. Make sure that the drain valve does not touch the walls of the tank (otherwise the float will become stuck and will not shut off the water when filling). To do this, check its movement by hand or turn the tank over.
Preparation
Successful toilet installation begins with choosing a new plumbing fixture .
A new toilet can be installed in the place of the old one or a minor redevelopment can be done in the bathroom. If the bathroom is very small and relocation is technically impossible , you need to choose a model of the same type as the device to be replaced.
Floor-standing toilets differ in the design of their main components. The toilet outlet can be:
- vertical;
- horizontal;
- oblique
Bowls are divided into:
- funnel-shaped;
- visor;
- disc-shaped.
The cistern can be mounted on the wall or combined with the base of the toilet . To attach the toilet to the floor, two or four fastening points are most often provided, but there are models that are attached to the floor using corners, which are necessarily included in the delivery package.
The most important selection criterion is the type of outlet . If you do not plan to redo the sewer pipe inlet, the drain should be arranged in the same way as before. It is almost impossible to qualitatively and reliably combine drains and inlets that do not correspond to each other, unless it is a toilet with an outlet
The method of installing the tank must be taken into account when designing and performing finishing work in the bathroom. To install the tank, you will need to prepare a place and install anchors in the wall.
If replacing a toilet is not part of a major overhaul, but is done as an emergency, it is better that the design of the flush cistern of the new toilet matches the old one . This is not a dogma, but elementary considerations of saving time, effort and money.
What follows is one of the most labor-intensive operations before installing a new toilet -
dismantling the old one:
- First you need to disconnect the drain tank from the water supply.
- The water supply should be turned off, the water should be drained from the tank and the hose should be disconnected.
- After this, the tank can be removed from its mounts.
- To remove the bolts, you will need a screwdriver or open-end wrench to hold the bolt and an adjustable wrench to loosen the nut.
- If the bolts are heavily rusted or coated with salt deposits, they must first be soaked with kerosene, vinegar, or use special compounds. For this purpose, WD-40 lubricant . After treatment, the deposits are loosened and the bolt gives in more easily.
- After dismantling the tank, the toilet itself is removed. First, unscrew the nuts and then disconnect the device from the sewer.
- In old houses, where major repairs have not been carried out for a long time, the drains are fixed to the sewer pipes using cement coating, which needs to be knocked down. To do this, prick the coating with a chisel in two or three places .
- After this, the toilet will have to be rocked from side to side until the drain loosens.
- The toilet is then tilted to drain the remaining water and only then disconnected from the sewer.
- The hole must be closed with a wooden plug of the appropriate diameter or hammered with a rag gag . This operation should not be neglected; gases from the sewer not only smell disgusting, they are flammable and highly toxic.
You can make a hole in the toilet pipe and use an improvised lever from improvised materials such as a stick or a metal rod. If your financial situation allows, simultaneously with replacing the toilet, it is worth replacing cast iron pipes with more modern plastic ones .
To save space and transport safety, toilets are sold disassembled.
Each product comes with instructions, following which anyone can assemble the device.
In general terms, the assembly diagram looks like this:
- A drain mechanism is installed in the tank . It is included in the delivery kit already assembled; you just need to insert it into the tank and secure it. Before installing the mechanism, you need to inspect the contacting surfaces and remove any burrs found.
- A rubber sealing washer is put on the device, it is inserted into the tank and screwed with a plastic nut with a seal. To avoid damage to the nut, this operation is performed manually , without the use of any tools.
- A cistern with an installed flush mechanism is attached to the toilet. For this purpose, a set of fastening elements is provided, which includes bolts, nuts, washers and rubber seals . Before inserting the bolts into the holes provided for them, put washers on them, then sealing elements.
- After alignment, seals are first put on the protruding ends, then washers . The nuts are tightened until they stop, alternately, so that the force is distributed evenly.
From this video you can learn how to properly assemble and install a toilet flush cistern yourself:
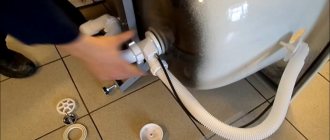
Place the tank on the bowl
YouTube channel Cersanit
Place the largest rubber gasket on the toilet shelf and place the tank on top, aligning the mounting holes. Place cone washers on the bolts with the narrow part facing down and insert the fasteners into the holes.
YouTube channel Cersanit
Install plastic and metal washers from below, and then tighten the nuts evenly by hand so that the tank fits without distortion. Place the lid on the tank, insert and tighten the drain button by hand.
Popular models
Diagram of the “West Standard” model
The manufacturer produces toilets in different sizes: from compact small options to regular standard ones. Some versions are available in several colors.
West Standard
Santeri West toilets are universal floor products.
The kit includes:
- tank volume 6 liters;
- plastic seat.
This version is available to any buyer due to its budget price.
Santeri Ultra Standard
A classic floor product. It features a laconic design and a snow-white body color. A fairly compact option that does not take up much space.
The disadvantages include:
- round bowl;
- small space;
- weak drain.
The model is suitable for children or small people.
Vorotynsky Standard
Toilet-compact Vorotynsky
Snow-white toilet bowl with a smooth surface, compact size. Convenient drainage hole eliminates blockages. The anti-splash system eliminates inconvenience.
The disadvantages include a tight button, which is difficult to press even for adults, as well as the formation of condensation on the tank.
Victoria Standard
It has a laconic appearance.
The kit includes:
- fittings for installation;
- comfortable seat;
- fasteners.
A guarantee of up to 2 years is provided even on the seat.
It is difficult to find components if replacement is required. The drain sometimes fails. Problems arise after several years of service.
Model differs:
- pleasant appearance;
- suitable for any size bathroom;
- ease of care.
The seat is equipped with rubber inserts, this softens the impact of the cover. The bowl is completely washed with water, which ensures perfect cleanliness. There is a shelf inside the seat that prevents water from splashing.
Keep in mind that condensation forms on the tank, and sometimes chips appear if used incorrectly. No double flush.
Try the toilet in place
YouTube channel Cersanit
Next, decide on the location of the new toilet. Move the bowl into place and try to sit down. To save space, you can press as close as possible to the wall, but not as closely as possible - it is advisable to leave a gap of 2-3 cm between it and the tank.
YouTube channel Cersanit
Align the drain with the sewer outlet. If you are using a straight pipe for the connection, measure with a tape measure and cut off the required piece. Use a knife to remove any burrs from the edge. If you use a corrugation or an eccentric cuff, try on how they become.
Connect to the sewer
YouTube channel Cersanit
Remove the bag or rag from the sewer outlet. Lubricate the O-ring in the socket with soap or detergent and insert the pipe into it, and then the toilet flush into it. Install the corrugation or eccentric collar in the same way.
YouTube channel “Good-natured Plumber”
On an old cast-iron sewer, first insert a special adapter collar with a diameter of 123 × 110 mm into the socket that has been cleaned and lubricated with sealant. For reliability, you can additionally coat the joint of the plastic pipe with the cuff with silicone.
Estimated prices for installation work
In order to choose an installation company, you can seek help from a service organization or a company that does plumbing work. It is important to conclude an agreement and specify warranty periods for installation work.
Here are the approximate prices for basic bathroom refurbishment work:
| Installation work | price, rub. |
| Dismantling | Up to 1000 |
| Installation of floor equipment | 1500-2000 |
| Installation of suspended equipment | 3600-4200 |
| Replacing corrugations | From 700 |
Additionally, you may need funds for preliminary consultation, replacement of sewer pipes and adjustment of equipment. The total amount in the end is not small. Self-installation significantly saves personal funds, which can be invested in purchasing better equipment.
Plumbing equipment designs
Attach the toilet to the floor
YouTube channel Cersanit
Move the bowl to the intended place and mark the mounting holes on the floor with a marker. If the toilet has hidden brackets, trace the bottom around the perimeter, and then measure the required distance from the edges according to the drawing in the instructions.
YouTube channel Cersanit
Drill holes in the floor. First the tiles using a special drill for ceramics, and then the concrete using a suitable drill. Remove dust and insert dowels into the holes.
YouTube channel “Alexander Cherepitsa”
Apply the silicone in a snake around the perimeter of the toilet, not reaching 2-3 cm from the edge, and wait about 20 minutes until it hardens a little.
YouTube channel “Alexander Cherepitsa”
Then install the plumbing fixtures in place and, putting plastic washers on the fastening bolts, tighten them with a wrench. Do not overdo it so that the ceramic does not burst; it is better to tighten the fasteners later if necessary. Place decorative caps on the bolt heads.
YouTube channel Cersanit
Fill the joint between the bowl and the tile using sealant. Remove excess with your finger or tissue and let dry. It is better to use transparent silicone, since the white one turns yellow and gets dirty over time.
If there are heated floor pipes under the tiles or you cannot drill through the tiles for other reasons, you can simply glue the toilet bowl to silicone.
To do this, the surface must be perfectly flat, clean and dry, and before using new plumbing, you must wait at least a day until the sealant has completely hardened.
Features of choosing plumbing fixtures
Before installing a toilet with your own hands in a private home, you need to make the right choice of this accessory, based on some recommendations:
- the toilet seat has a standard height of 40 cm with minor differences of 5 cm in one direction or another depending on the manufacturer (it is important to choose the most comfortable model);
- with a horizontal drain, the outlet of the hole in a standard toilet is located 18.5 cm from the floor level (this must be taken into account when organizing the connection to the sewer);
- with an inclined drain, the outlet of the hole is located 15 cm from the floor (normal gravity flow will be ensured by placing the wiring tee 10-15 cm below, i.e. near the floor level);
Possible options for flushing the toilet Source santehnika-nk.ru
- for vertical drainage, these models are usually placed on a drainage pipe and firmly secured with a clamp.
The vertical drain option is only possible if there is an underground of the required size with an appropriate foundation. Otherwise, it is better to use plumbing with an inclined or horizontal drain and install the necessary communications.
Install the toilet seat
YouTube channel “Good-natured Plumber”
Assemble the lid fittings. If there are “left” and “right” marks on the mounts, do not confuse them. Insert the rubber bushings into the holes, install the eccentrics on top and adjust the distance between them to the width of the toilet seat holes.
YouTube channel “Good-natured Plumber”
Tighten the mounting bolts with plastic washers from below. Place the decorative pads on the rubber part of the eccentrics and install the cover on them until it clicks.