The question often arises: is it possible to do the installation on your own?
Following certain instructions and knowing all the pitfalls is quite possible. The article will discuss such a source as a well, and what is the diagram for connecting the pumping station to the well.
We install a pumping station
The structure is assembled in dry, warm weather, choosing as a support a platform made of concrete or brick, which is covered with a hard rubber sheet at least 3 cm thick for shock absorption. The device is fixed with anchor bolts. The base for the unit can be a welded steel frame or a wooden plate. The equipment must be installed level and without distortion.
Pipe laying
The connection of the pressure station is preceded by the installation of pipes from the well to the house. It is recommended to use a HDPE product with a diameter of 32 mm as the material. It is dug in at a depth of 1.4-1.8 m, while the bottom of the trench is filled with a 20 cm thick layer of sand. If the system is placed on the ground, the intake line is thermally insulated. A hole is installed in the foundation of the house corresponding to the diameter of the supply element of the chain.
Connection of the pumping station.
Connecting the device
The water side pipe is equipped with a filter mesh with a check valve, for which a casing coupling is used. A similar connecting piece with transition 32 - 1РН is installed in the area of connection to the pressure device.
An additional mesh filter is also provided here, as well as a drain tap or a collapsible American fitting, which allows you to preserve the system for the period of repair of the pressure unit.
After connecting the intake pipe and the pump, the pressure hose or pump pipe is fixed to the inlet pipe of the storage tank. A relay is mounted inside the tank, which sets the required level of water pressure in the hydraulic tank. The control module can be expanded with water presence and pump temperature sensors.
In order to save money, the connection to the water supply system is made by installing a transition fitting of a smaller diameter. A shut-off ball valve and a collapsible fitting are screwed into it.
Then the pipe is equipped with a water purification filter and shut-off valves, which will cut off the device from the pipe when it is replaced. As an additional option, a bypass pipeline can be provided.
A drain for irrigation is organized before the filter element; after inserting the taps, it is possible to branch out the networks of cold and hot pipelines and a side branch of the heating system. During seasonal operation of the pipeline, a mechanism for draining water is installed at the lowest point of the system.
After creating the water supply circuit, the installation is connected to the electrical network and the equipment is tested.
Pre-start setup
Before switching on, the relay is set to a lower pressure value, which is achieved by compressing the corresponding spring with a screw.
Advantages and disadvantages
The advantages of the technology include:
- Gentle operating mode. The pump turns on only when there is a critical decrease in the water level in the storage tank.
- Compactness. All mechanisms are combined into one unit, which speeds up the process of maintenance and repair.
- The ability to continue to work in autonomous mode for a limited time after a pump breakdown or power failure.
Disadvantages include a high noise level and the need to use an ejector when drawing water at a depth of more than 8-10 m. An additional lifting mechanism can be remote or built-in - the second of them has high performance, but at the same time increases the noise level of the structure.
How to choose a pumping station for a well
It is necessary to select a pumping station for a well on a site taking into account the parameters of the pump and factors characterizing the water source. In particular we are talking about the following:
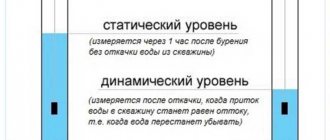
Distance of the water source from the main building. Lowest point of water intake. Conclusions should be drawn based on the dynamic water level, analyzing the indicators for about two days with constant use of the liquid. In this case, it is not recommended to take into account the static level, since the calculations may be erroneous. Nominal pump head
Here it is important to determine how high the water column can be created by the connected equipment. The calculation formula involves summing up the suction value, the length of horizontal sections of the water supply system, vertical lift and losses for transportation through pipes. Unit performance
Calculations can be taken based on the average water flow at all connected points. The resulting total value should not exceed the flow rate of the water supply source (read: “How to choose a pumping station for a private house - rules for choosing a water pumping station”). Mains voltage. Most pumping stations for domestic use operate on a 220 V network. As for powerful units, they are equipped with three-phase motors that operate on a 380 V network. Station power. Pumping stations of various types consume quite a large amount of electricity, from 500 W to 2 kW. Depending on the power of the pumping station, the type of circuit breaker should be selected. Storage capacity volume. This parameter depends entirely on the number of people living in the house. For example, a 24-liter capacity is sufficient for a family of 2 people; for a family of more than 5 people, a 100-liter tank should be installed.
The depth of the well also affects the type of pump. For example, for a well up to 15 meters deep, a pump with a built-in ejector is required; if the depth of the source exceeds 20 meters, then you need to use a pump with an external ejector. Loop suction increases water pressure, but at the same time reduces productivity and increases electricity consumption.
Selection of power and model
Every site owner has a question about how to choose and install a suitable model. An important criterion in this case is power. But such a moment does not mean that you need to choose the most powerful station of all. The indicator is selected depending on the water consumption and how many people live in the house. Sometimes low-power pumping stations are suitable because they have high productivity.
At the same time, experts remind that the performance indicator directly depends on the volume of the storage tank and the operating mode of the pump (whether there are breaks in it). The larger the storage capacity, the less often the automation is triggered, i.e. The load directly on starting the engine is also reduced.
When choosing a brand, everything depends not only on the technical characteristics, but also on the allocated budget. In addition, there is always a subjective factor and personal preferences that influence the purchasing decision.
But you need to keep in mind that about 50% of the drive is always occupied by air in a compressed state - this is necessary to ensure pressure inside and displacement of liquid. That is, water does not completely fill the device.
If the pump is turned off, then consumers will be able to rely on the volume of water that is in the tank. Therefore, it is important to choose it correctly.
Models of pumping stations.
The calculation scheme is as follows:
- if 1-2 people permanently live in the house (or it is a summer house, when a simple shower is installed), then the volume should be about 24 liters;
- if 3-4 people live, it is recommended to buy equipment with a capacity of 50 liters;
- if it is planned that there will be more than 5 residents, then the volume should be 100 liters.
When choosing, it is worth considering additional options. For such an installation it could be a dry release relay. It is not considered a mandatory part, and some manufacturers do not supply it. But experts recommend not to neglect it, since it allows you to extend the life of the equipment, and sometimes even prevents breakdowns.
Connecting a deep-well pump to a water supply system
When installing an individual water supply system, even at the stage of drilling operations, you should know the diameter and material of the pipeline, the depth of the water line, the operating pressure in the system for which the equipment is designed. When installing and turning on the water supply, follow the following recommendations:
When using a plumbing system in winter, you will have to take measures to protect it from the cold. Typically, pipes are laid underground and they must exit from the well head, so a caisson pit will be needed to install and maintain the equipment. To make it more convenient and reduce the depth, the water line is insulated and heated with an electric cable.
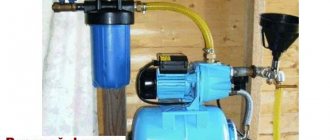
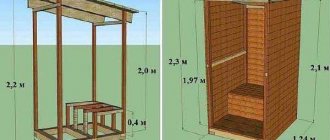
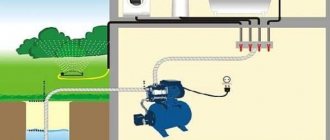
Rice. 6 Assembling a pumping station with your own hands - main steps
- When determining the immersion depth of the electric pump, set the dynamic level with the equipment turned on and suspend the unit 2 meters below the set mark; the minimum distance to the bottom for deep models is 1 meter.
- When using sand wells, it is necessary to install sand filters or rough cleaning filters in the water line in front of the equipment.
- Electric pumps change their pumping efficiency when the supply voltage changes, so for stable operation it is better to purchase a voltage stabilizer and connect the equipment to it.
- For ease of operation and maintenance, the pumping station is often assembled with your own hands. A pressure gauge and pressure switch are mounted on the hydraulic accumulator using a standard five-inlet fitting, but since there is no pipe for attaching the dry-running relay, it will have to be installed on an additional tee.
- Often electric pumps have a short power cable, not long enough to connect to the mains. It is extended by soldering a similar one with further insulation of the connection point with a heat-shrink sleeve.
- The presence of coarse and fine filters in the water supply system is mandatory. They must be placed before the automatic control system, otherwise the ingress of sand and dirt will lead to their incorrect operation and breakdown.
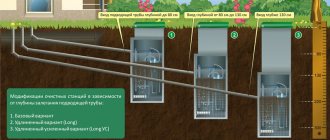
Rice. 7 Placement of automatic equipment in a caisson pit
⇡# Battery life
The battery life of the VivoBook S15 S533FL on a single charge is typical for laptops with similar screen sizes and hardware specifications. The 50 Wh battery provides more than six hours of active web surfing or watching movies in HEVC. In this case, at the maximum screen brightness, which is equal to 200 cd/m2, adopted in our methodology for measuring battery life.
Pump station control unit
A standard set of pump station control devices consists of a fitting, a pressure switch and a pressure gauge and is installed on the pressure pipeline. The pressure gauge is used to monitor the current pressure in the system, and the relay is the most important element for controlling the pumping station. It controls the supply of water to the pressure tank according to specified parameters and ensures automatic operation of the pump, turning it on and off.
The main operating elements of the relay are the minimum and maximum pressure springs, which are triggered when the pressure in the network reaches the value specified by the settings. At low pressure, the spring opens and closes a contact that turns on the pump motor. Exceeding pressure compresses it, and when the maximum threshold is reached, the contact opens. The pump turns off and the water supply stops.
The automation unit is a more complex device with advanced capabilities. In addition to switching electrical circuits when responding to increases and decreases in pressure, the automation unit protects the system from dry running.
Image gallery Photos from
The pressure switch records and reacts to two water pressure values set in the settings in the system. When it falls below the lower value, the pump turns on, when it reaches the upper value, it turns off
The control unit also starts the pumping equipment when the pressure drops and stops it when the upper pressure value is reached. This device allows you to more accurately set the lower and upper pressure limit settings
In addition to the duties performed by the pressure switch to start/stop the pump, the control unit protects the unit from “dry running” - work with an empty working part, as a result of which the motor can burn out
Pressure switch for pumping station control
Pressure switch components and design
Pumping equipment control unit
Expanded functionality of the automation unit
When choosing a control device for stations pumping water from shallow excavations, it is better to give preference to the option with protection against dry running. It will protect the pump from overheating and turn it off if for some reason (dirt has entered, the liquid level in the source has dropped below the intake unit) water stops flowing into the system.
The pumping station operates in cycles, each of which can be divided into two stages:
- The pump turns on and lifts water from the source. It fills the system and hydraulic tank until the pressure exceeds the upper threshold. After this, the pressure switch turns off the pump motor and the water supply stops. The pumping station goes into sleep mode.
- When consumers are turned on (opening taps, using water-consuming equipment), water comes from the hydraulic accumulator tank. Fluid flow from the hydraulic tank is carried out until the pressure drops to the lower threshold. This causes the pump to turn on again and the water to rise.
The number of cycles per hour must not exceed the maximum number of starts allowed for the pump used.
Design features of the pumping unit
A pumping unit (station) is a whole complex of technical devices, each of which plays its own role in ensuring the efficient operation of the entire system as a whole. A typical design diagram of a pumping installation includes a number of elements.
Main parts of the pumping station
Pump
In this capacity, as a rule, surface devices of the self-priming or centrifugal type are used. They are installed together with a set of other equipment included in the station on the surface of the earth, and an intake hose is lowered into a well or well, through which the liquid medium is pumped out from an underground source.
Mechanical filter
The filter is installed at the end of the hose, which is lowered into the pumped liquid medium. The purpose of such a device is to prevent solid inclusions contained in the water pumped from an underground source from entering the internal part of the pump.
Well mesh filters
Check valve
This element prevents water pumped from a well or well from moving in the opposite direction.
Hydraulic accumulator (hydraulic tank)
The hydraulic tank is a metal container, the inner part of which is divided by an elastic rubber partition - a membrane. One part of such a tank contains air, and the other part is pumped with water, raised by a pump from an underground source. The water entering the accumulator stretches the membrane, and when the pump is turned off, it begins to compress, acting on the liquid in the other half of the tank and pushing it through the pressure pipe into the pipeline under a certain pressure.
Pumping station hydraulic accumulator design
Working according to the principle described above, the hydraulic accumulator of the pumping station ensures constant pressure of the fluid flow in the pipeline. In addition, the pumping station, the installation of which does not take much effort and money, eliminates the occurrence of hydraulic shocks that are dangerous for the water supply system.
Automation block
It controls the operation of the pumping unit. The main element of the pumping automation unit is a relay that responds to the level of water pressure that fills the accumulator tank. In the event that the water pressure in the hydraulic accumulator drops to a critical level, the electric pump is automatically turned on using a relay, and water begins to flow into the hydraulic tank, tensioning the membrane. When the pressure of the liquid medium rises to the required level, the pump turns off.
Automation blocks allow you to automate the operation of the electric pump
Pumping units are also equipped with pressure gauges for measuring pressure and pipes, with the help of which they are connected and connected to the main circuit of the water supply system.
It should be borne in mind that a typical pumping unit, which is made on the basis of a surface pump, can be used to pump water from wells and wells whose depth does not exceed 10 meters. In order to lift water from deeper underground sources, you can additionally equip the pumping unit with an ejector or assemble a pumping station with a submersible pump, but this design scheme is used quite rarely.
Installation diagram of a pump with a remote ejector
The modern market offers many pumping stations of various models and brands, the prices of which vary quite a lot. Meanwhile, you can save on purchasing serial equipment if you buy the necessary components and assemble the pumping station with your own hands.
First start-up and verification of correct installation
For initial start-up, the pump must be filled with water. To do this, you should provide a special filler funnel, cut off from the pump by a shut-off valve. A more convenient option for initial filling is pumping the pumping station with a manual piston pump connected at the outlet of the station.
The pump is controlled by a pressure switch.
It is connected to the hydraulic system and has a spring-loaded diaphragm (bellows) that transmits water pressure to the electromechanical part of the relay. The relay ensures that the contacts close when the pressure drops below the set one (switch-on pressure) and open when the switch-off pressure is reached. Usually the value of the lower pressure is directly adjusted by adjusting the compression force of the corresponding spring. The second adjustment is responsible for the pressure difference between turning the pump on and off.
You can determine what pressure values are set by looking at the pressure gauge on the supply pressure line. If there is no flow (closed taps), turn on the station and wait until it turns off. The pressure gauge will show the cut-off pressure. Open the water tap (it’s more convenient to be near the station), and slowly release the pressure. When the station is turned on, record the turn-on pressure. If the measured values do not suit you, remove the cover of the pressure switch and adjust the pressure values by rotating the corresponding nuts.
During the initial installation of the station and during its operation, it is necessary to maintain real parameter values in the operating range specified in the station passport. It is not recommended to force the pump to work, as they say, to wear out by increasing the pressure on the relay. This mode usually reduces the time between starting and stopping the pump. If the set pressure is significantly increased, the pump may go into mode without turning off at all, this means that the pump power is not enough to create the set pressure.
A simple tire pressure gauge is used to determine the available pressure. Naturally, before checking with a pressure gauge and installing the station, check the nipple. If air does not try to escape from it, then there may be a malfunction of both the nipple and the membrane itself. Be sure to keep in mind that it makes sense to measure air pressure only if there is no water pressure in the membrane, for which it is necessary to bleed it off with the pump turned off.
The preset air pressure should be slightly higher than the pump activation pressure. Then, by the time of start-up, there will still be a small amount of water left in the tank.
The check valve ensures that water moves in the system only in one direction. The automation of the pumping station controls the pressure or the presence of flow in the pressure part of the water supply. This means that the check valve should always be installed so that the pressure at the installation site of the automation cannot spontaneously decrease. Depending on the specific conditions, the check valve can be installed directly at the inlet of the pumping station or at the end of the water intake pipe lowered into the well. Sometimes they are installed at both points.
When starting, the pump must be filled with water. This should also be taken into account when choosing a location to install a check valve. To protect the pumping station from sand, filters are sometimes installed on the water intake line. A check valve is often mounted at the end of the water intake pipe, combined with a mesh filter into one unit. Surface pump stations are sometimes supplied with a rope filter at the inlet. Of course, you need to monitor its condition; as it becomes clogged, the suction depth will gradually decrease.
Video about connecting the station
The plot provides information necessary for clarity. How to assemble the station, as well as how to properly connect it to the well.
How to do a test run
The main condition for this is that the pumping station is filled with water, including all lines, as well as the hydraulic accumulator. Water enters the device through the filler hole. Turning on the power and starting the engine is carried out after the shut-off valves have been opened. After this, water gradually fills the pressure pipe. This is necessary in order to displace all the air from it. As a result, pressure increases.
As a rule, this parameter can take values from the range from 1.5 to 3 atmospheres; when the limit is reached, the equipment turns off.
Thus, the effective operation of such equipment is ensured not only by the correct choice of model suitable for use in certain conditions, but also by proper connection. And for this, it is first decided where the equipment will be installed, after which a hermetically sealed connection of the equipment with the internal and external pipelines is organized.
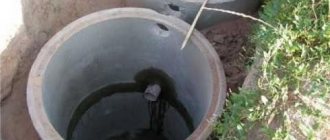
Connection diagram of a pumping station to a well at the dacha
The pumping station can be placed inside the well, if there is space for this; in addition, utility rooms are often allocated for it in the house itself or in the room
Pay attention to the depth at which the pipeline will be located. The pipe must not only be insulated, but also placed below the freezing depth of the soil so that the water in it does not freeze during the cold season
In order for the system to work correctly, you need to choose not only the type of pump, but also the depth at which it will operate. The deeper the water source and the farther it is from the building, the more powerful the pump itself should be. There should be a filter at the end of the pipe; it is located between the pipe and the pump, protecting the latter from debris getting into the mechanism.
It is usually written on the devices what depth they are designed for, but it is worth taking a more powerful one, since the calculation is carried out only from the bottom of the well to its surface, without taking into account the distance to the building. It is easy to calculate: 1 meter of vertical pipe location is 10 meters of its horizontal location, since it is easier to supply water in this plane.
Depending on the type and power of the pump, the pressure may be stronger or weaker. It can also be calculated. On average, the pump provides 1.5 atmospheres, but this is not enough pressure for the normal operation of the same washing machine or hydromassage; the water heater may require a higher temperature.
In order to control pressure, the equipment is equipped with a barometer. Depending on the pressure parameter, the size of the storage tank is calculated. The productivity of the station also plays an important role. This parameter indicates how many cubic meters per minute the pump is capable of delivering. You need to calculate based on peak water consumption, that is, when all the taps in the house are open or several consumer electrical appliances are running. In order to calculate which pumping station for a well is suitable, you need to know the productivity. To do this, you need to add up the number of water supply points.
From the point of view of power supply, it is more convenient to use those systems that are powered from a 22 Volt network. Some stations operate on 380 V phases, but such motors are not always convenient, because a three-phase connection is not available in every home. The power of a household station may vary, on average it is 500-2000 W. Based on this parameter, RCDs and other devices that will work together with the station are selected. To prevent the structure from overheating, many manufacturers install automation that will turn off the pumps in the event of an emergency load. The protection also works if there is no water in the source when power surges occur.
How to calculate the volume of a hydraulic accumulator?
The size of the tank determines how often the pump motor will turn on. The larger it is, the less frequently the installation operates, which allows you to save on electricity and increase the service life of the system. A hydraulic accumulator that is too large takes up a lot of space, so a medium-sized one is usually used. It holds 24 liters. This is enough for a small house inhabited by a family of three.
Trailer operation of hydraulic accumulator expansion tank
If up to 5 people live in a house, then it is better to install the tank at 50 liters; accordingly, if there are more than 6 people, it should be at least 100 liters. It is worth noting that the standard tanks of many stations hold 2 liters; such a hydraulic tank can only cope with water hammer and maintaining the required pressure; it is better not to save money and immediately replace it with a larger one. It is the number of water users in the house that will determine which pumping station to choose for the dacha.
Water purification
Do not forget that water from a well, even if it is suitable for drinking, may have impurities, for example, sand, small stones, and various debris may get into it, which can be gotten rid of by using a special water purification system. The most commonly used filters are filters. They are placed outside to make them easy to change. They can have different fractions and purify water to varying degrees. At the output, deep fine filters are used.
Models
- Gilex.
- Vortex.
- Ergus.
- Bison
- Gardena.
- Wilo SE.
- Karcher.
- Pedrollo.
- Grundfos.
- Wilo.
- Poplar.
- Unipump.
- Aquario.
- Aquarius.
- Biral.
- SFA.
- Vortex.
- Waterstry.
- Zota.
- Belamos.
- Pedrollo.
Before choosing a pumping station for a summer house with a well, it would not be superfluous to find out how things are with servicing the products of the selected manufacturer, and whether there are nearby dealers who can provide spare parts.
Connection sequence
Connection to a well and borehole
First, let's look at how to properly connect a pumping station to a well or well.
In this case, we will pay attention specifically to the two-pipe connection diagram, since it is more complex. We work in this order:
- First, we assemble the ejector with our own hands. As a rule, this is a monolithic unit made of cast iron, which has three outlets.
- We install a coarse filter made of propylene mesh at the lower outlet of the ejector.
- There is a plastic socket at the top of the cast iron structure. You need to put a squeegee of the required length with a diameter of 32 mm on it.
- Next, you need to assemble a squeegee to fit the diameter of the pipeline. Usually two parts with adapters are enough for this.
- A bronze coupling is installed at the outlet of this outlet. With its help, the transition to the polyethylene pipe will be made.
- Next, trenches are dug from the hydraulic structure to the house below the freezing point of the soil.
- Water pipes are laid in the trenches.
- A cap is installed at the exit of the well casing. If you can't find it, you can use a knee with a smooth angle.
- To connect the ejector to the water supply pipeline, couplings are used.
- Before lowering the second end of the pipe, it must be passed through the elbow at a right angle.
- Polyurethane foam is used to seal the space. After this, the pipe can be connected to an adapter (angular), and it, in turn, must be connected to the outer part of the water supply.
- Now you can lower the ejector into the well. In this case, the immersion depth must be determined in advance, taking into account the elevation of the top of the casing pipe.
- The head is fixed to the casing using reinforced sanitary tape.
Features of connecting to the water supply
If there are centralized water supply networks near your home, then the pumping station can be connected to them. Typically, the need for such a connection arises when the pressure in the system is too low, which does not allow the heating equipment to function efficiently and correctly. This situation can arise for several reasons:
- the hydrogeological conditions of the area have changed;
- outdated equipment is used;
- As the number of residents has increased, water consumption needs have become greater.
To connect to the central water supply you need to perform the following sequence of actions:
- The place where the pipeline will be disconnected is selected in advance. After stopping the water supply, the water supply is divided into two parts.
- So the part that comes from the city highway is connected to the storage tank.
- The liquid from this tank must flow through pipes to the pumping unit. A pipeline leading to a residential building is connected to the outlet from the pump.
- Next, the electrical wiring is laid and connected.
- After this, you can perform a test run, configure and adjust the equipment.
The main thing in setting up a pumping unit is to select the correct pressure in the system. To adjust the equipment, a small amount of water (about 2 liters) is poured into a special hole on the pump unit. Now you need to open the tap and measure the pressure in the system at which the pump turns off and on.
If the pressure at which the unit operates does not fall within the specified limits, it is necessary to adjust the device. It's very easy to do this:
- The cover on the pressure switch opens.
- To adjust the device shut-off pressure, use a screw marked “DR”. It needs to be twisted towards decreasing or increasing depending on the results.
- To adjust the switching pressure, you need to turn the screw marked “P”.
- After adjustment, the cover on the relay is put in place.
Also, do not forget that the long-term and proper operation of pumping equipment is affected by the composition of the water, namely various admixtures of sand and clay. To protect the equipment from impurities, a filter is installed at the suction inlet of the station.
Choosing an installation location
There are two options.
First. If water from the well is used only in the summer, and there are no options for connecting the water supply in the house, you can connect the pumping station to the well according to a temporary (seasonal) scheme. This means that during the winter some of the pipelines that might have thawed can be disassembled and reassembled in the spring. It is possible not to disassemble the water supply system, but then it is necessary to provide drainage fittings for emptying the pipelines for the winter, and also carefully maintain the slopes of the pipes to eliminate the possibility of incomplete emptying of the pipes. In this case, there are no requirements for placing the pumping station in an insulated room. Water points can be located wherever it is convenient. The main thing is that in this case there is no need to lay a stationary anti-freeze pipe and, most importantly, there is no need to install this pipe into a well in the ground.
Second. In the case of year-round use of water and its use in the home plumbing, it is necessary to install a water pipe into the house. The pipe should be buried below the soil freezing level; this level should be determined based on whether the installation site belongs to a specific geographic area. If this is not possible, you can use various methods of electrical heating of pipelines. The pipe insertion into the well must be absolutely sealed. It is better to supply water to the house after the final formation of the well, simultaneously with the installation of a well clay castle.
When installing a pumping station based on a surface pump outside the well shaft, it should be taken into account that even if the required level difference between the pump and the water level is maintained, the additional load on the suction pipeline is exerted by the length of its horizontal section. It is advisable to minimize the distance in order to properly connect the pumping station and well. To make approximate calculations, keep in mind that one meter vertically is equivalent to four meters horizontally. For example, when installing a pumping station in a well, the horizontal length will be 8 meters, then the suction depth is reduced by two meters.
When connecting a pumping station to a submersible well, the same principles remain. The only difference is that the automation is installed indoors, and the pump itself is lowered into the well.
The figure shows the pump configuration.
Where to install the check valve
First, a few words about how a water check valve is indicated on the diagrams. There is a special icon for it. These are two triangles with their vertices facing each other. One of the triangles is shaded, one is not. The direction of movement of the working medium is indicated by an arrow. In the opposite direction the flow is closed.
Graphic designation of a check valve in diagrams
In general, there is no clear indication of where exactly the check valve should be installed.
It is important that it performs its functions, and the location of its installation is a secondary matter. The water supply or heating system must work correctly. And you determine its specific location based on system parameters and ease of maintenance
The exception is the water supply in the apartment. Here they will clearly tell you that we install a check valve in front of the meter and nothing else.
And you determine its specific location based on the system parameters and ease of maintenance. The exception is the water supply in the apartment. Here they will clearly tell you that we install the check valve in front of the meter and nothing else.
Where to put a check valve on the water when introducing it into the apartment - after the meter
For example, in the boiler piping there should be a non-return (shut-off) valve in the supply pipeline. It prevents hot water from entering the system, which can happen when the water heats up and this creates increased pressure that can “overwhelm” the water supply. In this case, it is better to place the return line closer to the source of hot water, so as not to subject other piping elements and cold water pipes, which today are not always made of metal, to thermal stress.
On a well or in a well with a submersible pump
If you are looking for information on where to install a check valve on a submersible pump, the information may be contradictory. Some advise installing it immediately at the outlet of the pump, others at the entrance to the house or in a pit if we are talking about a well. Oddly enough, all three options work. Just for different occasions.
We select the installation location of the check valve in the water supply system depending on the parameters of the system and equipment
It is possible to install a check valve in a house or in a pit above a well if the vertical section of the pipeline does not exceed 7 meters. The length of the horizontal section (if it is without slope) does not matter. With such a length of the pipeline, water will not flow back into the well or well.
Installation location of the check valve in a water supply system with a submersible pump
If the water surface is below seven meters (the pump draws water from a depth of more than 7 meters), we install a check valve after the pump. You can do it right away (as in the photo above), or you can install a filter, then a check valve. It is permissible to install the valve a couple of meters above the water level. This no longer plays a big role. But this installation method - at depth - is inconvenient for maintenance. Sooner or later the valve will have to be either cleaned or replaced. If it is in a well or in a well, everything must be taken to the surface. The replacement itself takes just a few minutes. It takes about five minutes to unscrew the thread, remove the old one, check/clean it or install a new one. But all the preparatory work is hard, wet and unpleasant. So, if possible, we move the check valve into the house or pit.