Not all users know how to caulk a cast iron sewer pipe. Moreover, not everyone understands what we are talking about. However, during the assembly or reconstruction of a sewer system, the ability to correctly caulk pipe joints will be very useful.
Many houses still have old cast iron pipelines, which are not practical to completely replace with modern plastic. The pipes are still strong, capable of working for decades. As a rule, they are left intact, replacing only the apartment horizontal sections of wiring. Let's look at how cast iron pipes are connected when installing drainage systems.
Features of cast iron pipes
Cast iron pipes were used everywhere in Soviet times. Alternative fabrication materials have been used on a limited scale for the assembly of specialty sewer lines. The properties of cast iron pipelines allow the old system to still work. The advantages of these pipelines:
- strength;
- long service life;
- resistance to temperature changes;
- ability to work with aggressive liquids.
The disadvantages are:
- susceptibility to corrosion;
- heavy weight;
- fragility, inability to withstand sharp blows;
- difficulty of assembly.
The most significant drawback is the complex connection procedure, or chasing, of cast iron sewer pipes. Combined with the large weight of the parts, which create a significant load on the supporting structures, such drainage lines were difficult to install and maintain. However, the durability and reliability of cast iron systems are appreciated by experts. All networks, the condition of which does not cause concern, are still effectively used for wastewater disposal.
Cutting off an unnecessary section of pipe
If you want to repair or replace a sewer or water pipe system, you need to carry out each step step by step. After all, this process is different in that if it fails, you can damage your neighbors’ sewer system.
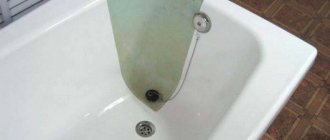
Chasing a toilet outlet is difficult because in order to dismantle this element of plumbing, it will have to be broken. It will not be possible to remove it whole.
Before you begin caulking the sewer system, it is necessary to repair the damaged area. There are several recommendations for this case.
The first stage of caulking cast iron sewer:
- The end pipe is very easy to replace. Here you won’t have to do any special work other than the caulking itself.
- If you want to replace the central part of the sewer riser, then this will be more difficult. Here you will have to make a cut.
- Four centimeters from the common pipe, make a cut in a circle. Use a protective mask, goggles and gloves.
- The unfinished part is carefully finished with a hacksaw. It is not recommended to hit the pipe with a hammer. The fact is that the fragility of metal is unpredictable; upon impact, instead of a damaged pipe, the required part may burst, and in this case, the next element will have to be replaced.
- We tie a large piece of rags to the pipe, then stick it into it. This is necessary to prevent foreign objects from getting into the riser.
- Now they go down some distance from the cut along the damaged element so that there are 20-30 centimeters left to the point of caulking, and we make a new cut. Carefully remove the cut piece.
- The hole in the pipe is again covered with a rag.
When cutting a pipe, all actions must be performed very carefully. Do not cut the product flush, as this increases the danger of work.
It is very convenient to do such work together with a friend. Then one person can hold the element to be cut, and the other can cut.
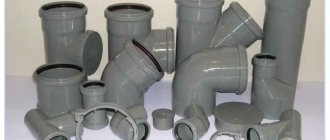
Connection methods
The assembly of cast iron pipelines is a complex and responsible task. There are several types of connections:
- into the bell This is the most popular type, which is called “caulking of sewer pipes.” The process requires accuracy and experience, strict adherence to technology requirements. Proper caulking can withstand several decades of leakage use;
- coupling connection. This option is used for socketless pipes. Special couplings are used that tightly grip the edges of the elements being connected. The build quality is high; no special experience or skills are required to complete the work. However, the necessary conditions for installing the coupling are not always available.
There are couplings that are not equipped with threaded clamps. They consist of two sockets into which the ends of the elements to be connected are inserted. Assembly of such lines also requires stamping of sewer pipes, performed using standard technology.
The procedure consists of filling the socket gap with a sealant and sealing it using hardening compounds. The sealant most often used is tarred hemp strand, which is stuffed into 2/3 of the socket and thoroughly compacted. The remaining third is then filled with a durable protective compound. For this purpose, cement and plumbing sulfur are used. Lead caulking is sometimes used in pressure lines, a complex but very effective procedure.
Caulking of pipe joints with various types of joints
If sulfur was used when installing the pipe, the joint is heated with a blowtorch until the sealant completely melts. When the connection cools, the pipe will easily unscrew. If the pipe swings and turns at the junction, it means that a heel was used. Before removing it, carefully swing the pipe, use a screwdriver to pick up a strand, and remove it. This process is much simpler than caulking pipes installed on sulfur.
Profession of a worker performing coining and coining operations
Embossing and chasing has many nuances. This is done by a qualified plumber. When you call a pipeline specialist, you have more confidence that the appropriate materials will be used, technological details will be observed, and the solidification time of the solution or melt will be maintained.
What skills do you need to have to perform minting?
According to the Unified Tariff and Qualification Reference Book (UTKS), a 2nd category plumber must be able to prepare sealing strands and cement mortars. Plumbers of the 3rd category and above must be able to make pipe connections. Of course, they must have skills in working with tools, both measuring and plumbing, understand the details of pipelines and know safe working practices.
How to hammer a bell
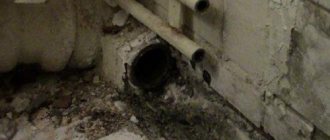
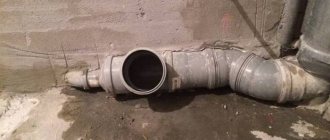
During repair work, reconstruction or expansion of the drainage system, it often becomes necessary to connect different lines. Before caulking a sewer pipe, it is often necessary to disassemble an old, defective connection. It is extremely difficult to hammer out a bell that has become overgrown with monolithic layers over many years. The main problem is the danger of destroying the socket of an entire pipe or tee. If this happens, you will have to disassemble and replace the entire riser or horizontal pipeline.
Before caulking out an old cast-iron sewer, it is necessary to clean the connecting element and remove all foreign objects and deposits. As a rule, various temporary patches of paint, additional layers of mortar, and other materials are applied over the standard connection. All such areas must be completely removed.
After this, it is necessary to determine what material the insulating seal is made of, since it is much easier to caulk a cast iron sewer with cement than with sulfur. If cement mortar is used, the process of disassembling the joint will be easier. However, if pouring with plumbing sulfur was used, the procedure will be complicated. The material will have to be heated with a gas torch or blowtorch, since it will not be possible to simply break and remove particles from the gap - sulfur has high strength and viscosity. You will have to work in a gas mask, since toxic gases will be released when heated.
Procedure
In order to caulk a cast iron drain, you must first remove the cement or sulfur filling (1/3 of the depth of the socket), and then remove the hemp strand (2/3 of the depth). The first stage requires caution and accuracy. There is a high risk of breaking the socket of a tee or other receiving element. First they use a chisel, then a screwdriver with a long thin blade. With gentle blows of a hammer, the screwdriver is immersed in the gap, breaking off small pieces of the seal.
Many sources recommend first tapping the socket around the circumference with a hammer, and then checking to see if the pipeline has become loose. This is useless advice, since it is impossible to caulk cast iron sewers in this way. Until the top layer of cement or sulfur is removed, the pipe will not be able to swing. In addition, hammer blows can break the socket, which will significantly increase the amount of work.
When the hard plug is removed, the joint will gain mobility. They move it a little to the side, pick up the rope and pull it out, swinging the pipe to the sides to facilitate the process. After this, the bell will be completely freed, the connecting element can be easily removed.
Also read: What is the danger of sewer smell to health: the composition of the gas, where it comes from
Work algorithm
Chasing a cast iron pipe
Depressurization of cast iron elements is one of the most difficult tasks when repairing a sewer yourself. To get the job done as quickly and efficiently as possible, it is recommended to prepare all the necessary tools in advance.
To carry out the work you need:
- grinder (you can use it to cut off part of the pipe);
- grinding discs;
- safety glasses, gloves and mask;
- soldering iron (useful for heating connections);
- hammer;
- screwdrivers of different sizes and configurations;
- pipe wrench;
- chisel.
Note! To avoid the spread of unpleasant odors throughout the room and the entry of various debris into the pipeline, you should cover the drain hole with a piece of cloth.
Sequence of work performed:
- The first step before hammering out a cast iron sewer pipe is to tap the joint with a hammer. However, this should be done carefully. Otherwise, the structure may be damaged, which will lead to a complete replacement of the riser. It is also possible to carry out such manipulations; a wooden tool is often used.
- As soon as you finish tapping, you should pay attention to the condition of the fasteners. If the pipe moves from side to side, and it is possible to disconnect it, you need to do the following. You need to rock the product by prying it with a screwdriver. The rope should be hooked with pliers and carefully pulled out.
Advice! During the procedure, you should pump the pipe more and more.
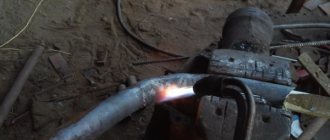
- If, even after frequent and prolonged hammering, the pipe does not change its position, we can conclude that the fastening was carried out using a sulfur solution. To remove the fasteners, you must first burn out the dried mixture. This can be achieved in several stages. The first step is to heat the joint using a soldering iron. This needs to be done in a circle. Next, you need to continue hammering, trying not to damage the integrity of the product. If the structure of the elements begins to wobble, you can try to dismantle the element using a key.
Heating the joint with a soldering iron
*
- Having successfully dismantled the product, you should thoroughly clean the joints using a chisel. The emphasis should be on cleaning the edges, since this is where the rubber seal will be installed.
- Before installation, the sealing material must be lubricated with a special substance.
- The last step is to install the new product in the prepared area.
Cleaning the joint
When burning sulfur, it is imperative to wear a protective mask and goggles. They will not allow harmful vapors to enter the body.
How to mint
Caulking is a procedure for compacting and sealing a connecting element. It is necessary to prepare materials and tools:
- oiled rope (hemp strand);
- cement (or asbestos cement) mortar;
- a wooden spatula that fits freely into the gap of the socket;
- long screwdriver;
- hammer.
Caulking of sewer pipe sockets takes place in 2 stages:
- filling the gap with tow or rope (bonding). Using a cord is considered a more effective option. The sealant is inserted into the gap and begins to be wound onto the pipe, constantly tamping it with a spatula. The material must be compacted and pushed into the gap until it stops. The process is stopped when the gap is filled to 2/3 of the depth;
- Cement mortar is poured into the gap over the seal. It is pushed with a wooden spatula or screwdriver, evenly distributing the material throughout the entire volume of the cavity. The quantity should be such that the entire gap is completely filled to the very top of the socket.
Caulking the bell with sulfur is not practiced at home. It is necessary to melt lump sulfur with 10-15% kaolin, which requires special equipment and enhanced ventilation. This method is only possible in factory conditions.
Methods for caulking pipes and options for its neutralization
Embossing a pipe, that is, connecting its elements, can be done in three ways. Moreover, each of them requires its own specific approach.
Nowadays, in order to connect elements, it is not at all necessary to caulk the pipe. This can be done using a special adapter coupling. Moreover, such an element can connect pipes made of various materials, for example, cast iron and plastic.
Pipe embossing can be made from different materials. Various pipe caulking and ways to eliminate it:
- It will be easiest to separate the elements if they were caulked. This is a rope that is wound around pipes and compacted. To check whether this method was used, you need to hit the socket several times with a rubber hammer, and then try to loosen it. If the pipe gives in, then most likely it was the heel that was used. In this case, you need to pick out the top layer of the rope with a screwdriver, find its end and pull it out. Throughout the entire work, it is necessary to carefully loosen the pipe. They shake it until they can pull out the required element. If the top of the heel was covered with cement mortar, then it must first be knocked down. To do this, place a screwdriver on it at an angle and tap it.
- In Soviet times, the heel was used infrequently. Sulfur was much more common. In this case, you will have to do quite dangerous work. You will definitely need to wear a gas mask, because sulfur vapors will be released, which are extremely poisonous. It is also necessary to ventilate the apartment. So, you need to melt the sulfur with a blowtorch so that it becomes liquid. When heating, it is necessary to periodically tap the pipe until noticeable movement appears. When the pipe itself heats up, you will need to take it with an adjustable wrench and pull it towards you with force. This will free up the required element.
This is how pipes are caulked. It is worth noting that the option with sulfur is the most dangerous. Therefore, if you do not have a gas mask or a special construction respirator, then it is better not to start at all.
Safety rules for installation and repair of cast iron pipes
When working with cast iron, to avoid injury, you need to wear special clothing, gloves or mittens. It is prohibited to use an iron hammer. If you don't have a rubber tool, use a wooden one. A respirator and safety glasses will help protect your respiratory tract and eyes from metal fragments. The workplace of a plumber must meet the requirements of fire safety regulations. Caution should also be exercised at home.
When working with the pipeline in a multi-family apartment, it is worth remembering that unskilled actions can lead to leaks and sewage entering the lower floors. To avoid troubles, it is worth minting under the guidance or with the participation of a specialist. If you have no skills at all, it is better to contact an experienced plumber. In this case, the pipe will last a long time after minting.
Repair work on the street
If there is a need to repair a cast iron pipe that is located on the street, then you can use the same methods as described above.
However, it is advisable to do additional fixation of the joined cast iron pipes so that deformations in the ground do not open cracks. If the pipe is adjacent to a septic tank, then the above methods may not work. The design of the septic tank is subject to seasonal fluctuations, and this can destroy the integrity of the connection being repaired. In this case, the first step is to use liquid glass, which is filled on top in large quantities with mastic, which is used for gluing joints in panel houses. In principle, mastic perfectly seals cracks on its own, so if liquid glass is not available, you can do without it. However, it is still better to do sealing with it, it is more reliable.
When renovating, many people try to replace all outdated communications at once. It turns out that the most difficult thing to work with is cast iron sewer pipes that need to be dismantled. Previously, they were connected using cement, sulfur or aluminum. It turns out that the system was carried out for centuries. But now the end of the century has come. And at the same time, difficult work begins.
At first glance, it may seem that removing cast iron pipes is very easy. But here you need to work wisely. After all, if you apply too much force, you can damage the riser that connects several apartments at once. In this case, the anger of the neighbors is inevitable. There will be costs, time and a lot of work.
Before you start dismantling an old cast iron pipe, you need to familiarize yourself with some rules:
- turn off the water supply in the house;
- remove the hose from the flush tank on the toilet;
- clean the toilet carefully;
- remove from the premises all devices and objects that may interfere with the work;
- Cast iron is a brittle material. Pipes that are located far from the riser can be broken with a hammer;
- removal of pipes that directly approach the riser;
- Cuffs are installed on the bell. First, the bell is cleaned of lubricants.
Installation of a sleeve for the passage of pipes through ceilings or walls is carried out in certain cases
Installing a sleeve for pipe passage through ceilings should be done in certain cases, for example, when the pipeline is subject to thermal expansion. And the need to install the sleeve must be taken into account at the highway planning stage. All nuances of use should be taken into account not only when laying a new pipeline, but also when replacing old communications.
The area where the pipeline is laid through the walls and ceiling becomes the main point of deformation stress. In such places, the pipe is exposed to the chemical environment and mechanical loads. Due to such circumstances, in the SNIP building codes, pipelines are equipped with additional structural parts, which are called sleeves. What they are and why they need to be installed will be discussed in detail below.
The device for passing the pipe through the wall is an important element, and it performs the following functions:
- mechanical;
- protective;
- waterproofing;
- fire protection;
- sanitary.
In addition, this element can increase the service life of the highway and facilitate the replacement of structures.
The sleeve is arranged as follows:
- a case for which a steel structure is used;
- packings made of soft, fire-resistant material.
The sleeve for the passage of the pipe is made in the form of tubular products. And the free space between the structures is filled with fire-resistant material. It must not be rigid in structure. This is necessary so that when the pipe heats up, it will begin to change its dimensions, and if there is hard material, it may become damaged.
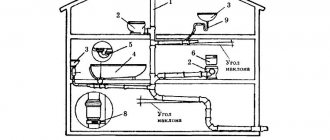
The diagrams provided above show that the highway can pass through any building in two planes. Thus, the ceilings between floors are crossed by vertical networks (risers), and the walls are crossed by wiring running horizontally. The provided figure shows an example of the arrangement of a part, first in the ceiling, and then in the wall.
In both the first and second cases, the cover of the part must be firmly secured. The tubular product must move freely through it. The diameter of the cover in one and in the second case must be 10 mm larger than the diameter of the pipeline. And the cover itself is securely fastened in the passage hole.
Installation and caulking of the main line cartridge is carried out by calculating the height that the screed has. The length of the sleeve should be 20 mm greater than the thickness of the ceiling. If this point is not observed, then there is a risk of water entering the floors located below.
Is it necessary to install liners?
The need to install a sleeve for the passage of pipes passing through walls is dictated by the requirements of SNIP. They are due to the following reasons.
- The polymer pipeline changes its dimensions due to the influence of temperature. In addition to expansion, it can move. To prevent deformation and create the necessary free space, SNIP recommends using sleeves. These devices for passing pipes through walls and ceilings make it possible to maintain the integrity of the structure during installation activities and during significant temperature changes.
- SNIP also states that a device for passing pipes through walls and ceilings allows dismantling without destroying the structure.
- Installing protection for the passage of pipes through walls, ceilings or foundations becomes a barrier to the penetration of odors and insects from adjacent rooms.
In accordance with SNIP, sleeves are recommended to be installed only in certain cases. Their installation is not always considered advisable. Also, waterproof material for laying between pipe products is recommended in situations where the cartridge is laid through a passage unit through the ceiling.
Let's look at what types of sleeves there are
Sleeves for the passage of pipes in accordance with the requirements of SNIP differ in the material of manufacture. In addition, the size of the device for passing the pipeline through a wall or partition also differs.
We analyze the internal wiring
This stage usually takes the least time. There is no point in keeping the pipeline inside the apartment intact, so there is no need to disassemble it. It is enough to simply cut off the outlet leading to the bathtub, sink and other plumbing fixtures using a grinder, and then saw or split it into smaller pieces and take it out of the apartment.
Dismantling the riser
Dismantling the riser must be done with extreme caution. First of all, you need to make a couple of horizontal cuts in the upper part of the pipe, at a distance of 10–15 cm from the ceiling
You should not saw through the pipe completely; it is better to leave a section of 3–5 cm in size intact. Then carefully knock out the ring formed between the cuts with a sledgehammer.
Next, the section is sawed from below at a distance of about half a meter from the tee/cross. After this, remove the clamps that secure the pipe to the wall. Then the section is split off along the saw line, removed from its place and removed from the room.
Tee analysis
The procedure for dismantling the tee/cross will depend on how its joint with the lower section of the sewer pipe is sealed. If cement is used as a sealant, the fan outlet is carefully loosened using a crowbar. During the process, you can try to break off and remove small pieces of cement putty using a narrow screwdriver. If the cement layer is very thick, knock it down with a hammer and chisel. Having removed the bulk of the putty, the crosspiece is carefully removed from the socket.
If the tee is sealed with sulfur, in order to remove it, it is necessary to heat it for a long time with a blowtorch or hairdryer. When heated, the sulfur putty will melt. The tap must be constantly loosened little by little to speed up the melting process. As soon as possible, it is removed from the socket.
If the fan outlet cannot be manipulated, it is simply cut off with a grinder at a distance of 5–6 cm from the lower socket. The remaining part of the riser is then cleaned, and new pipes are connected to it using special adapters.
Repairing a deteriorating sewer system. The technology of caulking depends on the method of connecting the joints (type of seal): cement ones are carefully broken with a hammer, heated with sulfur with a blowtorch. It is more difficult to disassemble than a recently assembled one, since over the years it rusts and the thickness of deposits increases. In any case, this is a labor-intensive process, cast iron, with all its advantages, it is a brittle material and breaks under the direct application of force.
Nuances of heating systems
When installing heating systems in houses, some of the pipes end up in the thickness of foundations, ceilings, walls, etc. Technical standards provide certain recommendations for organizing the combination of pipelines with building structures.
For example, the places where the risers pass through the ceilings must be sealed with cement to the full thickness of the ceiling being organized, and the perimeter 80-100 mm above the ceiling must be protected with a cement layer of 20-30 mm. Before sealing the riser with pipe mortar, you should wrap it with rolled construction waterproofing without a gap.
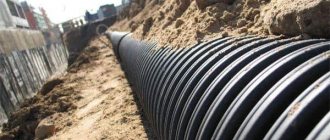
Repair work on the street
If there is a need to repair a cast iron pipe that is located on the street, then you can use the same methods as described above. However, it is advisable to do additional fixation of the joined cast iron pipes so that deformations in the ground do not open cracks. If the pipe is adjacent to a septic tank, then the above methods may not work. The design of the septic tank is subject to seasonal fluctuations, and this can destroy the integrity of the connection being repaired.
In this case, the first step is to use liquid glass, which is filled on top in large quantities with mastic, which is used for gluing joints in panel houses. In principle, mastic perfectly seals cracks on its own, so if liquid glass is not available, you can do without it. However, it is still better to do sealing with it, it is more reliable.
Almost all Soviet buildings are equipped with cast iron sewer lines, since such pipes are durable and resistant to wear. But a cast iron pipeline requires the correct approach to use and dismantling.
Unlike drain pipes, which can last for decades, connections inside your home may require replacement sooner. Also, interventions in the sewer system may be forced during work on installing washing equipment or remodeling a bathroom. To do it according to the rules, it is not necessary to call and wait for a master; all the work can be completed by the owner himself, if he knows how to handle basic tools. Dismantling the sewer system should not take much time, but dismantling old products is more difficult. Let's figure out how to properly dismantle cast iron pipes.