When trying to equip kitchen spaces with fashionable sets and modern household appliances, you should not neglect a small device installed under the sink called a siphon. A sink siphon will allow you to avoid some unpleasant moments when using the drainage system. So, we’ll look at what this device is and how it works in this article.
Siphon installation process
A siphon is a pipe system that creates a water plug between the sink and the sewer. This design allows you to avoid unpleasant odors from the sewer network entering the room, and also collects debris from the sink in the sump, which prevents clogging of the drain system.
The role of a siphon can also be played by a pipe bent in a special way, which also creates a water plug. On sale, the siphon can come complete with a sink, but more often it has to be purchased separately.
Why do you need a siphon?
The kitchen sink (sink) is connected to the central or local sewerage system. Some homeowners and apartment owners connect the drain hole directly to the piping system that discharges sewage. For this, a corrugated pipe is usually used, which can be easily bent in the desired direction. However, if you do not create a water seal, “aroma” from the sewer system will enter the kitchen. The main purpose of a siphon is to block unpleasant odors from the sewer.
Manufacturers produce high-quality products that differ in:
- reliability;
- strength;
- durability exceeding the service life of the mixer;
- resistance to chemical compounds, high temperatures and mechanical stress;
- simple installation, which allows a person without experience to install a siphon in the kitchen;
- versatility of use.
Mounting markings
Marking the mounting locations on the wall is done as follows: to accurately drill the necessary holes for making fastenings, you need to attach the sink to the wall, aligning the upper level of the sink with the marked line and mark them on the wall through the mounting holes located in the bowl. It is better to carry out the steps to mark the mounting holes with your own hands together. It’s another matter if you use a sink, a tulip, or one installed in a countertop; by placing the bowl on a footrest and moving it towards the wall, you can easily make a mark.
Preparing the mounting site
Checking the level
How does he work
The principle of operation of the siphon is based on its design feature. The lower part of the device, called a reservoir or sump, constantly contains water coming from the sink bowl. At this moment, high pressure arises in the drain - this leads to the displacement of the “old” liquid.
When the water supply stops, the pressure in the siphon equalizes. As a result, some of the liquid remains in the curved part. This water plug prevents unpleasant odors from entering the room from the sewer.
Water flows freely from the siphon and enters the sewer, and air cannot enter the room from the sewer, since the vertical pipe is located below the water level
The siphon plays another important role. Since it is installed after the kitchen sink, it is able to trap some debris. It accumulates in the sump and is easily removed by partial disassembly when removing the tank - the homeowner can carry out this procedure independently, without the involvement of a professional plumber. Preventing waste from directly entering the sewer system will prevent it from becoming clogged.
How to install a sink in the kitchen with your own hands - step-by-step diagram
Step 1: Marking
Most mortise sinks are sold with a ready-made template; it acts as a packaging container. It is enough to cut out such a template from cardboard and attach it to the countertop at the location of the sink - and the contour of the seat is ready.
If there is no template, you will have to make it yourself. To do this, it is better to use thick cardboard (for example, from a TV or monitor). After measuring the inside of the sink, transfer this measurement to the cardboard surface and cut off a few centimeters more. It is better to cut a piece of cardboard several times than to look for a new piece.
Step 2: Location
The proverb about the need to measure seven times before the first cut is very relevant for our work. You can move the finished template around the tabletop easily and freely - until you start sawing right through it. So consider how the tap will open, where the filter will be, how kitchen utensils will be positioned, etc.
The cardboard template should be traced as evenly and accurately as possible. To do this, attach it to the tabletop with ordinary tape and draw one thin line with a pencil. After which the “cardboard assistant” peels off and goes into waste paper; we will no longer need it. We cover the perimeter of the future hole from the outside with masking tape for 8-12 cm in order to prevent it from being damaged by mechanical tools.
Step 3: Drill and saw
Yes, yes, the first mechanical tool will be a drill, not a saw. A drill with a diameter of 2 mm is selected and several closely spaced holes are drilled in the place where it is convenient to start cutting out the contour. The holes are connected into a single groove using a chisel.
It is convenient to saw the tabletop with a wood jigsaw. Just don’t forget to stock up on extra blades - thick tabletops are difficult to saw, and the blade is likely to break if it deviates slightly from the vertical. Take your time and move the jigsaw confidently - it is more difficult to correct a crooked cut than to immediately cut a hole along a plumb line, with a strictly perpendicular cut.
Step 4: Complete the installation
Apply sealant to the end of the fresh mounting hole and insert the sink tightly. We hold the sink under load for 10 to 60 seconds (depending on the type of sealing compound)
Carefully remove excess glue from the outside and inside of the sink and wait several hours until the sealant has completely hardened. We connect hoses, pipes, sewerage, install a faucet and use the new sink for your pleasure
General structure of the device
Different manufacturers produce sewer siphons; their design differs little from each other. The main details of the so-called kitchen sink elbow include:
- A decorative grate with small holes on the drain that prevents large waste from entering the sewer system. To install it, the kit includes a rubber gasket to seal the joint between the grate and the sink.
- Pipe for connecting the outlet and the filter grid. The part is secured with a corrosion-resistant metal bolt and nut.
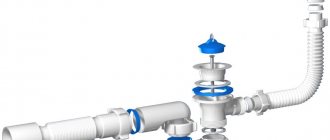
- A siphon with a lower removable reservoir for cleaning when clogged - it eliminates the need to completely disassemble the elbow-shaped device.
The design of a siphon with the necessary components for its assembly.
The design of modern siphons (not only for a kitchen sink, but also a washbasin in a bathroom with or without an overflow) necessarily contains fixing rings with gaskets for connecting individual parts of the devices. The kit also includes a corrugated tube for connecting the outlet pipe of the siphon tank and the sewerage inlet.
Manufacturers create and produce different models, so their designs differ slightly in design and different number of parts.
Determining the height of the sink mounting
Determining the height of the sink. If it does not have additional accessories, then the standard mounting height is 85 cm, even for a small bathroom. Having noted this height, a line is drawn along which the upper level of the washbasin will be attached. In the case of using a tulip sink or a washbasin mounted into a countertop, there is no need to determine the height of the fixture of the plumbing fixture, since it depends on the height of the pedestal or countertop.
Material of manufacture
Manufacturers produce plastic or metal drains. The metal used for construction is usually brass, bronze or stainless steel. Products in this design are excellent for open placement, as they will become one of the decorative elements of the kitchen space. However, they are much more expensive than plastic structures.
Stainless steel siphon
A common disadvantage is the accumulation of contaminants on the inner surface of the water seal. This leads to a gradual reduction in the cross-section of the device. If maintenance is not performed regularly, it will become clogged. However, dirt and grease adhere less to plastic than to metal.
Modern drainage structures made of metal are purchased if a set of expensive plumbing fixtures is installed and an exclusive interior is created. The installation of a metal siphon under a sink is often carried out by professionals, because the joints between its individual parts are sealed using rubber seals and fum tape.
In old houses you can see cast iron siphons - these are real rarities and are no longer produced.
Cast iron siphons can still be found in old houses
Mostly, plastic sink drain pipes are installed. They are practical designs that effectively fulfill their purpose. If necessary, they can always be replaced or cleaned. After all, they are inexpensive and are made with a smooth inner surface on which grease does not accumulate and other contaminants do not linger. Therefore, plugs rarely form in plastic structures. Such products are also lightweight.
Plastic is a material that is resistant to corrosion and has good temperature characteristics. Manufacturers use polyethylene or polypropylene for production. Only significant mechanical impacts can damage a high-quality device.
A siphon is also called a “sink sump”. A plastic drain is a construction kit because it can be disassembled and assembled in a certain sequence. If necessary, it is always possible to replace a single part or tighten one of the nuts if a leak occurs.
Sink installation
Having connected the plumbing fixture to the water supply with your own hands, you can proceed to the next stage, which is installing the washbasin:
- this stage is the easiest, you need to put the sink on the studs, insert plastic spacers and tighten the nuts;
- When using a tulip sink or a sink built into the countertop, it is fastened to supporting elements.
Mounting the sink on the brackets
Installing a tulip sink
Dimensions
There is not much space under the sink, so the size of the structure is limited. In most cases, this siphon size is sufficient. For the device to operate efficiently, its bandwidth must also be taken into account. We should not forget about the distance between the outlet pipe from the siphon and the inlet of the sewer system. As a rule, the maximum height of the structure does not exceed 250 mm.
There are no exact standards here, except for the diameter of the drain pipe
Putting a siphon on a kitchen sink when the diameter of the drain and sewer pipe are the same size is not a problem. However, when there are differences in pipe diameters, it is necessary to think about their connection in advance. In this case, various cuffs and their connecting pipes are used. For example, a 50 mm internal double-socket tee will allow you to connect a 50*40 sink and a 50*25 washing machine with sealing collars.
Various adapter sleeves allow you to hermetically connect the necessary devices to the main sewer system
Connection to sewerage
Having completed the installation work and connecting to the water supply, you need to connect the sink with your own hands to the sewer. This process begins with the installation of a siphon. When installing it, you need to consider whether the sink has an overflow or not. If yes, then the siphon must be equipped with an additional tube to transfer water into the sewer system.
Siphon
Common types
Manufacturers produce several types of sink siphons. They are selected depending on the characteristics of the installation site.
Some types of siphons: bottle with a tube, bottle with partitions, tubular
Corrugated drain
The corrugated tube is convenient to use when the sink drain hole has a non-standard location. This device is also used if you plan to install additional equipment or any necessary items under the sink. When connecting it to the sink, you need to pay attention to the amount of water in the curved place. It should be enough to create a reliable water lock, which guarantees reliable protection against the penetration of odors from the sewer.
A drain in the form of a corrugated tube is not an ideal design, because dirt quickly accumulates on the ribs of the product.
Structurally, the corrugated siphon consists of the following elements:
- pipe with grille and union nut;
- corrugated tube
Additionally, pipe fastening may be required.
Drain with corrugated pipe
The corrugated drain is installed in a matter of minutes. First, we attach the outlet pipe with the grate to the sink. Fixation is carried out using the gasket and screw included in the kit. Then the corrugation is inserted into the pipe at one end and secured with a nut, and the other side is inserted into the sewer pipe. If cleaning is necessary, the corrugated hose is disconnected from the pipe and the sewer. Then it is washed or replaced with a new one.
Bottle drain
Bottle siphons are most often installed. They are well suited when you need to drain dirty water and other waste from multiple sinks. In this case, the required number of special bends is installed.
The design of the bottle drain consists of the following elements:
- metal or plastic grille;
- intake pipe;
- bottle container;
- pipe for draining sewage into the sewer;
- a transition piece that allows you to connect the siphon to the sewer system.
The bottle drain is a completely rigid product. If necessary, the design is supplemented with corrugation for more convenient connection to the sewer. Cleaning the bottle drain is done by unscrewing the bottom part of the bottle-shaped container and removing accumulated dirt.
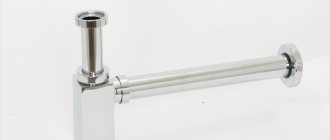
Pipe drain
This type of siphon is installed not only on sinks, but also on bathrooms. It has a completely rigid structure - outwardly similar to the letters S and U.
Simple pipe (straight-through) siphon
Since many modern kitchens have dishwashers, the pipe siphon may have an additional outlet.
Pipe siphon for sink McAlpine (UK) with outlet for household appliances, 40 mm (MRSK6). The MRSK4A model is equipped with an angular outlet. When choosing, be guided by the specified sizes
There are models of tubular siphons with a break in the stream flow. Such siphons are not attached to the sink - after installation there is a difference between the siphon and the sink. It is necessary to prevent germs from the sewer from entering the sink. They are used in preschool institutions and catering establishments.
Flat drain
This is a small siphon under the sink, where size is critical. It is usually used when a “washing machine” or dishwasher is installed under the sink. There are models with a break in the jet flow.
The design is a regular knee, but it saves space
In addition to small dimensions, a distinctive feature of a flat drain is also its rigid design. Such siphons rarely become clogged. If there is a need to perform a complete cleaning, the grille is unscrewed, and then the entire structure is removed from the sink.
With overflow
When the sink has overflow protection, a siphon with overflow is installed under it. The design of the product includes an additional pipe, to which a small diameter tube is connected from the overflow hole in the upper part of the sink. This design prevents the sink from overflowing with water and reduces the risk of flooding the room and neighbors living on the floor below.
A siphon with overflow is installed not only for sinks, but also for sinks
There are also drains with one or two outlets at the neck. They are used when it is necessary to additionally connect a dishwasher or washing machine.
Please note how many components a pipe siphon with overflow has. If you are afraid of getting confused when installing it yourself, it is better to invite a professional plumber
Installation of fasteners
The next stage is the installation of fasteners, the choice of which depends on the method of installing the sink:
- According to the markings of the mounting holes, they are drilled;
- dowels are driven into these holes;
- Special pins are screwed into the dowel. It is screwed to a depth such that its protruding edge allows you to secure the sink and tighten the fixing nut. The length of this edge of the stud should not be small, but slightly more than the thickness of the bowl, plus the distance for the nut.
Making holes
Screw in the dowels
Screw in the mounting pins
Basic selection rules
To ensure effective drainage of used water in the kitchen, you need to choose the right siphon. To do this, consider the following recommendations:
- You need to purchase the kit immediately. In addition to the siphon, it must contain all the necessary components for connecting it to the sewer. If parts are purchased separately, there is a possibility that they will not be able to be assembled into a single structure.
- It is necessary to measure the free space under the sink in advance. If it is minimal, you should give preference to a short siphon.
- With closed installation, there is no need to purchase an expensive designer siphon. It is better to buy a less beautiful product of good quality, but at a lower price. After all, no one will see it, and it will not spoil the interior of the kitchen.
- If the sink siphon is open, it makes sense to buy a product with a decorative design.
Each device always comes with instructions - you need to study them carefully before installation. It is also necessary to pay attention to the absence of damage to the siphon, the quality of the threads, sealing elements and plugs.
Summarize
Assembling a siphon for a sink, washbasin, shower cabin or bathtub does not take much time and does not require special skills. However, there are a number of nuances that you should be aware of and take into account so that you do not have to do double work by redoing something. You need to take everything into account so that you don’t soon need to replace a completely new device with a more functional model, because you forgot to take into account that you will place a washing machine nearby and it will also need to be connected to the sewer through a siphon.
If you are new to plumbing and are installing a siphon for the first time, the manufacturer’s instructions for the product may be incomprehensible in some ways. Having only a schematic description of the assembly and installation sequence of the device, it does not contain important information and tips that will help you avoid mistakes and protect your kitchen from sewer leaks.
Installation nuances
To install a siphon on a sink, an experienced person needs to spend a few minutes. If you don’t succeed so quickly, it’s okay. First you need to prepare the tools and consumables. The maximum that may be needed:
- screwdriver;
- gas key;
- sealant.
As a rule, when installing plastic products, all you need is a flat-head screwdriver.
If it is necessary to change the siphon, the old product is first dismantled. This procedure begins with installing a basin or other container under the drain to prevent water from getting onto the floor. First, all parts of the plastic siphon are removed. Then the protective grille is removed by unscrewing the screw. If a metal drain is dismantled, you will have to use a gas wrench.
Finally, the inside of the drain hole in the sewer riser is cleaned of contaminants. You can use a rag or paper towel for this.
How to collect drain correctly
At the beginning of the process, you need to check that all parts are present. To do this, we study the attached instructions and lay out all the elements, for example, on a table.
A bottle drain is often installed. Its assembly is carried out in the following sequence:
- The individual parts of the flask are connected after installing a gasket of small thickness. The sealing element must be pressed well against the part from all sides.
- The nut is secured to the corrugation.
- A cone-shaped gasket is placed on the corrugated pipe. The sharp part of the sealing element is located closer to the edge.
- The corrugated tube is inserted into the outlet pipe of the flask and secured by tightening the nut.
- On the other part with the grille, a second nut and gasket are fixed.
- The two separate parts of the siphon are connected by tightening the nut.
At the end of the process, the drain is secured under the sink. If necessary, you can use silicone sealant to improve the tightness of all siphon joints. It is recommended not to use too much force when tightening the nuts.
The nuts are tightened by hand! Don't use keys!
Installing a new device
The assembled drain structure is fixed to the sink as follows:
- gaskets in the form of rings are placed under the grate and on the top of the siphon;
- the assembled drain element is pressed from below to the hole in the sink, and a grate is installed on top from the side of the bowl;
- the screw is tightened;
- a nut and an o-ring are put on the pipe;
- the siphon is inserted and the nut is tightened;
- a hose is screwed to the siphon;
- the second end of the hose is connected to the sewer.
If necessary, an adapter is additionally used if the parts at the junction have different diameters. At the end of the installation process, the functionality of the drain is checked by filling it with water and checking for leaks.
Rules for attaching a tulip shell
When attaching a tulip shell, there are certain rules:
- as with standard mounting, the tulip must be placed against the wall to determine the location of the mounting holes;
- Next, a cast iron bracket is attached, with which the tulip sink is attached. Its fastening is carried out according to the same principle as a dowel with a hairpin;
- The bowl is attached to a screwed bracket, while simultaneously moving the foot of the structure. It should be noted that the tulip can be monolithic, separate, with a shortened footrest, which is used in a small bathroom;
- then the siphon is installed and then the mixer;
- The final stage is the installation of the footrest, which will hide all communications.
Stages of installing a tulip sink
So, installing a sink in the bathroom yourself does not require the help of specialists. Its quality and reliability depend on the materials used, DIY fastening methods, and sink models, thanks to which some types of washbasins can be placed in a small bathroom due to their compactness.
Manufacturers
The choice here is simply huge, from cheap Chinese goods to expensive branded ones. The choice for each situation is individual and is based on the installation location of the device, what kind of work it will perform and financial capabilities.
Some manufacturers:
- Akvater is a Russian company, quite well known and has its own sales market.
- AlcaPLAST - products of this company, a compromise of price and quality.
- Hansgrohe is a brand from Germany, a leader in quality and design.
A few important notes
Before you start connecting the sink, you need to take into account some of the nuances of the work:
- to connect the kitchen sink to the sewer, you do not need to tightly tighten all the connections, since in this case the rubber sealing gaskets can be damaged;
- in the case when, when checking the quality of connections between the pipe and the cuff, there is a leak, then it is necessary to remove the cuff and thoroughly dry the surfaces that are to be reconnected. Then the dry cuff is lubricated with sealant and the connection is made again;
- To connect a double kitchen sink, you should purchase a special siphon that has an outlet to two pipes.
Every home craftsman, subject to the installation rules, can connect a sink or kitchen sink with his own hands.