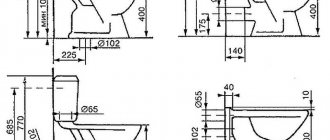
The primary and main function of the siphon is to receive the draining water and redirect it to the opening of the sewer network. The second is to prevent stale air from entering the shower room from the sewer. The third is collecting waste that ends up in the water. For a comprehensive solution, valve designs (another name for siphon) have been developed.
Gate valves are installed on all plumbing fixtures, except those that already have a valve in their design as an integral part of the structure. Shower trays do not have one, so the shutters are installed when they are installed. A special feature of shower sinks is their low installation, which limits the height of the shutter products.
Siphon rating
When considering candidates for inclusion in the top, we took into account the level of demand, the demand for goods, and analyzed which brands buyers prefer more often. As a result, the list was significantly narrowed, after which we compared the following characteristics:
- Device type;
- Principle of operation;
- Body shape;
- Materials;
- Diameter of connection, outlet;
- Dimensions, pipe height, weight;
- Equipment;
- Possibility of cleaning;
- Speed, ease of installation;
- Design, demanding installation of the cabinet.
The result of the comparative analysis was a top list of 10 positions. For convenience, we have divided it into categories so that you can go to the type you are interested in, taking into account specific tasks - units for a bathroom sink, under a kitchen sink, a shower tray or a washing machine. Customer reviews determined the pros and cons.
General working conditions
After taking a shower, water, which is usually called waste water, should be drained from the shower, or rather from the pan, into the sewer riser. By default, in all apartments there are special sewer crosses on the sewer riser, through which drains from the bathroom and kitchen are drained into the sewer riser.
Regardless of whether the riser is cast iron or plastic, the principle is the same: the apartment's sewer pipes with a diameter of 50 mm are connected through a cross to a riser with a diameter of 110 mm. Let's simplify the task in this article, we will assume that there is a cross on the riser and there is no need to change it.
The best siphons for a bathroom sink
If you are choosing a siphon for a bathroom, the design should include an overflow, which will prevent water from overflowing the sides of the bathtub. In addition, the second important element is closing the drain for filling. Three nominees, the best products according to VyborExpert, meet precisely these requirements.
Viega 5755 366 681
Semi-automatic bath siphon from the German brand “Viega” with a streamlined design and an outlet diameter of 1 ¼. Creates an air exchange barrier between the cavity of the sewer pipes and the bathroom. This prevents unpleasant odors.
The bottle-shaped model is made of silver brass with a pleasant glossy chrome plating. This gives the product a beautiful appearance. It is recommended for installation where the installation of a cabinet is not provided.
Equipment: siphon, plug, water seal, drain pipe and socket. The design provides 3 points in a row on top of the nut for better adhesion of the sliding elements. This prevents the risk of leakage. The presence of a rubber stopper allows you to independently block the drain and draw water into the sink.
There is a height adjustment from 130 to 180 mm, which is convenient and practical during installation. Connection diameter – 32 mm. The distance from the wall must be taken into account - 250 mm. Due to ease of installation, it can be installed manually without special skills.
Advantages:
- Streamlined, glossy design;
- Adjustable height;
- Full set;
- Easy to install;
- Leak protection;
- Stopper for collecting water.
Flaws:
- Price;
- Special care if used without a cabinet.
The chrome coating will look presentable in combination with a towel dryer and harmonize with the mixer. It requires regular care, rubbing to add shine, and removing dried drops of water.
McAlpine mrsk2
A classic basic element for the bathroom from the English brand “McAlpine” with a connection diameter of 1 ½. Provides anti-clog protection with a long service life of up to 3600 days.
The bottle shape of the model has a number of advantages: the product is convenient to clean, since the design includes a screw-on sump lid, which eliminates complete dismantling. The gap between the drain neck and the sewer socket is adjustable, as is the height. There is a water seal, its height is 50 mm.
The product is made of durable white plastic. This material can withstand light loads. In addition to the siphon itself, the kit includes a plug and an outlet with a diameter of 1 1/2″. The throughput capacity of the model is up to 36 liters per minute.
Advantages:
- Standard connection diameter;
- Anti-clog protection;
- Long service life;
- Possibility of adjusting the gap;
- Cleaning without complete dismantling;
- Inexpensive.
Flaws:
- Risks of leakage;
- The kit does not include gaskets or release.
If any valuable objects get into the drain hole, then the presence of a sump will simplify the task of removing them without large-scale dismantling. To do this, it will be enough to unscrew only the lower element.
AlcaPlast A41
Budget model from the Czech brand “AlcaPlast” in a classic design. A bathroom sink with a cut-in diameter of 40/32 mm is intended. Suitable for installation together with a concealed cabinet.
The bottle design, made of white high-quality plastic with a stainless steel grille, is reliable, durable, and resistant to chemicals. Withstands high temperatures up to 95 degrees, mechanical stress.
Installation is simple, a person without experience can handle it. This is due to the fact that the manufacturer decorated the product with rare relief strips. The nuts will be easier to twist while ensuring a secure grip. The complete set from the manufacturer includes a siphon, socket, plug, and drain pipe.
Thanks to the rubber plug, you can block the water outlet for household needs. There is a height adjustment function from 197 mm to 302 mm. This model significantly saves space by hiding under the cabinet.
Advantages:
- Stainless steel socket;
- High-quality seals;
- Resistance to chemical compounds;
- Easy installation due to long bolt;
- Adjustable height;
- Inexpensive.
Flaws:
- May leak if installed incorrectly;
- Periodic cleaning of the system.
Every six months, rubber gaskets lose their elasticity and become thinner, so if they leak, they need to be replaced. If chips or cracks appear on the surface, updating is also required. The siphon is not repairable.
Recommendations for installing a low tray with legs
The small size of siphons for low pallets requires special care during installation. Correcting errors is much more difficult than with standard pallets, keep this in mind and perform all technological operations very carefully. How to install a siphon on a low tray?
Step 1. Remove any remaining dried adhesive from the mastic used for tiling the walls. During tiling, the bottom row is always not completed; it is installed only after installing the shower tray. Remove the mastic with a metal spatula. Remove construction debris from the bathroom floor.
Removing glue residue with a spatula
Floor cleaning
Practical advice. It is much easier to remove the adhesive immediately after laying the last row of tiles, when it has not yet hardened. Use a damp cloth and rinse it several times in clean water.
Step 2. Cover the area of the wall near the pallet with a new layer of waterproofing. The height of the area is approximately 10–15 cm. We recommend using any mastic, they all cope with their tasks efficiently. The main condition is not to violate the technology, follow the recommendations of the manufacturers. The mastic can be applied with a roller or brushes; the number of layers depends on the condition of the base.
Application of waterproofing
Step 3. Attach the legs to the low tray. To do this, turn it upside down and place it on sheets of cardboard from the packaging; the cardboard will prevent scratches. Choose the optimal location of the legs, taking into account the size of the pallet and the characteristics of the load-bearing surface. The fact is that there are options for the sewer pipe to exit directly next to the wall, and there are options for placing it at a distance. The feet must not touch the sewer pipe.
Installing legs on a pallet
To fix the legs, self-tapping screws of the appropriate length are used; they are included with the pallet. Do not replace them with stronger ones, as this may damage the front surface of the pallet. Don’t worry that they won’t withstand the loads; designers always make reliability calculations using a safety factor.
Fixation with self-tapping screws
Step 4. Place the tray with the fixed legs in place and adjust its position. You need to check horizontality in two directions; adjustment is done using special screws on the legs. After completing the adjustment, be sure to tighten the locknuts; they prevent the threads from unscrewing spontaneously.
Pallet installation and adjustment
Practical advice. It will not be possible to adjust the position of the low tray in one go. First, place a level on the shelf of the pallet against the wall and set it horizontal. Then set the level to a position perpendicular to the original one, again set it horizontal. After this, you need to once again adjust the horizontality of the pallet shelf against the wall.
Checking the tray position
Step 5. Insert a pencil into the drain hole and draw a circle on the floor. The siphon body for the low tray will be placed in this place; draw lines on the wall along the bottom edge of the shelves. Remove the tray.
Position mark
Marking the position of the siphon body
Step 6. Use a ruler to make the lines clearer. They serve to mark the places where the side supporting elements of the pallet are fixed.
Drawing lines using a ruler
Step 7. Attach the fixing elements to the wall and mark the locations of the holes for the dowels. The upper plane of the devices must be located exactly along the line.
Step 8 . Drill holes for the dowels. The depth of the holes should be 1–2 cm greater than the length of the plastic parts. The reserve is necessary so that dust residues do not prevent the plastic parts from entering all the way. Secure the structures with dowels.
Drilling holes for dowels
Driving in dowels
Fixing the fasteners
Step 9. Attach a waterproofing strip to the two corner sides of the pallet; it is sold together with the pallet. Use double-sided tape to secure.
Attaching the waterproofing strip
The process of fixing the waterproofing strip
The photo shows how the strip should be secured and how to position the double-sided tape
At this point the preparatory work is completed, you can begin installing the siphon. Before installation, carefully read the instructions and study the purpose of each part. If you have little experience, it is recommended to first completely assemble the siphon , this will help you better understand the technology and stages of work.
Step 1. Remove all parts from the packaging and place them next to your work area.
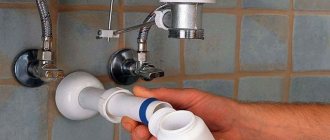
Step 2. Place a nut on the connection pipe of the siphon to the sewer pipe, and then a rubber seal. Insert the assembled assembly into the outlet on the body and tighten the nut. To prevent damage to the rubber seal, lubricate it with any technical oil or soapy water.
Housing, elbow, washer and rubber gasket
Connecting elements
Step 3 . Install the siphon on the place marked on the floor and measure the length of the pipe that will be needed to connect to the sewer. Use a hacksaw to cut the plastic pipe. If the pipe and pipe are located at an angle, then use an elbow. All connections must have rubber seals. Check the slope of the drain pipe; it should be at least two centimeters per linear meter.
Pipe length measurement
Trying on a pipe section
Measuring the distance between parts
Important. After cutting the pipe, be sure to remove the burrs and make a small chamfer at the end. Burrs can be removed with a sharp knife, the chamfer is made with a grinder. If this is not done, then with a high probability the thin edges of the seal will tear during connection.
Pipe cutting
File sanding
Connecting the siphon to the drain
Measuring the height at which the siphon body will be located
Aligning the siphon horizontally
Step 4: Reinstall the shower tray and place it firmly against the wall. Check the stability of the position. Press at different angles, there should be no wobble.
Step 5. Fix the bottom edge of the pallet to the terminals installed on the walls. Check the position again with a level and adjust it with the legs if necessary. All legs must rest on the floor.
Pallet fastening
Pallet installation
Step 6. Place a rubber gasket on the siphon body, lift it until it stops with the bottom plane of the pan. With one hand, support the body from below, and with the other, place a metal ring on top to secure it and screw it in place. Tighten the bolts evenly in turn on each side of the hole, do not allow distortions.
Connection of siphon and drain hole
Fixing the metal ring
Step 7. Pour water into the drain and check the tightness of all connections. Check very carefully, do not rush. During operation, minor leaks are very difficult to detect; water will constantly drip in a little, building structures will be wet. As a result, the appearance of fungus and the gradual destruction of materials. In the future, liquidation will require a complex of expensive construction measures.
Leak test
Step 8 . Using a small brush and roller, apply an additional layer of waterproofing to the wall, paying special attention to the junction of the ends of the pallet with the wall.
Applying an additional layer of waterproofing
Step 9. While the mastic has not hardened, glue a waterproofing strip to it and coat the surface with mastic again. Allow time for the materials to harden. The exact time is indicated by the mastic manufacturer, but in most cases it is 24 hours.
Gluing the waterproofing strip
Applying mastic
Step 10. Install a decorative drain grate on the siphon. Check that the fastening is secure.
Decorative drain grate
At this point, the work on installing the siphon is completed, you can begin tiling the wall. Next, foam blocks are placed around the perimeter of the pallet; adjustment of the dimensions is done with a hacksaw for wood with fine teeth. Once the finishing work is completed, you can mount the walls of the shower stall, connect the mixer, etc. A correctly installed siphon for a low tray will serve well for many years, and any violations of the technology will eventually cause the need for unscheduled repair work. Learn liquid acrylic for baths at the link.
The best siphons for the kitchen sink
If you are looking for a design to fit under the kitchen sink where there is plenty of free space, consider the corresponding designs. They usually have an enlarged body due to the frequent use of water supply. Three products from trusted companies have become this year's favorites.
Orio A-4011
A kitchen sink siphon with an enlarged body is presented by the Russian brand “Orio”. This is a model for kitchen sinks with a connection diameter of 3 ½ (40 mm), an outlet for household appliances, a flexible pipe and a rectangular overflow.
The bottle shape is made of white plastic, which is easy to clean from clogs and fatty deposits. The material is resistant to various chemical compositions and high temperatures. The diameter of the stainless grid is 114 mm. The height when installing the siphon is adjustable from 285 to 350 mm. Flexible pipe length 310–650 mm.
The model is convenient to use and easy to install. The set includes 2 gaskets (rectangular, semicircular) for an overflow with a length of 300 mm. The height of the water seal is 60 mm, which meets hygienic standards.
Advantages:
- Large building, sump;
- Allotment for household appliances;
- Sustainable material;
- Adjustable height;
- Easy installation;
- Nice kit.
Flaws:
- If assembly is not done carefully, there may be leaks;
- Requires cabinet installation.
To avoid leaks, the bottle body must be disassembled and assembled very carefully, strictly according to the threaded connections. It is easy to clean; just unscrew the bottom part, where most of the large debris settles.
Prevex P-loc Pl-d9cf5-Sink siphon
Siphon for a kitchen sink made in Finland with a cut-in diameter of 40/50 mm and an oblique outlet direction. A distinctive feature is the presence of 3 outlets, which allow you to additionally connect the drain from the washing machine and dishwasher.
The type of siphon is pipe, the advantages of which include a long service life. The design is rigid, it is important to select pipe modifications exactly in size. Material: gray plastic with no risk of corrosion. The inner surface is smooth, which does not allow debris to linger.
The package includes a siphon, 1 short and 1 long screw. The grille is made of stainless steel. Under the sink the product looks compact, there is space for a trash can or a small dishwasher. Easy to install even for beginners.
Advantages:
- Availability of 3 branches;
- No corrosion;
- Smooth inner surface;
- Compactness;
- Possibility of cleaning;
- Easy installation;
Flaws:
- Expensive;
- Not all types of chemicals are suitable for cleaning.
When installing with a corrugated pipe, it is important to be careful; there is a risk of bending it. Then debris will accumulate in the pipe. Some acid-based chemicals attack plastic, so the choice of cleaning products must be considered.
Ani Plast A0145S
A budget model from a Russian bottle-type manufacturer with an enlarged body. This is a sink siphon with an overflow that prevents flooding. Connection diameter 40 mm, ½.
The corrugated pipe and flask are made of white plastic, which means the product is not subject to corrosion. The siphon is adjustable in height from a minimum of 105 to a maximum of 185 mm. The sump tank for heavy particles is removable, which means that if clogged, the structure does not need to be completely dismantled.
The neck is made of steel, the height of the water seal is 60 mm. The light weight of 465 g relieves the sink of unnecessary load. The kit includes an outlet, a stainless steel grill, and rubber gaskets.
Advantages:
- Enlarged body;
- Availability of flexible overflow;
- Height adjustment;
- Removable sump;
- Lightness;
- Inexpensive.
Flaws:
- If the thread is over-tightened, the plastic may burst;
- No corrugation.
Alkaline detergents are considered effective for cleaning. They should not be mixed with acidic cleaners. In general, the product is very easy to install, inspection is convenient
DIY installation
It is better to install the siphon on the pallet at the very beginning, so that later you can check the operation of other systems when installing them.
To prevent leaks during operation, all joint surfaces are covered with sealant.
When installing a siphon on an acrylic sink, it is necessary to apply silicone to the liner closer to the threads to provide additional protection for the seam between the acrylic and the fiberglass in the drain hole of the pan. If this is not done, delamination of acrylic and fiberglass may begin in the future. Be sure to clear the sink drain hole of threads and remove the film around it.
The connections should not be overtightened so that the plastic does not burst and lasts a long time.
Before the installation procedure, the product is assembled “idle” in order to understand in what sequence its installation will occur. You need to familiarize yourself with the diagram given in the instructions, disassemble the product, reassemble and disassemble again.
You can clearly see the disassembly of the siphon in the video:
After this you can start installing it:
- The pallet is installed on the base. The height of the drain hole (above the floor) is measured. The slope of the outlet pipe is checked: the slope of the line from the drain to the sewer hole should be 5-6 centimeters per meter. If the condition is not met, the shower sink must be raised to the missing height. The height of the space under the sink for installing shutter fittings should not be less than 8 cm. When the sink is installed correctly, the tray is removed. Proceed to installing the siphon.
- If there is an overflow, it is mounted: one end of the corrugation is connected to the drain hole (overflow) through a pipe (O-rings must be installed), the other is connected to the body of the product. For the second connection, the pipe is threaded into the nut, and a conical gasket is put on its end (with the cone facing the body).
- The outlet is mounted, for which a gasket is placed on top of the drain hole and an insert with hooks is installed (or another part, depending on the design of the product), a gasket and the top of the siphon body are installed below. The parts of the upper part of the outlet are installed.
- The shower sink with the attached product is installed in place. The water seal is connected by a pipe to the sewer.
- The connection is checked for leaks. If the test results are satisfactory, if other construction work is to be done, the surface of the locking parts of the product is covered with protective caps.
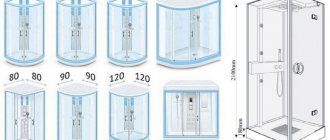
The best siphons for shower trays
If you are installing a shower tray, there is very little free space between the outlet and the floor, so compact, low models will be appropriate. Consider the fact that the diameter of the shower drain must have increased throughput. Therefore, the parameters will be specific. Vyborexperta.ru recommends 2 nominees, leaders in positive reviews.
AlcaPlast A491CR
Siphon for a shower cabin with a drain hole with a diameter of 90 mm from the Czech brand “AlcaPlast”. Purpose – drainage of water from low trays. For ease of installation, the elbow connected to the drain is rotating.
Material – white smooth plastic with chrome plated, resistant to chemical and thermal influences up to 95 degrees. The design of the classic form is self-cleaning, easily allowing blockages to pass through to the drain pipe. Mounting height 65 mm, outlet direction – inclined. Water leaves at a rate of 37.2 l/min.
The package also includes a round chrome-plated cover, an elbow, 3 screws, and a mounting kit. There is no overflow, but there is a water seal. Even an inexperienced person can install a simple device.
Advantages:
- Rotating knee;
- Self-cleaning design;
- Material stability;
- Full set;
- Easy installation;
- Efficient water drainage.
Flaws:
- Requires camouflage;
- If installed incorrectly, it may leak.
Correct installation is important for trouble-free operation. The structure cannot be blown out with compressed air, as increased pressure contributes to depressurization of the connections. Compactness makes it compatible with different cabins.
Cezares CZR-02-90
A product from the Italian brand “Cezares” with a water seal and a decorative chrome-look cover for marble, SMC, acrylic low shower trays. The diameter of the sewer connection is 43 mm.
The deodorization system in the design is a water seal. Water drains at a speed of up to 33 l/min in a direct way. The rectangular body is made of plastic; this material significantly extends the service life. The vertical direction of release comes with a diameter of 1 ½, the dimensions of the lid are 12x12x1.8 cm.
The height of the case is adjustable. The modern design with a wet seal looks stylish in a shower stall. There is no built-in filter. The lid in the center is decorated with gold, chrome, and bronze.
Advantages:
- Compatible with different shower cabins;
- Quick drain of water;
- Durability;
- Stylish design;
- Adjustable height;
- Decorated cover.
Flaws:
- Price;
- There is no filter.
The device cannot be cleaned with aggressive chemicals used to remove blockages in toilets. They can corrode rubber gaskets and also damage the surface of acrylic trays.
Criteria for choosing a dry siphon
In order to prevent mistakes when choosing a shutter model in a particular case, the following factors must be especially carefully considered. The main conditions of which, when choosing, should be the following:
- A fairly important indicator for choosing the required dry seal for sewerage is the amount of waste that will pass through it. For example, a dry shutter with a passage diameter of 50 mm is well suited for a washbasin. For showers or baths, valves with a larger throughput capacity will be required. In such cases, it is necessary to purchase a device with a passage diameter of 100 mm.
- The second condition that must be taken into account is the height of the device. Horizontal bends, as a rule, have a height of 7 to 10 cm, while vertical bends require more free space (about 15-18 cm). Therefore, if you do not want to carry out installation in cramped conditions, it is best to choose a horizontal model.
Helpful information! When purchasing this device, you need to pay attention to the little things. It is advisable to make sure that the device is working. This is done quite simply - you just need to pass a certain amount of water through it.
Don't forget about the appearance of the device. Shower drains, the design of which includes dry seals, can be equipped with a grate of any configuration. There are quite a lot of design solutions in this situation. This allows you to turn the device into a decorative product that will delight with its aesthetics.
The best siphons for a washing machine
The design of the units attached to the washing machine is distinguished by the presence of an additional outlet for the inlet pipe. The end here is predominantly threaded, fastening is done using a nut or under a hose. To simplify your search, VyborExpert offers 2 proven models.
Ravak x01612
Siphon with outlet for a washing machine with an outlet diameter of 32 mm from the famous Czech brand “Ravak” for sinks, dishwashers, and washing machines. Can be used with all types of bottom valves, sink drains with an outlet of 40-46 mm.
The bottle-shaped body material is white plastic, the release is not included. Height 240 mm, depth 330 mm. It is mounted in washbasins, which are mounted in cabinets or on countertops. The siphon does not limit the space in the furniture drawer, preserving internal space for storing things.
The design, weighing 295 g, is equipped with a valve that prevents wastewater from flowing back into the system. The outlet diameter is 1 ¼, the product is technically sound and safe. Installation is simple, in a couple of steps.
Advantages:
- Versatility;
- Famous brand;
- Compact, light weight;
- Quick installation;
- Availability of valve;
- Fixed drain.
Flaws:
- The need for camouflage under the closet;
- Price.
The structure should not be located high, otherwise the operation of the dishwasher or washing machine pump will be difficult. The most optimal distance from the floor is no more than 50 cm. The siphon cannot be placed above household appliances.
SantecPro AQ372P5
Siphon with overflow, semi-automatic release from the Polish brand “SantecPro” for a sink with 1 outlet for a washing machine or dishwasher. The diameter of the connection to the sewer pipes is 32/50 mm.
The housing has a maximum height adjustment of up to 250 mm. The bottle shape, made of durable white plastic, protects the home from the penetration of unpleasant sewer odors, and also eliminates the risk of leakage. The beautifully designed 1 ¼ diameter outlet is made of stainless steel.
The package also includes a water seal and a bottom valve to save water. Design dimensions 250x275x32/50 mm, weight 280 g. Water throughput specified by the manufacturer is up to 5 l/min.
Advantages:
- Semi-automatic “click-clack” release;
- Height adjustment;
- Material and shape;
- The presence of a bottom valve;
- Versatility;
- Inexpensive.
Flaws:
- Dimensions;
- Marking of plastic.
The most important thing during the installation process is to ensure that rubber gaskets are not forgotten or lost. They protect the structure from leakage of wastewater and guarantee long-term service.
How to make a dry shutter yourself?
In order to make this device yourself, you will need a plastic ball and a gasket. The ball should be slightly larger than the diameter of the drain hole.
- A plastic ball must be placed on the drain hole.
- After this, you need to secure it around the edges. The ball must be securely fixed.
- To accomplish this task, you need to put a gasket on the sewer pipe that will securely fix the ball in the pipe. The height of the wall above the level of the drain pipe should not be less than 5 cm.
When using the system, the ball floats and water easily penetrates into the drain. When the structure is inactive, the ball lies on the drain hole, thereby blocking the path of sewer gases.
How to choose a siphon
There are several criteria by which you can choose in absentia which siphon for a sink, shower tray/bathtub or washing machine is better. We recommend paying attention to the purpose of the unit, its design features, materials, drain mechanism, as well as the diameter of the connection and outlet.
Purpose
Structurally, such units also differ in purpose. For example, models with a drain and a non-return valve are suitable for a washing machine; flat products with an overflow are installed in the bathroom. In the kitchen, due to the frequent use of the water supply, units with an enlarged body are used, but under the shower tray, on the contrary, the most compact, low alternative is needed.
Design
Based on the type of construction, a distinction is made between horizontal and vertical systems. If direct pipe installation to the floor is planned, the second option with good throughput without the risk of congestion is appropriate. Horizontal systems are universal, that is, for any room where the sewer system has a slight slope.
Material
Most often, siphons are made of plastic, polypropylene. Thanks to this, manufacturers reduce the cost of production. Such threads cannot withstand strong tightening, as they may burst. Products made from brass and stainless steel are more reliable and attractive; they are durable, but require additional costs to purchase.
Drain mechanism
According to the principle of operation, siphons are divided into 3 types:
- automatic - click-clack, where the cover on the pin prevents water from entering the pipe or units with a special handle and cable placed on the cover to monitor the flow of water;
- semi-automatic - a similar operating mechanism, but it requires physical effort by pressing the pin to drain the water;
- manual - the simplest design; drainage here is performed by lifting the lid to reveal the drain.
Click-clack is convenient in tandem with the bathtub. The remaining models are universal, they adapt to different tasks and purposes of use.
Connection and outlet diameter
One of the important selection indicators is the thread size of the pipe with which the product is connected to the plumbing fixtures. It must correspond to the diameter and pitch of the installation location. The second edge of the housing, which is attached to the sewer, must correspond in diameter to the collector tee.
Sewer drain with dry siphon
Installation of this design is carried out in rooms where drainage occurs from the entire floor surface. During construction, a sealed floor screed is installed, in which a siphon is installed to prevent air from entering from the sewer.
But in the case of a sewer drain in a bathroom or bathhouse, it is necessary to take into account long-term downtime of the room, which is especially true for shower rooms in bathhouses. In such situations, when the water in the seal dries out, air with an unpleasant odor from the sewer easily penetrates into the room.
Because of this, in addition to the water seal, a dry siphon is also installed in baths and bathrooms. It is not a special device, and its installation is carried out as part of the sewer drain structure. This valve allows you to block the lumen of the pipe even without water.
Which siphon is better
After getting acquainted with the 10 nominees and the criteria for the right choice, the final decision on which siphon to buy will be much easier to make. Having compared all the pros and cons of the described top positions, Vyborexperta.ru especially noted:
- Viega 5755 366 681 – chrome-plated sink siphon with a streamlined body made of silver brass, reliable protection against leaks;
- AlcaPlast A41 – high quality components, resistance to chemical compounds, ease of installation;
- Prevex P-loc Pl-d9cf5-Sink siphon – model with 3 outlets for connecting to a large sink, washing machine, dishwasher;
- AlcaPlast A491CR - self-cleaning design with a rotating elbow, effective water drainage;
- SantecPro AQ372P5 is a modern model with a semi-automatic click-clack release.
A siphon is an important addition to plumbing, without which a safe drainage system is impossible. If you have no experience in selecting such products, thanks to the subtleties and nuances described in the review, you will cope with this task. In addition, modern modifications are so simplified that you don’t have to be a master to install them.
Types of siphons according to the method of drainage control
The siphon for the tray is part of the drain design. There is often a need to leave some water in the pan. To do this, close the outlet of the siphon.
There are several options on how to do this:
- using a cork;
- using a lever;
- by pressing the button.
Let's look at all drain control methods to understand how they work.
Cork as a control mechanism
The most primitive elementary option is a design with a plug. This outlet is not equipped with any valves; the water simply leaves the pan through the hole and goes straight into the siphon. To collect water, the drain hole is closed manually using a plug.
This design does not present any complexity. This technique is familiar to everyone, because it is used in ordinary bathtubs and sinks. In modern shower stalls, ordinary drains are used less and less.
Tray siphons, in which the drain hole is closed with a plug if necessary, are in little demand. They are being replaced by more convenient models with a button
The concept of a “drain plug” will soon completely disappear from everyday life; it will be replaced by new automatic devices.
Drain control using a lever
An outlet with an automatic bottom valve is much more convenient than a conventional “plug” system. There is no need to constantly look for this same plug; the hole closes automatically when you turn the lever.
The design is quite simple; the lever is usually located in the mixer area. The valve and mixer are sold and installed together, which is not very convenient.
Turning the valve leads to partial or complete blocking of the drain hole. This system is convenient because there is no need to bend over, look for a plug or immerse your hand in water.
Click-clack button for water release
Separately from the mixer, you can purchase an automatic drain valve of the Click-clack system, also known as Push&Open. The valve is a large button that can be pressed with your foot.
The push-button flush system is easy to use, looks stylish and doesn't require you to dip your fingers into dirty water to release the water, as is the case with a plug.
When pressed once, the drain closes, when pressed again, it opens. Using such a device is as easy as shelling pears, and its installation is much easier and faster than an automatic lever valve.