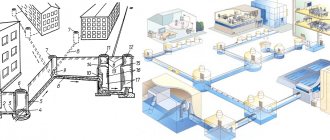
Purpose and design
The device is divided into a pipe and a bent siphon, which helps protect the apartment from the unpleasant odor that spreads from the drain.
The design prevents the water drain pipe from clogging with solid particles coming from plumbing fixtures.
How does a siphon drain work?
During draining, the liquid flows into the siphon, passes along the bend, rises and enters the sewer. In this case, part of the water remains in the lower part of the curved tube.
It is a hydraulic seal that does not allow odors to pass through. The curved section of the siphon traps solid particles and small objects. To clean this area, the parts are removed and reinstalled after cleaning.
Step-by-step installation process
Before deciding on a specific model, you must first take all measurements, in particular, measure the space at the bottom of the sink . In addition, it is worth carefully analyzing what equipment will be installed in the room in the future and whether it will need draining.
Installation of the selected model must be carried out according to the instructions provided by the manufacturer and located in each box with the product. Thanks to the detailed information, the installation process will not take much time and will not require any specialized knowledge. The main requirement for assembly is the tightness of the connections between each part. Before making a purchase, it is advisable to check the condition of the threads on the bottom plug. It is this place that is the weak link in most models.
Installing a siphon on a sink:
- at the bottom of the sink, you need to put a grille and secure it with a nut.
- the assembled structure is directed to the drain to secure the connection with a locking nut. It is not twisted very tightly, just until it stops.
- When installing a water pipeline with several holes, for future installation of other equipment, unused drainage systems must be closed with plugs.
Although the process seems quite easy, it still requires analytical skills and some experience. To avoid leaks or other problems, you should contact installers who have extensive experience in this field. They will provide a warranty, perform all the work quickly and efficiently, using modern equipment.
Types of drainage devices under the sink
There are many device options.
Pipe
The device is a curved pipe, which in most cases is metal. This older example of the device is called a knee. The modern version of the siphon is lightweight, has a shiny bronze or brass surface and convenient connectors.
The curved area is located at the bottom of the structure where waste accumulates. If there is a need to install 2 drain holes, then the pipe elbow is installed closer to the pipe leading to the sewer. Above the drain, pipes and adapters are assembled, making 2 drains into one up to the pipe elbow.
Tubular siphon design
Corrugated
The corrugated device is a curved tube where the bend is formed due to the corrugation. This area makes the device movable and facilitates connection to the drain. The soft hose is made of plastic, and a clamp is used to maintain the corrugation. It can be moved, straightening the folded area or making it more pronounced.
Corrugated folds have disadvantages, which include the accumulation of dirt and food deposits in them. The part is difficult to clean. The downside is the thinning of the material, which can leak. Due to the properties of plastic, boiling water should not be poured into the sink.
Corrugated siphon design
Bottle
In most cases, a bottle siphon is used for installation. It looks like a bottle, inside which water moves along a curved space formed by a double partition. The liquid moves inside the tube and enters the lower part of the device. Afterwards, the drains are directed up the space between the outer and inner partitions of the device and then, thanks to a side hole, flow into the sewer.
If there is a need to install 2 or more drains from the sink into the sewer, then a transition piece is mounted to the device.
This adapter receives the main drains from above, and on the side there is another drain from the plumbing equipment. The bottle drain can be metal or plastic. Metal structures are durable, and plastic ones are affordable.
Bottle siphon design
Dry siphon
There is no permanent accumulation of water in the design. Inside there are rubber seals that act as a water seal and block the passage of unpleasant odors. When the liquid is drained, the rubber moves, allowing the drains to pass through, and returns to its original position after they pass through. The rubber part is called a dry water seal. Due to the lack of liquid, the device is installed in cold rooms, where freezing of the water seal and deformation of pipes can occur.
Operating principle of the water seal
A hydraulic seal is a design used to reduce the load on the sewer system during water hammer and prevent unpleasant odors from entering the home. If the selection and installation of equipment is carried out in accordance with generally accepted requirements, the sewer system can last for many years without repair.
Nowadays, on store shelves there is a large selection of water seals of various designs, the main element of which is a curved pipe. This provides a constant water barrier. Some siphons are additionally equipped with special auxiliary devices.
The main condition for uninterrupted operation is the presence of water in the siphon cavity. After all, this is a kind of barrier that prevents gases and odors from entering the room. If the water seal is not used for a long time, the water will slowly evaporate, which can lead to the appearance of unpleasant odors. With regular use of the equipment, the volume of water in the siphon is always at the proper level.
Based on technical and design features, several types of water seals can be distinguished. Let's look at each of these types.
Siphon for bathroom, washbasin or kitchen
Thanks to the siphon in the box, there is space under the sink in the bathroom and kitchen. To mount the device, a hole of appropriate size is made in the wall. The siphon is disguised in the wall, and a tube is passed to it. For the bathroom, you can take a curved pipe. In addition to it there is a corrugated hose that connects the drain to the overflow.
Bathtub drains often have a plug designed to be installed in the drain hole. A siphon with a small height is suitable for a shower stall, and a bottle drain is mounted under the sink. The hidden design is suitable for assembling the system for washing machines and dishwashers. It is recommended to install a branched drain in the kitchen area.
How to choose the right one
The siphon must match the parameters of the sink. In the standard model, an inexpensive tubular or practical bottle device is sufficient. If the sink or washbasin is exclusive, then the parts must be purchased complete with plumbing fixtures.
Before purchasing a siphon, determine what else will be connected to the structure. It is better to take one multifunctional device than 3-4 ordinary ones. For a double sink you will need a model with 2 drains. The washbasin in the bathroom should be protected from overflow.
Construction for two sinks Source samstroy.com
The throughput of the siphon must be able to withstand all connected devices. The more devices are connected to the structure, the larger the cross-section and the more drainage systems of the model. When the washing machine or dishwasher actively drains, the sink will “choke” with liquid.
The more equipment is connected to the drain, the wider the cross-section of the siphon. The throughput of the device is calculated by the parameters of the water pressure from the tap and the number of connected household appliances. At maximum load, it is a mistake to mount a compact flat one; it is better to give preference to a capacious bottle one.
Measure the diameter of the sewer hole and siphon. The device parameters must match the system characteristics. Traditionally, the entrance to the pipe can be (in mm):
- 50;
- 40;
- 32.
For siphons with a smaller pipe, installation is carried out through an adapter with rubber seals. Designs with a large diameter are not suitable. The size in universal corrugations is often adjusted by trimming or union couplings.
Several drains in the design Source ekb-holod.ru
If you don’t plan to leave the siphon in plain sight, then you don’t need expensive metal parts. Copper, bronze or chrome-plated structures are not visible under cover caps or in the cabinet. The device must be practical and easy to use.
Features of installing a drain with overflow
Information about drain collection is included in the instructions that came with the siphon. To work you will need:
- flat screwdriver;
- insulating tape;
- siphon;
- bucket;
- sealant;
- adjustable wrench;
- a napkin made of paper or fabric.
When choosing a sealant, preference is given to products based on rubber or silicone. The products must be suitable for connecting plumbing parts.
System assembly
First, connect the drain to the sink. The structure is placed under it and the dimensions are first checked for compliance. Next, unscrew the plug from the bottom of the device and inspect it for damage, thereby checking the reliability of the structure.
Before assembly, inspect the threads on the body. If there are burrs on it, they are carefully cut off. If this deficiency is not corrected, damage to the O-ring may occur during installation. Before installation, check all threaded connections, nuts, joints and gaskets.
To assemble the device flask, you will need:
Siphon assembly process
- put the gasket on the threads of the upper section of the structure;
- screw the bottom of the siphon;
- place a rubber seal of the appropriate diameter on the drain tube and put on 2 tension nuts;
- insert the drain pipe into the hole at the bottom of the siphon, push it to the desired height and tighten the nut loosely;
- install a gasket in the cover of the device and screw the drain to the body.
The rubber seal placed in the groove is coated with a small amount of sealant. To ensure reliability, the substance is lubricated with the lower thread of the plug, which is screwed into the body. To tightly connect the parts, a winding is used to remove the element when necessary. Before collection, the length of the tube is selected, the height of which is determined by the depth of the shell.
The main pipe is connected to a tube with clamps. Subsequently, the part is mounted to the sink, placing a gasket between the elements. The area between the pipe and the overflow with outlet is secured with a nut. It is recommended to tighten plastic parts by hand to avoid breakage.
Installation of the structure
First you need to turn off the water, connect the protective grille and the sink drain hole, placing a rubber seal no more than 5 mm thick between them. If the grille dimensions are larger than the hole, use a sealant rather than a gasket. A rubber seal is placed on one edge of the outlet pipe, and a chamfer is removed from the other edge, improving the fit of the pipe into the siphon.
To connect the sink and the pipe, you will need a screw with a diameter of 6 mm. The part is inserted into the protective grille and tightened. Then the drainage pipe is connected to the outlet pipe. In this case, it is necessary to monitor the connection points. For reliable sealing, you can use plumbing tape.
How to decide on a bathtub drainage system
A bathtub drain siphon is an equipment without which no bathtub would function. A drainage system is necessary to ensure that used water goes into the sewer system. Any drainage system includes a siphon. It protects the room from the penetration of bad odors from the sewer system.
Designs for draining water are divided into several conditional groups:
- simple drain-overflow. A design in which the drain is combined with an overflow with a regular corrugated pipe, and the water goes into the sewer system using a siphon. The drain is closed with a stopper to prevent water from leaking out;
- automatic drain-overflow. When installing this design, the drainage of water from the bathroom is automated. This happens using a special valve. The water stops draining after the special handle located next to the overflow is turned;
- design with a water collection function - drain and overflow, allowing you to collect water into the bath without unnecessary actions.
When choosing a drain/overflow for a bathroom, you should definitely pay attention to the manufacturer, because the quality of the drain will determine how much water gets onto the floor.
Floor-mounted shower with siphon
What types of sink siphons are there?
When choosing a suitable model, first of all you should pay attention to its design and shape. Depending on these characteristics, the following types of plumbing fixtures are distinguished:
- Tubular. It is a collapsible or non-dismountable tube, which has an S-shape. There are models on sale that have a special twist-off lid at the bottom. It is necessary to clean the device from accumulated dirt.
- Bottle. At the location of the hydraulic lock, the product has a shape that resembles a bottle in appearance. This model can be connected to the sewerage system using either a flexible or straight pipe. This option has a number of advantages: it is easy to install, can be easily disassembled if necessary, and if something falls into the sink, the item will not be lost, but will remain at the bottom of the flask. The disadvantages include the formation of blockages at the point where liquid exits the glass into the drain pipe.
- Corrugated. One of the most popular options for sink siphons. This is explained by its low cost, versatility, and ease of installation. Thanks to the flexibility of the tube, the device can be installed even with limited space under the sink. The hydraulic lock system is formed by manually bending the tube into the required position. The disadvantages include the fact that due to the uneven surface of the tube, the device is prone to contamination, and it cannot be disassembled. But this drawback is also a plus - thanks to the small number of connecting joints, the likelihood of leakage is reduced.
- Hidden type. The model is a bottle version, where only a pipe for draining water is located outside. The glass itself is mounted on the wall. This option is not in great demand due to its high cost.
- Dry type. It is a new product on the plumbing market, which did not prevent the product from quickly gaining popularity among consumers. The system is a device equipped with a special membrane. Under water pressure it opens, and after the end of the liquid supply it contracts. This helps to completely block the drain hole. This design prevents the formation of stagnation in the siphon, and as a result, no unpleasant odors arise.
Types by installation method
Manufacturers of sanitary products have a large number of materials that can be easily processed, which is why bathroom sinks have different shapes. This variety makes it possible to harmoniously integrate plumbing fixtures into the interior of the bathroom, but it also places new demands on drainage systems. Based on their location, they are divided into the following types:
- Sinks with central drain. In such models, the drain hole is located almost in the middle of the bottom of the bowl. This arrangement is convenient because, thanks to it, the water quickly leaves the sink without stagnating. However, this arrangement of the drain pipe does not allow any household appliances or furniture to be installed under the sink.
Sink with central drain - Sinks with side drain. The side drain is not located at the bottom of the sink bowl, but on its back wall or at the junction of the wall and the bottom. It is convenient because it allows you to move the siphon body outside the sink. This allows you to install the sink above a washing machine or cabinet. However, due to this arrangement, the water cannot completely drain from the bowl; it settles at the bottom, causing limescale to form.
Sink with side drain
Important! Also, recently new models of drains designed for hidden installation have begun to appear. They are compact, so they do not take up much space, so they are practically invisible from behind the side of the sink. However, the main factors that must be taken into account when choosing a siphon are the correspondence of the diameter of the pipes and the throughput of the device, which allows you to effectively drain water from the washbasin.
How to choose the right size and other parameters of the siphon
To ensure that the device meets all the necessary requirements, when purchasing you should pay attention to the following parameters:
- Siphon size. If you plan to connect several products, which will lead to a large load on the device, you should pay attention to models with a wide cross-section. They have excellent throughput.
- Neck diameter. It is necessary to take into account both the size of the neck of the siphon itself and the diameter of the sink drain hole.
- Outlet pipe diameter. It may differ from the size of the sewer pipe neck. The best option is when the sizes match. Otherwise you will need to use adapters.
- Availability of additional pipes. If you plan to connect a washing machine, dishwasher or other appliances to the system, pay attention to models with additional inlets.
- Design. This characteristic is important if the device is involved in shaping the overall design style of the room. In this case, models made of brass are suitable.
- Price. The cost of a product is affected by the material from which it is made. Models made from different materials are on sale: polyvinyl chloride, metal, plastic. The choice of material directly affects the service life of the device. As practice shows, siphons made of metal last the longest. True, they are more expensive than plastic options.
Attention! Some unscrupulous manufacturers use recycled materials for production. This material is not of high quality, and the product turns out to be fragile and short-lived. Therefore, when purchasing, you should pay attention to the material from which the siphon is made.
The siphon is one of the most important elements of any sink. Therefore, the choice of a suitable model should be approached with all responsibility. After all, the product will not only prevent the entry of unpleasant odors from the sewer system, but will also protect against a possible flood.
Materials used to make siphons
| Material of manufacture | Short description |
Plastic | The most popular material for the manufacture of siphons, in terms of its performance indicators, completely satisfies the majority of consumers. Due to modern fillers, it has high levels of mechanical and chemical resistance. The material is very technologically advanced, which not only reduces production costs, but also allows you to create various geometric shapes. In terms of cost, plastic siphons are the cheapest and have many types and modifications. |
Stainless steel | The service life is virtually unlimited, they have excellent design characteristics, and are often used in open sewer systems. The price is much higher than plastic siphons; during installation they require accurate measurements. Assembly and installation require some experience in plumbing work. |
Non-ferrous copper-based alloys | The most expensive materials for the manufacture of sanitary equipment are used only on exclusive sinks. Physical characteristics do not differ from stainless steel products. They are not afraid of large dynamic and static loads. |
Cheap chrome or nickel alloys | They occupy a middle position in terms of cost and performance indicators; they are most often used for the manufacture of individual elements of plastic siphons. |
Sink siphons
Despite the different types of materials and the wide range in prices, all siphons operate efficiently and perform their main technical tasks for a long time.
Recessed and surface mounting
Such sinks are a priority choice for spacious rooms. They are often installed in pairs on one flat base - tabletop, cabinet. The shape of the bowl can be any, even the most non-standard. Overhead ones are installed on the surface, and built-in ones are cut into the surface. This is the most ergonomic option.
The bowl of a built-in washbasin can be installed in several ways: hidden and mounted under the countertop (important for countertops made of natural stone), the sides of the bowl protrude and are located above the countertop (ideal for rectangular bowls), semi-built-in - the bowl is embedded in the countertop, but its front part protrudes beyond its limits.
Installation technology
- The tabletop is marked for cutting a hole. As a rule, for mortise models, manufacturers include a special template for carrying precise markings.
- Using a jigsaw, a hole is cut according to the markings.
- The end of the hole must be cleaned with sandpaper and sealant applied in 2-3 layers.
- The mixer and siphon are assembled and installed on the washbasin.
- The side is covered with a special waterproof tape, which acts as a seal.
- The fastening elements included in the kit are installed on the side.
- The bowl must be carefully turned over and sealant applied to the edge.
- Next, the washbasin is installed in the hole, and the fasteners are tightened tightly.
- The siphon is connected to the sewer outlet, the mixer hoses are connected to the water intake.
Installing a sink on brackets
This is the simplest and most common installation technology. It includes 5 stages:
- On the installation wall, draw a straight line parallel to the floor with a pencil. The height is determined individually.
- We measure the thickness of the wall of the device, the one that will be adjacent to the wall. The resulting parameter is the distance that is measured down from the drawn baseline; we draw another line at the measured mark. This is where the brackets will be attached.
- Measure the exact distance between the brackets. We attach them to the base line and mark the attachment points. We drill holes at the marks, insert dowels into them and attach the brackets to the wall.
- According to the manufacturer's instructions, we attach the bowl to the brackets.
- We connect the mixer and siphon.
Siphon installation features
The siphon, like the mixer, can be attached before fixing the bowl or after. The ease of performing this operation determines the type of plumbing product. For example, a tulip sink, at the stage of screwing it to the wall, should already be equipped with a water seal, which will only need to be connected to the sewer. Otherwise, the decorative leg will create significant difficulties during the assembly of the drain fittings.
You can also use the option when only part of the drain (its upper part) is mounted on the washbasin, before it is secured. This is done if pipe or bottle type siphons are installed. If you have a corrugated water seal, then, in case of limited access under the washbasin, you will have to screw it in whole at once.
Connecting plumbing in the bathroom
Today, when deciding how to connect a sink to a sewer in a toilet, it should be taken into account that washbasins are now, as a rule, equipped not with a single outlet pipe, but with a full-fledged drain and overflow system. In this configuration, the drain pipe is supplemented with a tube leading from a hole located high in the side wall of the plumbing, above the mixer, with a drain channel.
Thus, when filling the bowl, water will not overflow, falling through the drainage tube directly into the siphon.
Sink overflow drain system
Dismantling
The first step in installing a drain when replacing a washbasin or bathtub is to dismantle the old device. To do this, remove the holding screw located in the center of the drain grid installed in the washbasin. Due to long-term use, parts of this structural element sometimes become stuck to each other.
In such a situation, the solution is to dismantle the lower flask of the siphon apparatus: then, in the process of turning the upper part, the coupling of the screw and the grille will most likely be loosened. There is also the option of using a special product - a solution, which will help remove old contaminants that adhere to parts.
After the siphon flask or pipe is dismantled, it is necessary to clean the drain pipe and then plug it while installing new equipment, for example, with a rag - if you do not want the open riser to stink and poison your existence throughout the entire repair process.
Where to put the faucet?
Before you figure out how to install a faucet on a sink, you should choose the right model, paying attention not only to its aesthetic appeal. Important parameters of shut-off valves are:
- installation location - on the washbasin, on the wall or in the wall;
- locking mechanism design.
1.Where and how to install the tap?
The most common are faucets that are mounted on a sanitary bowl in the corresponding hole. This arrangement is currently the most optimal in terms of design, ease of installation and maintenance.
Shut-off valves can be attached to the washbasin both before and after its fixation. However, it is often more convenient to install the faucet before the washstand is in its permanent place. The water supply in such models is carried out with flexible steel-braided hoses, metal-plastic, copper or corrugated bellows connections.
Wall-mounted faucets are often used when they are designed to distribute water alternately to the washbasin and bathtub, or when space under the bowl is limited, for example, due to the washing machine located there.
In the recent past, wall-mounted basin faucets were used alternately for the sink and bathtub to save space and money. Now this is an expensive accessory.
Faucet sets installed in the wall are considered luxury, expensive shut-off valves and require an extensive amount of preparatory work. Their connection to the water supply is carried out using specially installed rigid sections of pipelines.
2.Lock mechanism
Regardless of the sink model, the installation of the mixer is selected with a swinging lever (“joystick”) or with axle boxes (“twisters”) of valve or plate type. In the vast majority of cases, controlling the water supply using joysticks turns out to be more convenient than by rotating the axle boxes.
Attention! A ball valve with a swinging lever can cause certain inconveniences of use in systems in which hot water is supplied from double-circuit autonomous heating boilers without the use of intermediate storage tanks.
Preparing to connect the sink
Determining the installation height of a plumbing fixture (for more details: “Installation height of a sink - at what height to install it correctly”). The sink, not equipped with additional accessories, is located at a height of 850 millimeters. At this level, draw a horizontal line - it will be the guideline for installing the washbasin. The top surface of the plumbing fixture must correspond to it.
If there is a support leg or when the sink is installed in a cabinet, there is no need to determine the height of the plumbing fixtures. This parameter depends on the size of the leg or cabinet.
Marking mounting locations on the wall.
Before installing the fastening system, it is necessary to make appropriate markings on the wall. The sink bowl has mounting holes for connecting the sink to the sewer. The plumbing fixture is applied to the wall, as in the photo, its upper edge is aligned with the drawn line and the places where the holes for fasteners will be located are marked. This work is easiest to do with two people. One person should hold the washbasin near the marked line, and the second at this time can mark the places for fasteners from below. If there is a leg or a supporting cabinet, installation work is simplified - the plumbing fixtures are placed on a support and the mounting points are marked on the wall.
Installing a sink on a semi-pedestal
Such models look elegant and save space. The semi-pedestal is a decorative element and does not perform load-bearing functions. It only hides communications. The height here is not fixed, but is determined independently.
- The package includes powerful brackets that are attached at a measured height to the wall using dowels and self-tapping screws. When attaching them, be sure to use a building level to ensure the bowl is level.
- The bowl is hung on the installed brackets and connected to the water supply and sewerage systems (we assemble and install the mixer and siphon group).
- Depending on the model, the semi-pedestal is mounted using a spring suspension or studs. Both options provide reliable fastening of the decorative leg.
Mounting a pedestal sink
The advantages of this type are that the pedestal takes on the main load, reliably supports the bowl, and hides the plumbing and siphon. But such devices have a fixed installation height. All necessary elements are included in the package. If the flexible hoses are not long enough to connect to the water supply system, you will need to purchase hoses of the required length.
Installation technology
- Marking. We place a pedestal against the wall and carefully place the bowl on it. We set it exactly level and mark the mounting points through the mounting holes. We drill holes in the marks, drive dowels into them and screw in self-tapping screws with a screw thread for the nut.
- Installation of mixer and siphon. We connect flexible hoses to the mixer. On the back of the mixer there is a special groove in which you need to install a rubber gasket-ring. Install the faucet tightly into the hole in the sink. On the reverse side you need to install a rubber seal and a washer. Then we fix the tap with a nut and a pin. Then we strip and install the siphon. The siphon is connected to the sewer outlet using a corrugated pipe, but only after installing the washbasin.
- Using the mounting holes, we put the bowl on the self-tapping screws and secure it with nuts and plastic washers (this prevents damage to the earthenware).
- We connect flexible hoses to the water supply and the siphon to the sewer outlet. Then we place a pedestal under the bowl. As a rule, installation of the pedestal does not require additional fastening to the floor; it stands stable.
Important point
When installing the bowl, do not tighten the nuts as much as possible so as not to damage the product.