Andrey
10948 0 2
Andrey August 11, 2016Specialization: facade finishing, interior finishing, construction of dachas, garages. Experience of an amateur gardener and gardener. We also have experience in repairing cars and motorcycles. Hobbies: playing the guitar and many other things that I don’t have time for :)
If you notice that the siphon in the bathroom is out of order, do not rush to call a locksmith. The fact is that replacing it is a fairly simple procedure that takes only a few minutes of time. The only thing is that you first need to familiarize yourself with some of the nuances of this work, so next I will tell you how to properly install a siphon for a bathtub with an overflow.
Siphon for installation in the bathtub
Types of siphons
The procedure for cleaning a siphon largely depends on the structure of the latter. Structurally, they can be divided into the following types:
- Bottle (aka flask);
- Corrugated;
- Pipe;
- Flat (similar in shape to a bottle, but at the same time has a flat sump shape).
Each type has its pros and cons. It is worth noting that the bottle model is most common for installation on kitchen sinks and bathroom sinks. A tank with a sump not only provides reliable protection against unpleasant odors, but the design also provides a large space for debris to accumulate (compared to tubular or corrugated models).
Tubular siphons have a very simple design. In fact, they are a curved U-shaped pipe. The rotation creates a seal that prevents unpleasant odors from entering the room. To clean this model, it is necessary to remove the curved section of the pipe, where all the debris usually accumulates.
Corrugated siphons are similar to tubular ones. In this version, the bend is formed independently from corrugations. Cleaning is usually done using a cable. Corrugated and tubular models are commonly used for installation on bathtubs and showers. They are compact in size (compared to bottle ones), which means they take up little space. However, this design gets clogged faster. However, the only waste in bathtubs and showers is usually soapy water and hair, so these models are considered the most suitable.
How to protect yourself from stagnation
Stagnation occurs due to the careless handling of users who let wool, hair, paper and other debris into the sewer. It is better to regularly care for the siphon, namely, take preventive measures. In order not to be puzzled by the question of cleaning the siphon, you should only pour chemicals into the drain from time to time or use a plunger.
There is no way to completely protect against clogging. But if you regularly carry out cleaning operations, at least once every few months, then the possibility of stagnation will be minimal.
Clearing the blockage
Siphon cleaning can be done mechanically or chemically.
Mechanical, in turn, can be done using the following methods:
- With complete or partial disassembly of the siphon;
- Using a plunger;
- With the use of a hydraulic pump;
- Using a cable.
Partial disassembly
This method is available for bottle siphons; it does not imply complete dismantling of the latter. A bucket is installed under the sink or sink into which water and waste will drain. The sump is unscrewed, the cause of the blockage is eliminated, and the part is installed back. When installing, pay attention to the correct installation of all gaskets, otherwise leaks may occur. Cleaning the siphon of washbasins and sinks usually just comes down to a partial disassembly procedure.
Complete disassembly
Cleaning a bathroom siphon usually involves completely disassembling the siphon. Before starting the procedure, place a container into which the water from the system will be drained. Siphons may differ in design, however, in general, the procedure boils down to the following:
- The nut on the knee is unscrewed and it is removed;
- The nut connecting the siphon to the corrugation is removed;
- We dismantle the connection pipe to the washbasin (sink);
- After mechanical cleaning, we wash all parts. The siphon reservoir with outlet must be completely disassembled and cleaned using a piece of cable;
- That's it, you can assemble the siphon in reverse order. Be sure to check the nuts for proper fit and tightness. We let the water run and check for leaks.
Cleaning with a plunger
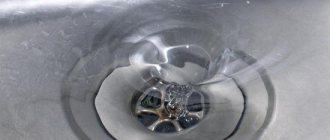
A plunger is a simple product consisting of a rubber valve and a handle. To begin with, the sink must be filled with water to a level of five to seven centimeters. We press the valve of the plunger to the drain hole, without lifting it from the surface, we make several vigorous movements up and down, as if pushing water into the drain. Remove the plunger and check if the water has started to drain. If not, repeat the procedure. Usually five or six approaches are enough. When cleaning, it is necessary to take into account the presence of an overflow, which should be closed with a stopper or rag to create a vacuum when working with a plunger.
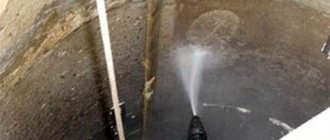
Using a manual hydraulic pump
A manual hydraulic pump is a more modern tool for dealing with blockages. The principle of its operation is quite simple: a water flow is created that pushes the obstacle down the pipe. If this fails, the tool, on the contrary, can direct the flow upward, creating a suction effect on the blockage.
The technology for using a hydraulic pump is quite simple:
- The overflow hole closes;
- A certain amount of water is drawn into the pump (depending on the model);
- The nozzle of the tool is pressed against the drain;
- The trigger is pressed and water is pumped;
- The procedure must be repeated until the blockage is cleared.
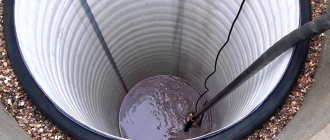
Cleaning with a plumbing cable
A plumbing cable is a more difficult tool to use. It is a twisted wire, the length of the cable is usually three meters, but the diameter can vary, depending on the purpose. There is a drill at one end and a handle at the other. The cable is used to remove blockages directly from the water supply system, and not from the siphon itself.
The procedure for removing blockages using such a tool includes the following steps:
- Cover the floor, and preferably the walls, with oilcloth;
- Disassemble and wash the siphon;
- Two people should work with the cable; one person will push the cable and the other will turn it. The cable should be pushed until it fits freely into the pipe, and it must be constantly turned. If progress slows down, it means you are approaching a mud plug. Try to advance the cable, turning it all the time. If forward movement is not possible, do several back-and-forth moves.
- If unsuccessful, remove the tool, clean it and repeat again. It may take up to three or four attempts.
- After the plug is removed, reassemble the siphon and pour a couple of liters of boiling water into the system, this will help drain the remaining dirt.
Removing blockages using chemicals
Today, manufacturers offer a number of ready-made products to remove blockages. Their range is quite large, however, they all act either on the basis of acids or alkalis. When choosing a product, carefully read the instructions for it and follow it exactly. Do not exceed the specified concentration and under no circumstances use two products (especially if we are talking about acidic and alkaline) at the same time, this can lead to damage to the pipes and overall failure of the drainage system.
You can also use a home remedy consisting of non-carbonated soda and table vinegar. True, this mixture only helps with mild blockages. Pour two tablespoons of soda into the drain hole (note that it must be pushed in), then pour in about 200 ml of vinegar. We are waiting for the reaction to end. After a couple of minutes, add two more liters of boiling water.
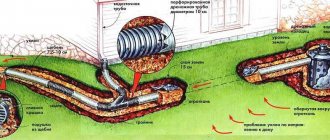
Design and principle of operation
Sewage equipment under a bathtub or sink looks like a connection of several pipes responsible for a continuous supply of water. One pipe is for draining used liquid, the other is for overflow.
Sometimes the drainage system is supplemented with a special device that controls the level of incoming or outgoing water.
The operating principle of such systems is simple - water, having passed specially shaped bends, moves on, but part of it remains inside. This approach helps create a seal that prevents the spread of sewer gases indoors.
Semi-automatic draining allows a person to independently control the position of the plug in the overflow hole. You can fill or empty the tub without bending over.
Some craftsmen have gotten used to doing this while lying down, using their feet to control the drain mechanism.
How to disassemble a siphon in a bathroom or kitchen to clean it
Procedure:
- Place a bucket under the sink - the remaining waste will flow into it. We unscrew the sump and wait for the liquid to drain.
- Remove the union nuts that secure the pipe in different areas. We separate the hose leading into the sewer pipe from the siphon and disconnect the bottom of the device. We separate the rigid elements (they are partially installed one into the other).
- If there is debris in the parts, clean them and rinse them with a hot detergent solution.
Attention! The upper part of the device, located above the water seal, remains in place. It can be freed from dirt with a short length of wire with a curved end.
Upon completion of the work, reassemble the product in the reverse order, not forgetting the gaskets and tightening the fasteners tightly.
Method three: soda, vinegar, water
An alternative to a chemical product is a mixture of soda and vinegar essence. It happens that the drain does not allow soda to pass through, then you have to push it through with a cotton swab. Cleaning work should be carried out in several stages:
- Wipe the sink with a dry cloth;
- Pour half a glass of soda and the same amount of vinegar into the siphon;
- Cover the drain with a towel for 30-40 minutes;
- Heat water in a kettle and pour it into the siphon. You can use regular tap water.
The described method is suitable for both removal of contamination and prevention.
Method one: plunger
A plunger is a hand-held rubber device designed for cleaning drains. During pressing, pressure is generated, which loosens the clots of waste and pushes them into the drainage.
The algorithm for cleaning with a plunger is as follows:
- Close the drain with a plug;
- Fill the sink halfway with warm water;
- Cover the drain with a plunger;
- Press the plunger sharply several times;
- When the suction ends, quickly remove the plunger from the drain.
This cleaning option is only possible for minor blockages.
Method four: soda, salt, water
Another way is to use three components at once for washing. When water, salt and soda interact, a chemical reaction occurs to form a solution that has cleansing properties.
Algorithm:
- Mix half a glass of soda and the same amount of salt. Pour the resulting mass into the siphon;
- Pour boiling water into the drain;
- Wait for the reaction to complete. Do not use the sink for eight hours;
- After the expiration date, rinse the sink with warm water.
The most convenient time to perform the procedure is at night.
Method seven: removing the sump
The problem of blockage is solved by removing the siphon sump. A septic tank is a place where garbage accumulates. This method takes much less time than the previous one, but does not become ineffective.
Procedure:
- Prepare a bucket and place it under the still assembled siphon;
- Unscrew the sump;
- Remove all debris from it and clean the walls from grease stains;
- Screw on the sump;
- Turn on the water and check how easily it flows;
- Once again, pay attention to the sump: if installed incorrectly, leaks are likely.
If the problem is not solved and the water still flows with difficulty, you need to completely disassemble the siphon.
Method two: chemicals
Before cleaning the siphon using a chemical, you need to find out what material the pipes are made of. “Mole” products are suitable for metal pipes; products like “Mr. Muscle” are suitable for any other material.
To clean the sink siphon with a chemical, you must:
- Pour the product into the sink and let it sit for half an hour;
- Fill the sink with warm water;
- Clean with a plunger.
Chemicals remove both blockages and unpleasant odors.
Design
Before you get interested in how to remove a siphon from a shower stall, let’s get acquainted with its features. This element is also called a “ladder”. This product can be used to connect various plumbing fixtures. It is not used for structures with a built-in water lock and those that are connected directly to the sewer system. The following elements are suitable for shower trays: 1. Bottle (flask) trays. The functional element here is a special compartment with the shape of a bottle. These siphons are installed for high shower trays. 2. Pipe. They are assembled from several pipes of different lengths, which are connected by adapters. They are characterized by compact dimensions, therefore they are in demand for almost all shower cabins. 3. Corrugated. These are also pipe devices, but instead of hard ones, soft pipes are used that bend easily. They have a rough inner surface, which causes them to become clogged faster, which is why they are less popular. The best option for a shower stall is a pipe siphon, which has suitable characteristics and small dimensions.
Drain design
How to choose the right siphon for a shower stall?
Replacement
Let's move on to how to change the siphon under the shower stall. It is not recommended to buy cheap products, since in order to replace a failed siphon, you will have to remove the pan. And to do this, of course, not in all cases, you have to dismantle the shower stall. Not all parts can be reused later, so you should immediately choose a reliable product that will not require frequent maintenance. No matter how reliable the equipment is, it cannot last forever. To replace the siphon, first remove the decorative panel from the bottom of the tray. It is often secured with snap-on clips. To open them, you should press the panel around the periphery with slight force. Dismantling is carried out as follows: 1. The elbow is detached from the external sewer pipe. 2. The elbow is unscrewed from the pallet, for which an adjustable wrench or washer is suitable. 3. The overflow, if any, is disconnected. 4. The drain is removed.
Element dismantling
The next step is how to disassemble the shower siphon for cleaning. The sequence of work looks like this: 1. Place a container under the siphon into which the remaining dirty water will drain. 2. Unscrew the union nut. It is better to do this slowly so that the liquid does not get on the floor. 3. Pour out the remaining water. 4. Remove the gasket from the rubber.
Appearance of the disassembled device
Read also! Maybe
Installation of a new drain
At the preparatory stage, you need to remove the old siphon. Access to the device opens after removing the decorative grille. You will need to unscrew the screw that secures the masking. With prolonged use, the threaded threads wear out. In difficult cases, a grinder will help to disassemble the structure.
You should take into account the large amount of dirt that comes out of the siphon after removing the plug. Before you begin, you should consider ways to protect your bathroom flooring.
other methods
A variation of baking soda and a chemical agent is regular hot water. This method is only effective if there is a metal pipeline. Boiling water removes holes in a few minutes. If the pipes are made of plastic, the water is heated, but not extremely hot.
Action plan:
- Prepare a solution: for five liters of liquid there is a glass of powder;
- Pour the solution into the pipeline;
- After 30-40 minutes, treat the drain with water;
- If the blockages have not disappeared, repeat the operation.
If there are not too many blockages, just unscrew the siphon and rinse it thoroughly. The process will take a couple of minutes, but will save you unnecessary problems.