For some reason, a tradition has become established in the process of carrying out renovation work in an apartment to part with the Soviet past: heating radiators, ceramic tiles, electrics, sinks, etc. But old cast iron bathtubs are not on this list. There are many reasons, but the main one is that modern means allow you to repair the bowl yourself, i.e. restore enamel at home.
There are several ways to repair a hot tub that you have loved for many years:
- insert insert;
- spray epoxy enamel from a can;
- fill the bathtub with acrylic.
A separate article is devoted to each of these methods. In this material we will talk about how to carry out repair work using self-leveling acrylic.
Bathtub enamel coating
The cheapest way to make an old bathtub look more beautiful is to enamel it. After restoration, such a bathtub will be no different in appearance from new plumbing. Its surface will become just as smooth and shiny, without any flaws. The advantages of enameling a bathtub are, first of all, cost-effectiveness, as well as resistance to chemicals and quick restoration work.
Preparatory work
Before the procedure, it is necessary to completely remove the old layer of enamel from the bathtub. To do this, take abrasive powder, apply it to a household sponge and thoroughly rub it into the surface of the bathtub. Then you should use sandpaper and clean the enamel from the bathtub again. Some craftsmen at this stage use a drill with an abrasive wheel, this significantly speeds up the preparatory process. But it should be taken into account that small particles of enamel will scatter throughout the room, and you will have to wear a respirator
It is very important to remove rust from the bathtub and thoroughly clean the chipped areas. After cleaning the bathtub from the old enamel, a degreaser is applied to its surface
It can be a specialized fat solvent or regular baking soda. Then you need to wash the bath thoroughly and fill it with hot water. The plumbing should be left in this state for 10-15 minutes. Then drain the water and wipe the surface dry with a cotton cloth. Now the bath is ready for restoration work. Stripping the bathtub of old enamel is also required to cover it with acrylic.
Enameling technology
The second stage of restoration work begins with mixing the hardener with the enamel
The resulting mixture is applied with a roller in an even layer to the surface, and it is important to start from the top edge, heading down to the drain. This prevents the appearance of bubbles and unevenness.
The first coat of enamel is a preliminary primer and must be given time to dry. When the primer is completely dry, apply the second layer of enamel in the same way. Another advantage of enamel coating is the ability to apply several layers. Only after a week will the bath be ready for its intended use.
Bathroom care
The restored enamel surface of the bath requires careful care, because the service life of the plumbing depends on it. Do not allow metal objects to get into the bathtub, clean it using powdered and chemical detergents, or soak laundry using bleaches. Damage to enamel can also occur from various products that contain alcohol or acetone. Therefore, you should not spray your hair with fixing varnish in the bathroom or remove manicure from your nails. It is better to remove dirt with a soft sponge soaked in a special gel.
Preparation of enamel
- Thoroughly mix the liquid mixture and hardener in a container.
- Slowly add the solvent in small portions, continuously mixing the mixture. The composition must be homogeneous.
- Add the dye of the desired shade, the final intensity depends on its quantity. In the absence of a dye, the bath will turn out white.
Before you start applying the prepared mixture, you need to let it stand for some time, taking into account the air temperature:
- 15 degrees - 20-25 minutes;
- 20 degrees - 15-20 minutes;
- 25 degrees - 10-15 minutes;
- More than 30 degrees - 5-7 minutes.
What materials are used to restore enamel?
Today, many manufacturers offer restoration compositions. However, it is often the wealth of choice that confuses a person who does not understand this issue.
According to experts, the championship here belongs to the famous brand “TIKKURILA”. The Finnish-made composition dries perfectly and does not form bubbles or smudges. According to experienced craftsmen, even a beginner can paint a bathtub with liquid acrylic using the Tikkuril composition. The only argument against would be the high cost of the material.
Liquid acrylic “Eco Bath” produced in Russia is quite popular among craftsmen. It does not have a pronounced chemical odor and is characterized by good plasticity and fluidity. Mixes without forming bubbles and hardens quickly. The full cycle of work takes no more than two days.
Filled or flowing glass is famous for its durable coating and low price. However, this is where its advantages end. Stacked glass is not very suitable for DIY bathtub restoration. Due to the strong chemical smell, it is necessary to work with this material in a respirator. The composition is difficult to mix and forms smudges and bubbles when applied. The coating hardens completely only after 4 days.
Acrylic coating “Plastal” is a new product on the Russian market. The material has excellent fluidity and plasticity, mixes well without forming bubbles. When applied, it lays down in an even layer and has virtually no odor. Experts consider the only disadvantage of the finished coating to be its low impact resistance. Even a bottle of bubble bath can leave a dent.
Note: During the cold season, do not rush to prepare the mixture immediately after purchase. It is better to leave the components indoors for at least a day.
Restoring old enamel
As a rule, bathtub restoration is started for several reasons.
- Temporary housing. When the apartment is rented or, on the contrary, rented out, there is no point in spending money on expensive plumbing fixtures.
- Financial question. The old bathtub has already lost its marketable appearance, and buying a new one is not in the immediate plans.
- Features of the layout. Dismantling and removal of the old cast iron bowl is impossible. You can, of course, break it, but it’s a shame.
Restoring a cast iron bathtub is usually done in one of three ways: coating the bathtub with enamel, liquid acrylic, or installing an acrylic liner. There is, however, another rather extravagant solution for updating a cast-iron bathtub - covering it with mosaics. But this option, rather, relates to decoration; it is quite troublesome and impractical.
Important! Restoration of bathtubs is recommended to be carried out after completion of renovation work in the room, so as not to damage the new layer.
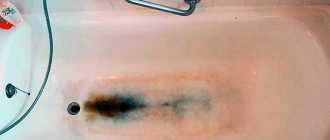
Streaks and sagging
In cases with epoxy enamel and liquid acrylic, drips or sagging may form. Therefore, it is worth monitoring these coatings, when enameling after 15 minutes, and when covering with acrylic after 5 minutes.
It is very easy to remove drips; you need to smear them with a brush in an upward motion. The sagging is cut off after drying with a mounting or painting knife. Sometimes it is necessary to install new cuffs or gaskets in the drain trims, because the drain holes become narrower and the thickness of the walls increases.
In conclusion, we can say that in appearance, the acrylic liner has the advantage. But, in terms of practicality, if it is installed in a steel bathtub, it will last 2 times less than the required period.
Therefore, when restoring a steel bathtub, it is better to choose enamel or liquid acrylic. This method of updating a bathtub will cost you several times less.
Method No. 3. Restoration using an inlay
Restoring bathtubs using acrylic liners is also called the “bath-to-bath” method. The liner is a structure made of acrylic, plastic or silicone, which is an exact copy of the bowl. You can buy it in a specialized store, having previously taken all the necessary measurements of the bathtub, and then glued it to the old bowl.
The most popular today are acrylic inserts - they are much more aesthetically pleasing and durable than plastic or silicone ones. This design is ideal for old bathtubs that cannot be restored with a new layer of enamel or liquid acrylic. In addition, the surface of the liners retains heat perfectly, its surface is absolutely smooth, but at the same time does not slip at all.
Bath liner
This is the most reliable way to restore a bathtub (the service life of a high-quality acrylic liner is approximately 15-20 years) and, contrary to popular belief, it does not reduce the interior space of the bathroom.
Advantages of a bathtub updated with a liner
However, this method of bathtub restoration also has its drawbacks.
- Difficult to install. Installation of an acrylic liner is a rather complex and time-consuming process. The liner is placed so that it covers the edges of the bathtub, and if the bowl is installed close to the wall, you will have to additionally remove the side and break the tiles.
- Possibility of water getting between two baths. If the installation was performed incorrectly, or due to wear and tear or the use of poor-quality materials, water may get between the liner and the bottom of the bowl. This will lead to dampness, mold and an unpleasant odor.
- Inconveniences during operation. Sometimes manufacturers make liners that are too thin, which is why they can sag underfoot and eventually become deformed or burst.
- Inserts are made for standard bathtubs only. As a rule, bathtubs are divided into two types - 1.5 m and 1.7 m, and if the bowl has non-standard sizes or shapes, choosing a liner will be very difficult, and sometimes impossible.
- Quite a high cost. Compared to new acrylic bathtubs, liners are inexpensive, but for the same price you can buy a new steel bathtub.
How much does a bathtub liner cost?
To reduce the risk of such problems, you need to buy only high-quality designs, and also strictly adhere to all stages and rules for installing liners.
Choice of acrylic liner color
How to choose an insert?
To avoid making mistakes when purchasing an insert, you need to take the following measurements:
- the width of the bowl along the inner surface, and measurements should be taken on both sides;
- length along the inner and outer surfaces;
- depth of the bowl at the drainage point.
To avoid making a mistake that will entail hassle and additional costs, you can invite a professional measurer.
Measurements
Another important criterion is the shape of the bath, rectangular or rounded. Based on these parameters, you can select a suitable liner. As for the quality of the product, here you need to pay attention to its surface (it should be smooth, without roughness, protrusions and other defects), as well as thickness. High-quality earbuds that can serve owners for a long time have a thickness of at least 6 mm.
How to choose a bath liner
It should be noted that most modern stores sell products with a thickness of 3 and sometimes 2 mm - such liners are very short-lived, and it is not recommended to use them for the restoration of bathtubs. In the best case, the structure will last about 5 years, after which it will have to be dismantled and replaced.
Which is better: an acrylic liner or a “fill-in bathtub”?
Restoring a bathtub with enamel: pros and cons
The coating applied to a metal or cast iron bowl in a factory wears out quickly. And after a couple of years, the bathtub becomes rough and loses its shine and snow-white appearance. Cast iron and metal bathtubs are often restored independently using special enamel. This method of restoring plumbing also has several advantages:
- efficiency;
- chemical resistance;
- low level of wear;
- possibility of applying several layers;
- quick completion of work.
The disadvantages of enameling a bathtub include:
short service life of the bath - no more than 5 years; the need to take special precautions and protection when painting, since the enamel has a very pungent odor.
How to enamel a bathtub?
First you need to prepare a set of materials and tools:
- brushes from 6 to 8 cm wide;
- roller;
- acetone;
- hardener;
- measuring glass;
- primer for metal;
- acetic or oxalic acid;
- gas mask or respirator;
- protective glasses.
The technology for coating the inner surface of a bathtub with enamel is more complicated than the technology for applying acrylic. The difficulty is that before applying the enamel, the surface must be as smooth as possible, so it must be thoroughly polished in advance. In addition, you should try to do the work very carefully, avoiding the formation of smudges, and quickly, before the enamel has time to dry.
The process of restoring an old bathtub using enamel includes 4 stages:
- Thoroughly clean the base of the bowl and apply primer to it.
- Preparation of all components intended for applying the first layer of enamel using a brush or roller.
- Complete drying of the material and subsequent application of enamel in several layers.
- Final polymerization of the enamel takes about 24 hours.
These are the methods for restoring bathtubs that exist today, and it’s up to you to decide which one to choose.
Buy a new bath or restore an old one?
Bathtubs are not replaced often, so when they plan to renovate, of course you want to buy a new one. It would seem that it could be simpler, especially since there are now many models of different shapes and sizes in stores. However, this solution is not suitable for everyone and it’s not even a matter of price.
Old bathtubs themselves are very strong, although the coating deteriorates over time. They already match the dimensions of your bathroom; there is no need to waste effort on dismantling and installing the structure. In the end, when you buy another bathtub, you only get updated enamel in a fresher color.
Restoration with liquid acrylic
If your bathroom does not fit into the standard dimensions, then installing a liner on it will not work. In this case, you can use the restoration method with liquid acrylic, or as it is also called - stacrylic. And the method itself is called the pouring bath method.
Many people think that this is the same as enameling a bathtub, but this is not the case. According to the manufacturers, the material used is the same as for the manufacture of the acrylic liner, only in liquid form, and it is distributed throughout the bathtub using the “pouring” method, and not with a brush: acrylic is applied to the walls by uniform flow.
Restoration with liquid acrylic - advantages of the method
- Lack of adhesive layer.
- High-quality liquid acrylic does not turn yellow.
- Resistance to household chemicals.
- Both cast iron and metal bathtubs can be restored.
- There is no need to dismantle the tiles, even if they are adjacent to the bathtub.
Restoration with liquid acrylic - disadvantages of the method
- The need to dismantle drainage devices.
- If the bathtub has factory unevenness, acrylic will completely repeat them.
- The time it takes for a layer to completely dry can be significant.
The reliability of such a restoration, like any finishing work, largely depends on the quality of materials and technology of the work. If errors were made during application, this may result in the formation of bubbles with subsequent damage to the glass layer.
In addition, many experts point out that overheating of such a layer is unacceptable. If exposed to too high temperatures, the top layer can also be damaged.
It is necessary to take into account that stakryl is a fairly new material, and manufacturers quite often adjust the formula for its production in order to “improve quality”, however, according to experts, this sometimes has the opposite effect. Therefore, it is better to use already proven material that has positive reviews.
Which acrylic to choose for the bathroom?
First, let's understand the terms. The domestic market for acrylic products designed to restore the bowl of a well-used bathtub is full of brands. “Plastol” , “Yarli” , “Standard” , “Stakril” , Finnacril and even “Ecoenamel” - there are many names.
All enamels are two-component, approximately similar in price - 1400-1500 rubles. for a 3.4 kg jar, which is enough to cover a one and a half meter container with acrylic.
All paints and varnishes of the “liquid acrylic” group, incl. Each brand listed above carries out bathtub restoration. The walls of the sanitary bowl are poured with two-component acrylic, which polymerizes and hardens, turning into a smooth and durable coating within a day.
The self-leveling bath is not a commercial product, but a painting technology. It consists of pouring a new paint coating over the existing worn-out layer of paint. Manufacturers are developing their own acrylic-enamel series of restoration materials for bathtubs, the formulas of which are carefully hidden from competing enterprises.
Among masters who restore bathtub containers and their clients, liquid acrylic of any brand is usually called glass acrylic. Although “Stakril” is a brand of the St. Petersburg enterprise “Ekolor”, popular rumor assigns the name of its brand to all liquid acrylic compositions.
The usual kit with liquid acrylic comes with a bottle of hardener. Some manufacturers offer a set of three products - liquid acrylic, hardener and degreaser
The reason is simple: “Stacryl” was the first widely advertised polymer material for bathroom restoration, which is why it became a household name for liquid acrylics in general. The technically correct name for acrylic-based bath paints is “self-leveling acrylic.”
Therefore, when choosing an acrylic bathroom paint, you need to name a specific brand of product, and not “you have acrylic.”
Now about the quality. Manufacturers of bulk acrylics LLC "Ekolor" (brand "Stakril"), LLC "Plastol", LLC "Ekovanna" and CJSC NPK "YarLi" (brand "Yarli") are the largest enterprises in Russia.
It is their products that are recognized as the highest quality on the domestic market. To independently repair the enamel coating of a bathroom, you should choose one of the mentioned brands.
In addition to having their own technical laboratories, many years of experience in the production and distribution of products throughout Russia, the products of all four listed manufacturers of self-leveling acrylic have one more advantage - they are trying to imitate it.
On the one hand, this is a plus, because it makes no sense to produce counterfeits under a bad brand and product. However, there is also an obvious disadvantage - the likelihood of purchasing a low-quality product.
The manufacturing company of Stakril has not changed the design of its packaging for many years. Therefore, any other colors on a container with acrylic mean only one thing - fake
Proper preparation of a bathtub for painting with acrylic: tips for the master
The main task at this stage is to ensure good adhesion (adhesion) of the paintwork and the metal base. With proper surface preparation, painting a bathtub with liquid acrylic gives excellent results. First of all, the bathtub must be thoroughly cleaned using any abrasive powder. The usual Pemolux, trisodium phosphate or Comet are suitable for this purpose (consumption is about 400 g for a standard bath). There is no need to rinse off the cleaning agent. You can clean the surface using powder.
If there are deep chips, use automotive putty or epoxy resin to repair them. The drying time of the composition is indicated in the instructions.
Before you begin applying the coating, it is necessary to dismantle the drains, since it is under them that the largest amount of dirt accumulates. In addition, in the future, they will still have to be changed.
Effectively preparing a bathtub for acrylic painting
implies that the surface for applying enamel should be rough, with noticeable irregularities. To make it this way you will need a special tool. It is best to use a drill for this purpose with a nozzle made of waterproof sandpaper number 24. You can also use a grinder, but it produces too much dust, which is then difficult to remove. The risk of injury with this method increases markedly. In addition, there have been cases when craftsmen damaged the bathtub body in this way.
A regular household vacuum cleaner without attachments will help remove the smallest particles of enamel formed during cleaning.
Note to the master: you can determine the degree of readiness of the surface by simply running your fingernail over it. Well-prepared enamel leaves a scratchy feeling. If the nail glides well, it is better to work with sandpaper.
After the surface of the bath has been treated with an abrasive material, it must be degreased again. Here you can already use liquid detergents: “Sanita”, “Toilet duckling” or their analogues.
Rinse off the detergent with hot water. Please note that alkaline solutions containing surfactants take longer to wash off than cleaning powders.
Before applying enamel, the surface must be thoroughly dried. Use a regular or hair dryer for this; a breeze-type heater will do just fine.
The instructions for enamels recommend degreasing the surface using solvents. It is best to use acetone for this purpose. Do not use white spirit for degreasing; it has an oily texture. Apply the liquid using a piece of cotton (or any other lint-free) cloth.
Please note that careful preparation of the bathtub for painting with acrylic guarantees a long service life of the finished enamel. For more information on preparing the bathtub surface, watch the video:
Preparing a product for restoration
Preparation is, perhaps, a rather serious and important stage. The more thoroughly you clean the surface of the bath, the better the new layer will be.
What will it take?
To begin restoration, you should have the following tools and materials at hand:
- respirator;
- roller or brush for applying enamel;
- an apron or old work clothes;
- latex gloves;
- sandpaper or grinder;
- old shoes (slippers);
- primer;
- acetone;
- bath restoration kit.
This stage involves the following steps:
- Sprinkle the old enamel surface with abrasive powder and clean it using sandpaper or an electric drill with a mounted grinding wheel;
- Treat areas affected by corrosion with a rust converter, wait 30 minutes and clean with sandpaper;
- Rinse off the enamel and crumbs with water, and treat the bath with a degreasing liquid using a lint-free cloth;
- fill the bathtub with hot water and let it warm up for 10 minutes;
- drain the water and use a microfiber cloth to wipe the bowl dry;
- check that there are no foreign elements or fluff left on the surface.
Then you need to disconnect the siphon and place it under the drain of the tank, excess acrylic will drain here.
What is acrylic
Of course, you can replace the hot tub with a new one, but this procedure is similar in complexity and cost to a full-fledged repair. To prevent this, there is one way - restoring the bathtub with liquid acrylic. Reviews of the event indicate the need to follow the instructions.
«>
Acrylic is a group of polymer materials containing methacrylic and acrylic acids with polymer additives. The material has existed for over 70 years under the name polymethyl methacrylate. It was created to replace glass. With the inclusion of additives, it is used to create plumbing fixtures. The material is light and durable.
According to reviews, restoration of a bathtub with liquid acrylic is carried out in various ways that will restore the worn surface of the product. Although different paints are used for painting, acrylic still has the best effect. If you properly prepare the working area, acrylic will have high adhesion to the metal surface and create a protective layer 2-8 mm thick.
About safety precautions
If you plan to cover a bathtub with acrylic at home, follow these safety precautions:
- Carry out the work in thick clothes, without hanging ends, let them be taken from household items.
- Shoes must be closed type. For example, operations in shale are not recommended.
- A hat, protective screen and rubber gloves must be used during the work.
- The hand tool must have a handle firmly attached to the base.
- Before using the grinder, you should check the integrity of the wires and the presence of cracks, chips and other defects in the abrasive wheel.
Painting a bathtub with acrylic, prepare and apply the mixture
After the surface is completely cleaned and degreased, cover the sides of the bathtub and the floor with paper or film to prevent the composition from getting on them. After the preliminary preparation is completely completed, you can begin preparing the mixture.
Liquid acrylic is a two-phase material. The polymer base has a thick consistency, while the hardener is quite liquid
Therefore, when mixing, pay special attention to the mass located on the bottom and along the walls. You need to mix the composition especially carefully; it is advisable to do it manually, using a regular stick.
A construction mixer can speed up the process, but it will be difficult to achieve the necessary homogeneity.
Advice: Manufacturers usually indicate in the instructions the hardening time of the enamel, however, in practice, this interval turns out to be slightly shorter. Therefore, it is better for a beginner to play it safe by leaving 15 - 20 minutes in reserve.
For ease of application, pour the prepared mixture into a plastic container. A bottle of hardener, cut off at the top, is quite suitable for this purpose. In the language of professionals, painting a bathtub with acrylic is called a “fill-in bath.” This term perfectly reflects the essence of the technological process. The composition is applied using the pouring method, starting from the edge of the bath. For a beginner, this stage presents a certain difficulty, since it is necessary to ensure uniform application around the entire perimeter.
Acrylic is applied in a circular manner, row by row. Once the sides of the tub are completely covered, continue applying the compound along the top edge of the tub, gradually moving lower. The liquid mass will flow freely to the bottom of the bath. To avoid smudges and unevenness, distribute the composition evenly using a wide spatula. As a result, the entire container should be covered with a layer of enamel of approximately 6 millimeters.
Note to the master: Drying time for each brand of enamel is determined individually and often depends on the room temperature. So at 17* C the paint can dry up to 4 days, while at 25* C the process will take only 48 hours.
While the enamel is drying, provide your bathtub with complete rest. If there are dogs and cats in the house, block their access to the bathroom. Otherwise, pet hair may end up on a wet, sticky surface and will be impossible to remove.
In conclusion, I would like to note that painting a bathtub with acrylic is a delicate process that requires a certain skill. Therefore, before you begin restoration yourself, think carefully. Perhaps turning to professionals will be a smarter choice.
Step-by-step instructions for restoring a bathtub with a liner
Stage one. Preparing the bath and available products
To install acrylic liners, polyurethane foam and silicone sealant are used. It should be noted that to perform the work you need to use only tools specifically designed for these purposes. Simple foam, which is used in repair work, will not work in this case - it has a low density and expands too much. To improve these characteristics, additional components are added to the foam - this is the material used for installing acrylic liners. In addition, in this case, a plumbing sealant is used, which is waterproof and mold resistant.
Preparing a bathtub for restoration with a liner is a rather long and labor-intensive process, which, in the absence of appropriate skills, is best left to specialists.
Remove old harness
Remove the old siphon
Apply sealant around drain holes
| Step, no. | Description |
| Step 1 | Release the sides of the bathroom, if necessary, remove one or two bottom rows of tiles. There is no need to remove old enamel, but it is recommended to clean the surface with an abrasive material - as a result, it will become rough and will adhere better to other materials. After this, it is good to clean the bowl of debris and crumbs, degrease with acetone or alcohol |
| Step 2 | Disconnect the bathtub from communications by removing the upper and lower drains. The crosspiece also needs to be removed, and you should not use a hammer or other similar materials for this purpose, so as not to damage the drain. Before proceeding with installation, it is better to check the condition of the pipes - if they are too worn out, it is better to take care of replacement |
| Step 3 | Try on the acrylic liner - the structure should fit easily or with little effort. Under no circumstances should you hammer it in using improvised tools. |
| Step 4 | Cut holes in the acrylic for the plums. The most convenient way to do this is to plug the bathtub with a stopper and lubricate it with some substance that leaves marks on the surfaces. Treat the second drain hole in the same way. Place the liner in the bowl, press it in the drainage areas and remove it - marks should be imprinted on the bottom of the structure. After this, all that remains is to mark the centers and drill holes of the required diameter. To avoid injury to the skin from the sharp edges of the cuts in the future, they should be thoroughly cleaned. |
| Step 5 | Determine the slope that is needed for good water drainage - usually it is 1.5-3% in the direction of the drain hole |
| Step 6 | Once again it is good to degrease the surface of the bathtub. Apply sealant to the upper drain hole, screw on the adapter, onto which sealant is also applied. After this, it should be applied to the drain hole, the width of the strip should be 2-3 cm, and the height depends on the tightness of the liner to the bowl |
Stage two. Installing the liner
The basic rule that should be remembered when installing an acrylic liner is that all work should be done quickly enough (in about 4-5 minutes), otherwise the adhesive composition will harden and will not “grab” the materials well.
| Step, no. | Description |
Step 1 | Apply polyurethane foam to the bottom and sides of the bathtub. Its quantity also depends on the tightness of the structure, but usually it is applied in stripes with an interval of 4-5 cm, and on the sides the stripes should be vertical and stretch from the bottom to the very top |
Step 2 | Install liner |
Step 3 | It’s good to press down the sides of the liner with your hands, then stand with your bare feet in the place where the drain is located and move towards the opposite edge - this way the liner will fall into place and press firmly against the surface of the bowl. After this, press down the walls of the structure well with your hands. It is not recommended to put pressure on the liner with any hard objects or hit it, otherwise you can damage the acrylic during the installation process |
| Step 4 | Connect the bathtub to the communications, using sealant if necessary |
Step 5 | Plug the bathtub with a stopper and fill it with cold water so that its surface is 1-2 cm below the top drain hole. Leave the bath for 5-6 hours, then drain the water and wait another 12-13 hours |
After the materials have completely dried, the seal between the bowl and the walls should be restored and the tiles should be put back in place.
Ceramic border will prevent water from getting behind the bathtub
Composition and technical characteristics of enamel and acrylic
Before considering how to cover a bathtub with acrylic or enamel, and which is better of these two components, it is necessary to understand the main components of the substances, and in addition the characteristics of the compositions:
- It should be understood that there is acrylic enamel on sale, which contains acrylic itself.
- Separately, each composition contains auxiliary components in the form of hardeners and synthetic additives.
- Often, substances contain special components that impart viscosity to the composition and subsequent hardening.
If restoration or painting of the bathtub is required during restoration, then it is better to use enamel rather than another two-component bathtub composition. All this is due to the fact that, unlike acrylic, enamel is significantly cheaper, even though it contains acrylic components. In addition, the method of restoring bathtubs with acrylic involves the use of a special liner, the choice of which is significantly complicated by finding the appropriate size, and also a suitable shape.
When comparing these methods of bathtub restoration, it is important to take into account that acrylic, unlike enamel, dries much faster. Additionally, when selecting material for reconstruction, it is necessary to rely on the fact that the compositions differ significantly in consumption per square meter of bathing tank area
Consumption per 1m2
When choosing enamel or acrylic for a bathtub, and distinguishing which is better, it is important to take into account the material consumption per square meter. Let's consider the main points associated with the use of a certain amount of material:
- on average, when using a sprayer, about 150-250 grams of enamel are spent to cover a square meter;
- if enameling is carried out with a brush, the consumption of the component can increase to 300-500 grams per square meter;
- if acrylic is used, then the consumption is on average 400-600 grams per square meter of space;
- when using a ready-made acrylic liner, these parameters are not taken into account, since a solid liner is used here.
Taking into account all these points, you can choose for yourself the best reconstruction option for a metal or cast iron bathtub, depending on which design option is used.
This is interesting: Technologies for galvanizing metals at home
Advantages and disadvantages of the method
In any business there are both pros and cons. Repairing a bathtub with acrylic also has its strengths and weaknesses. Among the advantages:
- acrylic coating restores the bowl to any degree of damage: chips, rust, scratches;
- the work of reconstructing the enamel layer can be done by the apartment owner himself - there is nothing complicated in the technology;
- fluidity of the repair composition, which allows you to repair small cracks on the bottom or sides of plumbing fixtures;
- excellent adhesion to the bathtub material (cast iron, enamel);
- the opportunity to move away from white and use color to change the color of the coating, which transforms the bathroom, allowing designers to bring to life the most unusual ideas;
- speed of the process - a professional will need no more than 3 hours to restore the plumbing (this includes all preparatory work and applying acrylic to the surface of the bathtub). The “home handyman” will naturally need more time, but he can do it in a day;
- repairability of the coating - a similar composition (sold in a smaller package for repairs) can be used to repair scratches that appear.
Cast iron bath before renovation.
Renovated bath.
The applied coating greatly changes the characteristics of the cast iron bathtub. She has additional advantages :
- fast warming up;
- retaining heat for a long time - a fully filled bath gives off heat very slowly: in about half an hour, the water temperature drops by 1.0-1.5oC;
- the sound of drawing water disappears - the new coating absorbs noise from the flow of water;
- a smooth, pleasant surface appears upon contact;
- slipperiness disappears (wet bath enamel has caused more than one injury);
- ability to maintain shine almost all the time of use.
Disadvantages of the method:
- the coating has low resistance to mechanical damage: it can crack if a medium-heavy object accidentally falls into the bowl from a low height;
- a through cut or scratch to the cast iron leads to the coating peeling off from the base;
- Acrylic, unlike enamel, cannot hide factory defects in cast iron (convex and concave). They are clearly visible against the background of a shiny surface;
- a hot object or cigarette butt causes burn-through of the applied layer;
- difficult care: special detergents and soft cleaning materials are needed. Liquid substances containing alcohols, ammonia, chlorine, acids and alkalis, as well as powders and brushes lead to the appearance of yellowness and loss of shine;
- the restored bowl is afraid of hot water (85-90oC) - it softens and begins to flow to the bottom of the bath. Therefore, first you need to draw a little cold water and only then bring the bath to the desired temperature;
- You should not wash your hair immediately after dyeing your hair - even a small amount of dye can change the color of the coating.
Restoration with acrylic
The possibility of updating a bathtub using liquid acrylic appeared relatively recently, after high-quality, easy-to-use compositions entered the market. Their characteristics are much better than the old type of composites.
Advantages
Polymer restoration using suspensions of acrylic polymers has tangible advantages compared to enameling:
- the products have good fluidity;
- the composition is firmly fixed due to high adhesion rates;
- the surface has a uniform shiny white color;
- Even very neglected plumbing fixtures can be restored;
- the bath does not slip after treatment;
- the sound of falling water is not felt;
- hot water retains its temperature for a long time.
After finishing the work and completely drying the coating, swimming in the bath will bring aesthetic pleasure. It’s hard to imagine how best to give the interior of a room a decent look. If you properly and regularly care for the equipment, and this is not difficult to do, the positive impressions will last for many years.
Flaws
The group of liquid acrylic polymers is diverse and contains products that differ in some components and, accordingly, in consumer qualities. The range of products is constantly expanding thanks to new developments, while enameling is carried out with long-known polymer composites.
Before starting your own restoration with liquid acrylic, you should understand the manufacturer’s recommendations as best as possible and consult with professionals. It might even be worth inviting them to inspect the bathtub, asking for advice on how to cover it and which liquid polymer is best to buy.
It is necessary to carry out the work with concentration; if the layer of liquid acrylic is applied poorly, it will be very difficult to eliminate the flaws, it is practically impossible to do it.
Many types of polymer paint, unlike enamel, take several days to dry, so it is recommended to postpone using the bathroom for four days. Premature entry of water will lead to the appearance of stripes and stains on the surface, spoiling the external impression.
Method No. 2. Filling bath
This method of restoring plumbing consists of the following: liquid acrylic is poured into a bowl, which subsequently hardens and forms a new coating. Compared to surface enameling, which is described above, it has a number of advantages.
- Acrylic is a thick and viscous substance, thanks to which it lays on the surface in a thick, even layer, hiding all the defects and unevenness of the bathtub.
- The composition does not leave smudges, streaks or bubbles on the surface.
- To restore the bathtub, you do not need to remove the tiles or dismantle the bowl.
- The process takes less time than enameling or restoration using an inlay.
- Acrylic creates a film on the surface that repels dirt and plaque.
- Applying the mixture does not require special knowledge and skills.
- Most materials used for bathtub restoration have virtually no unpleasant odor.
The method was called “Pour-in bath” due to the special method of application.
The result of this restoration method will be a smooth, glossy surface that perfectly retains heat and does not retain dirt. As with enameling a bathtub, before you begin, you need to think about the choice of material. It is important to note that neither for the sake of economy nor for any other purpose can you use ordinary acrylic, which is sold in hardware stores, for the restoration of bathtubs. According to its characteristics, it differs from sanitary acrylic, which is used specifically for the restoration of plumbing fixtures, so you can completely ruin the bathtub and harm your health. The choice in this case is made between glass and liquid acrylic.
Glass or liquid acrylic?
Bathtub restoration kit
Today, two types of materials are used for the restoration of bathtubs: glass acrylic and poured acrylic (the market leader in the production of such materials is the Plastall company, which is why liquid acrylic is often called plastol). Many consumers believe that they are no different from each other, but in fact this is not the case.
Self-leveling acrylic
Stakryl appeared in stores about 10 years ago and has already proven itself well. It fits well on any surface and is cheaper than plastol, however, restoring bathtubs with its help can be quite difficult for beginners, since the composition sets quite quickly. Working with plastol is much easier, since it is less demanding to use and does not have a pungent odor. In addition, this material retains its properties even after freezing.
Stakryl
The Plastall company offers consumers who want to restore their bathtubs themselves a whole line of materials.
| Name | Drying time | Peculiarities |
| "Plastol" classic | 36-48 hours | An easy-to-work material that spreads well, has increased ductility and good adhesion. It has no pungent odor, does not require the addition of thinners or other substances, and forms a smooth and fade-resistant film. The mixture retains its properties for 90 minutes |
| "Plastol-24" | 24 hours | A new material based on an improved classic formula. Applied in one layer, the surface does not turn yellow, does not crack or peel, and is resistant to mechanical damage and abrasion |
| "Plastol-M" | 36-48 hours | A budget solution with an optimized formula, so the result of using the material is no different from restoring bathtubs using more expensive products. Does not have a strong odor, does not cause allergies, the mixture retains its characteristics for 90 minutes |
| "Plastol-Super" | 16 hours | The “fastest” liquid acrylic that hardens in a matter of hours. Does not form bubbles or streaks, does not require the addition of solvents or other components, but the mixture is “viable” for only 45 minutes |
When choosing a material, it is important to pay attention to the price - a good product cannot cost less than what is indicated on the manufacturer’s website, and counterfeits do not provide the required quality of the finished coating. For those who do not yet have experience in restoring bathtubs, it is recommended to buy acrylic with a reserve so that it is enough to cover the entire surface.
DIY acrylic enamel
Apply acrylic to the surface of the bath evenly, avoiding long stops.
Usually in stores liquid acrylic for bathtubs is sold in plastic buckets; it is packaged in 3.5 kg bags plus hardener in a 0.5 liter container. This volume is quite enough to create an acrylic coating in a bathtub 1.7 m long. It is better to choose long-drying acrylic, so the new coating will last much longer and be stronger.
To work, prepare a small container of 1-1.5 liters, from which you will pour onto the surface of the bath; spatula and rubber gloves to avoid getting your hands dirty; wooden stick for mixing the two-component composition.
Never use an electric drill with an attachment designed for cement mortars. The hardener is liquid, and the polymer base is thick, so it can remain on the bottom and walls. Only thorough manual mixing will allow you to prepare the acrylic composition qualitatively.
Don't forget to cover the tiles at the edge of the bathtub with masking tape, and place a container under the drain hole to drain excess acrylic.
Step-by-step coating application
It will take 1 to 4 days for the acrylic coating to dry completely.
- You need to prepare liquid acrylic with your own hands; to do this, add a hardener to a container with a polymer base and mix everything thoroughly. Mix the mixture thoroughly for at least 10-12 minutes. Otherwise, unhardened areas of acrylic will appear on the surface.
- Pour the finished mixture into an empty container with a spout. You can use a plastic bottle with the neck cut off.
- Start pouring at the corner of the bathtub where it meets the wall.
- Pour a layer of 4-5 cm, which should flow freely along the walls of the bath to the middle.
- Move around the perimeter of the bathtub, applying the mixture evenly and not preventing it from draining. Do not over-pour.
- Close the circle around the perimeter of the bath and do not top up the already poured surface to avoid drips.
- The next circle should be started from the middle of the sides of the bathtub.
- At the end of the work, a thick layer forms at the bottom, which must be leveled with a spatula towards the drain hole. The excess mixture will flow out of the bath.
Do not touch the walls of the bathtub with a spatula, as this may damage the integrity of the acrylic coating. The surges will then disperse on their own.
All work must be done within 3-4 hours without long stops. It takes professionals about 2 hours to restore a bathtub using this method; without experience, the work takes longer.
After finishing all the work, close the bathroom to prevent air fluctuations and prevent insects and dust from getting onto the drying surface.
The bath should dry for at least one day (if using a long-drying composition it will take about 4 days) at a temperature of +17-25 degrees. When the bathtub is completely dry, screw the drain siphon and overflow into place, and remove the masking tape from the perimeter of the tiles.
https://youtube.com/watch?v=Z9koxOWbZ7A
Enameling with liquid acrylic can quickly and easily transform an old bathtub into a shiny and neat one. In addition, the new coating is resistant to microorganisms and mechanical stress, and has low thermal conductivity, which allows you to keep warm water in the bath longer.
And most importantly, the restoration of the bathtub occurs quickly, without lengthy surface preparation, excluding complete dismantling work. In addition, the acrylic layer will have good adhesion to the old coating
Moreover, it will exactly follow the contours of the bathtub, delighting with its impeccable white color.
Preparatory work
Restoring a bathtub with acrylic consists of several stages:
- preparing the bowl;
- preparation of the repair composition (liquid acrylate and hardener are mixed);
- covering the bathtub with acrylic;
- drying the restored layer.
In turn, the preparatory work consists of several steps:
- bringing the bathroom into working order;
- cleaning (polishing) old enamel;
- washing of restored plumbing fixtures;
- dismantling the drain and overflow;
- degreasing and drying the bath;
- protection of walls and floors from acrylic drops.
Preparing the premises
During work, there should be nothing in the bathroom that could fall, spill, or leave a speck of dust or lint on the surface of the poured acrylic. Therefore, toothbrushes, towels, personal hygiene items, cosmetics and detergents are taken out. The curtain and the crossbar under it are removed.
The washing machine and the sink cabinet are moved to a distance of 10 cm - they should not touch the side of the bowl.
The ventilation hole is sealed with paper and tape. This prevents dust from the hallway from entering the bathroom using natural draft, as well as the spread of enamel and rust particles to other rooms when it is necessary to sand off the rust and swollen enamel.
If the bathtub is located in a combined bathroom, all metering devices are covered with plastic wrap or newspapers using tape.
Plumbing cleaning
The acrylic coating must be applied to clean and dry cast iron or enamel. Therefore, peeled pieces of coating, accumulated dirt in microcracks, and rust are removed from the surface of the bowl. Dirt and peeling are removed manually or using a power tool: an electric drill with a grinding attachment or an angle grinder with an emery wheel.
Rusty areas can be polished until pure metal appears (to a shine), or they can be treated with a rust converter and then sanded with sandpaper.
Rusty areas are treated with anti-rust.
Manual work involves the difficulty of holding sandpaper in your hands. A special device for holding the abrasive or a wooden block of a suitable size around which the paper is wrapped can help.
Cleaning must be carried out over the entire surface of the sanitary ware, paying special attention to the bottom, transitions (bends) from the bottom to the walls of the font. Stripping should begin and end with circular movements.
Between them it is imperative to wedge horizontal passages with sandpaper. This technology allows you to remove dirt and rust, form irregularities on the surface up to 0.5 mm deep, which will provide additional adhesion of the acrylic to the bathtub.
Attention: there is no need to completely remove the factory enamel. But the previously applied bleaching layer is completely removed.
The cleaning work is considered completed if the inner surface and sides are clean and slightly rough, without chips or protruding factory enamel.
Bathtub washing
After cleaning is completed, the walls of the room and the walls of the bowl are very dusty, especially when using power tools. You can remove dirt with hot water from a shower hose. In this case, there is no need to dilute hot water with cold water - the hotter the streams, the better and faster the dust is washed off.
In this case, you need to wash everything: walls, washing machine, sink, faucet, floor, etc. After all, the slightest draft can raise a dust cloud and land it on plumbing fixtures treated with liquid acrylic. After this, the bath itself is washed with liquid detergents.
Removing the siphon and overflow
After completing the washing process, the drain and overflow are dismantled. The work is performed in the following sequence:
- close the taps on the mixer, and then, to be on the safe side, it is advisable to turn off the risers with cold and hot water for a while. If there are shut-off valves, it is better to turn them off. If this is not possible, then leaking taps in the bathroom are repaired;
- the shower hose is removed - not a single drop of water should fall into the bath until the acrylic has completely hardened;
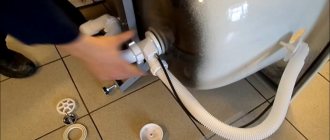
- You need to dismantle the drain and overflow carefully - you will have to put it back. A container with a volume of up to 0.5 liters for flowing acrylic is placed under the drain hole. The elbow of the sewer pipe from which the drain is removed is plugged with a rag. Otherwise, it will be difficult to breathe in the room due to the stench from the sewer.
The drain is removed.
If the screw does not unscrew, you have to act roughly.
The overflow is removed.
Degreasing the bowl
The process of preparing to fill the bathtub with acrylic is completed by sealing deep chips with quick-drying automotive putty and removing grease. To do this, a rag or soft, lint-free cloth is soaked in acetone or white spirit. Wipe the sides, walls and bottom of the bowl with a dampened rag.
This operation allows not only to remove fat deposits, but also to collect dust and lint remaining after previous operations. After this, everything is wiped dry, first with a rag or sponge, and then with a dry and clean palm. You need to walk along the sides and walls with your hand, pushing all the excess to the bottom, and then all the dirt along the bottom is sent into the drain hole.
To be on the safe side, the bowl is additionally dried with a construction or household hair dryer.
Protecting the room from liquid acrylic
You can paint a bowl with acrylic using two technologies: the pouring method and using a brush. In both cases, it will not be possible to avoid drops of the substance getting on the floor and walls. They are removed with great difficulty. Therefore, it is easier to protect the area next to the bathroom with packing cardboard or newspapers and tape.
To prevent smudges from the sides, the floor is covered with overlapping newspapers. In this case, it is advisable to secure them with tape so that they do not move. The walls next to the bowl are covered with masking tape. The mixer is closed with a plastic bag.
The walls and screen are covered with plastic film.
The screen under the bathtub is also covered.
Advantages of the method
For some 10-15 years, restoration of old cast iron bathtubs was carried out exclusively using polyester enamel, which provided a short-lived, long-drying and fragile coating. Now liquid acrylic, a composition unique in its properties, is used to renew the enamel layer.
It is a thick, but flowable and elastic compound consisting of 2 components: a base and a hardener. Liquid acrylic is applied to the surface of the bathtub by pouring or using a roller, and it dries for 2-5 days. Restoring a washing container using this method has the following advantages:
- Smoothness and appearance of the coating. Acrylic coating is smoother, shiny, even and white than factory enamel. It has practically no pores, so it has a “self-cleaning” effect, that is, it repels dirt, remaining clean for a long time.
- Durability. The service life of an acrylic coating is 10-15 years, if the recommendations for care and use of the product are followed, which is 2 times longer than that of epoxy enamel.
- Wear resistance. If enamel restoration is carried out using the pouring method, the acrylic layer is more than 6 mm thick, so the coating lasts a long time.
- Safety. Liquid acrylic does not have a pungent odor and does not emit toxic fumes, so you can work with it even if there are children in the room.
- Fast drying. Unlike epoxy enamel, acrylic coating takes only 3-5 days to dry.
- Variety of colors. If you add a tinting paste to the acrylic compound, you can get a mixture of any shade that suits the interior of the room.
Fake poured acrylic
There are more and more homeowners interested in restoring bathtub enamel every year. Following the growing demand, manufacturers of self-leveling acrylic are expanding production and improving a series of acrylic enamels for plumbing equipment. But a variety of types of “entrepreneurs” strive to make money from this paintwork.
First type : small companies intending to occupy a niche in the local market. Before reaching consumers with the liquid acrylic of their production, they buy the products of large companies in bulk, bottle them in their own containers and sell them under their brand.
Having won over buyers to the “new product” after several months of sales, such companies begin to bottle not other people’s products, but their own. Without sufficient funds and equipment, these companies develop acrylic technologies with “optimal characteristics”, using raw materials from dubious suppliers.
Second type : similar enterprises also purchase large quantities of liquid acrylic with hardener from well-known manufacturers, but only in original containers with a label.
Next, each container is opened, a portion of the product is poured out and the solvent is added. Diluted acrylic is taken to the market and sold under the guise of the original product.
If liquid acrylic is diluted with a solvent, its performance characteristics will sharply decrease. This coating does not adhere well to the bathtub; it is too liquid and brittle. After a short period of time, the painted bathtub turns yellow and the enamel peels off. Please note that liquid acrylic cannot be diluted with anything other than the included hardener.
This counterfeit can be easily recognized by the incorrect color of the label and the low-quality plastic from which its container is made. Similar “products” regularly appear in various regions of Russia
Third type : a small enterprise purchases several containers of liquid acrylic from well-known brands and tries to copy them. Having developed a very approximate formula and technological process, this company purchases the cheapest possible raw materials. The production of products with bright labels and names begins.
The manufacturer does not make any attempts to popularize a specific product brand, because The product is of low quality and soon there will be no buyers for it. However, the company often changes the shape of the containers and the name of the product, thereby restarting its sales again and again. Such liquid acrylic cannot be called high-quality, only cheap.
Expert in the field of arrangement of sewerage systems and water supply systems
Its largest domestic manufacturers have been working on improving the formula and the technological process for producing liquid acrylic for over five to eight years each. Only their products can last as long as possible, are odorless and resistant to yellowing. Therefore, it is necessary to choose enamels from large enterprises for bath repairs.
“Stakril” , “Ekovanna” and “Plastol” most often appear . To interfere with imitators, manufacturers of these brands periodically change the color design and shape of cans with liquid acrylic and a hardener.
You can find out the actual type of the brand you are interested in by visiting the manufacturer’s website and studying the product description page.
A label without distortions or swelling, markings on the lid, a high-quality PVC container with a rich color - this is an original product. The seal on the lid is intact, which means acrylic was not cast from this bucket
However, the goods are distributed differently in different regions - some batches are sold out for months. Within the factory warranty period and subject to proper storage procedures, packaged liquid acrylic is completely suitable for use.
Let's assume that you are offered a brand product, say, "Plastol" - the expiration date is fine, but the bucket is designed in an outdated design of the manufacturer. The seller explains: the batch of acrylic arrived before the design of the cans was changed, but otherwise the product is original.
Inspect the bucket of acrylic and the bottle of hardener:
- Marking on the lid. Plastol prints the batch number on the lids of the cans using laser lithography. Manufacturers of “Ekovanna” and “Stakril” mark the lids with adhesive labels with the batch number printed on them. There should be no other labels on the lids.
- Cover color . Be sure to make sure that the color of the caps on the jar and bottle matches the image of the product on the manufacturer’s website.
- Brand logo. Labels on the sides of cans and bottles must contain the actual manufacturer's logo;
- The correctness of the sticker. Labels on the sides of acrylic cans and on solvent bottles are applied by the original manufacturer using in-line machine adhesive. Distortions and crumpled areas mean that the label was affixed by hand and is a fake;
- Integrity of the filling. The plastic fuse on the caps of the bottle with hardener and the jar of liquid acrylic must be intact (not broken).
The caps of bottles containing liquid hardener are usually signed with a marker when releasing a batch - this is normal. There is not enough space on the bottle cap to fully print or place a label.
Additional information about the types of self-leveling acrylic, as well as tips for choosing restoration enamel, are given in the articles:
- How to choose enamel for bath restoration: a comparative review of popular products
- Self-leveling acrylic for bathtubs: seven popular compositions for restoration + what to look for when purchasing
Acrylic insert
You can become the owner of a beautiful and hygienic bath in a more affordable and simple way. The acrylic insert makes it possible to quickly and efficiently complete renovations in the bathroom. Installing a durable acrylic coating does not take much time, and the bath can be used in just a few hours
When choosing a liner, it is important to consider the quality of the material, its size, and installation method. Acrylic insert is only suitable for standard plumbing fixtures
Sizing
Before purchasing an acrylic insert, you will need to take measurements of the bathtub, even if it has a standard size.
- The main length of the bathtub is determined from the outer sides.
- The length of the bowl is the internal measurement without sides.
- Width at the drain area without sides.
- The width of the back is also without sides.
- Bowl depth - measured directly at the drainage point.
Based on these measurements, a sales consultant in a specialized store will be able to select a suitable insert.
Installation work
You can begin installing an acrylic liner in a bathtub without special preparation of the old coating. But it is better to treat the surface with sandpaper to roughen it - this will help improve the adhesion of the clamps. Then you need to correctly mark and trim the liner, insert it into the bathtub and use a marker to outline the locations of the drain holes and the line of the sides. Using a jigsaw, the acrylic tab is trimmed according to the prepared marks. Non-expanding polyurethane foam is distributed on the old surface; it is applied in vertical and horizontal stripes at a distance of 10-12 cm. The surface of the bathtub should look like a kind of foam mesh. Stripes are also applied to the sides of the bathtub. The drain holes are treated with sealant or silicone. Now you can install the acrylic liner and return the siphons to their place. Immediately after installation, you need to fill the bathtub with water and leave it like that for several hours.
Advantages and disadvantages
Acrylic liners have a structure that provides them with strength and reliability. High-quality materials used in their production and proper installation make it possible to speak with confidence about the advantages of this type of bathtub restoration. A refurbished bathtub with an acrylic insert increases heat capacity and aesthetic appeal. This coating is resistant to chemicals, and is easy to install and requires only basic construction skills. Some consumers are afraid to purchase an acrylic liner due to the reduced volume of the bowl. But this decrease is so insignificant that it cannot cause discomfort while taking a bath. The disadvantages of an acrylic liner include the need for dismantling work. If you install the liner without renovating the bathroom, in some cases you will have to remove the wall tiles where the plumbing joins. Failure to follow basic installation rules can lead to water leaking into the gap between the old and new coating. Such a bathtub will very soon become unusable and will either need to be completely replaced or a new liner installed. The top layer of acrylic in the liner, despite its excellent strength, can be damaged if basic operating rules are not followed.
Having studied all the possible ways to restore a bathtub, you can choose the option you like based on your personal preferences. The most inexpensive way to improve the appearance of plumbing fixtures is enamel coating. But it also has quite a lot of disadvantages. Most often, this material is used during renovations for the further sale of the apartment. Coating the surface of an old bathtub with acrylic is perhaps the most reliable and durable method. Even the high price and the likelihood of prolonged drying do not deter buyers. The main thing is to pour the acrylic correctly, using the instructions. An acrylic bathtub insert is something between these two methods. When choosing this option, you should realistically assess your construction capabilities, and if you do not have the necessary skills, it is better to spend a little money and use the services of professionals. By the way, this also applies to the first two methods of restoration. Carrying out the work yourself reduces repair costs, but specialized companies will do it professionally and efficiently.
Acrylic liners
General concepts, advantages and disadvantages
For those who don’t want to “bother” with painting, because they are not sure that the restoration layer will be of high quality, there is another option that can update the bathtub in literally an hour.
If desired, you can find or order a liner for any shape of bathtub.
This method is to glue an acrylic liner into the bathtub. Such an update will cost a little more, but it is a 100% guarantee that the bathtub will be indistinguishable from a new one.
Acrylic liners for metal bathtubs are made in various colors.
The insert manufacturing technology is simple - an acrylic sheet is heated, and then an insert of the required size and shape is formed from it. For bathtubs of standard shapes and sizes, the insert can be purchased ready-made. But some local companies undertake to manufacture them to order, taking into account the individual parameters of the sanitary ware.
Prices for acrylic enamel VGT
Acrylic enamel VGT
The advantages of this method of updating a bathtub are the following:
- The liner exactly follows the configuration of the bathtub bowl, so there are no gaps between it and the base. Thanks to this, at first glance it is even impossible to understand that this is a restoration liner - the bathtub simply looks like a completely new product.
- After restoration, the bathtub becomes more durable, since it already consists of two materials - a metal base and a polymer insert.
- Thanks to the properties of acrylic, the bathtub becomes warmer to the touch and maintains a high water temperature longer.
- The acrylic insert does not darken over time and does not become covered with rusty spots.
- To clean acrylic, any detergents are used, except those containing abrasive components.
- The inlays are more resistant to mechanical damage, and if they occur, repairs can be made with liquid acrylic and grinding.
- The manufacturing material has antibacterial properties, so there are no mold or mildew colonies on it.
The illustration shows the difference: before and after installing an acrylic liner in the bathtub.
The disadvantages of this restoration method are the following:
- High cost compared to painting a bathtub with enamels.
- In order to install the acrylic liner, it is necessary to move the bathtub away from the wall and dismantle the tiles located on its sides. Dismantling part of the facing material leads to additional costs.
- The liner slightly reduces the volume of the bath.
- To install the liner you will have to invite a specialist. It is not recommended to do the work yourself, since if a mistake is made, it will be extremely difficult and expensive to correct. In any case, the liner will be damaged.
Operations for gluing the liner
Installation work includes seemingly the most simple operations. But the slightest violation of technology or even an awkward movement made due to inexperience can ruin both the bathtub and the liner.
Sanding the bathtub before installing the inlay.
However, we list the main operations:
- The first thing you need to do when starting work is to dismantle the bathtub drain and overflow necks.
- Next, before installing the liner, the surface of the bath is treated with abrasive until a slight roughness is obtained. To carry out this stage, use a grinder or electric drill with an emery attachment.
- Then the bowl must be thoroughly cleaned of enamel dust. This process is carried out using a vacuum cleaner.
- Once the bathtub has been cleaned, it should be dried with a hairdryer, as all surfaces must be completely dry.
- The next step in the insert is to determine the exact location of the drain and overflow holes - this can be done using measurements, or you can carefully install the insert into the bathtub and make marks on the insert through the holes.
- Then, according to the markings, windows are cut. To carry out this work, an electric drill is used with a core drill of the required diameter installed on it. The holes on the bathtub and the insert must perfectly match each other, so the markings must be done very accurately.
Applying foam to secure the liner.
- Now foam or special acrylic-based adhesive is applied to the inner surfaces of the bathtub.
Gluing the insert into the bathtub bowl using polymer glue.
- Then a tab is installed in the bowl, pressed well and the bathtub, if it has been moved away, is moved towards the wall.
- After this, immediately before the glue sets, the drain and overflow necks are returned to the holes and screwed into them.
- Finally, the tub is filled with water, which will press the liner tightly to the base. The water in the container must be left for several hours until the glue or foam finally dries and firmly connects the two elements to each other.
The entire process, from preparation to installation of the liner, will take several hours. And the service life of such an updated bathtub is stated by the manufacturers to be about 20 years.
* * * * * * *
So, having received information about the materials and technologies for bathtub restoration, the advantages and disadvantages of each of them, you can choose the best method for yourself. In any case, such an update will, presumably, be less expensive than completely replacing the bathtub with a new model.
Let’s finish the publication with an interesting video in which the master shows step by step the entire process of restoring a bathtub with liquid acrylic.
Other recovery methods
A popular method of restoration is the attachment of acrylic inserts. This is a way of working that is not suitable for independent use. The procedure is performed like this:
- The bowl is measured.
- An acrylic liner is created according to measurements using special equipment.
- The product is delivered to your home.
- The technician installs the liner into the bathtub bowl and seals it using a special compound.
- At the end, plumbing fittings of new sizes are connected.
The lifespan of the liners is 20 years. But the duration of use of sealants and adhesives that are used to install the product is several times less. As a result, moisture gets between the bathtub and the liner, and an unpleasant smell of rot appears.
«>
Prices for earbuds vary depending on the manufacturer - 4-5 thousand rubles. But it also happens that the price does not include inviting a surveyor and other work, which is why the final price increases. As a result, it is equal to a complete replacement of the bathroom with a new one, since the dismantling of the tiled walls is required.
Thus, with the help of bathroom restoration, it will be possible to improve living conditions in a short time, without carrying out major repairs. Since this work is simple, you can do it yourself. You just need to do it carefully.
Recommendations for further coating care
For some reason, it is generally accepted that caring for acrylic applied using the pouring method should be gentle. In other words, it is dangerous to breathe into such a cup. In fact, the voiced point of view is erroneous - you can and should clean a bathtub in the same way as a new one made of acrylic.
Let us recall the main provisions:
- You can care for the surface not only with laundry soap, but also with special products: Sanox, Akrilan, Domestos, Cif, Cillit, Sarma, etc.;
- It is prohibited to use various powders and pastes with abrasives;
- Do not wash freshly dyed hair in the bathroom, use hairspray to fix hair, cut varnished nails, soak laundry, etc. — the acrylic layer may turn yellow or change color;
- To wash the surface you need to use soft sponges, which a good housewife always has in her kitchen. Different brushes and cleaners leave scratches;
- After taking a bath, you must rinse it. You need to wash it 1-2 times a week, depending on the frequency of water treatments.
If during operation a part of the coating swells or a through hole appears, it is necessary to take urgent measures and repair the defect. For this you will need:
- liquid detergent;
- lemon juice or 9% vinegar;
- fine grain sandpaper (P60);
- paste or emulsion substance for polishing (polish);
- foam sponge or soft cloth.
The repair process is simple:
- Damaged areas are washed with a soft cloth or sponge. Difficult stains are treated with lemon juice or table vinegar;
- scratches and holes are sanded with sandpaper. The swellings are cut off with a knife and cleaned in the same way;
- degreasing of damaged areas is carried out;
- scratches and cracks are repaired with polish, and liquid acrylic prepared for use is applied to the cut areas.
More details about caring for an acrylic bathtub are described in the article “Care for an acrylic bathtub”, which provides not only the rules for cleaning the bowl, but also ways to get rid of stains that appear from various sources of pollution.
Acrylic coating
Restoring a bathtub using acrylic is much more expensive than the method described above. But still, this is a more reliable and durable way to improve the appearance of plumbing fixtures, as well as give it new properties. The advantages of acrylic coating include not only excellent strength and smoothness. The updated bathtub will have low thermal conductivity, allowing it to maintain the required water temperature. And the smooth surface prevents excessive dirt from sticking; even after 10 years, such a bathtub will not acquire a yellowish tint. And the ability to choose the desired color of acrylic that perfectly matches the interior of the bathroom will be another significant advantage.
Surface preparation
Restoring a bathtub with liquid acrylic also requires cleaning the surface from the old layer of enamel. The technology is the same, but after degreasing and rinsing with warm water, it is necessary to treat large damage with quick-drying putty. Also, before pouring acrylic, you should remove the siphon to drain the water, and place a small container under the resulting hole. Small scratches do not need to be covered with putty; the acrylic will fill them in during the pouring process, creating excellent adhesion to the old coating.
Acrylic pouring method
Liquid acrylic can be used to restore both cast iron and steel bathtubs; the process technology is the same. After preparing the bath, heat its entire surface with hot water. This creates ideal conditions for effective adhesion of acrylic paint to the cleaned surface. Then prepare a solution of two components, strictly following the manufacturer's instructions. The mixture must be mixed until smooth. For convenience, it is recommended to pour part of the mixture into a smaller container and process the bath from it. Pouring acrylic should begin from the sides, continuously passing the entire perimeter of the bathtub. A thin stream should create approximately a 4-5 mm layer of acrylic, gradually flowing down to the middle of the bathtub walls. The next step is to pour acrylic from the middle of the walls, the stream flows down to the very bottom
It is very important at this stage not to try to correct the resulting unevenness, and also to add more acrylic on top. This material itself is able to properly distribute over the surface.
The bottom of the bathtub, filled with acrylic, should be leveled with a soft spatula, and excess liquid should be removed through the drain hole.
Disadvantages of acrylic coating
- Acrylic will not correct factory defects in an old bathtub;
- The bath can be used for its intended purpose only after the coating has completely dried (after about 1 week).
Coating service life
The acrylic coating has good strength and stability; cracks and scratches rarely form on it. But still, like any plumbing fixtures, careful care is required. First of all, you should avoid hitting the acrylic surface with heavy objects, otherwise serious damage will occur that is unlikely to be repaired. After taking a bath, it is recommended to immediately remove dirt from the surface and wipe it dry. Severe contamination requires the use of abrasives, and they are contraindicated for acrylic bathtubs. For cleaning, it is better to use a regular gel dishwashing detergent. Also, soaking laundry with bleaches or dyes is best done in a basin rather than in a bathtub.
Materials and tools
Restoring a bathtub with liquid acrylic requires the purchase of basic and auxiliary materials, as well as a set of tools. Materials you will need:
- liquid acrylic;
- degreaser (“White spirit”, “Thinner No. 646”, acetone, kerosene, etc.);
- rust converter (“Tsinkar”, “Ferum-3”);
- sandpaper P60 - 5 pcs.;
- masking tape (paper);
- scotch.
Tools and equipment needed:
- electric drill or screwdriver with a grinding attachment;
Electric drill with a special attachment for grinding.
- a small square or rectangular container for pouring acrylic (you can use a cut-off bottle of detergent);
When pouring acrylic, it is better to work with a small rectangular container.
- container for mixing acrylic components;
- wooden or plastic spatula for stirring the composition;
- metal spatula, about 10 cm wide, new, free of dirt and rust;
- rubber spatula - used to adjust the poured coating;
- construction knife for adhesive tape and masking tape;
- screwdrivers: Phillips and slotted - necessary for disassembling the siphon;
- gas key;
- soft rags for working with solvent and rust converter;
- a wide brush or roller, if you plan not to pour liquid acrylic, but to apply it with painting tools;
- tweezers from a cosmetic set for removing brush hairs or roller lint caught in the applied acrylic.
You also need to stock up on special clothing. You will need:
- headdress (scarf) - to prevent hair from getting on the treated surface;
- trousers with a shirt to protect the body from acrylic splashes. The substance is safe, but is washed off with great difficulty;
- respirator - necessary when carrying out grinding work (lots of fine dust);
- disposable gloves.
Important nuances
When performing work, it is necessary to prevent water from entering the surface of the bathtub. To do this, you should move the tap and shower head towards the sink.
When covering a bathtub, the workplace should be organized in such a way that nothing interferes with the master. Therefore, even before starting work, you should remove everything unnecessary from the bathroom. In this case, there will be enough space and when covering the bathtub, the owner will not encounter any inconvenience during the work.
Before using acrylic to cover a bathtub, you must thoroughly warm the product . The best solution is to use an industrial hair dryer. However, not everyone has the opportunity to use it. Therefore, a regular home hair dryer will do. However, when drying the bathtub, it is necessary to periodically turn it off so that the hair dryer does not burn out due to overload.
How to choose a composition for bath enamel
When performing work to restore a bathtub, you must first select the enamel, focusing on indicators such as:
- quality;
- price;
- color.
It is worth choosing from more expensive materials. They have many advantages. One of them is good drying speed. In addition, they remain fluid for a long time. Another plus is high adhesive qualities . They adhere well to the primary layer, forming a rubber coating.
The price of the composition deserves special attention when choosing enamel. It is optimal if it is the same as the old coating. If it was not possible to find an identical one, then you can use a material that differs from the main coating by no more than 1 tone. If, after covering the bathtub with new enamel, you find yellowish spots peeping out, you can eliminate them by applying another coating over the new layer of enamel.
The work of applying enamel has certain differences from the usual painting with paint. You should know that the mixtures used during work are two-component. When a hardener is added to the compound, they lose fluidity . They cease to be liquid within 45 minutes after adding the hardener. After this time, working with this material is more reminiscent of plastering. Using such a non-flowing composition, it is extremely difficult to obtain a perfectly flat surface.
Therefore, if this is your first time creating a bathtub cover using the pouring method, then it would be useful to read the operating instructions before starting it. Before starting work, it is worth practicing on a small site in order to gain the necessary experience in performing the work. Another important point that should not be forgotten is that the material must be prepared immediately before enameling the product. After the preparatory work is completed, you need to start preparing it.
Most often, to create a new coating with your own hands, you use a composition that includes two components. In addition, the product can be enameled with liquid acrylic, which is less toxic and has the ability to maintain fluidity for a long time. In terms of cost, such a composition is more expensive. However, working with it is simpler and safer. But even using liquid acrylic, you should not give up respirators. In addition, before starting work, it is necessary to ensure maximum flow of fresh air into the room.
Technology of applying polymer to the bowl
For ease of application, pour liquid acrylic into a container with a small spout. The easiest way is to cut it out of a hardener bottle. Now you can get to work. We begin to pour the polymer from the side adjacent to the wall. Pour the liquid composition in a thin strip onto the side of the bowl in a layer of 4-6 mm.
If the wall is tiled, carefully apply the mortar under it using a rubber spatula. The acrylic should flow down to about the middle of the bowl. Carefully move the stream around the perimeter along the side of the container until the circle is closed.
We try to do everything clearly and quickly, since long breaks in work are unacceptable. After the first circle is completed, we begin pouring acrylic from the middle of the bowl. We move in a circle, capturing the entire surface of the bath. Uneven sagging may form on the container. Under no circumstances should you take a spatula and try to level them.
The consistency of the material is such that after some time they will disappear on their own. If you try to level the composition with a spatula, the layer of polymer will turn out to be too thin and uneven. It will no longer be possible to correct such a defect.
You need to pour acrylic onto the side of the bathtub with precise smooth movements, trying to do everything quickly enough, otherwise the quality of the coating will suffer.
After the composition completely covers the bowl, its remains will flow into containers placed under the technological holes. The next stage is polymer hardening. This process lasts several hours; the exact time should be indicated on the packaging of the material.
Before finishing the job, it is recommended to turn off the lights in the room and shine an LED or halogen flashlight into the bathtub. This way, trash cans that accidentally fall on the surface will be visible. They definitely need to be removed.
Experts advise closing the bathroom doors tightly and not approaching the bowl until the polymer has finished curing. This is due to the fact that all kinds of contaminants stick too well to the still wet acrylic. Even ordinary dust can ruin a new surface, not to mention threads, lint or hairs.
After the composition has completely dried, carefully cut off all the sagging on the edges of the drain and begin installing the new trim.
Don't forget to apply silicone sealant to all connections. Another caveat: the drain holes should not be tightened too much, otherwise you can “cut through” the acrylic coating.
Before installing the trim on the restored bathtub, you need to carefully cut off the acrylic sagging in the drain hole
How not to make a mistake in choosing a material?
Work on updating the bathtub begins with the choice of composition for restoration. This is a responsible undertaking, and the final result largely depends on it. To make the right choice, you need to understand exactly what liquid acrylic is. This is a modern polymer material, which necessarily includes two components: a base and a hardener.
Everything you need can be bought at any building materials store.
You can find many different materials on sale, the composition of which may vary.
The manufacturer introduces various additives into liquid acrylic that improve its properties or change color. Before purchasing, you need to carefully study the information from the manufacturer and determine whether certain additives are needed or not. It’s also a good idea to get acquainted with the reviews of those who are already using the updated bathroom. The most popular restoration compositions today are:
Option #1 – liquid acrylic “Lux” from “EcoVanna”
The material is specially designed for DIY restoration of bathtubs at home. Made without solvent, mixes well, rarely bubbles, very flexible and flowable. Advantages of the composition:
- excellent fluidity;
- no drips;
- high adhesion;
- good hiding power, leaves no gaps;
- spotless white finish;
- faint odor;
- completely hardens within 24 hours;
- service life – up to 15 years.
The composition does not give a dark shade. To change the color, it is recommended to use LUX color from the same manufacturer. May be incompatible with colors from other companies. The kit includes hardener and base. Packaged in buckets of three different sizes, each of them is designed for a bath of a certain size.
Liquid acrylic is a two-component mixture that is mixed before use. The dose of each component is measured at production
Option #2 – glass or flowing acrylic
The very first of the compositions that are used to restore the enamel of bathtubs using the pouring method. He is quite difficult to work with. The composition does not mix well, achieving complete homogeneity is quite difficult. Unmixed mixtures can leave poorly hardened areas on the walls of the bath.
During operation, streaks and bubbles often form, worsening the appearance of the bowl. The composition is available only in white; Epoxy-51 and Stakryl colors are used to give the desired shade.
Properties of the material:
- the highest coating strength among analogues;
- good hiding power;
- snow-white smooth white surface;
- curing time – from 2 to 4 days;
- maximum “viability” of the solution is 70 minutes;
- presence of a strong unpleasant odor;
- service life – up to 20 years.
Glass acrylic must not be diluted with solvent. The introduction of even a small dose of solvent into the composition destroys its structure. It becomes liquid and flows too quickly to the bottom of the bath, leaving too thin a layer of coating on the walls of the bowl.
Liquid acrylic is packaged so that each package is enough for a standard bathtub of a certain size
Option #3 – plastol
The composition is produced by a Russian-Slovenian company according to European quality standards. No solvents are used in its production. The material mixes well, does not bubble, and is applied easily, leaving no drips or streaks. Recommended for those who want to independently restore their bathtub with liquid acrylic.
Properties of Plastol:
- good hiding power;
- high adhesion, especially with cast iron, steel and plastic;
- bright white color that does not change during operation;
- good fluidity, no sagging or bubbles;
- UV resistance;
- no pungent odor;
- complete curing time 36 hours;
- service life is 20 years.
The video shows in detail the process of restoring a bathtub using Plastol.
When choosing liquid acrylic, it is worth considering some nuances. If possible, you should look at the color of the hardener. If it is dark brown, dark red or dark yellow, the finished solution may have an undesirable tint. Visually, the tone of the composition depends on the level of lighting in the room.
That is why, if you plan to tint acrylic, it is better to select the tone directly in the room where the bathtub is installed. Thus, the best option is to purchase the composition along with a set of suitable tinting pastes. Another tip: when purchasing, be sure to check the expiration date of the polymer. Using expired acrylic will never give good results.