Owners of private houses most often have to independently install local treatment facilities on their site. It is cheaper and easier to install sewer wells in the form of a regular cesspool or a sealed storage tank. A well-designed treatment or storage point will do the job perfectly. Do you agree?
Here you will learn what materials are used in the construction of treatment facilities and storage tanks for independent sewerage. We have described in detail the technologies for constructing typical sewer wells. Taking into account our recommendations, it will be easier for you to decide on the best option in terms of price and effort.
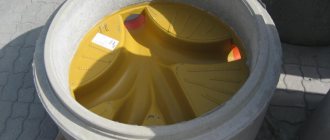
Installation of a plastic well
The use of ready-made plastic structures equipped with shaped parts will not only provide significant time savings, but will also make it possible to carry out installation independently even in the absence of experience and training.
It is only important to strictly comply with the requirements regarding the location of structures and the choice of their size, which are determined by a set of system parameters (diameter of pipes, straightness or presence of turns in the main, laying depth, etc.). The rest of the installation is carried out in several steps:
- digging a pit,
- construction of the foundation (sand-crushed stone cushion, poured base),
- installation of the structure (and its anchoring if necessary),
- connecting the well to the system.
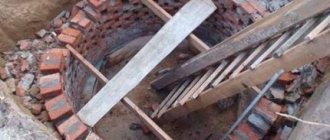
Installation of the tray part of a sewer inspection well in a pit
How to install a rotary well
Rotary well
Essentially, this is the same inspection well, but installed at the point where the pipeline turns.
But here the place of inlet and outlet of pipes is different: the holes are located relative to each other at an angle of more than 45 degrees.
This is what a rotary concrete well looks like
If you decide to install sewer wells of this type, let’s consider it using the example of using a corrugated pipe.
To do this you will need to do the following:
Installation of a rotary well
- dig a pit 40 cm deeper than the depth of the pipes;
- compact the bottom;
- arrange a sand-cement cushion 20 cm high;
- make cement pouring of the base;
- install a wide corrugated pipe with holes made in it for connecting sewer pipes;
- connect the pipeline using special couplings that ensure a tight connection;
- lay a layer of waterproofing and thermal insulation;
- install a cover on the inspection well;
- backfill.
This is how a rotary well is mounted
If the rotary well is made of reinforced concrete rings, products with a diameter of 1 meter should be used so that you can go down and service the pipes.
Sewer wells - SNiP, design and installation diagrams
The technology for arranging sewer wells has been worked out to the smallest detail and documented. Construction regulations prescribe a basic series of regulations that the work carried out must comply with. In particular, SNiP has number 2.04.03-85 and is called “Sewerage. External networks and structures.” The document regulates the locations of different types of structures, dimensions and requirements for the structures being erected.
Regardless of the purpose, private or public use, the installation of sewer wells must be carried out in accordance with the rules and requirements. For example, an inspection object must be located in front of the entrance of the local sewerage system to the centralized sewer, outside the red building line.
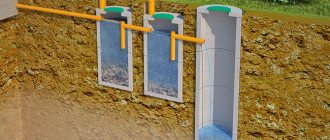
Construction of a filtration well: functions, diagram, device
A well designed to filter wastewater is installed in the sewer system after the septic tank.
Its task is to accept wastewater that has undergone preliminary treatment and then pass it through a layer of soil, which, in this case, acts as a filter.
Most often, this water treatment element is installed if there is no possibility of draining wastewater into the central sewer network or underlying soils.
Photo: filtration well
1. Manhole cover 2. Exhaust pipe 3. Neck body 4. Insulating cover 5. Supply pipe 6. Outer gravel layer 7. Well body 8. Shield 9. Internal filter layer
Important! When planning a site for a filtration well, it is worth considering the distances to nearby buildings and wells for drinking water (according to SNiP this is no closer than 10 and 30 meters, respectively). It doesn’t matter what shape the filtration structure will have, but if you plan to construct a sewer well from concrete rings, then something like a foundation is made around the perimeter of the base
It does not matter what shape the filtration structure will have, but if it is planned to construct a sewer well from concrete rings, then something like a foundation is made along the perimeter of the base.
Photo: sewer well made of concrete rings. Gravel, expanded clay, broken bricks and other material with a fraction size of approximately 10 to 70 mm are poured inside the well.
Outside, along the entire perimeter, bedding is made from the same composition as inside the well, but not more than 1 m. The supply pipe should be approximately 15 cm above the filter layer.
Important! To prevent erosion of the bottom filter, a wooden shield pre-treated with an antiseptic compound is placed under the stream of water.
How to calculate the size of a septic tank from rings
For the calculation you will need the following information:
- the number of people living, taking into account the household appliances used that consume water and plumbing fixtures;
- the design of the structure as a whole - single or multi-chamber;
- type of waste disposal - discharge of waste water into the ground after clarification, connection to centralized communications, pumping using special equipment;
- soil features on the site. The latter is necessary in order to correctly determine the type of foundation required for installing a septic tank and the nature of the pit preparation.
For ease of calculation, we will accept the most popular design option - a two-chamber septic tank with the discharge of settled and treated waste into the ground through a crushed stone-sand cushion.
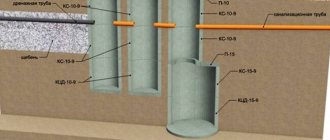
The illustration shows a well with a diameter of 1,000 mm. Since the internal diameter is indicated, models KS 10-3 and KS 10-6 with a height of 290 and 590 mm, respectively, from Table 1.2, are suitable for this standard size. The capacity of KS 10-3 is 0.1 cubic meters, for KS10-6 the volume is 0.16 cubic meters.
Next, you need to calculate water consumption and, accordingly, the amount of waste per day.
On average, SNiP 2.04.09-85 gives the following recommendations: 200...250 liters per day per person. Accordingly, a family of four consumes about 1000 liters per day, which corresponds to one cubic meter. If this standard seems too “costly”, you can recalculate the approximate consumption taking into account the water consumption for each hygienic procedure.
Table 1.3. Water consumption for hygiene and household procedures.
| Type of procedure, type of plumbing fixture | Amount of water, l |
| Taking a bath | 150…180 |
| Using a shower (in a shower cabin or hydrobox, bathtub, except for “tropical shower” type devices) | 30…50 |
| Hand washing, washing over the sink | 1…5 |
| Flushing the toilet (depending on the model and the possibility of incomplete flushing) | 9…15 |
| Using a bidet (depending on the model, the presence of manual control of water flow) | 5…17 |
| Water consumption by washing machine, per cycle | 40…80 |
| Dishwasher water consumption per cycle | 10…20 |
| Washing dishes for the family: of two people of three people of four people | 12…15 17…20 21…35 |
| Water consumption when preparing food, including during preservation | 10…50 l/hour |
Important: this does not include water costs for irrigation, since the liquid goes directly into the soil and not into the septic tank.
Interestingly, both hand washing and manual dishwashing use two to three times more water than using automatic devices. Therefore, before installing a septic tank, it is a good idea to install an economical washing machine and dishwasher - the volume of drain water will be less.
According to statistical studies, the average resident of Russia uses plumbing fixtures in accordance with this infographic.
Also, for a family of four, at least 5...8 times a month they use the washing machine for a full cycle, and if they have a dishwasher, they turn on the dishwasher once or twice every day.
Of course, for a private home the indicators may differ slightly, but it is better to focus on large numbers.
Thus, taking into account the information from tables 1.3. and infographics, we get approximately the same figure as given by the standards, that is, one thousand liters (one cubic meter) for a family of four people per day.
Since they usually try to ensure that the level of wastewater in the septic tank does not rise above the middle of its height, or better even a third (taking into account unforeseen circumstances, difficult treatment of some wastewater, exceeding the average daily discharge), then accordingly we take the volume of the septic tank equal to the average daily water discharge multiplied by on three:
V = Q x 3 = 1 x 3 = 3 cubic meters.
Thus, for a well with a volume of 3 cubic meters, 30 KS 10-3 or 19 KS 10-6 rings will be required. Of course, this quantity is divided into two wells according to the scheme - about 18 and 12 when using KS 10-3 and 11 and 8 for KS 10-6. The first number refers to the primary filtration well, the second to the septic tank for the final purification of water discharged into the ground.
Taking into account the sizes of the rings, the height of the wells will be 5.5 (7) and 3.5 (4.8) meters. The dimensions are indicated taking into account the installation of the bottoms and ends of the wells. For rings of other diameters, the height of the wells will be very different, so it is necessary to take into account the groundwater level and correctly calculate the ratio of the diameter and height of the reinforced concrete products.
The depth of the pit is calculated taking into account the arrangement of the sand and gravel cushion under the well (with or without a bottom), as well as taking into account the fact that the head is usually located 0.2...0.5 m below ground level.
Construction of a drainage well made of concrete rings
A drainage well made of concrete rings or other material is required if the aquifer is located close to the site. The system helps protect structures located underground from erosion by water, allows excess melt and storm water to be drained away and the fertile soil layer to dry out. A drainage well is a mandatory element of the entire system, but it can be made from scrap materials or from durable plastic or concrete structures.
The design of the wells is simple: installation on a pad that serves as a filter layer. The thickness of the cushion is at least half a meter, composition: crushed stone, medium gravel and sand. A backing is required, even if the bottom ring is equipped with a filtration bottom. In this case, storage and revision structures are placed on a compacted base filled with a cement screed or bottom slab.
The installation of the rings must be strictly vertical; the joints must be sealed with bitumen-based mastics or coated with a solution containing concrete. The depth of the hole for the well is at least 1.5 meters, and the best place for digging is lowland.
For the device to work well, it is necessary to make a hole in the link located closer to the surface for the pipe, which is sealed at the joints. And to give strength to the entire structure, the prefabricated elements are fastened from the inside with metal plates, which you can make yourself. After installing all the links, the space between the walls of the shaft and the ground is filled with gravel, then the surface is leveled and, if necessary, covered with a lid or geotextile.
A positive aspect is the quick start-up of the well - the device can operate after the sealant has dried.
Solving installation issues
Assembling a structure from concrete rings
Components of the assembly of structures made of concrete rings.
Start by preparing the installation site:
- mark out the area for the pit;
- debris, trees, and shrubs are removed from the territory;
- provide access for equipment.
A hole is dug to the depth of the structure, adding 20 cm for a crushed stone cushion. The walls are formed and the bottom of the pit is leveled. Cover with crushed stone and, if necessary, seal with bitumen.
Next, work on installing the well is carried out sequentially:
- A reinforced concrete slab is laid on the crushed stone bed or a screed is made. Trays are formed, reinforced with reinforcing mesh.
- Lower the working chamber rings. After settling, after 2-3 days, the seams are sealed with cement, the inside is covered with bitumen, and the pipes are sealed.
- Install the floor slab and neck. The joints are carefully sealed. Waterproofing is done from groundwater 0.5 m above its level.
- Conduct a leak test. Close the pipes, fill the chamber with water and leave for 24 hours.
- They are backfilled with earth using a tamper. Set up a clay castle: 0.3 m wide, 0.6 m above the pipes. A concrete blind area 1.5 m wide is made around the neck.
The hatch is closed with a lid.
Installation features
Let's consider the algorithm for constructing an external sewer system:
- creating a project. It includes the calculation part, layout diagram of components, system elements, specification for materials, components;
- acquisition of necessary materials, pipes, containers;
- production of earthworks. According to the diagram, markings are made, then trenches are dug for laying pipes, nests for containers, wells, and collectors;
- installation of containers, septic tanks, and other reservoirs. In conditions of high groundwater levels, a concrete anchor is first installed at the bottom of the nest to fix the position of the container. Alignment along the axes, waterproofing (if necessary), and insulation are immediately performed;
- Pipelines are being laid. They must have a given slope that corresponds to the diameter of the pipe. So, for elements of 110 mm, the level should decrease by 2 cm for every meter. The larger the diameter, the smaller the optimal slope;
- pipes are insulated. Different materials are used. The best choice is a foam shell. It tightly covers the pipe, completely eliminating the loss of thermal energy;
- tests are being carried out. They pass water through the channels and see how tight the connections are. Detected defects, leaks or other defects are eliminated. After this, the trenches are covered with soil. From this moment the system can be considered put into operation.
This algorithm applies to almost all complexes. Each project has its own characteristics, but the general construction procedure remains unchanged.
Manufacturing materials
When choosing a material for the construction of a sewage storage tank, several factors must be taken into account:
- Firstly, it is worth studying the climatic conditions, temperature values, and amount of precipitation.
- Secondly, you need to know the characteristics of the soil, the location of groundwater, and the level of soil freezing.
- Thirdly, the terrain is of great importance.
Self-installation of sewer wells is carried out using the following materials:
- Brick or cobblestone.
- Concrete.
- Reinforced concrete rings.
- Plastic containers.
- Car tires.
Waterproofing of sewer mines
High-quality waterproofing is the key to the proper functioning of the sewage disposal system. The tightness of the structure ensures the absence of foreign water, in particular groundwater, in the sewer line. Their entry into the sewer accelerates the process of accumulation of sewage in the well. Accordingly, poor waterproofing affects the frequency of calling a sewer truck to pump out wastewater.
Waterproofing is carried out in accordance with the following rules:
- Before applying sealing compounds, the joints of reinforced concrete rings are cleaned of dirt and then moistened to increase the adhesion of the mastic to the concrete surface;
- Waterproofing is carried out using waterproof mastics, which fill the gaps between reinforced concrete rings;
- The waterproofing must dry evenly over the entire area of the gap, so it is prudently covered with polyethylene.
A sewer well is the main element of a sewerage system, which can have several functional purposes. Some types of structures are used as a waste collection point, while others are used to control the operation and clear the sewer line of blockages. In the process of assembling sewer shafts, it is necessary to take into account SNiP standards, which relate to the parameters of the installed equipment, as well as the level of the pipeline and the distance between structural elements.
https://youtube.com/watch?v=Lg7l8vHw13s
Excavation
In most cases, the installation of sewer wells is carried out in pre-dug pits.
During excavation work, many nuances are taken into account: Types and types of sewer wells
- Functional purpose of the sewer shaft;
- Construction of a facility for waste disposal;
- Type of material from which the well is made;
- Linear dimensions of the structure;
- Volumes of sewage entering the system.
You can make a pit yourself, but if several wells are installed, the preparatory stage can be very delayed. Therefore, when carrying out excavation work, it is more advisable to use an excavator.
Drop tanks
Quite often there are areas located on the slopes of the area, where elevation changes range from one to 10 meters. In such cases, for proper installation of the sewer system, differential wells are installed in the areas. The maximum angle of inclination of the pipe should be no more than three meters; otherwise, it is better to make a stepped structure with a gradual drop of no more than one and a half or two meters.
The distance in this case will be considered the same as with turning ones. In both cases, installation will take place in places where the angle of the pipe changes. Accordingly, when making calculations, one should proceed from the bends of the sewer line and install mechanisms that level out the strong slope of the terrain.
General preparatory stages during construction
Professional teams who are engaged in laying an autonomous sewer system first of all visit the site and inspect it, selecting the most suitable location for the drainage well.
Next, a pipe laying diagram is drawn up, the depth and angle of inclination are calculated. This is important for gravity flow systems. Where it is impossible to meet this requirement, it is necessary to install a pump that will push waste into the septic tank under pressure. At this stage, the price for installing a sewer well and main line is already known.
When the calculations are completed, the marking of the site begins. To do this, use ropes and pegs where trenches for pipes will be made so that the main line is level. The place for the septic tank is calculated with a margin so that the distance between the walls of the pit and the concrete rings can be filled with sand.
Next comes the purchase of the required amount of materials that builders recommend using - concrete rings or plastic containers, as well as pipes of the required length, plastic inspection shafts, connecting elements.
Installing reinforced concrete rings under the sewer system with your own hands is a difficult task, because only a construction crane can lift the weight of the structure. It is recommended to find a technical solution with which the rings will be installed in the pit.
Stages of sewerage installation
- Drawing up and coordination of the project. A sketch of the pipe layout is created, the types of installation work are determined, and the required amount of materials and components is calculated;
- Preparatory work. This includes, for example, dismantling old sewers or digging trenches and drainage holes;
- Installation of risers and sewer pipes, connection to plumbing points;
- If available, installation of an external sewer pipeline and treatment system;
- Checking connections;
- Commissioning.
The cost of sewer installation will depend on the need to dismantle the old system, the complexity of the work to be done and materials.
Installation of internal sewerage
In other words, this is the installation of a sewer system within the boundaries of an apartment or house. This includes replacing or installing a riser and laying a pipeline from it with subsequent connection to devices.
When replacing a riser in an apartment, the pipe is replaced within one or several apartments of a common riser. In a private house, the riser is led outside, its upper part acts as a ventilation hole. The remaining pipes are laid horizontally, at a slight angle to ensure gravity flow.
The standard installation of pipes in an apartment involves running three lines from the riser leading to the bathroom, bathroom and kitchen, where plumbing fixtures are located.
For a home, the distribution of appliances does not matter, because any number of risers can be installed there. Sewage pipes can be laid both on top and inside the floor or walls.
Installation of external sewerage
A private house must have its own sewage drainage system. Therefore, an underground pipeline with a thickness of 11 to 20 cm is laid, which will discharge wastewater into a cesspool or treatment plant.
Pipes underground must be protected from destruction by soil, so a layer of sand is poured under them and on them and filled with water. At the entrance of the pipe to the cesspool, the depth must be at least a meter, otherwise there is a risk of freezing. Every 25 meters or at turns, at differences in height of the pipeline being laid, inspection wells are installed.
There are two methods of operating a sewer pipeline: gravity and pressure, in which wastewater is discharged by pump pressure.
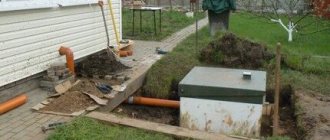
Installation of an autonomous cleaning system
The installation process involves digging a pit at a depth of up to 3 meters. For a station with soil post-treatment, you need to install either a filter well or an absorbent trench - special drainage pipes.
If you plan to install a biological treatment station, an additional filtration well or drainage ditch is dug.
Alternative to plastic insert
First, it is necessary to empty the storage tank or septic tank to be repaired by pumping out the contents with the involvement of a team of vacuum cleaners. The service of pumping out a septic tank and removing its contents is provided by utility services and private companies. It is cheaper to negotiate directly with the municipal services sewer man.
Sewage transport will need an access area to the work site. Moreover, the shorter the transport arm of the vehicle, the shorter the access distance will be. Its permissible length is up to 180 meters and even more - up to 500 m, if it is a high-pressure polyethylene hose.
Pumping out a septic tank should be carried out by trained specialists; amateurs will not be able to do it. Work on cleaning a septic tank is carried out with a special pump - a sewer (fecal) pump.
Waterproofing concrete septic tank joints
To seal the gaps between the concrete rings of the well, you need to reach them from outside the structure. It is necessary to dig a ditch around the septic tank to a depth that allows you to work with the joints between the reinforced concrete sections.
Accordingly, the more rings there are in the tank structure, the deeper the ditch will have to be dug. The width of the ditch is at least a meter. It will be difficult to work in a narrow ditch.
Having dug up the walls of the septic tank, you need to dry them. By the time waterproofing work begins, there should be no dark spots on the concrete walls. The seams must be cleared of accumulated debris and soil, exposing a cavity at least 70 mm deep.
If rain is expected, the well and the ditch dug around it should be covered with moisture-proof material (plastic film, tarpaulin, etc.).
If you dig out a septic tank with a narrow trench, there will not be enough space for waterproofing work
To fill the seams, you need well-punched clay and a plaster float. The clay should be kneaded with your feet in a basin or other similar container. Packing joints between concrete rings with unpressed clay is ineffective - its structure will be uneven and include voids that allow water to pass through.
The external seams between the concrete sections of the septic tank can be sealed with a cement-sand mortar mixed with liquid glass. Composition of the mixture: liquid glass, cement and sifted fine sand in a ratio of 1:1:3.
The mixture should be prepared in small portions - when liquid glass is added, the solution quickly hardens. The seams are filled with this solution using a spatula.
The joint mortar is also prepared from a mixture of cement and PVA construction adhesive. Proportion: 5 parts cement to 1 part PVA. After filling the joints with mortar, two or three layers of liquid glass can be applied on top. This will enhance waterproofing.
Before filling the joints with cement mortar, it is necessary to treat them with a primer. Technical priming materials are used for septic tanks. For example, this is one part bitumen to three parts gasoline.
There are pores in the structure of the concrete stone, so septic tanks assembled from reinforced concrete rings allow water to pass through, albeit in small quantities. When freezing, the water in the pores will crystallize, increase in volume and ultimately destroy the monolithic compound.
To avoid destruction of concrete by crystallizing water, it is necessary to impregnate the concrete from the outside with bitumen mastic at least 0.5 m below the depth of seasonal freezing in the region
Installation of roll waterproofing
Having completed the work on the seams of the concrete rings, we begin to form the surface layer to protect the tank from moisture. If clay was used for the joints, then roll materials cannot be applied over them - the clay plaster will be broken when the adhesive mastic hardens.
The outer surface of the concrete well must be completely covered with a primer, for example, bitumen-gasoline. This will improve the bonding of rolled waterproofing with concrete rings. Then the walls are coated with heated tar mastic, and the rolled bitumen material is glued in two or three layers.
Note that bitumen mastic is not suitable for waterproofing the walls of a septic tank with rolled materials - it cracks when it cools.
If there is a high groundwater table in the region where the septic tank is installed, then it is recommended to carry out waterproofing to the entire height of the sewer well shaft
To reduce or eliminate the likelihood of soil heaving around a concrete shaft, sand and crushed stone backfill is used (40% sand, 60% crushed stone). It fills a ditch previously dug around an underground reservoir to repair the seams between well rings.
If there is sand without clay inclusions, gravel or crushed stone deposits under the soil layer on the site, then backfilling can be done with soil from a dump formed during the development of a pit around the septic tank.
Network composition
Various sources can be used for water supply. There are social and autonomous types. Public ones have high power and are capable of providing water to large settlements. Autonomous are wells or wells designed to supply a certain, relatively small number of consumers.
The public complexes include:
- main lines or water intake;
- stationary treatment plant with a preparation complex;
- pumping station providing standard pressure in pipes;
- system of pipes, wells, shut-off valves, and other technological components.
Sewage systems are also divided into public and autonomous. The first has a branched structure, largely replicating the water supply network. Installation of sewerage networks is carried out according to our own standards, of which sanitary requirements come first. The drainage systems include:
- pipeline complex;
- wells for one purpose or another (inspection, rotary, extinguishing, differential);
- pumping stations;
- open trays (for rain nets);
- filters, sand traps, settling tanks.
Treatment facilities are also part of the sewer system, but form a separate group of structures. In autonomous systems of private houses, waste disposal is carried out independently. There are structures that accumulate wastewater, but require periodic pumping. There are more modern installations that can process organics partially or completely. They are built according to their own rules, which cannot be ignored.
Peculiarities
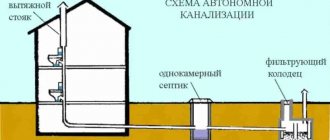
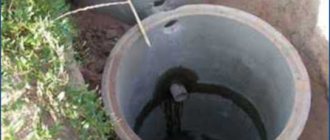
Any drainage system must have a sewer well or chamber. Such equipment should be located at the entrance to the septic tank, which is located on a suburban area. Sewerage structures also have a different name - wet or drainage well.
An autonomous type sewer system is a complex standard design of an engineering system, the installation of which will require plumbing and construction knowledge. The key component of each autonomous sewer system is a special well.
The system should have several wells:
- observation;
- turning;
- well for household waste;
- well for rainwater.
The owner of a country property must understand the features and differences of each type of structure.
Features of the creation of sewer wells are described in the sanitary and technical standards of SNiP. The documents describe the location of wells, markings and the need for preliminary preparation.
Features of the arrangement according to SNiP are as follows:
- before work you need to decide where the well will be located;
- markings will be required on the ground;
- trees and bushes that interfere with construction work must be uprooted;
- easy passage of equipment must be ensured to the construction site;
- You will need to draw up a detailed diagram that is agreed upon with the water utility and neighbors.
The following technical requirements apply to sewer wells:
- inspection structures should be located in increments of 30-40 m if the hatch diameter is 15 cm, or 50 m if the diameter is 20 cm;
- at each pipeline bend, as well as at the branch pipe locations, rotary type wells should be located;
- in places where the diameter of the pipes changes or there is a sharp slope, the installation of a drop well will be required;
- there must be a minimum distance of 3 m between the storage well and the living space;
- the diameter of a modern sewer well can be 40-70 cm; auxiliary pipes can be used for the outlet.
Installing an inspection hatch and laying pipes
In order to properly build a sewer shaft, you need to take into account the features of assembling parts at all stages of its construction. Not the last place in the installation process is the installation of the inspection hatch. Its device is quite simple, but requires precise execution of the necessary work:
Ladders for sewer wells
- The last ring of the well is covered with a flat slab with a hole for an inspection hatch;
- A metal rim is mounted along the edge of the hole. It will protect the stove from mechanical damage when opening the lid;
- Then carefully install a metal hatch, preferably cast iron.
When the construction of the well is completed, you should immediately begin laying sewer pipes. According to SNiP standards, during their installation the following parameters must be taken into account:
- The laying depth of sewer pipes must be at least 70 cm;
- In order for sewage to flow through the main by gravity, the slope of the pipes must be at least 2 cm per 1 linear line. meter of sewer line;
- The entry of the pipeline into the sewer shaft must be located above the level of the sewage disposal pipe.
Only by observing the relevant SNiP standards can you ensure uninterrupted and autonomous operation of not only the sewer well, but also the sewage main.
Choosing a site for construction
First of all, it is necessary to find the right place to build a water intake structure and determine its depth. If there are similar structures in neighboring areas, the task becomes easier. To do this, you should talk to your neighbors and find out the following information from them:
- What is the depth of the water intake structure on their site.
- What volume of water does it produce?
- When was it built?
- Features of its use.
When choosing a site for construction, you should be guided by the standard distances from SNiP 30-02-97. According to them, the following minimum distances are allowed between the well and other objects on the site:
- from the foundation of the house to the water intake structure the minimum permissible distance is 5 m;
- the minimum distance at which a well can be built from buildings for domestic animals is 4 m;
- to any outbuildings on the site – 1 m;
- trees must be at least 4 m away;
- a minimum of 1 m is set back from the bushes to the water intake structure;
- there must be at least 50 m from septic tanks and cesspools to the source of drinking water.
According to SNiP, there should be no cesspools above the water intake well.
Where to order well digging in the Moscow region?
If you have already realized the full degree of responsibility when building a well and are ready to entrust it to specialists, you will probably start looking for the best in the Moscow region. We sincerely approach the purity of relationships with the customer. Therefore, we wish you to find the most responsible and careful builders of your personal water source.
And, of course, if you contact us with this task, we will be happy to use all our knowledge and skills in this matter - for the benefit of you and your Family.
Call!
Types of inspection wells and the permissible distance between them
Observation
Installed for free access and maintenance of the system. The distance between wells is indicated in the table.
| Pipe section (mm) | Distance between wells (m) |
| 150 | 35 |
| 200-450 | 50 |
| 500-600 | 75 |
| 700-900 | 100 |
| 1000-1400 | 150 |
| 1500-2000 | 200 |
| >2000 | 250-300 |
Rotary
Mounted in places where pipes form a turning angle
- The distance between wells is calculated along a straight section of the pipeline.
- The length of the segment is indicated in SNiP. If you do not meet the requirement, you will have to install an additional well.
Variable
Structures are necessary in areas with changes in the height of pipe laying
- SNiP has not established standards for the distance between these structures, but the following requirements are imposed:
- One difference cannot be more than 3 meters. If the slope is greater than this footage, then a stepped overflow system with wells is created.
- If the difference is 50 cm, the well can be replaced with an overflow
Nodal
Used at the junction of pipes. The distance depends on the diameter of the pipe.
| Diameter (mm) | · Distance (m) |
| · 600 | · 1 |
| · 700 | · 1,25 |
| · 800-1000 | · 1,5 |
| · 1200 | · 2 |
When arranging an external sewer line, it should be taken into account that the distance from the sewer to a source of drinking water must be at least 30 meters.
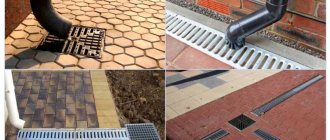
Types of wells in the sewerage system
Drainage networks consist of various elements, each of which has its own functions. Pipelines transport wastewater, shut-off valves regulate this process, and wells of various types allow you to monitor the condition of the system and serve as its end point.
There are several types of sewer wells for various purposes
To carry out control, three types of well structures are installed:
- Observations.
- Drops.
- Rotary.
- Nodal.
The first ones are installed on long sections of sewer pipeline to inspect it and clean it as necessary. The latter are installed in areas with a large slope and allow you to reduce the flow power. Still others are installed at pipe turning points so that in case of blockages they can be cleared. And the fourth ones are installed when it is necessary to combine several water pipelines.
Sewerage pipelines end with a well of one of two types:
- Storage – used for storing wastewater.
- Filtration – designed for clarification and purification of wastewater.
In a private house, the installation of sewer wells of all these types is regulated by the rules set out in SNiP 2.04.03-85 “Sewerage. External networks and structures" (SP 32.13330.2012) and SNiP 31-02-2001 "Single-apartment residential houses" (SP 55.13330.2011),
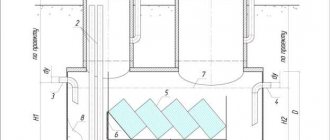
Reinforced concrete well diagram
According to sanitary standards, septic tanks and sewer wells must be removed at least by:
- 3 meters from trees on a personal plot;
- 5 meters from the foundation and underground gas pipelines;
- 10 meters from the garden beds;
- 30 meters from sources of drinking water.
It is often necessary to install a sewer well at a fairly large distance from a private house. You cannot do without long pipelines; you will have to install additional inspection units.
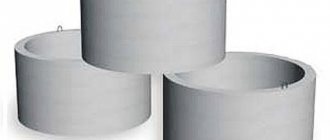
What are sewer wells made of?
Underground chambers of the external sewer system can be equipped with:
- concrete (reinforced concrete rings);
- bricks;
- factory-made plastic products.
Factory-made concrete rings are available for any size
Preparing the base
In order to properly install a sewer shaft and connect it to the pipe system, special attention must be paid to arranging the bottom of the pit. As a rule, reinforced concrete wells are used to assemble treatment facilities
Unlike plastic and other materials, they are more durable because they are not afraid of temperature changes and moisture. However, if they are installed, additional waterproofing will be required, which we will talk about in more detail, but a little later.
So, the construction of a storage type well involves the following finishing of the bottom of the pit:
- Fine-grained crushed stone or gravel is poured into a layer of 15-20 cm;
- After this, the mineral cushion is filled with concrete mortar;
- In order for water to leave the system by gravity, you need to make a slight slope of the bottom towards the outlet pipe.
What standards regulate the location of objects on the site of a private house?
The main document according to which the construction of a house and the installation of communications is carried out is the project. It contains a work plan indicating all distances and dimensions. The distance from the house to the sewer drainage point is also indicated here. During design, we are guided by two standards:
- SNiP 2.04.01-85;
- SanPiN 2.2.1/2.1.1.1200-03 (or 2.1.5.980-00).
These documents detail all the requirements for sewerage and define the minimum permissible distances between objects and buildings. It must be taken into account that instead of SNiP, the updated version of SP 30.13330.2016 is used today. It is more in line with current realities, although there are no fundamental differences. Regardless of where and by whom the sewerage system is built, the rules and regulations must be strictly followed.
Some owners of private houses believe that the location of the sewer system is their own business. This is a wrong point of view. The rules and regulations specified in building and health directives must be followed by everyone without exception. If the system is being built on the site of a country house, the requirements are more relaxed. But, for a residential building, all existing requirements must be met.
It is noteworthy that the issue of the distance from the septic tank to the house is ambiguous. While the minimum value is clearly defined, the maximum value is not mentioned anywhere. Sanitary standards for sewerage for the private sector also do not mention a maximum. It is only noted that it is advisable to make the distance as large as possible. However, if the septic tank is too far away, blockages or defrosting of the pipes are inevitable. Under such conditions, the system will not be able to operate normally. Therefore, the location of the sewerage system on the site must meet not only sanitary, but also operational requirements.