If a person lives in a house, it must have a sewer system, since waste products still need to be removed somehow. And it’s hard to disagree with this, isn’t it? Modern industry offers many solutions: from multi-section septic tanks to neat dry closets. But an ordinary cesspool in a private house is still relevant and in demand.
But, before you start building a cesspool on your site, you will have to weigh the pros and cons. After all, an incorrectly chosen location, and the design of the cesspool itself, subsequently threatens to result in many problems. The most common of them is the appearance of an unpleasant odor. We will tell you how to avoid this problem.
In the article we collected and summarized information about the types and design features of cesspools. In addition, here you can find useful tips and recommendations on how to choose and build a sewer system on your site. The material is accompanied by thematic photos and videos.
Types of cesspools and arrangement rules
The cesspool should be placed on the site so that special equipment can drive up to it. Plus, the location of the well, if there is one, the depth of the flowing groundwater and the number of people living in the house are taken into account.
Important! The standard cesspool volume per person is 0.5 m³. But practice shows that it is best to choose a volume of 2 m³ per 1 family member.
When classifying, the volume of the pit is determined from the frequency of use and design. That is, if living in a house is carried out seasonally, for example, in spring and summer, then a sump tank of the simplest design is sufficient. If accommodation is carried out on a permanent basis, then the design is selected from 3 types:
- drain (no bottom provided) - ideal for a bath;
- hermetically sealed – for large amounts of waste;
- storage septic tank - suitable for partial cleaning and drainage of wastewater.
Let's talk about the features of each type.
Drain
This is an absorption sump where the waste is cleaned by an earthen filter. Large volumes are not provided for the design. After installation for some time, the water drains without difficulty unless the soil is mixed with clay. Subsequently, sludge accumulates in the barrel, so the absorption structure must be cleaned.
The big disadvantage of such a pit is environmental pollution. The situation gets worse if the outlet is made from the toilet.
Sealed
Most often, a sealed cesspool is made of concrete rings, solid slabs or bricks. The big advantage is that a sealed cesspool is absolutely safe for the environment. The septic tank is cleaned by pumping out sewage using a special machine. It can be single-chamber, double-chamber, etc.
One of the disadvantages is the need for frequent waste pumping.
Cumulative
A storage septic tank can also consist of one or more chambers. The bottom must be laid out with broken bricks or crushed stone. That is, sewage does not come into contact with the soil and does not pollute groundwater.
The principle of operation of a septic tank is standard - after filling the tank, pumping is performed. The frequency of removal depends on the volume of the pit. For example, if a storage tank is installed at a dacha, where the owners come only on weekends, then the car is required no more than once a year.
Volume calculation
To calculate the volume of a drainage type tank, you can use the following formula: V=(Vn×N)×3, notation:
- V – volume of a drainage type tank for wastewater;
- Vn is the volume of water consumed by a person during the day, it ranges from 0.15 to 0.2 m3;
- N is the number of people living in a country house or in a private house.
Coefficient 3 is introduced based on the consideration that the tank capacity should be three times the daily water consumption.
After making the calculation, we recommend making a reserve of at least 20%. For example, four people live in a house, therefore, the calculation will be as follows: V = (0.2 × 4) × 3 = 2.4 m3. We add a margin of 20% and get the result that the tank must have a volume of at least 2.88 m3.
Note that over time, a cesspool without a bottom will still require cleaning, but it does not need to be done as often as when a sealed design is used.
Design options
The sewer system is a depression in the ground, the walls of which are reinforced with different materials depending on the expected time of use. Based on this, we can distinguish 2 main types of structures:
- permanent - concrete or brick;
- temporary - wooden or from old tires.
Permanent
A concrete pit can be made from a solid screed or rings. The bottom of the ring structure must be filled with concrete mortar and only after that the main part is installed. The second option is convenient because you can do it completely yourself. The big disadvantage is the frequent cleaning of the structure, which depends on the number of people in the family.
A solid screed design requires more money and time to implement. Reinforcement is placed at the base of the floor, and then filled with concrete mixture. Next, a form is erected, which is filled with the same solution. This sedimentation tank will last for many decades, sewage will not be able to penetrate into the ground and the volume will not decrease during operation.
A concrete septic tank consisting of two sections is less expensive than previous options. A large hole is dug to divide it into two parts. Each of the finished compartments will be connected by a duct. All wastewater ends up in a larger container with precipitation, and in a smaller container without precipitation.
Note! If the second section is reinforced with a drainage well, then wastewater flows into the ground without insoluble sediment.
The most complex septic tank design consists of 3 parts. It will require the use of additional equipment - a compressor with a timer is placed in the second compartment and a drainage pump in the third.
The most modern option available is plastic containers of different sizes. They are sealed, so wastewater will not get into the ground, but it will require constant pumping of waste.
Temporary pits are made from wood or used tires. When using boards in construction, the material is treated with a protective solution. The walls are made in the same way as for the formwork. Such sedimentation tanks are good because of their low cost, quick construction and high degree of isolation of the soil from possible ingress of wastewater. Service life – no more than 10 years.
The tire construction option does not require finishing or high costs and can last up to 25 years. But the big disadvantage is the high level of throughput, due to which sewage will go into the ground, thereby polluting it.
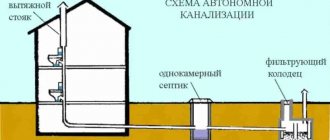
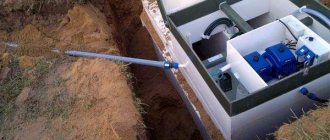
Local sewerage system with wastewater treatment
For a cottage equipped with modern plumbing equipment - a bathtub, toilet and bidet - a bunker-type sewer storage tank will not be enough.
A wastewater treatment complex will allow minimizing calls to specialists with treatment equipment, completely covering the need for sewerage, and avoiding local problems with soil contamination with sewage.
The principle of clarification (purification) of household wastewater through a system of drainage pipes is based on the natural order of filtration of fecal waste, which “works” in nature. Through the riser in the house, wastewater flows into a pipeline connecting the cottage and the septic tank. Sufficient volume of the sewer well is 2.5 m3.
When planning the landscape of a suburban area, we must not forget about the need to clean the septic tank. The car may not pass, and its hoses are not long enough
In such a storage tank, household wastewater is clarified with the precipitation of suspended matter. You will need to hire a sludge sucker with a team to clean the sludge deposited in the septic tank twice a year.
Self-cleaning with neutralization of sediments in a specially designed compost bin is also acceptable (see below). Clarified sewage water is sent to the drainage network, from where it goes into the ground.
The drainage pit is located at a distance of 5-20 m from the house. The main requirement for the location and positioning of the drainage network is a sufficient distance from the building so that the wastewater entering the ground does not wash away the foundation or flood the cellar.
From the sewer settling tank, the clarified waste stream moves first into a distribution well, then from it into a system of perforated drainage pipes made of polymer or asbestos cement.
Drainage pipes are laid at a depth of at least half a meter, actually at the level of development of the soil-vegetative layer. If the soil developed on sandy soil, then the length of the drains is calculated taking into account 10 m per person.
In soil with a sandy loam base, the length of the perforated pipe should reach 14 - 17 m, with a loamy base about 20 m.
For filtration in natural conditions, in the ground, of sewage, a two-chamber or three-chamber bunker is not necessary. A single-chamber drive will do if it is built correctly (+)
Sewage pipes from the well to the accumulation or discharge point should be placed with a slope of 0.02, i.e. There should be 2 cm of inclination per linear meter. It is desirable that the main part of the pipeline is laid below the frost depth noted in the region.
Areas located above the specified mark are thermally insulated with detachable cylindrical insulation made of polystyrene foam, polyurethane foam, polyethylene or slag backfill.
Laying a channel of 100-150 mm pipe that drains sewage water into a storage pit is carried out at least 50 mm above the distribution well with pipe routing through which clarified wastewater is directed to sealed drainage pipes.
The pipeline enters and exits into the pit through tees of 100 mm diameter. Their upper ends must be left open, with cleaning pipes placed above them, having an equal cross-section with the trays supplying and discharging waste.
There is a gap of 50 mm between the open end of the tee and each cleaning pipe. Sewage pipes made of polyvinyl chloride or polyethylene are used, the diameter of which is 100-150 mm.
One distribution well in a ground wastewater treatment complex is not enough. You will need at least two of these
A pipe is attached to the lower end of each tee. It must be brought 400 mm below the calculated water level in the drain hopper.
All components of the drainage pit, together with the ground filtration system, require ventilation. This function is assigned to the sewer riser inside the house, the upper end of which is located above the roof level, the cesspool itself and each sewer pipe.
The pipeline from the distribution well to the drains laid in sandy soil is carried out with a slope of 3 mm, in sandy loam 2 mm, in loamy 1 mm
In trenches dug under the filter system, pipes are laid with the perforation down. The joints of drainage sewer pipes are insulated with roofing felt, tape, simply polyethylene or a similar material.
Which pit is better - sealed or drain?
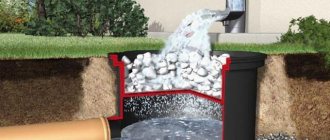
If the daily throughput does not exceed 1 m³, then a drainage pit can be used. To do this, a recess with a volume of 3 m³ is dug, and a cushion of sand (30 cm) and stones (50 cm) is placed on the bottom. Additionally, the walls are reinforced with bricks or tires. The opening closes regardless of the needs of use.
Such a filtration pad has a slow throughput, so water entering the ground will be slowly purified.
A sealed cesspool is suitable for areas where a lot of water is drained and it stagnates. In this case, ready-made containers are purchased that are immediately ready to be buried in the ground. In some cases, holes are dug out on their own and filled in, or concrete rings are installed in them.
Drainage sewer complex
It is better to make the body of the wells, which contain the wiring elements of the drainage system intended for collecting and discharging groundwater, round. When making their walls from brick, a 400 mm internal diameter of the circle is convenient, from concrete – a 700 mm diameter.
The distribution well is not built higher than 400 mm, otherwise it will be inconvenient to work with the wiring inside it. Brick walls must be plastered and iron-clad from the inside. From the outside, it is permissible to waterproof them with clay or bitumen coating.
The necks of all distribution wells must be covered with covers made of reinforced concrete, plastic or tarred boards. A heat insulator is laid on top - slab polystyrene foam with a 200-400 mm layer of surface soil filling.
The channel cross-section for laying drains cannot be chosen arbitrarily. The operation of the filtration system depends on this
According to the direction of the drains, the wells are equipped with one-, two- and three-sided water intake outlets - open pipe outlets closed by vertical stroke gate valves. Wooden gates will be needed to regulate the water supply and when repairing the well.
At the bottom of water distribution wells, open concrete trays are formed, leading from the supply pipe to the receiving drainage pipes. The height of the trays should be equal to the diameter of the largest pipe entering the well. Their bottom is brought to the level of the lower wall of the pipes.
In polymer drainage pipes (their lower part), slots are cut 15 mm wide, with a height of approximately half the diameter of the pipe. Cuts with a pitch of 1000 mm will ensure uniform flow of clarified drain water into the ground.
The bottom of the drainage trenches is given a trapezoidal shape. They contain a 100-150 mm layer of gravel or crushed stone with a grain size of 15-25 mm. In principle, the thicker the underlying layer of crushed stone (gravel), the better the filtration of wastewater will be.
After giving the specified slope to the surface of the fill, drainage pipes are placed on it. Gravel or crushed stone is poured on top of them in a 50 mm layer, then the soil is level with the soil level.
The drains should not be connected to each other. The movement of waste water into them is carried out only through distribution wells
The distance between the septic tank and distribution wells depends on the type of soil on the site. The required number of wells from which parallel drains are drawn is two or more.
Characteristics of the wastewater filtration complex depending on the type of soil:
- Sand . Two drains, each 18 m long, with a 1.5 m intermediate distance between them. Filtration field area – 70 m2;
- Sandy loam . Five drains, each 19 m long, the step between them is 2.5 m. The area of the filtration field is 231 m2;
- Light loam . Seven drains are 18.5 m long, with a 3 m distance between them. The area of the filtration field is 495 m2.
To prevent the formation of air pockets in the drainage pipes and to remove the methane inherent in the wastewater treatment process, the drainage system will require an air flow. At the end of each drain, it is necessary to build a riser from a pipe of 100 mm diameter, raising it 400-500 mm above the ground.
Principle of design and preparation
Competent planning and a carefully designed scheme will help avoid problems during the construction process from existing norms and regulations. Please pay attention to the following points:
- Sanitary requirements regarding location.
- Type of system, based on the characteristics of the site.
- Depth of the pit.
- Technology of work carried out.
- Preparation of materials.
Each of the points has its own nuances, the implementation of which is necessary for safety and reliable operation:
- The place for the cesspool should be far from fences, a house, or a well. This is especially true for water tanks, where the established distance should not be less than 25 m.
- If the garden is raised, then the cesspool cannot be placed in the lower part of the plot. During periods of heavy rain or melting snow, groundwater may become contaminated. Construction technology is selected according to the soil characteristics of the surrounding area.
- The dimensions of the pit must be calculated based on the number of people living in the house on a permanent basis. Also, the volume of the structure must be a multiple of the capacity of the sewer truck - this is another important condition, which was established based on the need for pumping and removal of waste.
- Perpetual cesspools are an ideal option if you don’t want to constantly call a cleaning machine. The reservoirs are connected to each other by tubes. When one is filled, liquid begins to flow into the other.
- The best choice is a sealed design that eliminates odors in the area and in the house. But the owners of such pits will have to carry out constant pumping, especially if the bathroom and shower are intensively used in the house.
If you plan the project and work poorly, you may encounter the following consequences:
- unpleasant odor on the site and in the house;
- the remaining water will freeze in the drain pipes when overflowing from one section to another;
- penetration of harmful substances into soil and wastewater.
Compliance with established standards will create a comfortable atmosphere for living. The owners only need to clean and monitor the condition of the system.
Additional requirements
Requirements for the distance from cesspools to utilities:
- at least 30 m to the reservoir;
- at least 3 m from trees;
- distance from the stream more than 10 m;
- distance to the road is more than 5 m.
All requirements are mandatory, otherwise the pit will create a lot of inconvenience for residents.
We choose a place, taking into account SanPin requirements
When choosing a location for arranging a tank, you must take into account a number of rules and features. This determines how effective the sewage system will be and whether it will be convenient to use.
What you need to focus on when choosing a location for arranging a sewage tank:
- It is important to determine the depth of groundwater. If there is a possibility that sewage will enter groundwater, then constructing a reservoir for sewage is prohibited;
- If there is a possibility of floods, then it is strictly forbidden to use tanks with filtration holes in the walls of the structure, since there is a high probability of contamination of the environment in the event of flooding;
- The sewage tank must be accessible to equipment that pumps sewage out of the tank;
- The depth of the pit should be no more than 3 m. Compliance with this condition is necessary for the possibility of pumping out wastewater. At greater depth this process becomes much more complicated;
- The walls of the tank must be insulated to the depth of soil freezing. It must be possible to install a cover on top;
- It is prohibited to place the pit on slopes;
- It is prohibited to install a sewage tank closer than 5 m from the living space and from the neighbors’ fence.
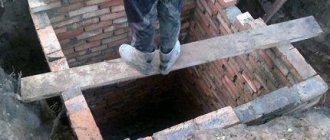
Construction of a cesspool in stages
The process can be divided into 5 points:
- digging a pit;
- backfilling the soil with gravel and sand;
- masonry;
- laying a pipeline from the house;
- backfilling the storage tank and pipeline with earth.
After calculating the required volume, markings are made taking into account the materials used and the selected dimensions. For example, if concrete rings are chosen as the main material, then the hole will be deep, but not large in volume.
Next, pay attention to the base, which should be covered with gravel and sand to level the surface. Reinforcement is laid out on it and poured with concrete mixture. The thickness varies from 15 to 20 cm depending on the diameter of the pit.
If you plan to use the pit on a permanent basis, then to prevent freezing, mineral wool is laid between the soil and concrete and covered with earth. Selected blocks, boards, tires or concrete rings are installed on the finished surface.
At the end, a hatch made of boards treated with mastic is placed on the finished cesspool. A hole with a diameter of at least 10 cm is made in the finished lid for ventilation. Ready-made slabs with holes are also used. Any of the selected covers must lie above the ground level so that the sump cannot be flooded by groundwater.
After completing the main stage, a trench is dug for the sewer pipeline, where the pipes are installed. It is important to remember that the laying is carried out at an angle and is insulated if the trench passes above the freezing level. The pipes are not fixed because they can be damaged by soil movement.
Walls
There are various options for cesspool walls. They are covered with bricks, logs, concrete rings and slate. The choice of wall material depends on the personal desires of the builder.
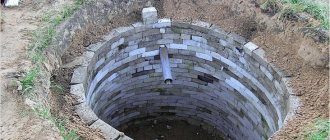
Brick walls
Most often, the walls of the cesspool are lined with brick. This material has a number of advantages: easy accessibility, ease of laying, strength. It should be noted that not all bricks are equally suitable for constructing a cesspool. Sand-lime brick has low moisture resistance, so it should never be used for this purpose. What cannot be said about ceramic bricks, its varieties are completely suitable.
Masonry can be done with your own hands, using ordinary mortar, but the mason must leave small gaps between the sides of the bricks and not fill them with cement. This is necessary to filter the wastewater and pass it into the soil surrounding the pit. Outside the masonry, 30 cm of space should be left and filled with broken bricks, gravel and sand to improve the filtration of wastewater.
Log walls/plank walls
In summer cottages, the walls of cesspools for outdoor toilets (without pumping) or other needs are most often covered with shields made of boards, bars, or a small log frame is made. This material is less durable, but will cost much less than other analogues. You can handle the design yourself.
If you decide to line the pit with boards, first prepare 4 large bars. It is better to choose the size 10X10. They are covered with a special solution - protection from bark beetles and rot (if the bars are made of larch, no protective agents are needed, this tree does not rot for decades). One end of each block is slightly sharpened; this is necessary when attaching the block to the ground of the pit. The bars must correspond to the depth and have a reserve of length to deepen them into the bottom of the pit.
After the bars are placed in the corners of the pit and secured, you can begin installing the boards. The strongest and thickest boards (if different sizes are used) are placed closer to the bottom of the pit; later, it is at the very bottom that the strongest earth pressure will be exerted on the walls. The boards, coated with a special protective solution, are nailed so that the bars are inside the wooden box.
It is recommended to maintain a distance of 1-2 cm between the boards to allow waste water to escape into the soil. It is much more convenient to knock together a wooden box outside the pit and then lower it. But this will require the help of a crane or a large number of people, because the weight of the structure will exceed 400 kg.
IMPORTANT! A log house is constructed in a similar way. It should only be noted that the thickness of the logs will significantly reduce the volume of the drainage pit. To avoid this, it is necessary to reconsider the volume of the pit.
Walls made of concrete rings
For long-term use of the drainage pit, it is best to construct it from concrete rings. Concrete is the most stable and unpretentious material.
You won’t be able to create a structure from concrete rings with your own hands; you need to take care of purchasing them in advance. You also need to calculate in advance which ring and where the hole for the pipe will be; it is drilled before immersion. When there are rings, the question arises: how to lower them into the hole (It is worth remembering that the hole should not be completely dug at the time of lowering the first ring). There is a wide range of possibilities here, from the use of a crane (the weight of one ring reaches 600 kg) and winches, to self-immersion of the rings. A more economical option would be to deal with this problem yourself.
First, a pit is dug with a height equal to the height of one concrete ring. One of its edges is made partially flat (beveled) for easy lowering of the structure. A ring is rolled onto the beveled edge so that the axis of the ring is directed towards the center of the pit.
Using a lever made of a block (3 m length recommended), the ring is turned over, dragged to the flat edge and gently slides down in a vertical position. For ease of descent, boards can be laid out on the gentle edge. After the first ring has taken its position, the builder lowers down and begins deepening the hole from inside the ring.
Gradually, with increasing depth of the hole, the ring will gradually settle. After which the same operation is performed with the next ring. It is very important to ensure that the structure is strictly horizontal when deepening the hole. After lowering all the rings, holes are drilled in their walls (5 cm recommended) every 30 cm in the vertical direction, they are intended to release waste water.
Cost of construction work
When determining costs, it is necessary to understand that installing a small drainage pit is not economically feasible. When calculating the cost, it is best to consider a size of at least 3,000 liters. It is recommended to analyze the parameters:
- costs for the selected device type;
- prices for employee services.
For a better understanding, you should look at the situation using an example. The calculations include work:
- A complete set of components required for construction (including the preparation of concrete mixture, waterproofing and hatch).
- Delivery (taking into account the distance to the destination).
- Digging a pit and then backfilling it.
- Concreting the bottom.
- Installation work.
The approximate cost of the work will be 30,000 rubles.
Sanitary standards
To avoid problems later, it is necessary to comply with sanitary standards:
- The drainage pit must be located at least 35 meters from the well.
- You cannot use a storage system without a bottom if there is excess waste (more than 1 cubic meter).
- The lid should cover the pit tightly, especially in winter, to avoid freezing of the tank. And it’s best if the lid has additional insulation.
Tips from professionals for construction
When doing all the work with your own hands, professional builders recommend:
- Backfilling a three-cube tank requires at least 1.5 m³ of soil.
- After concreting the bottom, the mixture must stand for at least 10 days to achieve the required strength.
- For brickwork, errors are acceptable. Because the main function is to keep the soil from crumbling, and slightly uneven rows do not affect the quality of the task performed.
- For formwork, corrugated sheets or boards are best suited.
- Compact and level the soil around the entire perimeter and on top of the well.
A large selection of designs allows you to make a device that will correspond to your financial capabilities, and using the above tips, each owner will be able to independently build a reliable cesspool.
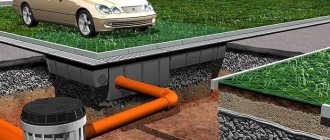
Technology for installing plastic containers under sewerage
Despite the apparent simplicity of the construction operations, installing a plastic tank is not so simple:
- A pit is dug to suit the size and shape of the container. The dimensions of the pit are 50 cm larger on each side. Digging is done manually with shovels or an excavator.
- The bottom is leveled and filled with sand, which is compacted.
- A trench is dug from the house to the pit.
- The barrel is being installed inside the pit.
- The gaps between the container and the walls are filled with sand. In this case, as the filling progresses, water is poured into the barrel. This is done so that the walls of the tank do not bend inward under the influence of sand filling, thereby reducing the volume of the drainage pit. After completion of the work, the water is pumped out and released into the garden or outside the site.
- Sewer pipes are being installed from the house to the pit.
- The pipe is connected to the tank using a double-sided coupling or a socket method.
- Bury the trench with soil.
- The upper part of the sewer plastic container is also covered with soil, leaving only a hatch with a lid on the surface.
- Install the ventilation pipe.
Installation of a plastic container under a cesspool Source kanaliza.ru
Cleaning a cesspool in a private house
The operation of vacuum cleaners does not guarantee complete cleaning of the tank. Only liquid can be pumped out, and sediment will accumulate at the bottom. Speaking about cleaning, it should be noted that special preparations are used to optimize the process:
- Bioactive complexes. They include colonies of bacteria that eliminate unpleasant odors when working together. They are environmentally friendly, but only live at temperatures above +4 °C, so using such products in winter is impossible.
- Nitrate oxidizers. They do not emit hazardous substances and do not pose a danger to people, animals and plants. Suitable for use in the cold season.
When disinfecting cesspools, use a product whose components are:
- sodium hypochlorite – 5%;
- creolin – 5%;
- bleach – 10%;
- naphthalizol – 10%;
- sodium metasicalicate – 10%.
To eliminate unpleasant odors, ventilation is used as an additional means. It is equipped with plastic sewer pipes with a diameter of 10 and a height of 60 cm. They are installed in the upper part of the pit.
Exploitation
Regardless of the material chosen for construction, cesspools require waste pumping out. To prevent sewage from flooding the area, it is necessary to monitor the filling height (normally 30 cm below the ground level). After reaching a certain level, a special machine is called in to clean the container.
To reduce costs, you can use bioactive complexes or nitrate oxidizers, which help decompose sediment and reduce unpleasant odors.
It is advisable to think about clean-up costs before starting construction work. Financial costs can be reduced if several holes are made at the bottom of the pit and plastic tubes are inserted into them, the ends of which will protrude 70-80 cm above the bottom.
If during operation it was discovered that the volume of the cesspool is insufficient, then you should dig another hole nearby and connect it to the main one using plastic tubes.
Video description
This stage of installation of external sewerage is shown in more detail in the video:
- They test the pipeline by running water through it. If there is no leak, a trench is buried;
- all joints, if required by the design, are sealed;
- carry out backfilling of soil into the gap between the earthen and erected walls;
- close the container with a lid with a hatch;
- a vertical ventilation pipe with a diameter of 100 mm with a deflector on top is removed from the ceiling to remove gases and avoid the appearance of an unpleasant odor.
The instructions on how to properly make a cesspool from a finished container look much simpler. It is simply installed in a pit on a sand cushion, the drain pipe is led into the finished hole and filled up.
When burying a plastic barrel without stiffeners, it must be simultaneously filled with water in order to balance the external pressure on the walls Source strport.ru
Advantages and disadvantages
The advantages of the design include:
- a simple way to organize a waste collection container;
- financial accessibility;
- possibility of independent creation.
The disadvantages include:
- the design requires periodic cleaning using a sewer machine;
- the container smells bad, so you will have to spend extra money on biological or chemical agents;
- if the established standards are neglected during the location, then there is a high risk of contamination of the site and wastewater;
- the pit stands out on the site, so it needs to be further improved, increasing the amount of costs.
If all norms, rules and advice are followed correctly, the identified shortcomings will be avoided.
Permits
To begin with, it is worth saying a few words about the legal issues associated with the construction of a cesspool, septic tank, and other local treatment facilities on the site. The fact is that you cannot create such objects without regard to anything.
In order not to cause problems for yourself, and the autonomous sewer system has been legalized, before starting work, it is necessary to obtain a SES permit for construction. This is due to the fact that any waste entering sewer containers is almost always a favorable environment for the development of a large number of harmful microorganisms. Therefore, sanitary and epidemiological supervision monitors the construction and operation of such structures in order to protect groundwater from biological or chemical contamination that can lead to the spread of various diseases.
In order to obtain permission to build a local sewer system, you will have to collect a package of documents. The list of necessities includes the following:
- Documents confirming ownership of the site and the main building located on it.
- A technical passport with a site plan showing all buildings without exception.
- A copy of the plan on which it is necessary to determine the probable location of the drainage pit or septic tank.
- Design of a septic tank or pit. They will help you develop it in the design organization.
- Project (plan) of a residential building with the location of the bathroom in it.
Example of topographic survey of a site
- Topographic survey of the site, which is carried out by specialists from geodetic organizations. The survey plan displays not only all the buildings and boundaries of the site, its topography, hydrological resources, the presence of vegetation, soil type, and other necessary data.
- Agreement with organizations involved in the removal of various household waste.
The collected documents and application are submitted to the regional SES or to the organization carrying out environmental protection activities. You will have to wait about a month for a building permit. The organization issuing the permit has the right to monitor the correct operation of the local sewage system, timely cleaning, and compliance with environmental standards.
Options for improving drainage
After installing the receiver, protruding edges of the necks with covers remain above the ground surface. Currently, many garden design solutions have been found that will help disguise a cesspool.
Ready solutions
Suitable for pits that require constant pumping. The main rule is a bright camouflage with many decorative elements. The cover requires weekly removal, so you can take advantage of design solutions and lightweight acrylic stone structures.
Lids are produced in standard sizes. Materials used in production:
- metal;
- plastic;
- rubber.
The advantages of using ready-made solutions in the garden:
- variety of materials;
- weigh no more than 10 kg;
- fit perfectly into any style.
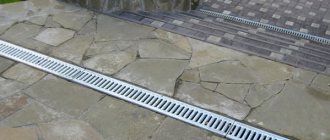
This method is suitable for a hatch whose neck is located near the yard next to a path made of tiles or stone.
Unusual decor
An ordinary rubber hatch can be turned into a unique design work. The main condition is that the top part must be absolutely smooth. These lids are also made of plastic.
If your drawing skills have not achieved the desired result, then you can use stickers. How to make an unusual decor:
- You will need to choose a sticker that is protected from moisture, otherwise the decor will look unattractive.
- Carefully stick the film and smooth it over the surface so that no air remains inside.
Another solution is to decorate with regular vinyl film.
Pros:
- a budget option;
- There are many options for designer decor;
- you can easily do it yourself.
Instead of stickers, also use stencils to apply patterns. You will also need spray paint or markers to mask scratches on the car.
Fake diamond
Necks can be decorated with voluminous lids made of non-standard materials. For example, artificial stone made from acrylic resins with the addition of crumbs or quartz.
What are the advantages of a decorative item:
- the stone does not react to exposure to sunlight and withstands temperature changes;
- lasts for decades;
- products of any shape and volume are created;
- wide range of color solutions.
You can put artificial lizards, cats, etc. on top of the decorative item.
Mini sculptures
Instead of covers, if your budget allows, you can put plaster or acrylic decorations for the garden. The newest material is polystone, which is a liquid acrylic stone with the addition of crumbs. It is poured into ready-made molds and painted after hardening.
Pros of use:
- light weight - no more than 20 kg;
- resistance to frost and ultraviolet radiation.
To decorate sewers on lawns, bright covers with shapes are suitable.
To provide a home with sewerage, you must choose a location taking into account all the rules specified in SNiP and SanPin. Also decide on the volume, calculate costs for materials and additional services, and then follow the work technology. In this case, the cesspool will last for decades.
Features of recesses for which there is no bottom
Stages of work:
- First, they dig a pit. 1.5 m 3 of soil is used for thermal insulation above the ceiling; the top layer and the rest of the soil are distributed throughout the site.
- Then they make a cushion at the bottom (crushed stone, sand), through which the sewage will escape.
- At the same time, pipes are laid at an angle, which avoids stagnation of liquid, and walls are erected, which can be either concrete rings or brick.
- After laying the second ring, a pipe leading to the well is installed in its upper part.
- When the pipeline is laid, rings and covers are installed, proceed to the installation of hatches.
- If the masonry is brick, make a trench, and the dimensions of the cesspool must be observed (the width is 30 cm, the height corresponds to the level of the walls).
- Don't forget to treat for moisture.
In this case, the concrete slab will lie not only on the walls of the well, but also on the soil layer, access to the hatch is left open.
Recommendations
How to choose a fecal pump with a grinder for cesspools: detailed description, properties Read about plastic entrance doors in this article
Let's learn about the advantages and disadvantages of commercial linoleum here