The cesspool is still used, despite the emergence and active use of septic tanks and local treatment facilities. This is due to the low cost of arrangement and the possibility of using used materials. Digging a pit is carried out independently or using special equipment. First you need to select the appropriate type of device and ensure the pit is sealed.
A properly equipped cesspool functions for many years without requiring attention.
Types of cesspool installation for a private home
Available options:
- sealed pit (with a bottom);
- cesspool without a bottom.
In the first case, the wastewater ends up in a storage tank, which needs to be cleaned periodically. The pit with the bottom is well protected from leaks. Waste products and contaminated water accumulate inside. When the level of wastewater rises to a critical level, the pit is cleaned using a sewer truck. The frequency of such manipulations depends on the intensity of use of plumbing fixtures (toilet, bathtub, sink).
If the object is small (1-2 people live in the house), purchase a special small-sized container. It is sealed and made of polymer material.
This design is called a drive (available in the form of a plastic container). In properties with permanent residence, it is recommended to drain into a large pit. In this case, the depth of the structure should not exceed 3 m, otherwise it will be difficult to pump out wastewater.
Positive qualities of this type of structure:
Sump pit diagram.
- due to tightness, sanitary safety is ensured: the soil is not contaminated, the likelihood of leaks is reduced, provided that the finishing work is carried out correctly;
- a closed cesspool is installed in different types of soil.
A pit without a bottom has the disadvantage of a high risk of penetration of pathogenic bacteria into the soil and surface groundwater. This may be a consequence of a violation of construction work or operation of the structure.
Features of this version of the sewer system:
- the side walls prevent the penetration of contaminated liquid into the upper layers of the soil;
- instead of the bottom, drainage is installed, which is used as crushed stone or gravel.
The wastewater first goes through a kind of filter of small and medium fractions. Then they fall into the soil, which also traps pollution. Such sewer systems also require periodic cleaning, but they are carried out much less frequently.
It is necessary to install separate pits for wastewater from the sink/bathtub and waste products (from the toilet). This is due to the fact that water containing a minimum amount of insoluble inclusions drains faster through the drainage at the bottom of the pit.
To maintain the conditional cleanliness of such structures, bioactivators are used. They contain bacteria that accelerate the process of decomposition of contaminant fractions. As a result, almost all wastewater leaves through the drainage. Only sediment remains in the pit in the form of sludge containing insoluble particles.
Open drainage structures are not equipped in the following cases:
- clay soil on the site: water will have difficulty draining through such a sewer system, which is due to the high density and fat content of the soil;
- close occurrence of groundwater: sewage does not pass through the soil, but immediately enters the water, polluting the environment.
Basic information
If a cesspool was built without taking into account all sanitary and technical standards (according to SNiP), sewage can seep into the soil, and then into groundwater, which can lead to severe poisoning of the body. If you are making a drainage hole with your own hands, do not forget to take into account all the requirements for the work.
This type of sewage system can most often be found in dachas, as well as in private houses where two or three people live temporarily. Such a number of residents use water evenly, so systematic cleaning of the cesspool is not necessary.
Types of cesspools
Depending on the design features, the frequency of water use, the location of the facility, etc., there are many types of cesspool design. Each has its own advantages and disadvantages.
For reference! If the cesspool is rarely used, then it is sufficient to use a temporary sump.
Cesspool made of concrete rings
This type of structure does not collapse, does not collapse over time, like a brick pit, where there is a large load on the walls; it looks more aesthetically pleasing, and the installation process takes less time. The only disadvantage of this type of cesspool is that the installation of concrete rings requires special equipment, since the weight of the rings is quite large.
Drainage pit made of concrete rings
Step one. Selection of concrete rings
Concrete rings differ from each other in diameter, which varies from 0.7-2.5 m. When creating a cesspool from concrete rings for an average house, the best option would be to use rings with a diameter of 1 meter, in the amount of 5 pieces. If a large house, more than 200 sq. meters, and there are several shower rooms and toilets, then you need to choose rings with a diameter of more than 1 meter.
Selection of concrete rings
Below is a table of mass-dimensional characteristics of concrete rings:
| Dimensions (inner diameter × outer diameter × height), mm | volume, m3 | Weight, kg |
| 700×800×290 | 0,05 | 130 |
| 700×840×590 | 0,10 | 250 |
| 700×840×890 | 0,15 | 380 |
| 1000×1160×290 | 0,08 | 200 |
| 1000×1160×590 | 0,160 | 400 |
| 1000×1160×890 | 0,24 | 600 |
| 1500×1680×290 | 0,13 | 290 |
| 1500×1680×590 | 0,27 | 660 |
| 1500×1680×890 | 0,40 | 1000 |
| 2000×2200×590 | 0,39 | 980 |
| 2000×2200×890 | 0,59 | 1480 |
Rings, depending on the design, are divided into two large groups:
- with a lock;
- flat.
The name of the group “with a lock” speaks for itself, that is, these rings are equipped with a locking connection, which is very convenient when installing rings. Flat rings have “regular”, flat edges.
Scheme of a cesspool made of concrete rings
To make rings, it is necessary to use a metal frame together with 500-grade cement. It is also worth noting that some products are equipped with a lid and bottom, which facilitates the construction process.
Step two. Construction
First, you need to dig a hole with a diameter 50 cm larger than the diameter of the rings, and a depth of 30-35 cm greater than the total height of all the rings of the cesspool.
Construction process
Next, you need to level and, most importantly, compact the hole so that the rings do not sag after installation; after performing these operations, fill in a layer of 2-3 cm of coarse sand. Fill everything with water, let it absorb and compact the bottom again. Next comes the process of installing the rings. If a ring with a bottom is used, then the installation process will not be difficult, but if the ring does not have a bottom, then it is necessary to create one, that is, fill the bottom of the cesspool with concrete, but before that you need to tie the reinforcement and put it on the bottom. Therefore, before purchasing a ring at the base, decide for yourself which option suits you best.
The mesh of reinforcement should be entirely inside the ring, so if you need to lift it, use bricks.
To create a solution, it is necessary to maintain the appropriate proportion: cement – water – sand – crushed stone 1–0.5–2–3. It is advisable to use cement of 500, but not lower than 400. Next, we begin mixing using a concrete mixer, or manually using a shovel. The bottom must be filled in one stage in order to eliminate seams and joints. After the solution is ready, pour it in, level it, and remember to remove air from the solution by piercing it with a sharp object.
Step three. Installation of rings
As mentioned earlier, concrete rings cannot be installed without special equipment, so we use a truck crane. For this purpose, there are special ears on the rings, to which the cables cling.
Installation of concrete rings
You only need to lift the rings by all the ears, while tensioning the cables evenly. Observe safety precautions when working with a crane and heavy objects.
After installing the first ring, use a level to level it. Then install all the other rings. The joints between them must be filled with cement-based sealant. At the end, install the lid and coat all joints of the structure with bitumen mastic. After this, it is necessary to fill in the voids between the walls of the pit and the finished structure.
Concrete rings with sealant
As a result, we get a high-quality cesspool made of concrete rings. This process is quite labor-intensive and requires the rental of special equipment, but all costs are completely justified.
Finished pit
Video No. 1 – How to make a cesspool with your own hands
Video #2:
Sealed
This cesspool is the safest for the soil and the environment as a whole, but its operation will require fairly frequent pumping of water. Various collectors are also used that allow water to be purified mechanically.
The design of a sealed pit is simple. Its construction will require concrete, from which the bottom and walls are made. The reinforcement included in the structure of the pit allows it to be made not only airtight, but also quite strong.
Fittings for a sealed drain pit
The advantage of this type of cesspool is its ease of manufacture.
The disadvantage is that for its constant operation it is necessary to regularly pump out water.
Without pumping
The construction of this cesspool can be carried out using various methods and technologies, but “without pumping” does not mean a complete absence of maintenance. The operation process includes wastewater processing.
Such a pit is most often used to collect and purify wastewater from showers and baths. It is built on sandy soils to ensure good throughput.
Layout of the drain pit
The advantage is ease of making with your own hands, low maintenance costs.
Disadvantage: high probability of soil contamination.
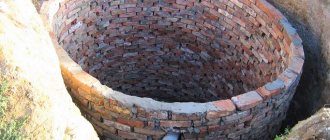
Made of brick
This object can be made sealed or without a prepared bottom, but with a large drainage layer. It is this type of cesspool that has proven itself in wastewater processing.
Brickwork cesspool
Making a cesspool does not require special preparation or special equipment, and the choice of design depends on the number of water consumers, as well as on the soil.
The advantage is ease of making with your own hands.
Disadvantage: it all depends on the type of pit design.
Construction of a drainage pit made of brickwork
Construction of a brick cesspool - video:
Products from the manufacturer
Septic tanks manufactured at enterprises differ in shape, volume, materials, and have their own design features.
Waste passing through the septic tank is effectively cleaned or disposed of at special points.
Ready-made septic tank
There are septic tanks, the design of which allows, after processing waste, to use water for irrigation or drainage into the ground. For this purpose, microorganisms are used that process the sludge in the cesspool.
The advantage is that you don’t have to build various objects, which sometimes take a lot of time and effort.
The disadvantage is the high cost of the equipment.
Using microorganisms
It is possible to recycle wastewater, as well as the sediment formed in it, using aerobic and anaerobic microorganisms. These bacteria come in a variety of forms, including liquid, powder, and packets that dissolve in wastewater.
Bioactivator for cesspool
In simple septic tanks, anaerobic microorganisms are used, since they contain the necessary enzyme, with the help of which the process of decomposition of organic waste occurs.
The advantage is the effective purification of sewage water, the absence of an unpleasant odor.
Choosing a location for a sewer pit.
It is important to choose the right place for sewer construction, because its further operation and safety for human health depend on this.
Therefore, this stage must be approached with full responsibility. When choosing a location, the following factors must be considered:
– the possibility of using a special vehicle for pumping wastewater;
– distance from the source of drinking water.
In accordance with sanitary standards, the cesspool must be located at a distance of at least 5 meters from the house. But it is necessary to take into account the type of sewer pit. For example, a sealed pit can be located within 5-7 meters from a living space, but a storage tank without a bottom should be located at a distance of 25-30 meters to avoid unpleasant odors, as well as the entry of various microorganisms into drinking water.
The cesspool must be cleaned periodically, so it is worth taking care of this at the stage of choosing a location.
Concrete ring construction: step-by-step instructions
A standard sewer storage tank consists of 2-3 rings. Each ring measuring 1x1.5 meters can accommodate up to one and a half cubes.
The construction of a cesspool from concrete rings is a multi-stage process that requires adherence to a certain sequence.
Step #1. Digging a pit and arranging the bottom
Having decided on the dimensions of the future “well”, they dig a pit, the dimensions of which are 80-90 cm larger than the diameter of the rings being installed. The walls of the pit are cleaned and leveled. The bottom of the pit is carefully compacted.
When constructing a filter structure, the bottom of the pit is lined with a 25-centimeter layer of fine gravel or broken brick
To create a sealed pit bottom, cement is poured or bricks are laid on pre-built formwork, the dimensions of which correspond to the shape of the future tank.
The bottom with the formwork installed is laid out with several layers of bricks or filled with cement mortar. It takes 5 to 7 days for concrete to harden. To simplify your task, use ready-made concrete rings already equipped with a bottom.
Step #2. Construction of the walls of the structure
After the poured bottom has acquired the desired strength, the installation of concrete rings begins. The rings are sequentially lowered into the prepared shaft well using a winch or crane. If during immersion the ring becomes warped and gets stuck in the ground, the hole should be slightly expanded.
When installing and adjusting the rings, in order to avoid distortions, the vertical and horizontal planes should be checked using a building level
To soften the blow and avoid the appearance of cracks in the concrete, boards are temporarily laid on the upper edge of each ring. Concrete rings, if necessary, are tied with reinforcement and fastened together with steel plates or brackets. A more reliable grip can be achieved by using rings with a “lock”.
The joints are covered with cement mortar with the addition of liquid glass and waterproofed using old rubber seals.
To ensure waterproofing properties, the outer surface of the installed rings is covered with bitumen mastic and wrapped with roofing felt.
After completing the installation of the tank barrel, the voids between the outer walls of the constructed tank and the pit are strengthened:
- stones;
- broken bricks;
- soil dumped when digging a pit;
- construction waste.
In regions where the depth of soil freezing exceeds one meter, it is advisable to insulate the tank walls.
The pipeline to the cesspool is laid below the freezing point of the soil. To achieve the required slope, the pipes are laid in a trench using brick supports.
Step #3. Installation of hatch and ventilation pipe
The upper ring is covered with a slab made of reinforced concrete. At the final stage, ventilation is installed that will remove methane and explosive sulfur gas formed as a result of rotting.
To construct an outlet pipe, take a meter-long section with a diameter of 100 mm and deepen it into the cavity of the well so that the upper end rises half a meter above the ground.
To prevent the spread of unpleasant odors, the cesspool is covered with a plastic waterproof hatch. It is installed on a neck with a height of 300-500 mm.
The inspection hatch must be equipped with two hermetically sealed covers: the first is placed at the ceiling level, and the second at ground level
The double lid will prevent the spread of unpleasant odors in the summer and freezing of the contents in the winter. To increase the insulating properties of the structure, the space between the covers is laid with pieces of mineral wool or pieces of foam plastic.
A layer of clay is laid on top of the ceiling, on top of which decorative soil is poured at the level of the installed lid.
Calculation of cesspool volume
The dimensions of the pit are determined taking into account the number of people living in the house. Their age plays a role. For example, it is generally accepted that for 1 adult there is 0.5 m³ of wastewater, for 1 child - 0.25 m³. To find out the daily volume, the indicated values are multiplied by the number of people. For example, if 2 adults and 1 child live in a house, the following is considered sufficient: 2*0.5 + 1*0.25 = 1.25 m³. The resulting value can be rounded up to 1.5 m³.
A more accurate volume can be found by multiplying the resulting value by the number of days before pumping.
For example, if a sewer truck is called once a month, then 37.5 m³ will be sufficient. If you round up, you get a total pit volume of 38 m³. It is necessary to take into account another margin - up to 10% of the obtained value. If the hole is too large, you can make it smaller, but pumping will be done more often.
The depth of the structure should be 2-3 m. Digging a hole less than 2 m is not recommended, since it is necessary to allocate a meter-long space for the release of gaseous substances. In addition, it is important to take into account the likelihood of soil heaving, which can contribute to raising the drainage level and displacing runoff. The width is determined based on the initial volume of the cesspool and its depth.
Standards for placing a cesspool on a personal plot.
Choosing the location of the drain pit
The treatment plant and storage tank are installed on the site taking into account the norms and regulations described in GOST, SNiP.
Basic recommendations:
- a sealed storage tank can be located at a distance of 5 m from a residential building (but this is permissible in extreme cases, when there is not enough space on the site), the drainage well is installed further - from 25 m;
- 10 m are retreated from the neighboring plot to the cesspool;
- the storage tank or drainage well should be located at a distance of 30-50 m from the natural reservoir;
- there should be 15 m to outbuildings;
- the pit is dug at a distance of 2-4 m from the road.
To prevent wastewater from entering the garden plot or vegetable garden, you should retreat at least 5 m and only then proceed to installation.
Cost of construction work
When determining costs, it is necessary to understand that installing a small drainage pit is not economically feasible. When calculating the cost, it is best to consider a size of at least 3,000 liters. It is recommended to analyze the parameters:
- costs for the selected device type;
- prices for employee services.
For a better understanding, you should look at the situation using an example. The calculations include work:
- A complete set of components required for construction (including the preparation of concrete mixture, waterproofing and hatch).
- Delivery (taking into account the distance to the destination).
- Digging a pit and then backfilling it.
- Concreting the bottom.
- Installation work.
The approximate cost of the work will be 30,000 rubles.
Construction of an independent sewer system
Diagram of a homemade brick septic tank.
To speed up the work, the option of installing a ready-made storage tank, for example a septic tank made from Eurocubes, is often chosen. However, a structure built with your own hands from brick will be cheaper.
A diagram of such a design:
- digging a hole in the ground;
- the walls and bottom are reinforced with bricks;
- a sewer pipe is installed on the side under the soil layer, it is located at a slight angle to speed up the movement of wastewater;
- the structure is closed with a lid and a hatch is provided for maintenance;
- in the upper part of the pit (in the side wall) there is a hole for connecting the ventilation duct.
A structure with a filter base is built according to the same scheme. However, in this case, a crushed stone cushion is formed at the bottom. There should not be a hard bottom that ensures tightness, as in the first case.
When choosing a finishing material to protect walls from wastewater, you need to take into account the properties and degree of strength of the products.
For example, it is not recommended to use silicate or porous bricks. Such material will absorb moisture, which will not only lead to its destruction, but will also cause the contaminated liquid to spread outside the storage tank.
The best option for a sewer structure is baked brick. It is durable and therefore can withstand the forces of soil heaving. In addition, baked clay brick is not a material with a porous structure. For this reason, it is better resistant to moisture.
If you plan to install drainage at the bottom of the pit, use a multi-layer structure: a layer of soil, sand, gravel or crushed stone. The recommended distance of the filter base from groundwater during the rainy season, when its level rises to its maximum, is 1 m. Sometimes holes are left in the walls of the well during laying, which will improve the filtration properties of the structure.
Digging a pit
Excavation of soil on the site is carried out in accordance with previously made calculations. Moreover, between the outer surface of the brick structure, which will be erected in the future, and the walls of the pit, a gap of up to 50 cm is left on each side.
If this is not done, the storage volume will decrease, since brick walls will have to be moved.
This measure allows for waterproofing on the outer sides of the structure. Even if baked brick is used, the structure is protected from prolonged contact with moisture. This helps to increase its service life.
Preparing the base of the container
The foundation of a sealed structure must be strong. For this reason, reinforcement is performed, and drainage is additionally arranged. If you skip one of the stages, the strength of the cesspool will decrease.
Instructions for making the base:
Installation diagram of a septic tank with a sand and gravel filter.
- A sand and gravel cushion is formed at the bottom of the pit. The total layer thickness is 200 mm. The sand is carefully compacted, which reduces the risk of subsidence of the base during the process of pouring and drying concrete. Gravel should also be compacted whenever possible (it consists of large fractions, so such material is more difficult to compact).
- The base is waterproofed. To do this, roll durable material, such as roofing felt, is placed at the bottom of the pit. It is laid with an overlap. Thanks to this, cement laitance will not get into the ground when filling the hole with mortar.
- A pre-prepared frame of steel rods with a diameter of 8-10 mm is laid on top of the roofing felt. It is recommended to use flexible strong wire for fastening. Welding will cause a deterioration in the properties of the material, resulting in a decrease in the strength of the structure. The cell dimensions of the reinforcing mesh are 100x150 mm.
Concrete bottom casting
To prepare the solution, use cement grade M300 and higher. Due to this, the strength of the structure increases. The prepared multilayer base is poured with a layer of concrete up to 150 mm thick. This is enough for the cesspool to withstand the impact of a large volume of wastewater.
Installation work can continue when the concrete has dried. If there is no time to wait 28 days, they move on to brickwork after 7-10 days.
During this time, the solution will set and harden enough to withstand a significant load without the risk of loss of properties.
Walling
In most cases, load-bearing structures are constructed using half-brick technology. For large pits, more reliable walls are erected: 1 or 1.5 bricks. To strengthen the structure, after completing the construction of the vertical partitions, the space between the storage tank and the walls of the pit is backfilled. A mixture of sand and cement is used.
There is no need to prepare the solution. It is enough to wait until sedimentary moisture begins to release, helping to strengthen the cesspool. The desired result is achieved when the cement-sand mixture is completely moistened. The result is a monolithic structure that will withstand the load exerted by wastewater even when the storage tank is full.
Application of waterproofing
Work to protect brick partitions from moisture is carried out as the masonry is completed. It will not be possible to protect the surfaces after construction is completed due to the small distance between the storage tank and the walls of the pit.
Coating and roll materials are used for waterproofing. Bitumen-based insulation is the most common. They use mastics and roofing felt.
It is recommended to cover the cesspool with coating-type materials. Roofing felt will not last long in direct contact with monolithic walls made of a moistened mixture of cement and sand. It is permissible to combine waterproofing materials, but this will lead to an increase in the cost of the structure. The sand and cement mixture used for backfill does not need protection. On the contrary, it is necessary to ensure access of moisture to this layer of material. Only under such conditions is it possible for the composition to harden.
Finishing the walls of the cesspool from the inside
Waterproofing a brick septic tank must be done using water-repellent materials.
It is recommended to use plaster compositions made from materials with suitable properties. Thus, preference should be given to mixtures with moisture-resistant properties.
But this waterproofing method is not reliable enough, given that the plaster layer will be affected by water in the existing storage tank around the clock.
For this reason, liquid glass is added to the mixture at the preparation stage. A potassium or sodium composition is suitable. This component improves the properties of the plaster.
However, all possible methods should be used to protect the internal walls due to the high humidity inside the drive. For this reason, the surfaces of the structure are additionally ironed with cement.
Covering the drain pit
From above, the pit and brick structure are closed in different ways:
- concrete slab with a hole for a sewer hatch;
- a wooden shield, to protect it from water, it is covered with roofing felt, the surfaces are pre-tarred.
A layer of thermal insulation material helps to reduce the outflow of heat from a structure in the winter season. It is recommended to use polystyrene foam for this purpose.
However, such measures do not always help prevent freezing. It is necessary to additionally use a layer of soil as a thermal insulation material. Soil is laid on top of a concrete slab or wooden panel. The layer thickness should be 150-500 mm.
DIY installation methods
There are several methods for the device, much depends on the size and level of complexity.
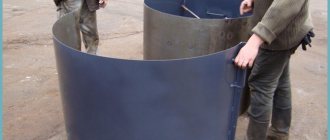
How to make an absorbing model?
The absorption drain pit is suitable for owners of small country houses. Simple device, easy maintenance and choice of location.
Wall coverings can be made from several materials, but the simplest option is from tires or concrete products:
- A hole is dug with a diameter of 800 mm: please note, it must be larger than the size of the ring.
- A concrete screed is made around the perimeter of the pit, which will be a reliable base for the rings.
- In the lowest ring, holes are made every 100 mm to allow water to escape.
- The diameter of the filter holes is 50 mm.
Advice . The depth of the sedimentation tank should not exceed 300 cm so that it is not difficult to remove the sediment.
- The constructed pit must be filled with broken bricks, gravel or crushed stone to a depth of 100 cm. The pit is filled with exactly the same material from the outside.
- Before backfilling, it is necessary to carry out all waterproofing work that can block the external aggressive environment.
At the final stage of the work, a plate with several holes is installed (for the ventilation pipe and hatch).
How to build a sealed model?
In general, it is no different from the previous method, but there are still minor differences:
- The bottom needs to be concreted.
- No infiltration holes required.
Construction of a cesspool without a bottom
Scheme of a cesspool without a bottom.
For a family of 5 or more people, it is recommended to choose another option for arranging the sewer system. In this case, it is advisable to build a cesspool with a drainage base.
The installation principle remains the same as in the case of a sealed drive. However, instead of a solid base, a layer of bulk materials is formed: soil, crushed stone. The technology for constructing walls and their waterproofing is the same.
The brickwork is strengthened with a sand-cement mixture, the structure is covered with a slab on top, and isolated from contact with water.
Local sewerage system with wastewater treatment
In this case, ready-made septic tanks are used. They are installed in prepared pits. The main function of such structures is to collect and purify contaminated water.
Septic tanks can be one-, two- and three-chamber. Each of the compartments solves different problems.
The wastewater passing through them is first purified naturally (sediment sinks to the bottom), then goes through the stage of biological treatment, then ends up in a drainage well or filtration fields (equipped according to the principle of drainage). Here the water is purified to 90-97% and can be reused.
Drainage sewer complex
Distribution wells are being installed. Their height does not exceed 400 mm, the diameter varies from 400 to 700 mm depending on the type of material used to construct the walls. To protect the structure from water, the same techniques are used: coating insulation of external surfaces, plaster inside, as well as the ironing method.
The wells are covered with concrete slabs or wooden panels and thermal insulation is provided. It is recommended to equip them with bends. A concrete tray is created at the bottom of the wells; its height corresponds to the diameter of the pipes. Such wells are located away from the septic tank. Communications are diverted from them.
How to clean a cesspool
You can use a special vehicle and do the cleaning quickly. But it is not always possible to take advantage of this. In this case, you must organize cleaning yourself.
Cleaning the cesspool
Cleaning methods:
- using a bucket and rope;
– using a special pump.
The first method is unpleasant and dirty. But the second one is fast and efficient, especially since nowadays there are many models of these pumps with different parameters, as well as prices, so everyone can choose the necessary equipment.
Another important cleaning element is the container into which wastewater will be drained, regardless of the choice of cleaning method. Afterwards, this container is removed and disposed of in specially designated places; waste cannot be dumped somewhere in a field or forest.
Homemade septic tanks
A septic tank, or sump tank, is a container consisting of a single sealed body (usually plastic), divided into several sections (for example, as in the figure - A, B, C), an intersection separator, a wastewater supply pipe and a pipe for purified discharge.
Such septic tanks are complex cesspools, but they can not only serve as a vessel for collecting wastewater, but also process dirty liquid into fertilizer for the garden. Homemade septic tanks are a design of 2 or 3 tanks. In the first, only rough purification of wastewater from large debris occurs, but in the second or third, bacteria will work - they process contaminated water into fertilizer.
You can build such a complex structure with your own hands, but this will require considerable financial investments. The essence of the work on arranging a septic tank cesspool:
- You need to buy two or three containers made of special plastic - they must be sealed with outlet holes to the outside.
- You will need to install overflow pipes between these containers - they must also be available. Moreover, they will need to be installed at an angle.
- The first container of the septic tank will contain a small filter - they are sold in stores and have a special marking “for a country septic tank.” This filter will be located at the outlet of the pipe leading to the second container.
- In the second compartment of a complex cesspool, bacteria will live that process waste and turn dirty water into practically clean water - at least, it can be used for watering the garden and washing the car.
- The third compartment is installed at will - it is needed to collect already purified water, but even without it the septic tank will be fully functional. The only clarification: in this case, you will need to install a drain valve in the second container - you will need to extract purified water somehow!
Experts say that the most practical thing is to invite professionals to install a cesspool. But it is quite possible to do it yourself, which will save significant financial resources. If you don’t have a construction/engineering education, and you have minimal or no experience in carrying out any construction work, then it’s better not to risk installing a septic tank yourself - specialists will do it with a quality guarantee.
The nuances of operating cesspools
In addition to the above measures, it is recommended to make a compost pit. Its walls are protected with a layer of clay (thickness up to 300 mm), then they are concreted. Brick laying is done on top. The walls of the compost pit should rise above ground level. They are subject to ironing. Sludge is dumped here when cleaning a septic tank.
This measure is used to disinfect sewage and convert it into compost. To do this, the sewage is laid out in layers: first peat or soil, then sediment from the septic tank, earth again on top, etc.